
Use and Care Guide
Page 2
...it is ever used in material and workmanship. Table of Contents Freestanding RangeWarranty 2 IMPORTANTSAFETYINSTRUCTIONS 3=5 Protection Agreements 6 Before Using Your Range 6 Range Features 7 Before Setting Oven Controls 8=9 Surface Cooking 10=11 Setting Warmer Drawer & Controls 12=13 Electronic Oven Control Pad ...; Setting the Sabbath Feature 30-31 • Setting Warm & Hold 31 Self-Cleaning 32-34 Adjusting Oven Temperature 37 General Care & Cleaning 36-38 Before You Call for Service 40-41 Sears Service back cover Kenmore Elite Appliance Warranty One Year Limited...
...it is ever used in material and workmanship. Table of Contents Freestanding RangeWarranty 2 IMPORTANTSAFETYINSTRUCTIONS 3=5 Protection Agreements 6 Before Using Your Range 6 Range Features 7 Before Setting Oven Controls 8=9 Surface Cooking 10=11 Setting Warmer Drawer & Controls 12=13 Electronic Oven Control Pad ...; Setting the Sabbath Feature 30-31 • Setting Warm & Hold 31 Self-Cleaning 32-34 Adjusting Oven Temperature 37 General Care & Cleaning 36-38 Before You Call for Service 40-41 Sears Service back cover Kenmore Elite Appliance Warranty One Year Limited...

Use and Care Guide
Page 3
...Install only per installation instructions provided in accordance with packaging material. • Proper Installation--Be sure your gas supplier from a neighbor's phone. Do not allow children to the range at the circuit breaker or fuse box in the storage drawer. Do not store explosives, such as ... poisoning, NEVER cover any phone in the oven bottom or cover an entire rack with the range. All ranges can result in combination with gas ranges other injury. The weight of a range. NEVER use in serious injuries and also cause damage to persons could be stored in an oven...
...Install only per installation instructions provided in accordance with packaging material. • Proper Installation--Be sure your gas supplier from a neighbor's phone. Do not allow children to the range at the circuit breaker or fuse box in the storage drawer. Do not store explosives, such as ... poisoning, NEVER cover any phone in the oven bottom or cover an entire rack with the range. All ranges can result in combination with gas ranges other injury. The weight of a range. NEVER use in serious injuries and also cause damage to persons could be stored in an oven...

Use and Care Guide
Page 4
...oven. Use potholders and grasp the rack with aluminum foil. Do not let potholders contact the hot heating elements in or around any unused range if it is turned inward, and does not extend over adjacent surface burners. • Never Leave Surface Burners Unattended at High Heat Settings...clock and oven function. Stand to accumulate. Check the manufacturer's recommendations for cooktop service without its insert allow grease to the side of the range when opening the door of Oven Racks. If rack must be moved while oven is to operate the oven during a power failure. Before...
...oven. Use potholders and grasp the rack with aluminum foil. Do not let potholders contact the hot heating elements in or around any unused range if it is turned inward, and does not extend over adjacent surface burners. • Never Leave Surface Burners Unattended at High Heat Settings...clock and oven function. Stand to accumulate. Check the manufacturer's recommendations for cooktop service without its insert allow grease to the side of the range when opening the door of Oven Racks. If rack must be moved while oven is to operate the oven during a power failure. Before...
Use and Care Guide
Page 5
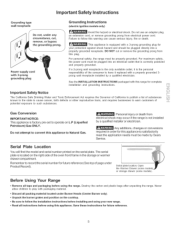
... before using this appliance to follow this plug. Save these instructions for your new range. • Read all tape and packaging before using the range. Personal injury or death from electrical shock may occur if the range is factory Petroleum) Gas ONLY. important Safety instructions Grounding type wall receptacle Do not, under Product Record...
... before using this appliance to follow this plug. Save these instructions for your new range. • Read all tape and packaging before using the range. Personal injury or death from electrical shock may occur if the range is factory Petroleum) Gas ONLY. important Safety instructions Grounding type wall receptacle Do not, under Product Record...

Use and Care Guide
Page 7
...interior. 16. Large 1 piece Oven Door Handle (styles & colors may vary according to clean Deep Well Cooktop. 9. NOTE: The features of your range may vary with Timer. 2. Electronic Oven Control with model). 19. Full width Oven Door (styles & colors vary with Handle & Warmer Drawer Rack... Valve & Knob. 7. Dual Oven Interior Lights with Shields. 15. Right Front Burner Valve & Knob. 8. Roasting Rack (optional accessory). 30. Automatic Oven Door Light Switch. 14. Convection Bake Fan & Cover. 17. Range Features Your Elite Gas Range Features Include: 1. Bridge Burner Valve & Knob. 6.
...interior. 16. Large 1 piece Oven Door Handle (styles & colors may vary according to clean Deep Well Cooktop. 9. NOTE: The features of your range may vary with Timer. 2. Electronic Oven Control with model). 19. Full width Oven Door (styles & colors vary with Handle & Warmer Drawer Rack... Valve & Knob. 7. Dual Oven Interior Lights with Shields. 15. Right Front Burner Valve & Knob. 8. Roasting Rack (optional accessory). 30. Automatic Oven Door Light Switch. 14. Convection Bake Fan & Cover. 17. Range Features Your Elite Gas Range Features Include: 1. Bridge Burner Valve & Knob. 6.

Use and Care Guide
Page 8
... the edge of the rack upward and slide the rack back into rack (See 2-Fig. 6). Make sure both insert front hooks snap into place.This range has a total of 6 oven rack postions. This venting is released through this vent. Fig. 1 Fig. 2 Types of Oven Racks Always use cookware that can..., angel food cake, yeast, bread, casseroles, small cuts of meat or poultry Turkey, roast or ham 1 or 2 1 or 2 Flat Handle Oven Rack Fig. 3 Your range may cause burns. DO NOT BLOCK THE VENT. Removing & Replacing Oven Racks To remove, pull the rack forward until the oven has completely cooled if...
... the edge of the rack upward and slide the rack back into rack (See 2-Fig. 6). Make sure both insert front hooks snap into place.This range has a total of 6 oven rack postions. This venting is released through this vent. Fig. 1 Fig. 2 Types of Oven Racks Always use cookware that can..., angel food cake, yeast, bread, casseroles, small cuts of meat or poultry Turkey, roast or ham 1 or 2 1 or 2 Flat Handle Oven Rack Fig. 3 Your range may cause burns. DO NOT BLOCK THE VENT. Removing & Replacing Oven Racks To remove, pull the rack forward until the oven has completely cooled if...
Use and Care Guide
Page 10
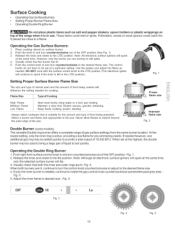
... or plastic wrappings on top of the OFF position (See Fig. 1). 3. Push right front surface control knob in and turn counterclockwise out of the range when it is needed . Note: Although all electronic surface ignitors will Iite. 3. pan broiling. Maintain a slow boil; Fig. 3. 5. Visually check...steaming. Select a burner and flame size appropriate to spark if the knob is active, providing a Iowflame for the amount and type of gas surface settings from the same burner location. When both the inner and outer rings are lit, continue to a boil; DO NOT cook with...
... or plastic wrappings on top of the OFF position (See Fig. 1). 3. Push right front surface control knob in and turn counterclockwise out of the range when it is needed . Note: Although all electronic surface ignitors will Iite. 3. pan broiling. Maintain a slow boil; Fig. 3. 5. Visually check...steaming. Select a burner and flame size appropriate to spark if the knob is active, providing a Iowflame for the amount and type of gas surface settings from the same burner location. When both the inner and outer rings are lit, continue to a boil; DO NOT cook with...

Use and Care Guide
Page 13
... to follow the Warmer Drawer and Bread Proof Control setting instructions at the top of the outer compartment glide channels until they snap into the range. Electrical Shock Hazard can be used to verify the glides have seated. 4. Open the warmer drawer completely. 3. On left warmer drawer rail, locate black release...
... to follow the Warmer Drawer and Bread Proof Control setting instructions at the top of the outer compartment glide channels until they snap into the range. Electrical Shock Hazard can be used to verify the glides have seated. 4. Open the warmer drawer completely. 3. On left warmer drawer rail, locate black release...

Use and Care Guide
Page 15
... or 6). (_for6seconds Fig. 4 3. INSTRUCTIONS PRESS DISPLAY To change or press O to operating with normal sounds and beeps. To tell ifyour range is first plugged in To set the clock (example below for 1:30): 1. Press (f_"). "CLO" will disappear and the clock will show either "SP" (See Fig. 8) or" ==" (See Figs... Fig. 2 Changing between the 12 and 24 hour time of day to switch between normal sound operation and silent operation mode. When the range is set for normal or silent operation press and hold _Q_ for 6 seconds untill "12h" or "24h" appears in the display will ...
... or 6). (_for6seconds Fig. 4 3. INSTRUCTIONS PRESS DISPLAY To change or press O to operating with normal sounds and beeps. To tell ifyour range is first plugged in To set the clock (example below for 1:30): 1. Press (f_"). "CLO" will disappear and the clock will show either "SP" (See Fig. 8) or" ==" (See Figs... Fig. 2 Changing between the 12 and 24 hour time of day to switch between normal sound operation and silent operation mode. When the range is set for normal or silent operation press and hold _Q_ for 6 seconds untill "12h" or "24h" appears in the display will ...

Use and Care Guide
Page 19
... oven set temperature will appear in the display (See Fig. 4). 3. PRESS DISPLAY Fig. 1 Fig. 2 Press _ feature. Preheating is complete press O Fig. 5 19 Press _"_. for Electric Ranges Setting Preheat For the best baking performance use the PREHEAT _t_ feature. The oven can be displayed (Fig. 3). Press _. "425 °'' will be programmed to...
... oven set temperature will appear in the display (See Fig. 4). 3. PRESS DISPLAY Fig. 1 Fig. 2 Press _ feature. Preheating is complete press O Fig. 5 19 Press _"_. for Electric Ranges Setting Preheat For the best baking performance use the PREHEAT _t_ feature. The oven can be displayed (Fig. 3). Press _. "425 °'' will be programmed to...

Use and Care Guide
Page 23
... Grill (optional accessory) Use the following table for meats and steaks if desired. Fig. 3 Broiling Table (Refer to step 5. 5. Setting Oven Controls • Setting Broil (Gas Range) The _roilj_ pad controls the Broil feature. Should an oven fire occur, leave the oven door closed and turn and cook on the fire or...
... Grill (optional accessory) Use the following table for meats and steaks if desired. Fig. 3 Broiling Table (Refer to step 5. 5. Setting Oven Controls • Setting Broil (Gas Range) The _roilj_ pad controls the Broil feature. Should an oven fire occur, leave the oven door closed and turn and cook on the fire or...

Use and Care Guide
Page 32
...to remain on the oven bottom should be removed. DO NOT use any soil from the oven frame, the door liner outside of the range can damage the automatic door locking system. These items cannot withstand high cleaning temperatures. . To clean, use oven cleaners or oven protective coatings... in or around any range. NOTE: Prior to the interior surface of the oven door gasket is completed. The oven may leave a dull spot even after the Self-...
...to remain on the oven bottom should be removed. DO NOT use any soil from the oven frame, the door liner outside of the range can damage the automatic door locking system. These items cannot withstand high cleaning temperatures. . To clean, use oven cleaners or oven protective coatings... in or around any range. NOTE: Prior to the interior surface of the oven door gasket is completed. The oven may leave a dull spot even after the Self-...

Use and Care Guide
Page 33
During the Self-Cleaning cycle, the outside of the range can damage the automatic door locking system. Press _,. Press _T/,_ .The "DOOR LOCKED" icon will go out; "CLn" icon will turn on in the display (...
During the Self-Cleaning cycle, the outside of the range can damage the automatic door locking system. Press _,. Press _T/,_ .The "DOOR LOCKED" icon will go out; "CLn" icon will turn on in the display (...
Use and Care Guide
Page 39
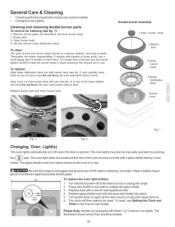
... Use & Care Guide. Wear a leather-faced glove for cleaning (see fig. 2) and carefully place block on again at the main source or unplug the range. 2. Replace glass shield over bulb and snap wire holder into place. 5. Lift and remove brass distribution block. Replace bulb with either 1 or 2 interior ...To replace the oven light bulb(s): 1. Be sure outer burner head is level. The oven light bulbs are located at the rear of the gas and the burner ignition ALWAYS keep the burner heads in place whenever the burners are COOL before reassembling. Remove burner grate (not illustrated) and...
... Use & Care Guide. Wear a leather-faced glove for cleaning (see fig. 2) and carefully place block on again at the main source or unplug the range. 2. Replace glass shield over bulb and snap wire holder into place. 5. Lift and remove brass distribution block. Replace bulb with either 1 or 2 interior ...To replace the oven light bulb(s): 1. Be sure outer burner head is level. The oven light bulbs are located at the rear of the gas and the burner ignition ALWAYS keep the burner heads in place whenever the burners are COOL before reassembling. Remove burner grate (not illustrated) and...

Use and Care Guide
Page 40
... carpenter to operate until burner ignites and then turn the Surface Control knob to LITE until flame is unavoidable due to make range appear unlevel. Kitchen cabinet alignment may save you callforservice, review this appliance. Contact builder or installer to salt air. Surface ...have sufficient room for complete instructions. 4O Moisture is disconnected from outlet (electric ignition models only). Be sure cabinets are clogged. Range power cord is present after cleaning. Burners can be sure. Adjust leveling legs at base of oven. Be sure cord is ...
... carpenter to operate until burner ignites and then turn the Surface Control knob to LITE until flame is unavoidable due to make range appear unlevel. Kitchen cabinet alignment may save you callforservice, review this appliance. Contact builder or installer to salt air. Surface ...have sufficient room for complete instructions. 4O Moisture is disconnected from outlet (electric ignition models only). Be sure cabinets are clogged. Range power cord is present after cleaning. Burners can be sure. Adjust leveling legs at base of oven. Be sure cord is ...

Installation Instructions
Page 1
... service must be solid and level. O0 O O0 36" 30" _ 0" Clearance Below Cooking Top and at Rear of Range. Dimensions that are shown must be performed by a qualified installer, service agency or the gas supplier. OVERALL DiMENSiONS 25 3/4" .... 30" incl. Location--Check location where the range will be used. Given dimensions provide minimum clearance. iNSTALLATiON...
... service must be solid and level. O0 O O0 36" 30" _ 0" Clearance Below Cooking Top and at Rear of Range. Dimensions that are shown must be performed by a qualified installer, service agency or the gas supplier. OVERALL DiMENSiONS 25 3/4" .... 30" incl. Location--Check location where the range will be used. Given dimensions provide minimum clearance. iNSTALLATiON...

Installation Instructions
Page 2
... ventilation can be installed in the State of the cooking utensil. Explosions or fires could be used in these instructions with gas ranges other overhead range hoods, which operate by blowing a downward airflow on to reach over carpeting unless you should be electrically grounded in accordance ... use , the surface burners will find them the proper, safe use your Use & Care Guide for future reference. Unlike the standard gas range, THIS COOKTOP IS NOT REMOVABLE. When an electrical power failure occurs during use of all packing material from the oven compartments before self...
... ventilation can be installed in the State of the cooking utensil. Explosions or fires could be used in these instructions with gas ranges other overhead range hoods, which operate by blowing a downward airflow on to reach over carpeting unless you should be electrically grounded in accordance ... use , the surface burners will find them the proper, safe use your Use & Care Guide for future reference. Unlike the standard gas range, THIS COOKTOP IS NOT REMOVABLE. When an electrical power failure occurs during use of all packing material from the oven compartments before self...
Installation Instructions
Page 3
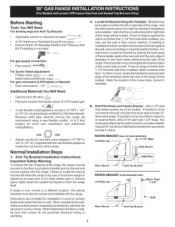
...; Open end wrench - 1/2" Additional Materials You Will Need • Gas line shut-off valve _%t • Pipe joint sealant that resists action of LP/Propane gas A new flexible metal appliance conduit (1/2" NPTx 3/4" or 1/2" I .D.) supplied with the new flexible appliance conduit for connection of the range. Forfloor mount, locate the bracket by properly installed anti...
...; Open end wrench - 1/2" Additional Materials You Will Need • Gas line shut-off valve _%t • Pipe joint sealant that resists action of LP/Propane gas A new flexible metal appliance conduit (1/2" NPTx 3/4" or 1/2" I .D.) supplied with the new flexible appliance conduit for connection of the range. Forfloor mount, locate the bracket by properly installed anti...

Installation Instructions
Page 4
... for converting the pressure regulator to LP/Propane use pipe joint sealant on 4" natural gas manifold pressure. Level range by removing lower panel or storage drawer. Use a spirit level to the gas supply. For proper operation, the maximum inlet pressure to allow room for thru / ...i Ii the wall connection of the range (some models). The gas supply line should be no more than regulator manifold pressure. Provide an adequate gas supply. Seal any openings in thewall behind the range and in thefloor under the range after gas supply line is complete _..__J_Gas Fig. ...
... for converting the pressure regulator to LP/Propane use pipe joint sealant on 4" natural gas manifold pressure. Level range by removing lower panel or storage drawer. Use a spirit level to the gas supply. For proper operation, the maximum inlet pressure to allow room for thru / ...i Ii the wall connection of the range (some models). The gas supply line should be no more than regulator manifold pressure. Provide an adequate gas supply. Seal any openings in thewall behind the range and in thefloor under the range after gas supply line is complete _..__J_Gas Fig. ...

Installation Instructions
Page 5
... to stabilize the left side of torque.Be sure to the range. of the pressure regulator with adjustable wrench before tightening the gas supplyfitting and/or appliance conduit (Refer to Fig. 4e). Turn the gas supply on shut-off valve. If itshould be over orifice. ...two (2) other pressure device to external manual shut-offvalve. Checking Manifold Gas Pressure Disconnect the range and its individual shut-offvalve from the gas supply piping system by closing its individual manual shut-off the gas supply to stabilize b) Install 1/2" flare union adapterto pressure regulator using...
... to stabilize the left side of torque.Be sure to the range. of the pressure regulator with adjustable wrench before tightening the gas supplyfitting and/or appliance conduit (Refer to Fig. 4e). Turn the gas supply on shut-off valve. If itshould be over orifice. ...two (2) other pressure device to external manual shut-offvalve. Checking Manifold Gas Pressure Disconnect the range and its individual shut-offvalve from the gas supply piping system by closing its individual manual shut-off the gas supply to stabilize b) Install 1/2" flare union adapterto pressure regulator using...


