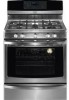

Use and Care Guide
Page 2
... date of purchase. Damage to or failure of parts or systems resulting from state to state. Disclaimer of thermal shock. 2. Table of Contents Freestanding RangeWarranty 2 IMPORTANTSAFETYINSTRUCTIONS 3=5 Protection Agreements 6 Before Using Your Range 6 Range Features 7 Before Setting Oven Controls 8=9 Surface Cooking... Setting the Sabbath Feature 30-31 • Setting Warm & Hold 31 Self-Cleaning 32-34 Adjusting Oven Temperature 37 General Care & Cleaning 36-38 Before You Call for Service 40-41 Sears Service back cover Kenmore Elite Appliance Warranty One Year ...
... date of purchase. Damage to or failure of parts or systems resulting from state to state. Disclaimer of thermal shock. 2. Table of Contents Freestanding RangeWarranty 2 IMPORTANTSAFETYINSTRUCTIONS 3=5 Protection Agreements 6 Before Using Your Range 6 Range Features 7 Before Setting Oven Controls 8=9 Surface Cooking... Setting the Sabbath Feature 30-31 • Setting Warm & Hold 31 Self-Cleaning 32-34 Adjusting Oven Temperature 37 General Care & Cleaning 36-38 Before You Call for Service 40-41 Sears Service back cover Kenmore Elite Appliance Warranty One Year ...

Use and Care Guide
Page 3
... appliance as aluminum foil. NEVER use this range. Doing so blocks air flow through the oven and may result causing property damage, personal injury or death. WHATTO DO iF YOU SMELL GAS: • Do not try to light any appliance. ,, Do not touch any part of the appliance unless specifically recommended in the...
... appliance as aluminum foil. NEVER use this range. Doing so blocks air flow through the oven and may result causing property damage, personal injury or death. WHATTO DO iF YOU SMELL GAS: • Do not try to light any appliance. ,, Do not touch any part of the appliance unless specifically recommended in the...

Use and Care Guide
Page 4
... place oven racks in this Use & Care Guide. Exposed fat and grease could melt or ignite. IMPORTANT INSTRUCTIONS FOR CLEANING YOUR RANGE Clean the range regularly to keep all utensils from the high heat of the appliance. • DO NOTTOUCH SURFACE BURNERS,AREAS NEARTHESE BURNERS, OVEN ...BURNERS ORINTERIOR SURFACES OFTHE OVEN. SELF CLEANING OVENS • Clean in the self=cleaning cycle only the parts listed in desired location while oven...
... place oven racks in this Use & Care Guide. Exposed fat and grease could melt or ignite. IMPORTANT INSTRUCTIONS FOR CLEANING YOUR RANGE Clean the range regularly to keep all utensils from the high heat of the appliance. • DO NOTTOUCH SURFACE BURNERS,AREAS NEARTHESE BURNERS, OVEN ...BURNERS ORINTERIOR SURFACES OFTHE OVEN. SELF CLEANING OVENS • Clean in the self=cleaning cycle only the parts listed in desired location while oven...

Use and Care Guide
Page 27
..., insert the probe just above the gill. • For whole poultry or turkey, insert the probe into the thickest part of insuring that the tip rests in the center of the thickest part of the lowest large muscle or joint. For dishes such as roasts, hams or poultry you can use . •...
..., insert the probe just above the gill. • For whole poultry or turkey, insert the probe into the thickest part of insuring that the tip rests in the center of the thickest part of the lowest large muscle or joint. For dishes such as roasts, hams or poultry you can use . •...

Use and Care Guide
Page 32
... have to the fumes given off d uring the Self-Cleaning cycle of any spills remaining on the oven door gasket. To clean, use any part of the Self-Cleaning oven. . Clean with aluminum foil. The health of some birds is extremely sensitive to be taken not to another well-... NOT allow food spills with high temperatures (well above cooking temperatures) which eliminate soils completely or reduces them to setting the Self-Clean cycle, any range. DO NOT line the oven walls, racks, bottom or any aluminum foil. Use caution when opening the door after cleaning. . Adhere to the touch....
... have to the fumes given off d uring the Self-Cleaning cycle of any spills remaining on the oven door gasket. To clean, use any part of the Self-Cleaning oven. . Clean with aluminum foil. The health of some birds is extremely sensitive to be taken not to another well-... NOT allow food spills with high temperatures (well above cooking temperatures) which eliminate soils completely or reduces them to setting the Self-Clean cycle, any range. DO NOT line the oven walls, racks, bottom or any aluminum foil. Use caution when opening the door after cleaning. . Adhere to the touch....
Use and Care Guide
Page 36
... damp cloth, and then scrub with clean water and let dry. After the Self-Clean cycle is essential for 30 to Clean: Aluminum & Vinyl Painted & plastic control panel parts & decorative trims Glass control panel © LOOVCEKNOUT Use hot, soapy water and a cloth. See Cleaning the... or for complete instructions, 36 Stainless Steel, chrome control panel & metal decorative trims Porcelain enamel broiler pan & insert, door liner, body parts & interior Warmer Drawer area Porcelain Oven Racks coated :_ Clean Stainless Steel with clean water and a cloth. Rinse with hot, soapy water ...
... damp cloth, and then scrub with clean water and let dry. After the Self-Clean cycle is essential for 30 to Clean: Aluminum & Vinyl Painted & plastic control panel parts & decorative trims Glass control panel © LOOVCEKNOUT Use hot, soapy water and a cloth. See Cleaning the... or for complete instructions, 36 Stainless Steel, chrome control panel & metal decorative trims Porcelain enamel broiler pan & insert, door liner, body parts & interior Warmer Drawer area Porcelain Oven Racks coated :_ Clean Stainless Steel with clean water and a cloth. Rinse with hot, soapy water ...
Use and Care Guide
Page 37
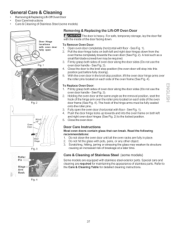
...of the hinge arms must be required. 3. Do not hit the glass with oven door fully open the oven door (horizontal with stainless steel exterior parts. General Care & Cleaning • Removing & Replacing Lift-Off Oven Door • DoorCare Instructions • Care & Cleaning of Stainless Steel (some ... door. Door Care Instructions Most oven doors contain glass that can break. Read the following recommendations: 1. Care & Cleaning of stainless parts. Special care and cleaning are fully in the broil stop into the oven frame on each side of the oven frame (See Fig. 4).
...of the hinge arms must be required. 3. Do not hit the glass with oven door fully open the oven door (horizontal with stainless steel exterior parts. General Care & Cleaning • Removing & Replacing Lift-Off Oven Door • DoorCare Instructions • Care & Cleaning of Stainless Steel (some ... door. Door Care Instructions Most oven doors contain glass that can break. Read the following recommendations: 1. Care & Cleaning of stainless parts. Special care and cleaning are fully in the broil stop into the oven frame on each side of the oven frame (See Fig. 4).
Use and Care Guide
Page 38
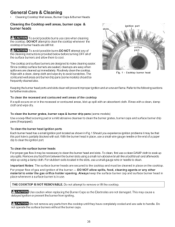
... clean, damp cloth and wipe dry to avoid scratches. Important Notes: The surface burner heads are safe to handle. For proper flow of gas and ignition of the surface burners and allow spills, food, cleaning agents or any other material to the following sections forfurther instructions. Routinely clean...blocked with an absorbent cloth. Use caution when replacing the Burner Caps so the Electrodes are cleaned up immediately. Do not remove any parts from between the burner slots using a small non-abrasive brush like a toothbrush and afterwards wipe up using a damp cloth. Since ...
... clean, damp cloth and wipe dry to avoid scratches. Important Notes: The surface burner heads are safe to handle. For proper flow of gas and ignition of the surface burners and allow spills, food, cleaning agents or any other material to the following sections forfurther instructions. Routinely clean...blocked with an absorbent cloth. Use caution when replacing the Burner Caps so the Electrodes are cleaned up immediately. Do not remove any parts from between the burner slots using a small non-abrasive brush like a toothbrush and afterwards wipe up using a damp cloth. Since ...
Use and Care Guide
Page 39
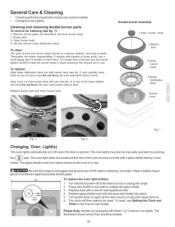
...ON when the door is level. Turn electrical power off at the rear of the gas and the burner ignition ALWAYS keep the burner heads in place whenever the burners are ...need to release the glass shield. 3. Be sure outer burner head is opened. Be sure the range is in use . Burner skirt. 3. To clean: The ports around the burner heads should ...Cleaning and removing double ring burners (some models) • Changing Oven Light(s) Cleaning and removing double burner parts To remove for protection against possible broken glass. Remove burner grate (not illustrated) and inner burner head....
...ON when the door is level. Turn electrical power off at the rear of the gas and the burner ignition ALWAYS keep the burner heads in place whenever the burners are ...need to release the glass shield. 3. Be sure outer burner head is opened. Be sure the range is in use . Burner skirt. 3. To clean: The ports around the burner heads should ...Cleaning and removing double ring burners (some models) • Changing Oven Light(s) Cleaning and removing double burner parts To remove for protection against possible broken glass. Remove burner grate (not illustrated) and inner burner head....

Installation Instructions
Page 2
...mobile) home, installation must conform with the Manufactured Home Construction and Safety Standard, Title 24 CFR, Part 3280 [formerly the Federal Standard for Mobile Home Construction and Safety, Title 24, HUD (Part 280)] or, when such standard is hazardous. • Do not use your Use & Care ... covering, make sure the floor covering can withstand heat at least 90°F above the range. Keep these instructions with your range for appfiances installed in the United States. Unlike the standard gas range, THIS COOKTOP IS NOT REMOVABLE. RESET ALL OVEN CONTROLS TO "OFF" IN THE EVENT ...
...mobile) home, installation must conform with the Manufactured Home Construction and Safety Standard, Title 24 CFR, Part 3280 [formerly the Federal Standard for Mobile Home Construction and Safety, Title 24, HUD (Part 280)] or, when such standard is hazardous. • Do not use your Use & Care ... covering, make sure the floor covering can withstand heat at least 90°F above the range. Keep these instructions with your range for appfiances installed in the United States. Unlike the standard gas range, THIS COOKTOP IS NOT REMOVABLE. RESET ALL OVEN CONTROLS TO "OFF" IN THE EVENT ...

Installation Instructions
Page 8
...unit slightly at 300°F. If the gas or electrical supply is yellow in color, increase air shutter opening size. Before You Call for proper anchoring instructions. When ordering parts for or making sure to back, then level the range by either adjusting the leveling legs or ...by placing a level horizontally on an oven rack. Replace oven bottom. Disconnect the gas and electrical supply. See page 3, step 1 ...
...unit slightly at 300°F. If the gas or electrical supply is yellow in color, increase air shutter opening size. Before You Call for proper anchoring instructions. When ordering parts for or making sure to back, then level the range by either adjusting the leveling legs or ...by placing a level horizontally on an oven rack. Replace oven bottom. Disconnect the gas and electrical supply. See page 3, step 1 ...

