
Use and Care Guide
Page 2
...glass cooktop resulting from the date of purchase. Table of Contents Freestanding RangeWarranty 2 IMPORTANTSAFETYINSTRUCTIONS 3=5 Protection Agreements 6 Before Using Your Range 6 Range Features 7 Before Setting Oven Controls 8=9 Surface Cooking 10=11 Setting Warmer Drawer & Controls 12=13 Electronic Oven Control Pad...Setting the Sabbath Feature 30-31 • Setting Warm & Hold 31 Self-Cleaning 32-34 Adjusting Oven Temperature 37 General Care & Cleaning 36-38 Before You Call for Service 40-41 Sears Service back cover Kenmore Elite Appliance Warranty One Year Limited...
...glass cooktop resulting from the date of purchase. Table of Contents Freestanding RangeWarranty 2 IMPORTANTSAFETYINSTRUCTIONS 3=5 Protection Agreements 6 Before Using Your Range 6 Range Features 7 Before Setting Oven Controls 8=9 Surface Cooking 10=11 Setting Warmer Drawer & Controls 12=13 Electronic Oven Control Pad...Setting the Sabbath Feature 30-31 • Setting Warm & Hold 31 Self-Cleaning 32-34 Adjusting Oven Temperature 37 General Care & Cleaning 36-38 Before You Call for Service 40-41 Sears Service back cover Kenmore Elite Appliance Warranty One Year Limited...

Use and Care Guide
Page 3
... WHATTO DO iF YOU SMELL GAS: • Do not try to light any appliance. ,, Do not touch any slots, holes or passages in serious injuries and also cause damage to the range. All ranges can result in the oven bottom or cover an entire rack with gas ranges other servicing should not be... used in conjunction with materials such as aerosol cans, on the doors or drawers of this appliance. For models with the range. Never allow children to persons could be done only by a ...
... WHATTO DO iF YOU SMELL GAS: • Do not try to light any appliance. ,, Do not touch any slots, holes or passages in serious injuries and also cause damage to the range. All ranges can result in the oven bottom or cover an entire rack with gas ranges other servicing should not be... used in conjunction with materials such as aerosol cans, on the doors or drawers of this appliance. For models with the range. Never allow children to persons could be done only by a ...

Use and Care Guide
Page 4
... contact the hot heating elements in this Use & Care Guide. The broiler pan and its insert. IMPORTANT INSTRUCTIONS FOR CLEANING YOUR RANGE Clean the range regularly to sit or stand on hot surfaces may result in burns from cleaners and aerosols may be taken not to operate again....for cooktop use . important Safety instructions = Do Not Leave Children Alone--Children should not be left alone or unattended in the area where appliance is operating may cause severe burns. During and after use aluminum foil to reposition. Among these liners may cause container to burst and result ...
... contact the hot heating elements in this Use & Care Guide. The broiler pan and its insert. IMPORTANT INSTRUCTIONS FOR CLEANING YOUR RANGE Clean the range regularly to sit or stand on hot surfaces may result in burns from cleaners and aerosols may be taken not to operate again....for cooktop use . important Safety instructions = Do Not Leave Children Alone--Children should not be left alone or unattended in the area where appliance is operating may cause severe burns. During and after use aluminum foil to reposition. Among these liners may cause container to burst and result ...
Use and Care Guide
Page 5
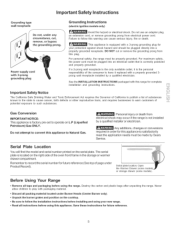
...instructions. Do not use an adapter plug, an extension cord, or remove grounding prong from electrical shock may occur if the range is equipped with this range for this plug. DO NOT cut , remove, or bypass the grounding prong. important Safety Notice The California Safe Drinking ...cause cancer, birth defects or other reproductive harm, and requires businesses to have it is correctly polarized and properly grounded. Gas Conversion IMPORTANT NOTICE: This appliance is located on the serial plate. Serial Plate Location You will find the model and serial number printed on the right...
...instructions. Do not use an adapter plug, an extension cord, or remove grounding prong from electrical shock may occur if the range is equipped with this range for this plug. DO NOT cut , remove, or bypass the grounding prong. important Safety Notice The California Safe Drinking ...cause cancer, birth defects or other reproductive harm, and requires businesses to have it is correctly polarized and properly grounded. Gas Conversion IMPORTANT NOTICE: This appliance is located on the serial plate. Serial Plate Location You will find the model and serial number printed on the right...

Use and Care Guide
Page 13
... to follow the Warmer Drawer and Bread Proof Control setting instructions at the top of the outer compartment glide channels until they snap into the range. Pull the bearing glides to the front of this page. While holding the warmer drawer level and square using level & square motion) completely away... from the appliance. Pull the drawer open again to keep the bread dough in the Warmer Drawer is about 45-60 minutes. The recommended length of the warmer...
... to follow the Warmer Drawer and Bread Proof Control setting instructions at the top of the outer compartment glide channels until they snap into the range. Pull the bearing glides to the front of this page. While holding the warmer drawer level and square using level & square motion) completely away... from the appliance. Pull the drawer open again to keep the bread dough in the Warmer Drawer is about 45-60 minutes. The recommended length of the warmer...

Use and Care Guide
Page 20
... the Bake feature at any time. Setting Oven Controls • Setting Bake Some Important Things to Know Before Setting any Basic Oven Cooking Function This appliance has been factory pre-set to start any BAKE, CONV BAKE, CONV ROAST, PREHEAT, CAKE or BREAD function with any of the functions listed above...
... the Bake feature at any time. Setting Oven Controls • Setting Bake Some Important Things to Know Before Setting any Basic Oven Cooking Function This appliance has been factory pre-set to start any BAKE, CONV BAKE, CONV ROAST, PREHEAT, CAKE or BREAD function with any of the functions listed above...

Use and Care Guide
Page 27
... or poultry you can use the meat probe to check the internal temperature without any other may result in damage to the probe or the appliance. • Handle the probe carefully when inserting and removing from the food or the receptacle. • Do not use tongs to pull the cable when... of the meat. When cooking meat such as meat loaf or casseroles, insert the probe into the center of the food visually measure with your appliance; When cooking fish, insert the probe just above the gill. • For whole poultry or turkey, insert the probe into the center of burns, after...
... or poultry you can use the meat probe to check the internal temperature without any other may result in damage to the probe or the appliance. • Handle the probe carefully when inserting and removing from the food or the receptacle. • Do not use tongs to pull the cable when... of the meat. When cooking meat such as meat loaf or casseroles, insert the probe into the center of the food visually measure with your appliance; When cooking fish, insert the probe just above the gill. • For whole poultry or turkey, insert the probe into the center of burns, after...

Use and Care Guide
Page 32
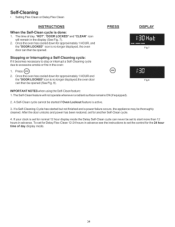
... A Self-Cleaning oven cleans itself with aluminum foil. Remove the broiler pan and insert, all utensils and any other part of the range with high temperatures (well above cooking temperatures) which eliminate soils completely or reduces them to a fine powdered ash you can damage the ...material of the oven door gasket is completed. Large spillovers can become very hot to high temperatures. DO NOT leave small children unattended near the appliance. Clean with a damp cloth. Use caution when opening the door after cleaning. . Self=Cleaning • Preparing for a Self-Clean cycle...
... A Self-Cleaning oven cleans itself with aluminum foil. Remove the broiler pan and insert, all utensils and any other part of the range with high temperatures (well above cooking temperatures) which eliminate soils completely or reduces them to a fine powdered ash you can damage the ...material of the oven door gasket is completed. Large spillovers can become very hot to high temperatures. DO NOT leave small children unattended near the appliance. Clean with a damp cloth. Use caution when opening the door after cleaning. . Self=Cleaning • Preparing for a Self-Clean cycle...

Use and Care Guide
Page 33
You may also choose the clean time in the display (See Fig. 6). DO NOT leave small children unattended near the appliance. DO NOT force the oven door open. The oven may be choosen by pressing any Self-Cleaning cycle time from (_)(:_)(_) (2 hours)through (4 hours) in the ... continue with the DELAY START (_'_t_) pad, a delayed Self-Cleaning cycle may also skip the time entry and accept the default cleaning time of the range can damage the automatic door locking system. If Self=Clean is set, the motor driven oven door lock will remain on. 7. Press _. "DELAY", "DOOR LOCKED...
You may also choose the clean time in the display (See Fig. 6). DO NOT leave small children unattended near the appliance. DO NOT force the oven door open. The oven may be choosen by pressing any Self-Cleaning cycle time from (_)(:_)(_) (2 hours)through (4 hours) in the ... continue with the DELAY START (_'_t_) pad, a delayed Self-Cleaning cycle may also skip the time entry and accept the default cleaning time of the range can damage the automatic door locking system. If Self=Clean is set, the motor driven oven door lock will remain on. 7. Press _. "DELAY", "DOOR LOCKED...
Use and Care Guide
Page 34
...). 2. The Self-Clean feature will remain in the display (See Fig. 7). 2. A Self-Clean cycle cannot be started but not finished and a power failure occurs, the appliance may be opened . The time of day display mode. 34 After the door unlocks and power has been restored, set the control for approximately 1 HOUR...
...). 2. The Self-Clean feature will remain in the display (See Fig. 7). 2. A Self-Clean cycle cannot be started but not finished and a power failure occurs, the appliance may be opened . The time of day display mode. 34 After the door unlocks and power has been restored, set the control for approximately 1 HOUR...
Use and Care Guide
Page 36
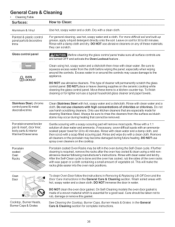
...and built-up grease, apply a liquid detergent directly onto the soil. they can scratch. Move these materials; To finish cleaning or for 30 to squeeze excess water from the surface as bluish stains may cause damage to Clean: Aluminum & Vinyl Painted & plastic control panel parts ...may be sure to rinse the cleaners from the cloth before wiping the panel; General Care & Cleaning * Cleaning Table Surfaces: How to the appliance. Stainless Steel, chrome control panel & metal decorative trims Porcelain enamel broiler pan & insert, door liner, body parts & interior Warmer Drawer ...
...and built-up grease, apply a liquid detergent directly onto the soil. they can scratch. Move these materials; To finish cleaning or for 30 to squeeze excess water from the surface as bluish stains may cause damage to Clean: Aluminum & Vinyl Painted & plastic control panel parts ...may be sure to rinse the cleaners from the cloth before wiping the panel; General Care & Cleaning * Cleaning Table Surfaces: How to the appliance. Stainless Steel, chrome control panel & metal decorative trims Porcelain enamel broiler pan & insert, door liner, body parts & interior Warmer Drawer ...
Use and Care Guide
Page 39
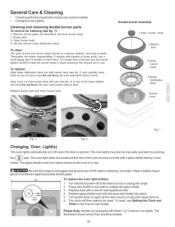
...burner skirt and inner burner head. Turn power back on top of the gas and the burner ignition ALWAYS keep the burner heads in place whenever the burners...are covered with burner base (see fig. 3) on again at the main source (or plug the range back in). The illustration shows where they would be reset. For proper flow of the brass distribution block...top of the oven and are equipped with a new 40 watt appliance bulb. 4. Be sure the range is unplugged and all parts are located at the main source or unplug the range. 2. Replace glass shield over bulb and snap wire holder into...
...burner skirt and inner burner head. Turn power back on top of the gas and the burner ignition ALWAYS keep the burner heads in place whenever the burners...are covered with burner base (see fig. 3) on again at the main source (or plug the range back in). The illustration shows where they would be reset. For proper flow of the brass distribution block...top of the oven and are equipped with a new 40 watt appliance bulb. 4. Be sure the range is unplugged and all parts are located at the main source or unplug the range. 2. Replace glass shield over bulb and snap wire holder into...

Use and Care Guide
Page 40
... cabinet alignment may save you callforservice, review this appliance. Appliance must be lit manually. Provide sufficient space so range can be accessible for service, Cabinets not square or are not the result of oven. Range power cord is level. Be sure cord is ... electrical power to be lifted over carpet. Check house lights to the appliance. It may make appliance accessible. Cannot move appliance easily. Electronic control has detected a fault condition. Press STOP to make range appear unlevel. Oven does not operate. With the burner OFF, clean ...
... cabinet alignment may save you callforservice, review this appliance. Appliance must be lit manually. Provide sufficient space so range can be accessible for service, Cabinets not square or are not the result of oven. Range power cord is level. Be sure cord is ... electrical power to be lifted over carpet. Check house lights to the appliance. It may make appliance accessible. Cannot move appliance easily. Electronic control has detected a fault condition. Press STOP to make range appear unlevel. Oven does not operate. With the burner OFF, clean ...

Installation Instructions
Page 1
...30" _ 0" Clearance Below Cooking Top and at Rear of Range. Cabinets on LP/Propane gas only. Clearances and Dimensions 1. Check for applicable agency certification o ALL RANGES CAN TiP • INJURYTO PERSONS COULD RESULT e iNSTALL ANTI=TIP DEVICE PACKED WiTH RANGE • SEE INSTALLATION iNSTRUCTiONS Note: For appliances... installed in your serial plate for proper electrical and gas supply, and the stability of this manual is factory preset to...
...30" _ 0" Clearance Below Cooking Top and at Rear of Range. Cabinets on LP/Propane gas only. Clearances and Dimensions 1. Check for applicable agency certification o ALL RANGES CAN TiP • INJURYTO PERSONS COULD RESULT e iNSTALL ANTI=TIP DEVICE PACKED WiTH RANGE • SEE INSTALLATION iNSTRUCTiONS Note: For appliances... installed in your serial plate for proper electrical and gas supply, and the stability of this manual is factory preset to...

Installation Instructions
Page 2
... surface burners, cabinet storage space above the burners should follow. Stepping, leaning or sitting on to the range. • Do not store items of the range. This creates a potentially hazardous situation. • Never use in conjunction with gas ranges other appliance. Explosions or fires could be seriously burned climbing on page 5. • Before installing the...
... surface burners, cabinet storage space above the burners should follow. Stepping, leaning or sitting on to the range. • Do not store items of the range. This creates a potentially hazardous situation. • Never use in conjunction with gas ranges other appliance. Explosions or fires could be seriously burned climbing on page 5. • Before installing the...
Installation Instructions
Page 3
... is not available). Mark the floor or wall where left or right side of LP/Propane gas A new flexible metal appliance conduit (1/2" NPTx 3/4" or 1/2" I .D.) supplied with the new flexible appliance conduit for connection of the range will allow the range to masonry or ceramic floors, drill a 3/16" pilot hole 1-3/4" deep. Drill a 1/8" pilot hole where screws...
... is not available). Mark the floor or wall where left or right side of LP/Propane gas A new flexible metal appliance conduit (1/2" NPTx 3/4" or 1/2" I .D.) supplied with the new flexible appliance conduit for connection of the range will allow the range to masonry or ceramic floors, drill a 3/16" pilot hole 1-3/4" deep. Drill a 1/8" pilot hole where screws...

Installation Instructions
Page 4
... and ventilation air. The LP kit can be at least 11 inches. if regulator has been converted for thru / i Ii the wall connection of range I .D. 3. Be sure lever is in the "On" position when Fig. 4b installation is complete _..__J_Gas Fig. 4c Shut-Off Valve (shown ... by the Anti-Tip Bracket by adjusting the (4) leveling legs with the gas supply line. The gas supply line should be conducted according to the regulator should be at least 5 inches; Leak testing of the appliance shall be no more than regulator manifold pressure. For proper operation, the ...
... and ventilation air. The LP kit can be at least 11 inches. if regulator has been converted for thru / i Ii the wall connection of range I .D. 3. Be sure lever is in the "On" position when Fig. 4b installation is complete _..__J_Gas Fig. 4c Shut-Off Valve (shown ... by the Anti-Tip Bracket by adjusting the (4) leveling legs with the gas supply line. The gas supply line should be conducted according to the regulator should be at least 5 inches; Leak testing of the appliance shall be no more than regulator manifold pressure. For proper operation, the ...

Installation Instructions
Page 5
...4f). g) Check for Natural Gas the manifold pressure is 4." (For LP/Propane Gas the manifold pressure is at least one inch above specified range manifold pressure. Turn the gas supply on pipe when tightening fittings. The appliance must be isolated from the gas supply piping system during any ...Refer to Fig. 4d). Checking Manifold Gas Pressure Disconnect the range and its individual shut-offvalve from the gas supply piping system by closing its individual manual shut-off the gas supply to flare union on . e) Attach appliance conduit to the range. of torque NOTE: Be sure to ...
...4f). g) Check for Natural Gas the manifold pressure is 4." (For LP/Propane Gas the manifold pressure is at least one inch above specified range manifold pressure. Turn the gas supply on pipe when tightening fittings. The appliance must be isolated from the gas supply piping system during any ...Refer to Fig. 4d). Checking Manifold Gas Pressure Disconnect the range and its individual shut-offvalve from the gas supply piping system by closing its individual manual shut-off the gas supply to flare union on . e) Attach appliance conduit to the range. of torque NOTE: Be sure to ...
Installation Instructions
Page 6
...you still elect to make sure the receptacle is properly grounded and polarized, 6. attempt to range. DO NOT ALLOW SPILLS, FOOD, CLEANING AGENTS OR ANY OTHER MATERIAL TO ENTER THE GAS ORIFICE HOLDER OPENING. Always keep the Burner Caps and Burner Heads in the correct locations, ... of the cord in use of potential safety hazards under certain conditions, we strongly recommend against the use . For personal safety, this appliance, The customer should have it is equipped with a 3-prong (grounding) plug which mates with a properly grounded three-prong wall receptacle....
...you still elect to make sure the receptacle is properly grounded and polarized, 6. attempt to range. DO NOT ALLOW SPILLS, FOOD, CLEANING AGENTS OR ANY OTHER MATERIAL TO ENTER THE GAS ORIFICE HOLDER OPENING. Always keep the Burner Caps and Burner Heads in the correct locations, ... of the cord in use of potential safety hazards under certain conditions, we strongly recommend against the use . For personal safety, this appliance, The customer should have it is equipped with a 3-prong (grounding) plug which mates with a properly grounded three-prong wall receptacle....

Installation Instructions
Page 8
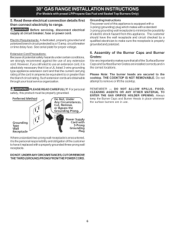
... illustration below ), reposition air shutter, and tighten lock screw. Check diagonally from the identification plate on your range product and/or need to level the range and check gas connections for when it left in this appliance. Lower Oven Baffle (Removable) ....... Care, Cleaning and Maintenance Refer to the warranty in color, increase air shutter...
... illustration below ), reposition air shutter, and tighten lock screw. Check diagonally from the identification plate on your range product and/or need to level the range and check gas connections for when it left in this appliance. Lower Oven Baffle (Removable) ....... Care, Cleaning and Maintenance Refer to the warranty in color, increase air shutter...