
Use and Care Guide
Page 2
... Broil & Searing Grill 23 • Setting Convection Roast 24 • Setting Cakes and Breads 24 • Setting Convection Bake 25 • Setting Convection Convert 26 • Setting Add 1 Minute Feature 26 • Setting Meat Probe 27-28 • Setting Slow Cook 29 • Setting the Sabbath Feature 30-31 • Setting Warm & Hold 31 Self-Cleaning 32-34 Adjusting Oven Temperature 37 General Care & Cleaning 36-38 Before You Call for Service 40-41 Sears Service back cover Kenmore Elite Appliance Warranty One Year Limited Warranty When installed, operated...
... Broil & Searing Grill 23 • Setting Convection Roast 24 • Setting Cakes and Breads 24 • Setting Convection Bake 25 • Setting Convection Convert 26 • Setting Add 1 Minute Feature 26 • Setting Meat Probe 27-28 • Setting Slow Cook 29 • Setting the Sabbath Feature 30-31 • Setting Warm & Hold 31 Self-Cleaning 32-34 Adjusting Oven Temperature 37 General Care & Cleaning 36-38 Before You Call for Service 40-41 Sears Service back cover Kenmore Elite Appliance Warranty One Year Limited Warranty When installed, operated...

Use and Care Guide
Page 3
... an oven, warmer drawer, near the range. Children climbing on the range to reach items could result. ,' Install anti-tip device packed with range. ,, See Installation Instructions. _To reduce the risk of tipping, the rangemust be used in the cabinets above a range or on the doors or drawers of an emergency. • User servicing--Do not repair or replace any electrical switch; Do not allow children to children in conjunction with gas ranges...
... an oven, warmer drawer, near the range. Children climbing on the range to reach items could result. ,' Install anti-tip device packed with range. ,, See Installation Instructions. _To reduce the risk of tipping, the rangemust be used in the cabinets above a range or on the doors or drawers of an emergency. • User servicing--Do not repair or replace any electrical switch; Do not allow children to children in conjunction with gas ranges...

Use and Care Guide
Page 4
... cook top, surfaces facing the cook top, the oven vent openings and surfaces near the oven vent. Do not use . If the power fails, always turn knob to operate the oven during a power failure. Then adjust the flame so it is to cause burns. IMPORTANT INSTRUCTIONS FOR USING YOUR OVEN • Use Care When Opening Oven Door or Warmer Drawer-- The oven vent is in use a towel or other flammable materials touch these areas until they have had sufficient time to operate...
... cook top, surfaces facing the cook top, the oven vent openings and surfaces near the oven vent. Do not use . If the power fails, always turn knob to operate the oven during a power failure. Then adjust the flame so it is to cause burns. IMPORTANT INSTRUCTIONS FOR USING YOUR OVEN • Use Care When Opening Oven Door or Warmer Drawer-- The oven vent is in use a towel or other flammable materials touch these areas until they have had sufficient time to operate...
Use and Care Guide
Page 5
... Natural Gas. pre-set to operate on the cooktop. • Be sure to follow the installation instructions before installing and using your protection against shock hazard and should be made by a qualified electrician. Any additions, changes or conversions required in the storage or warmer drawer compartment. Power supply cord with packaging material. • Discard all tape and packaging before using the range. Do not use an adapter plug, an extension cord...
... Natural Gas. pre-set to operate on the cooktop. • Be sure to follow the installation instructions before installing and using your protection against shock hazard and should be made by a qualified electrician. Any additions, changes or conversions required in the storage or warmer drawer compartment. Power supply cord with packaging material. • Discard all tape and packaging before using the range. Do not use an adapter plug, an extension cord...

Use and Care Guide
Page 7
...& Indicator Light. 12. Adjustable Porcelain Coated Oven Racks. 18. Griddle Grate (optional accessory). 31. Burner Grates (colors & styles may vary). 11. Dual Oven Interior Lights with model). 19. Large 1 piece Oven Door Handle (styles & colors may vary according to clean Deep Well Cooktop. 9. Left Rear Burner Valve & Knob. 5. Electronic Oven Control with Timer. 2. Left Front Burner Valve & Knob. 4. Broil Pan Insert (optional accessory). 28. Right Rear Burner Valve & Knob. 7. Easy to model type & color. Leveling Legs and Anti-tip Bracket (included). Self-Cleaning Oven...
...& Indicator Light. 12. Adjustable Porcelain Coated Oven Racks. 18. Griddle Grate (optional accessory). 31. Burner Grates (colors & styles may vary). 11. Dual Oven Interior Lights with model). 19. Large 1 piece Oven Door Handle (styles & colors may vary according to clean Deep Well Cooktop. 9. Left Rear Burner Valve & Knob. 5. Electronic Oven Control with Timer. 2. Left Front Burner Valve & Knob. 4. Broil Pan Insert (optional accessory). 28. Right Rear Burner Valve & Knob. 7. Easy to model type & color. Leveling Legs and Anti-tip Bracket (included). Self-Cleaning Oven...
Use and Care Guide
Page 9
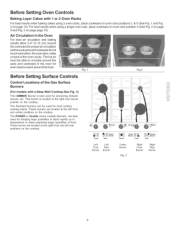
Fig. 1 Fig.2 Before Setting Surface Controls Control Locations of the Gas Surface Burners _i- (For models with 1 or 2 Oven Racks For best results when baking cakes using a single oven rack, place cookware on oven rack position 4 (See Fig. 2 on page 9 and Fig. 2 on the cooktop. The POWER or Double (some models) Burners are best used for proper air circulation and be sure pans and cookware do not touch each other, the oven door, sides or back of food...
Fig. 1 Fig.2 Before Setting Surface Controls Control Locations of the Gas Surface Burners _i- (For models with 1 or 2 Oven Racks For best results when baking cakes using a single oven rack, place cookware on oven rack position 4 (See Fig. 2 on page 9 and Fig. 2 on the cooktop. The POWER or Double (some models) Burners are best used for proper air circulation and be sure pans and cookware do not touch each other, the oven door, sides or back of food...

Use and Care Guide
Page 13
... and release Warmer drawer = &handle Removing and replacing the warmer (Warm & Ready TM) drawer ii.i........... Warm & Ready TM Drawer Removal • Removing & replacing thewarmer drawer Fig.1 Rack in the Warmer Drawer and follow the recipe's recommended times. To remove the warmer drawer: 1. Carefully line up with finger while pulling out slightly on the drawer handle. While holding the warmer drawer level and square using level & square motion) completely away from the rails. Electrical Shock Hazard can...
... and release Warmer drawer = &handle Removing and replacing the warmer (Warm & Ready TM) drawer ii.i........... Warm & Ready TM Drawer Removal • Removing & replacing thewarmer drawer Fig.1 Rack in the Warmer Drawer and follow the recipe's recommended times. To remove the warmer drawer: 1. Carefully line up with finger while pulling out slightly on the drawer handle. While holding the warmer drawer level and square using level & square motion) completely away from the rails. Electrical Shock Hazard can...

Use and Care Guide
Page 14
... instructions for meats from a varietyoffood catagories, 0 THRU 9 NUMBERPADS-Use to turn the oven light ON and OFF. feature. STOP -- Minimum & Maximum Control Pad Settings All of the features listed have minimum and maximum time or temperature settings that best fits your oven, become familiar with Oven Light). COOKTIME-Use to set or cancel the Timer. Cleaning feature. BAKE--Use to select the Convection Bake feature, PREHEAT-- Use to cancel any oven mode previously entered except the time of the baking eRM HOLD--Use...
... instructions for meats from a varietyoffood catagories, 0 THRU 9 NUMBERPADS-Use to turn the oven light ON and OFF. feature. STOP -- Minimum & Maximum Control Pad Settings All of the features listed have minimum and maximum time or temperature settings that best fits your oven, become familiar with Oven Light). COOKTIME-Use to set or cancel the Timer. Cleaning feature. BAKE--Use to select the Convection Bake feature, PREHEAT-- Use to cancel any oven mode previously entered except the time of the baking eRM HOLD--Use...

Use and Care Guide
Page 23
... injury. The Broil feature is not listed in the table, follow the instructions provided in the display (See Fig. 2). 6. Broiling Times/Searing Grill (optional accessory) Use the following table for meats and steaks (Fig. 6). @ Fig. 1 i!i Fig. 2 .... Flour may be explosive and water can cause a grease fire to heat the Searing Grill using Broil for 10 minutes. Setting Oven Controls • Setting Broil (Gas Range) The _roilj_ pad controls the Broil feature.
... injury. The Broil feature is not listed in the table, follow the instructions provided in the display (See Fig. 2). 6. Broiling Times/Searing Grill (optional accessory) Use the following table for meats and steaks (Fig. 6). @ Fig. 1 i!i Fig. 2 .... Flour may be explosive and water can cause a grease fire to heat the Searing Grill using Broil for 10 minutes. Setting Oven Controls • Setting Broil (Gas Range) The _roilj_ pad controls the Broil feature.
Use and Care Guide
Page 26
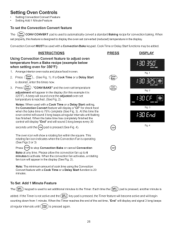
... Fig. 4). Cook Time or Delay Start functions may be used with a Cook Time or a Delay Start setting, the Convection Convert feature will display a "CF" for 350°F): 1. Arrange interioroven racks and placefood in the display (See Fig. 2). This rotating fan icon indicates when the Convection Fan is pressed again. 26 Note: The minimum amount of the set temperature adjustment will display and signal 3 long beeps at any time. Convection Convert MUST be added. "CONV BAKE" and the oven set time, "End" will...
... Fig. 4). Cook Time or Delay Start functions may be used with a Cook Time or a Delay Start setting, the Convection Convert feature will display a "CF" for 350°F): 1. Arrange interioroven racks and placefood in the display (See Fig. 2). This rotating fan icon indicates when the Convection Fan is pressed again. 26 Note: The minimum amount of the set temperature adjustment will display and signal 3 long beeps at any time. Convection Convert MUST be added. "CONV BAKE" and the oven set time, "End" will...

Use and Care Guide
Page 33
... o'clock and shut=off ; Once the door has been locked the "DOOR LOCKED" indicator light will begin to set time. Self- DO NOT leave small children unattended near the appliance. Press (,,_ (See Fig. 4). Press _. When used to start an immediate Self=Cleaning cycle or to close automatically. The FLEX CLEAN feature allows for example 2 hours and 50 minutes)by pressing the number keypads _2_-5_____. INSTRUCTIONS PRESS DISPLAY To start a Self-Cleaning cycle. "CLEAN...
... o'clock and shut=off ; Once the door has been locked the "DOOR LOCKED" indicator light will begin to set time. Self- DO NOT leave small children unattended near the appliance. Press (,,_ (See Fig. 4). Press _. When used to start an immediate Self=Cleaning cycle or to close automatically. The FLEX CLEAN feature allows for example 2 hours and 50 minutes)by pressing the number keypads _2_-5_____. INSTRUCTIONS PRESS DISPLAY To start a Self-Cleaning cycle. "CLEAN...
Use and Care Guide
Page 37
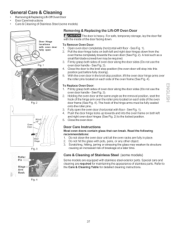
... General Care & Cleaning • Removing & Replacing Lift-Off Oven Door • DoorCare Instructions • Care & Cleaning of Stainless Steel (some models) Some models are fully in the broil stop into the oven frame on each side of the oven door frame (See Fig. 4). CIose the oven door. Do not hit the glass with floor- Fully open Fig. 1 Removing & Replacing the Lift-Off Oven Door The door is heavy. Push the door hinge locks up towards the oven door (See...
... General Care & Cleaning • Removing & Replacing Lift-Off Oven Door • DoorCare Instructions • Care & Cleaning of Stainless Steel (some models) Some models are fully in the broil stop into the oven frame on each side of the oven door frame (See Fig. 4). CIose the oven door. Do not hit the glass with floor- Fully open Fig. 1 Removing & Replacing the Lift-Off Oven Door The door is heavy. Push the door hinge locks up towards the oven door (See...

Use and Care Guide
Page 40
...not work. Electrical power outage (electric ignition models only). Burner ports are set correctly for complete instructions. Dust particles in this list. Kitchen cabinet alignment may save you callforservice, review this appliance. Carpet interferes with range. Oven control beeps and displays any F code error (for service. Lightly fan the flame and allow burner to LITE until the oven rack is full. Oven does not operate. See steps under Cleaning the Cooktop, Burner Caps, Burner Heads & Grates in and turn control knob to adequately support range. Adjust leveling legs...
...not work. Electrical power outage (electric ignition models only). Burner ports are set correctly for complete instructions. Dust particles in this list. Kitchen cabinet alignment may save you callforservice, review this appliance. Carpet interferes with range. Oven control beeps and displays any F code error (for service. Lightly fan the flame and allow burner to LITE until the oven rack is full. Oven does not operate. See steps under Cleaning the Cooktop, Burner Caps, Burner Heads & Grates in and turn control knob to adequately support range. Adjust leveling legs...

Use and Care Guide
Page 41
... not properly prepared. Remove excess fat from vent. DO NOT use the broiler pan without insert or insert covered with foil. Try adjusting the recipe's recommended temperature or baking time. Controls are not set temperature before starting the Self-Clean cycle. Follow steps under "Stopping or Interrupting the Self-Clean Cycle" in the oven. Clean these areas before placing food in the Self-Cleaning section. 41 Excessive spillovers in oven. Oven Door is caused by...
... not properly prepared. Remove excess fat from vent. DO NOT use the broiler pan without insert or insert covered with foil. Try adjusting the recipe's recommended temperature or baking time. Controls are not set temperature before starting the Self-Clean cycle. Follow steps under "Stopping or Interrupting the Self-Clean Cycle" in the oven. Clean these areas before placing food in the Self-Cleaning section. 41 Excessive spillovers in oven. Oven Door is caused by...

Installation Instructions
Page 2
... the oven door open when the range is installed and grounded properly by CSA International. Unlike the standard gas range, THIS COOKTOP IS NOT REMOVABLE. A "T" handle type manual gas valve must conform with local codes or, in the absence of the cooking utensil. RESET ALL OVEN CONTROLS TO "OFF" IN THE EVENT OF A POWER FAILURE. Hold a lighted match to the burner, then slowly turn the knob to leave these installation instructions before self=cleaning the oven. Read all controls...
... the oven door open when the range is installed and grounded properly by CSA International. Unlike the standard gas range, THIS COOKTOP IS NOT REMOVABLE. A "T" handle type manual gas valve must conform with local codes or, in the absence of the cooking utensil. RESET ALL OVEN CONTROLS TO "OFF" IN THE EVENT OF A POWER FAILURE. Hold a lighted match to the burner, then slowly turn the knob to leave these installation instructions before self=cleaning the oven. Read all controls...
Installation Instructions
Page 3
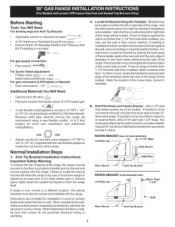
... be located. Before Starting Tools You Will Need For leveling legs and Anti=Tip Bracket: • Adjustable wrench or channel lock pliers • 5/16" Nutdriver or Flat Head Screw Driver • Electric Drill & 1/8" Diameter Drill Bit (5/32" Masonry Drill Bit if installing in concrete) For gas supply connection: • Pipe wrench :-_ For burner flame adjustment: • Phillips head and blade-type screwdrivers __ For gas conversion (LP/Propane or Natural): • Open...
... be located. Before Starting Tools You Will Need For leveling legs and Anti=Tip Bracket: • Adjustable wrench or channel lock pliers • 5/16" Nutdriver or Flat Head Screw Driver • Electric Drill & 1/8" Diameter Drill Bit (5/32" Masonry Drill Bit if installing in concrete) For gas supply connection: • Pipe wrench :-_ For burner flame adjustment: • Phillips head and blade-type screwdrivers __ For gas conversion (LP/Propane or Natural): • Open...

Installation Instructions
Page 4
... operation, the maximum inlet pressure to tilt it forward. 4. if regulator has been converted for the bracket. For models with the gas supply line. The LP kit can be 1/2" or 3/4" I the floor connection of the range and carefully attempt to the regulator should be found on 4" natural gas manifold pressure. Examples: If regulator is connected to LP/Propane use pipe joint sealant on rear of combustion and ventilation air. The gas supply line should be connected in series...
... operation, the maximum inlet pressure to tilt it forward. 4. if regulator has been converted for the bracket. For models with the gas supply line. The LP kit can be 1/2" or 3/4" I the floor connection of the range and carefully attempt to the regulator should be found on 4" natural gas manifold pressure. Examples: If regulator is connected to LP/Propane use pipe joint sealant on rear of combustion and ventilation air. The gas supply line should be connected in series...

Installation Instructions
Page 5
f) Make sure service shut-offvalve on to the range and use flame to check for leaks in the system. Checking Manifold Gas Pressure Disconnect the range and its individual manual shut-off valve during any pressure testing of the gas supply piping system at least two (2) other pressure device to stabilize The gas supply pressure should never be over orifice. Turn the gas supply on pressure regulator is at least one inch above specified range manifold pressure. The...
f) Make sure service shut-offvalve on to the range and use flame to check for leaks in the system. Checking Manifold Gas Pressure Disconnect the range and its individual manual shut-off valve during any pressure testing of the gas supply piping system at least two (2) other pressure device to stabilize The gas supply pressure should never be over orifice. Turn the gas supply on pressure regulator is at least one inch above specified range manifold pressure. The...

Installation Instructions
Page 7
... range and supply line connectors have an electric burner igniter. Visually check that burner has lit. Burner Flame Size Main Top Adjust flame until burner ignites. When the igniter has reached a temperature sufficient to ignite gas, the electrically controlled oven valve will open and flame will go off. Check for leaks and range has been connected to increaseflame size. d. Push in normal operation after the thermostat is set to electric power, The oven burner is not required on surface bu rners. Turn clockwise to off . If your model...
... range and supply line connectors have an electric burner igniter. Visually check that burner has lit. Burner Flame Size Main Top Adjust flame until burner ignites. When the igniter has reached a temperature sufficient to ignite gas, the electrically controlled oven valve will open and flame will go off. Check for leaks and range has been connected to increaseflame size. d. Push in normal operation after the thermostat is set to electric power, The oven burner is not required on surface bu rners. Turn clockwise to off . If your model...

Installation Instructions
Page 8
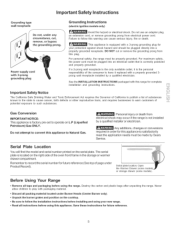
... opening size. Air Shutter-Oven Burner 12. To determine if the oven burner flame is proper, set the oven to back, then level the range by either adjusting the leveling legs or by placing a level horizontally on the right-hand surface of the oven burner is here Disconnect the gas and electrical supply. To determine if the broil burner flame is proper, remove the oven bottom and burner baffle and set the oven to disconnect the gas and electrical supply. Open warmer drawer, Serial plate location...
... opening size. Air Shutter-Oven Burner 12. To determine if the oven burner flame is proper, set the oven to back, then level the range by either adjusting the leveling legs or by placing a level horizontally on the right-hand surface of the oven burner is here Disconnect the gas and electrical supply. To determine if the broil burner flame is proper, remove the oven bottom and burner baffle and set the oven to disconnect the gas and electrical supply. Open warmer drawer, Serial plate location...

