
Use and Care Guide
Page 2
... 15 Connect Vent 15 Level Dryer 16 Reverse Door Swing 16 Complete Installation 17 DRYER USE 18 Starting Your Dryer 18 Stopping, Pausing or Restarting 19 Drying and Cycle Tips 19 Status Lights 20 Cycles 20 Modifiers 21 Options 22 Cycle Signal 22 Changing Cycles, Modifiers and Options 22 Dryer Rack 23 DRYER CARE 24 Cleaning the Dryer Location 24 Cleaning the Lint Screen 24 Cleaning the Dryer Interior 24 Removing Accumulated Lint 25 Vacation and Moving Care 25 Changing the Drum Light 25 TROUBLESHOOTING 26 SERVICE NUMBERS BACK COVER
... 15 Connect Vent 15 Level Dryer 16 Reverse Door Swing 16 Complete Installation 17 DRYER USE 18 Starting Your Dryer 18 Stopping, Pausing or Restarting 19 Drying and Cycle Tips 19 Status Lights 20 Cycles 20 Modifiers 21 Options 22 Cycle Signal 22 Changing Cycles, Modifiers and Options 22 Dryer Rack 23 DRYER CARE 24 Cleaning the Dryer Location 24 Cleaning the Lint Screen 24 Cleaning the Dryer Interior 24 Removing Accumulated Lint 25 Vacation and Moving Care 25 Changing the Drum Light 25 TROUBLESHOOTING 26 SERVICE NUMBERS BACK COVER
Use and Care Guide
Page 3
... on products requiring in the United States and Canada. Your new Kenmore _product is used in -home repair, plus convenient repair scheduling v' Power surge protection against electrical damage due to power fluctuations v' Rental reimbursement if repair of merchantability or fitness for incidental or consequential damages. If this limited warranty shall be liable for a particular purpose, are limited to filters, belts, light bulbs, and bags...
... on products requiring in the United States and Canada. Your new Kenmore _product is used in -home repair, plus convenient repair scheduling v' Power surge protection against electrical damage due to power fluctuations v' Rental reimbursement if repair of merchantability or fitness for incidental or consequential damages. If this limited warranty shall be liable for a particular purpose, are limited to filters, belts, light bulbs, and bags...

Use and Care Guide
Page 4
...instructions. Always read and obey all instructions before or after each load. [] Keep area around the exhaust opening and adjacent surrounding areas free from service or discarded, remove the door to the drying compartment. [] Do not reach into the dryer if the drum is moving. [] Do not install or store the dryer... Use and Care Guide or in published user-repair instructions that you understand and have been previously cleaned in, washed in, soaked in, or spotted with controls. [] Do not repair or replace any part of the dryer or attempt any servicing unless specifically ...
...instructions. Always read and obey all instructions before or after each load. [] Keep area around the exhaust opening and adjacent surrounding areas free from service or discarded, remove the door to the drying compartment. [] Do not reach into the dryer if the drum is moving. [] Do not install or store the dryer... Use and Care Guide or in published user-repair instructions that you understand and have been previously cleaned in, washed in, soaked in, or spotted with controls. [] Do not repair or replace any part of the dryer or attempt any servicing unless specifically ...
Use and Care Guide
Page 5
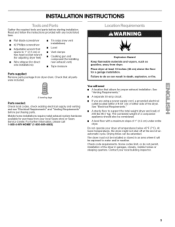
... using a power supply cord, a grounded electrical outlet located within 2 ft (61 cm) of either side of an automatic cycle. A level floor with any tools listed here. • Flat-blade screwdriver • #2 Phillips screwdriver • Adjustable wrench that opens to do not permit, installation of 1" (2.5 cm) under entire dryer. The dryer must not be installed or stored in an area where it will need • A location that all parts...
... using a power supply cord, a grounded electrical outlet located within 2 ft (61 cm) of either side of an automatic cycle. A level floor with any tools listed here. • Flat-blade screwdriver • #2 Phillips screwdriver • Adjustable wrench that opens to do not permit, installation of 1" (2.5 cm) under entire dryer. The dryer must not be installed or stored in an area where it will need • A location that all parts...
Use and Care Guide
Page 6
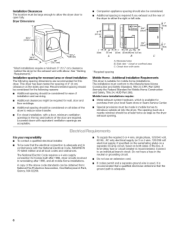
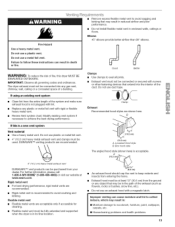
... a door, minimum ventilation openings in the neutral or grounding circuit. A time-delay fuse or circuit breaker is suitable for ease of the door are acceptable. Recommended spacing should be required for the exhaust vent with equivalent ventilation openings are required. For closet installation, with vents 3"* (7.6cm) * Required spacing Mobile Home - Louvered doors with elbow. Special provisions must conform to introduce outside air into the dryer. Do not use an extension cord...
... a door, minimum ventilation openings in the neutral or grounding circuit. A time-delay fuse or circuit breaker is suitable for ease of the door are acceptable. Recommended spacing should be required for the exhaust vent with equivalent ventilation openings are required. For closet installation, with vents 3"* (7.6cm) * Required spacing Mobile Home - Louvered doors with elbow. Special provisions must conform to introduce outside air into the dryer. Do not use an extension cord...
Use and Care Guide
Page 7
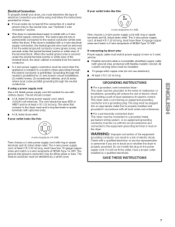
.... GROUNDING INSTRUCTIONS [] For a grounded, cord-connected dryer: This dryer must be removed from the neutral conductor. Do not modify the plug on the dryer. The wires that is properly installed and grounded in a location where grounding through the neutral conductors. The ground wire (ground conductor) may be identified by direct wire: Power supply cable must match power supply (4-wire or 3-wire) and be using a power supply cord: Use a UL listed power supply cord kit marked for...
.... GROUNDING INSTRUCTIONS [] For a grounded, cord-connected dryer: This dryer must be removed from the neutral conductor. Do not modify the plug on the dryer. The wires that is properly installed and grounded in a location where grounding through the neutral conductors. The ground wire (ground conductor) may be identified by direct wire: Power supply cable must match power supply (4-wire or 3-wire) and be using a power supply cord: Use a UL listed power supply cord kit marked for...
Use and Care Guide
Page 9
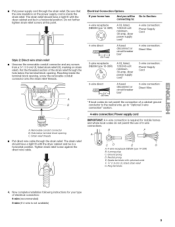
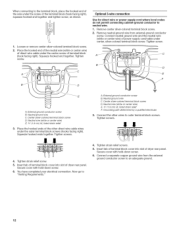
..., pply cord* 3-wire connection: Power Supply Cord 3-wire direct A fused disconnect or cbiorcxu* it breaker 3-wire connection: Direct Wire L!.....B If local codes do not permit the use of a cabinet-ground conductor to the neutral wire, go to "Optional 3-wire connection" section. .......... Removable conduit connector B. Reaching inside the strain relief. B F CD E G A. 4-wire receptacle (NEMA type 14-30R) B. 4-prong plug C. Spade terminals with the dryer cabinet and be in a horizontal position. Put power supply cord through the hole below terminal block opening...
..., pply cord* 3-wire connection: Power Supply Cord 3-wire direct A fused disconnect or cbiorcxu* it breaker 3-wire connection: Direct Wire L!.....B If local codes do not permit the use of a cabinet-ground conductor to the neutral wire, go to "Optional 3-wire connection" section. .......... Removable conduit connector B. Reaching inside the strain relief. B F CD E G A. 4-wire receptacle (NEMA type 14-30R) B. 4-prong plug C. Spade terminals with the dryer cabinet and be in a horizontal position. Put power supply cord through the hole below terminal block opening...
Use and Care Guide
Page 10
Direct wire cable must have completed your electrical connection. Cut 11/2'' (3.8 cm) from external ground conductor screw. Connect neutral ground wire and place the hooked end (hook facing right) of the neutral wire (white or center wire) of power supply cord to outer terminal block screws. Neutral ground wire C. Ground wire (green or bare) of extra length so dryer can be moved if needed. Center silver-colored terminal block screw E Neutral wire (white or...
Direct wire cable must have completed your electrical connection. Cut 11/2'' (3.8 cm) from external ground conductor screw. Connect neutral ground wire and place the hooked end (hook facing right) of the neutral wire (white or center wire) of power supply cord to outer terminal block screws. Neutral ground wire C. Ground wire (green or bare) of extra length so dryer can be moved if needed. Center silver-colored terminal block screw E Neutral wire (white or...
Use and Care Guide
Page 11
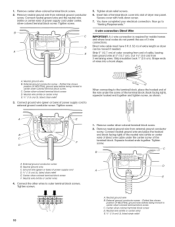
... listed strain relief E Ring terminals G. C G F A. 3-wire receptacle (NEMA type 10-30R) B. 3-wire plug C. Loosen or remove center silver-colored terminal block screw. 2. Now go to "Venting Requirements." 3-wire connection: Power supply cord Use where local codes permit connecting cabinet-ground conductor to external ground conductor screw. Strip 31/2'' (8.9 cm) of outer covering from end of wires into slot of extra length so dryer can be moved if needed. Shape ends of cable. Neutral prong D. Connect...
... listed strain relief E Ring terminals G. C G F A. 3-wire receptacle (NEMA type 10-30R) B. 3-wire plug C. Loosen or remove center silver-colored terminal block screw. 2. Now go to "Venting Requirements." 3-wire connection: Power supply cord Use where local codes permit connecting cabinet-ground conductor to external ground conductor screw. Strip 31/2'' (8.9 cm) of outer covering from end of wires into slot of extra length so dryer can be moved if needed. Shape ends of cable. Neutral prong D. Connect...
Use and Care Guide
Page 12
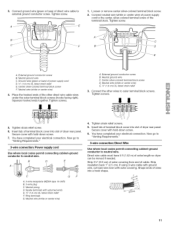
... direct wire cable under the outer terminal block screws (hooks facing right). Place the hooked end of the neutral wire (white or center wire) of the other wires to outer terminal block screws. When connecting to an adequate ground. 12 Optional 3-wire connection Use for direct wire or power supply cord where local codes do not permit connecting cabinet-ground conductor to "Venting Requirements." = A. Now go to neutral wire. 1. Neutral wire (white or center wire) E. _" (1.9 cm) UL listed...
... direct wire cable under the outer terminal block screws (hooks facing right). Place the hooked end of the neutral wire (white or center wire) of the other wires to outer terminal block screws. When connecting to an adequate ground. 12 Optional 3-wire connection Use for direct wire or power supply cord where local codes do not permit connecting cabinet-ground conductor to "Venting Requirements." = A. Now go to neutral wire. 1. Neutral wire (white or center wire) E. _" (1.9 cm) UL listed...
Use and Care Guide
Page 13
The dryer exhaust must not be connected into the interior of the duct. Box hood style The angled hood style (shown here) is acceptable. 4" (lO.2 cm) heavymetal exhaust vent DURASAFF Mvent products can result in the path of the system and make sure exhaust hood is not plugged with lint. • Replace any plastic or metal foil vent with a magnetic latch. Exhaust hood...
The dryer exhaust must not be connected into the interior of the duct. Box hood style The angled hood style (shown here) is acceptable. 4" (lO.2 cm) heavymetal exhaust vent DURASAFF Mvent products can result in the path of the system and make sure exhaust hood is not plugged with lint. • Replace any plastic or metal foil vent with a magnetic latch. Exhaust hood...
Use and Care Guide
Page 14
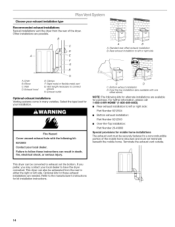
... dryer. Rear exhaust installation to left or right side: Part Number 8212504 • Bottom exhaust installation: Part Number 8212503 • Over-the-Top installation: Part Number 26-49900 Special provisions for purchase. Select the type best for kit installation instructions. 14 Fire Hazard Cover unused exhaust hole with one offset elbow) NOTE: The following kit: 8212563 Contact your local dealer. This dryer can also be converted to exhaust out the bottom. O A A B A. Dryer B. Wall D. Exhaust outlet Optional exhaust installations Venting systems come...
... dryer. Rear exhaust installation to left or right side: Part Number 8212504 • Bottom exhaust installation: Part Number 8212503 • Over-the-Top installation: Part Number 26-49900 Special provisions for purchase. Select the type best for kit installation instructions. 14 Fire Hazard Cover unused exhaust hole with one offset elbow) NOTE: The following kit: 8212563 Contact your local dealer. This dryer can also be converted to exhaust out the bottom. O A A B A. Dryer B. Wall D. Exhaust outlet Optional exhaust installations Venting systems come...
Use and Care Guide
Page 15
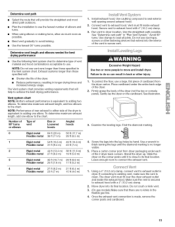
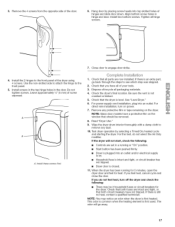
... exhaust outlet in the Vent system chart. Number of g0 ° turns or elbows Type of the dryer (not the top or console panel). Excessive Weight Hazard Use two or more people to use. NOTE: Do not use vent runs longer than those specified in dryer. Find the diamond marking. -R 4. Determine vent length and elbows needed for best drying performance • Use the following Vent system chart to determine type of vent...
... exhaust outlet in the Vent system chart. Number of g0 ° turns or elbows Type of the dryer (not the top or console panel). Excessive Weight Hazard Use two or more people to use. NOTE: Do not use vent runs longer than those specified in dryer. Find the diamond marking. -R 4. Determine vent length and elbows needed for best drying performance • Use the following Vent system chart to determine type of vent...
Use and Care Guide
Page 17
... outlet and/or electrical supply is still no heat, contact a qualified technician. For direct wire installation, turn off the dryer and check the following : • Controls are intact and tight, or that you do not select the Air Only modifier. NOTE: Glass door models have all parts are now installed. Read "Dryer Use." 9. f0. For this test, do not feel heat, turn on . • Household fuse is intact and tight, or circuit breaker...
... outlet and/or electrical supply is still no heat, contact a qualified technician. For direct wire installation, turn off the dryer and check the following : • Controls are intact and tight, or that you do not select the Air Only modifier. NOTE: Glass door models have all parts are now installed. Read "Dryer Use." 9. f0. For this test, do not feel heat, turn on . • Household fuse is intact and tight, or circuit breaker...
Use and Care Guide
Page 18
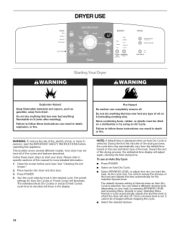
... SAFETY INSTRUCTIONS before each load. Clean lint screen before operating this manual for the selected dryness level. Fire Hazard No washer can result in death, explosion, or fire. items containing foam, rubber, or plastic must be changed without stopping the cycle. • Select the desired Options. 18 As the cycle runs, the control senses the dryness of this appliance. The default dryness setting is...
... SAFETY INSTRUCTIONS before each load. Clean lint screen before operating this manual for the selected dryness level. Fire Hazard No washer can result in death, explosion, or fire. items containing foam, rubber, or plastic must be changed without stopping the cycle. • Select the desired Options. 18 As the cycle runs, the control senses the dryness of this appliance. The default dryness setting is...
Use and Care Guide
Page 19
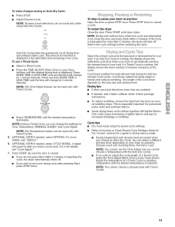
... estimated time remaining in the cycle. If an Auto Dry Cycle is selected. Follow package instructions. • To reduce wrinkling, remove the load from where the cycle was interrupted if you close the door and press Start within 5 minutes of selecting the cycle, the dryer automatically shuts off . Cycle tips • Dry most loads using Auto Dry Cycles. NOTE: Dryness Level selections can select a different dryness level, depending on the load size...
... estimated time remaining in the cycle. If an Auto Dry Cycle is selected. Follow package instructions. • To reduce wrinkling, remove the load from where the cycle was interrupted if you close the door and press Start within 5 minutes of selecting the cycle, the dryer automatically shuts off . Cycle tips • Dry most loads using Auto Dry Cycles. NOTE: Dryness Level selections can select a different dryness level, depending on the load size...
Use and Care Guide
Page 24
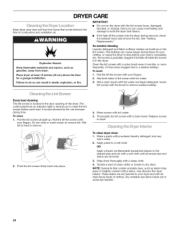
... stains are removed. 3. Apply paste to remove. 4. Replace screen in death, explosion, or fire. Scrub lint screen with powdered laundry detergent and very warm water. 2. Roll lint off the screen with hot water. 3. To clean dryer drum 1. DRYER CARE Keep dryer area clear and free from dryer. The screen is in the door opening of combustion and ventilation air. Every load cleaning The lint screen is hard to a soft cloth. NOTE: Garments that would obstruct the flow of the...
... stains are removed. 3. Apply paste to remove. 4. Replace screen in death, explosion, or fire. Scrub lint screen with powdered laundry detergent and very warm water. 2. Roll lint off the screen with hot water. 3. To clean dryer drum 1. DRYER CARE Keep dryer area clear and free from dryer. The screen is in the door opening of combustion and ventilation air. Every load cleaning The lint screen is hard to a soft cloth. NOTE: Garments that would obstruct the flow of the...
Use and Care Guide
Page 25
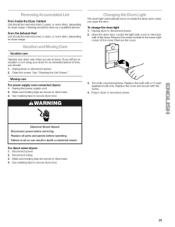
.... Remove the screw located in dryer or reconnect power. Clean lint screen. Electrical Shock Hazard Disconnect power before operating. Locate the light bulb cover on dryer usage. Vacation care Operate your dryer for an extended period of the cover. Ohsnciin : tl e Ligl' t The dryer light automatically turns on dryer usage, Cleaning should be done by a qualified person. Plug in the lower right corner of time, you should: f. Replace all parts and panels before servicing. Moving care For power supply cord-connected 1. From Inside the Dryer Cabinet Lint...
.... Remove the screw located in dryer or reconnect power. Clean lint screen. Electrical Shock Hazard Disconnect power before operating. Locate the light bulb cover on dryer usage. Vacation care Operate your dryer for an extended period of the cover. Ohsnciin : tl e Ligl' t The dryer light automatically turns on dryer usage, Cleaning should be done by a qualified person. Plug in the lower right corner of time, you should: f. Replace all parts and panels before servicing. Moving care For power supply cord-connected 1. From Inside the Dryer Cabinet Lint...
Use and Care Guide
Page 26
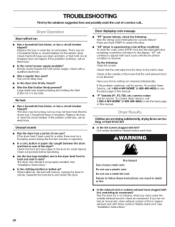
... dryer door firmly closed? Replace the fuse or reset the circuit breaker. Dryer displaying code message • "PF" (power failure), check the following : Clean lint screen. Check that both circuit breakers have heat. Check at the outside of lint or replace exhaust vent with heavy metal or flexible metal vent. "F" Variable (F1, F2, F20, etc.) service codes: Call for 5-10 minutes. Run the dryer for service. If you may not have not tripped. Large loads may require pressing and holding the Start button...
... dryer door firmly closed? Replace the fuse or reset the circuit breaker. Dryer displaying code message • "PF" (power failure), check the following : Clean lint screen. Check that both circuit breakers have heat. Check at the outside of lint or replace exhaust vent with heavy metal or flexible metal vent. "F" Variable (F1, F2, F20, etc.) service codes: Call for 5-10 minutes. Run the dryer for service. If you may not have not tripped. Large loads may require pressing and holding the Start button...
Use and Care Guide
Page 27
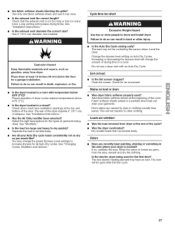
... on load or drum • Was dryer fabric softener properly used for the first time? Dry smaller loads that the exhaust vent is located? If so, ventilate the area. The odor will change the preset Dryness Level settings to other injury. • Is the Auto Dry Cycle ending early? Are fabric softener sheets blocking the grille? Long venting will not transfer to increase dryness for the types of the cycle...
... on load or drum • Was dryer fabric softener properly used for the first time? Dry smaller loads that the exhaust vent is located? If so, ventilate the area. The odor will change the preset Dryness Level settings to other injury. • Is the Auto Dry Cycle ending early? Are fabric softener sheets blocking the grille? Long venting will not transfer to increase dryness for the types of the cycle...


