

Use and Care Guide
Page 2
... Parts 5 Location Requirements 5 Electrical Requirements 6 Electrical Connection 8 Venting Requirements 13 Plan Vent System 14 Install Vent System 15 Install Leveling Legs 15 Connect Vent 15 Level Dryer 16 Reverse Door Swing 16 Complete Installation 17 DRYER USE 18 Starting Your Dryer 18 Stopping, Pausing or Restarting...21 Options 22 Cycle Signal 22 Changing Cycles, Modifiers and Options 22 Dryer Rack 23 DRYER CARE 24 Cleaning the Dryer Location 24 Cleaning the Lint Screen 24 Cleaning the Dryer Interior 24 Removing Accumulated Lint 25 Vacation and Moving Care 25 Changing ...
... Parts 5 Location Requirements 5 Electrical Requirements 6 Electrical Connection 8 Venting Requirements 13 Plan Vent System 14 Install Vent System 15 Install Leveling Legs 15 Connect Vent 15 Level Dryer 16 Reverse Door Swing 16 Complete Installation 17 DRYER USE 18 Starting Your Dryer 18 Stopping, Pausing or Restarting...21 Options 22 Cycle Signal 22 Changing Cycles, Modifiers and Options 22 Dryer Rack 23 DRYER CARE 24 Cleaning the Dryer Location 24 Cleaning the Lint Screen 24 Cleaning the Dryer Interior 24 Removing Accumulated Lint 25 Vacation and Moving Care 25 Changing ...

Use and Care Guide
Page 4
iMPORTANT SAFETY iNSTRUCTiONS WARNING: To reduce the risk of fire, electric shock, or injury to persons when using the dryer. [] Do not place items exposed to the drying compartment. [] Do not reach into the dryer if the drum is the safety alert symbol. SAVE THESE iNSTRUCTiONS You can happen if the ...safety messages will be exposed to the weather. [] Do not tamper with controls. [] Do not repair or replace any part of the dryer or attempt any servicing unless specifically recommended in this manual and on or in , or spotted with cooking oils may contribute to a chemical ...
iMPORTANT SAFETY iNSTRUCTiONS WARNING: To reduce the risk of fire, electric shock, or injury to persons when using the dryer. [] Do not place items exposed to the drying compartment. [] Do not reach into the dryer if the drum is the safety alert symbol. SAVE THESE iNSTRUCTiONS You can happen if the ...safety messages will be exposed to the weather. [] Do not tamper with controls. [] Do not repair or replace any part of the dryer or attempt any servicing unless specifically recommended in this manual and on or in , or spotted with cooking oils may contribute to a chemical ...
Use and Care Guide
Page 5
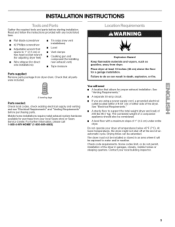
...-HOME ® (1-800-469-4663}. Failure to water and/or weather. If you are using a power supply cord, a grounded electrical outlet located within 2 ft (61 cm) of either side of a companion appliance should also be extended. A sturdy floor to 1" (2.5 cm) or hex-... for purchase from dryer. A level floor with any tools listed here. • Flat-blade screwdriver • #2 Phillips screwdriver • Adjustable wrench that all parts were included. 4 leveling legs Parts needed: Check local codes, check existing electrical supply and venting and see "Electrical Requirements" and "...
...-HOME ® (1-800-469-4663}. Failure to water and/or weather. If you are using a power supply cord, a grounded electrical outlet located within 2 ft (61 cm) of either side of a companion appliance should also be extended. A sturdy floor to 1" (2.5 cm) or hex-... for purchase from dryer. A level floor with any tools listed here. • Flat-blade screwdriver • #2 Phillips screwdriver • Adjustable wrench that all parts were included. 4 leveling legs Parts needed: Check local codes, check existing electrical supply and venting and see "Electrical Requirements" and "...
Use and Care Guide
Page 6
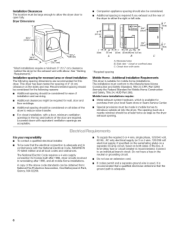
.... • To be considered. II IJJ14m_: 24in2.. 1" (- (2._m) (73.7 cm) (2.5crn) (2.Scrn)(59.2crn) (12.7cm) A B C A. Do not use an extension cord. Dryer Dimensions (1403. The National Electric Code requires a 4-wire supply connection for purchase from : National Fire Protection Association, One Batterymarch Park, Quincy, MA 02269. For closet installation, with a door, minimum...
.... • To be considered. II IJJ14m_: 24in2.. 1" (- (2._m) (73.7 cm) (2.5crn) (2.Scrn)(59.2crn) (12.7cm) A B C A. Do not use an extension cord. Dryer Dimensions (1403. The National Electric Code requires a 4-wire supply connection for purchase from : National Fire Protection Association, One Batterymarch Park, Quincy, MA 02269. For closet installation, with a door, minimum...
Use and Care Guide
Page 7
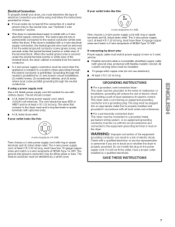
...cable must be grounded. The 3-wire power supply cord, at least 4 ft (1.22 m) long. In the event of malfunction or breakdown, grounding will reduce the risk of electric shock by a white cover. This dryer uses a cord having an equipment-grounding conductor and a grounding plug. WARNING... here. [] If local codes do not use with clothes dryers. The neutral ground wire is properly grounded. If the dryer is prohibited. Electrical Connection To properly install your dryer, you must determine the type of electrical connection you are in a location where grounding through the neutral...
...cable must be grounded. The 3-wire power supply cord, at least 4 ft (1.22 m) long. In the event of malfunction or breakdown, grounding will reduce the risk of electric shock by a white cover. This dryer uses a cord having an equipment-grounding conductor and a grounding plug. WARNING... here. [] If local codes do not use with clothes dryers. The neutral ground wire is properly grounded. If the dryer is prohibited. Electrical Connection To properly install your dryer, you must determine the type of electrical connection you are in a location where grounding through the neutral...
Use and Care Guide
Page 9
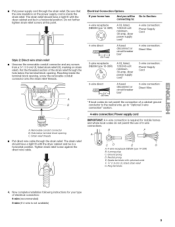
...A fused disconnect or cbiorcxu* it breaker 4-wire connection: Direct Wire 3-wire receptacle (NEMA type 10-30R) A UL listed, 120/240-volt 30-amp, dryer mpoinwimerumsu, pply cord* 3-wire connection: Power Supply Cord 3-wire direct A fused disconnect or cbiorcxu* it breaker 3-wire connection: Direct Wire L!.....B If local codes... Reaching inside the strain relief. Be sure that the wire insulation on strain relief). Put the threaded section of electrical connection: 4-wire (recommended) 3-wire (if 4-wire is required for your home has: And you will be in a horizontal position...
...A fused disconnect or cbiorcxu* it breaker 4-wire connection: Direct Wire 3-wire receptacle (NEMA type 10-30R) A UL listed, 120/240-volt 30-amp, dryer mpoinwimerumsu, pply cord* 3-wire connection: Power Supply Cord 3-wire direct A fused disconnect or cbiorcxu* it breaker 3-wire connection: Direct Wire L!.....B If local codes... Reaching inside the strain relief. Be sure that the wire insulation on strain relief). Put the threaded section of electrical connection: 4-wire (recommended) 3-wire (if 4-wire is required for your home has: And you will be in a horizontal position...
Use and Care Guide
Page 10
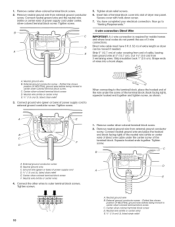
... and tighten screw, as shown. 1= Remove center silver-colored terminal block screw. 2. Strip insulation back 1" (2.5 cm). A. Center silver-colored terminal block screw E Neutral wire (white or center wire... (white or center wire) E. 3/4" (1.9 cm) UL listed strain relief You have 5 ft (1.52 m) of dryer rear panel. Now go to "Venting Requirements." 4-wire connection: Direct Wire IMPORTANT: A 4-... screw of wires into slot of extra length so dryer can be moved if needed. Direct wire cable must have completed your electrical connection. Insert tab of terminal block cover into a...
... and tighten screw, as shown. 1= Remove center silver-colored terminal block screw. 2. Strip insulation back 1" (2.5 cm). A. Center silver-colored terminal block screw E Neutral wire (white or center wire... (white or center wire) E. 3/4" (1.9 cm) UL listed strain relief You have 5 ft (1.52 m) of dryer rear panel. Now go to "Venting Requirements." 4-wire connection: Direct Wire IMPORTANT: A 4-... screw of wires into slot of extra length so dryer can be moved if needed. Direct wire cable must have completed your electrical connection. Insert tab of terminal block cover into a...
Use and Care Guide
Page 11
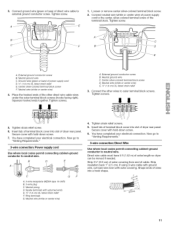
...wire) 4. Insert tab of terminal block cover into a hook shape. 11 Direct wire cable must have 5 ft (1.52 m) of cable. Shape ends of wires into slot of direct wire cable to external ground conductor screw...30R) B. 3-wire plug C. Loosen or remove center silver-colored terminal block screw. 2. Strip insulation back 1" (2.5 cm). Connect neutral wire (white or center wire) of power supply cord to outer ...green or bare) of dryer rear panel. External ground conductor screw B. You have completed your electrical connection. Tighten screw. A. Spade terminals with hold -down screw....
...wire) 4. Insert tab of terminal block cover into a hook shape. 11 Direct wire cable must have 5 ft (1.52 m) of cable. Shape ends of wires into slot of direct wire cable to external ground conductor screw...30R) B. 3-wire plug C. Loosen or remove center silver-colored terminal block screw. 2. Strip insulation back 1" (2.5 cm). Connect neutral wire (white or center wire) of power supply cord to outer ...green or bare) of dryer rear panel. External ground conductor screw B. You have completed your electrical connection. Tighten screw. A. Spade terminals with hold -down screw....
Use and Care Guide
Page 12
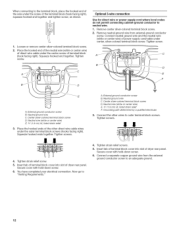
...together. Now go to an adequate ground. 12 Neutral ground wire C. Secure cover with hold -down screw. 6, You have completed your electrical connection. Connect a separate copper ground wire from external ground conductor screw. Place the hooked end of the neutral wire (white or center ...4. Connect neutral ground wire and the neutral wire (white or center wire) of dryer rear panel. A. Neutral wire (white or center wire) E. _" (1.9 cm) UL Iisted strain relief 3, Place the hooked ends of dryer rear panel. Tighten strain relief screw. 5. Insert tab of terminal block cover into ...
...together. Now go to an adequate ground. 12 Neutral ground wire C. Secure cover with hold -down screw. 6, You have completed your electrical connection. Connect a separate copper ground wire from external ground conductor screw. Place the hooked end of the neutral wire (white or center ...4. Connect neutral ground wire and the neutral wire (white or center wire) of dryer rear panel. A. Neutral wire (white or center wire) E. _" (1.9 cm) UL Iisted strain relief 3, Place the hooked ends of dryer rear panel. Tighten strain relief screw. 5. Insert tab of terminal block cover into ...
Use and Care Guide
Page 13
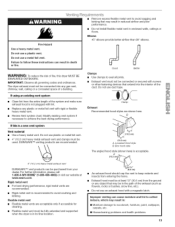
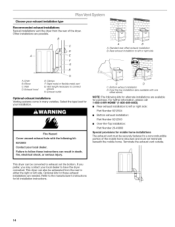
...Exhaust vent must be at www.sears.com. Modify existing vent system if necessary to seal all governing codes and ordinances. If this dryer MUST BE EXHAUSTED OUTDOORS. Rigid metal vent • For best drying performance, rigid metal vents are shown here. Improper venting can... that extend into any object that may be fully extended and supported when the dryer is recommended to woodwork, furniture, paint, wallpaper, carpets, etc. [] Housecleaning problems and health problems. 13 The dryer exhaust must be in the path of a building. Clamp Exhaust Recommended hood styles...
...Exhaust vent must be at www.sears.com. Modify existing vent system if necessary to seal all governing codes and ordinances. If this dryer MUST BE EXHAUSTED OUTDOORS. Rigid metal vent • For best drying performance, rigid metal vents are shown here. Improper venting can... that extend into any object that may be fully extended and supported when the dryer is recommended to woodwork, furniture, paint, wallpaper, carpets, etc. [] Housecleaning problems and health problems. 13 The dryer exhaust must be in the path of a building. Clamp Exhaust Recommended hood styles...
Use and Care Guide
Page 14
... to connect elbows H. Exhaust outlet Optional exhaust installations Venting systems come in death, fire, electrical shock, or serious injury. C D C. Other installations are needed, Refer to the manufacturer's instructions for your local dealer to a noncombustible portion of the dryer. Over-the-top installation (also available with the following kits for alternate installations are...
... to connect elbows H. Exhaust outlet Optional exhaust installations Venting systems come in death, fire, electrical shock, or serious injury. C D C. Other installations are needed, Refer to the manufacturer's instructions for your local dealer to a noncombustible portion of the dryer. Over-the-top installation (also available with the following kits for alternate installations are...
Use and Care Guide
Page 15
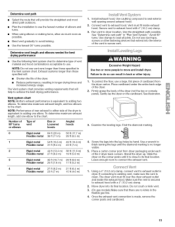
... entire back edge of the dryer. 2. To protect the floor, use a large, flat piece of vent Box or Louvered hoods Angled hoods 0 Rigid metal 64 ft (20 m) 58 ft (17.7 m) Flexible metal 36 ft (11 m) 28 ft (8.5 m) 1 Rigid metal 54 ft (16.5 m) 48 ft (14.6 m) Flexible metal 31 ft (9.4 m) 23 ft (7 m) 2 Rigid metal 44 ft (13.4 m) 38 ft (11.6 m) Flexible metal 27 ft (8.2 m) 19 ft...
... entire back edge of the dryer. 2. To protect the floor, use a large, flat piece of vent Box or Louvered hoods Angled hoods 0 Rigid metal 64 ft (20 m) 58 ft (17.7 m) Flexible metal 36 ft (11 m) 28 ft (8.5 m) 1 Rigid metal 54 ft (16.5 m) 48 ft (14.6 m) Flexible metal 31 ft (9.4 m) 23 ft (7 m) 2 Rigid metal 44 ft (13.4 m) 38 ft (11.6 m) Flexible metal 27 ft (8.2 m) 19 ft...

Use and Care Guide
Page 16
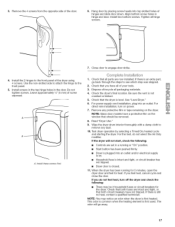
... -side opening . 2. Remove the door assembly 1. It I ---}P_ o 6. B. Lay the door on a flat, protected surface, with the inside of the dryer or work space to back. 5= Remove the 4 plastic plugs located outside the dryer door opening . Cosmetic screw 3. If the dryer is not level, prop up . Door strike B. You can change your door swing from...
... -side opening . 2. Remove the door assembly 1. It I ---}P_ o 6. B. Lay the door on a flat, protected surface, with the inside of the dryer or work space to back. 5= Remove the 4 plastic plugs located outside the dryer door opening . Cosmetic screw 3. If the dryer is not level, prop up . Door strike B. You can change your door swing from...
Use and Care Guide
Page 17
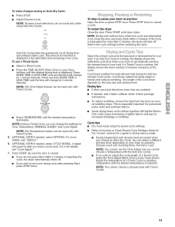
... screws. Check that all of the door. 6= Hang door by selecting a Timed Dry heated cycle and starting the dryer. 3. If you feel for heat. If the dryer will go back through the steps to see which step was skipped. 2. If you have all parts are intact and tight, or ...window that both circuit breakers have a protective film on power. 7. When the dryer has been running or "On" position. • Start button has been pushed firmly. • Dryer is plugged into an outlet and/or electrical supply is closed. 11. Install screws in the top hinge holes in hinge ...
... screws. Check that all of the door. 6= Hang door by selecting a Timed Dry heated cycle and starting the dryer. 3. If you feel for heat. If the dryer will go back through the steps to see which step was skipped. 2. If you have all parts are intact and tight, or ...window that both circuit breakers have a protective film on power. 7. When the dryer has been running or "On" position. • Start button has been pushed firmly. • Dryer is plugged into an outlet and/or electrical supply is closed. 11. Install screws in the top hinge holes in hinge ...
Use and Care Guide
Page 18
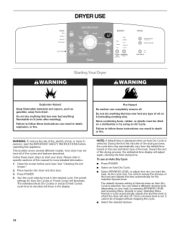
... screen before operating this manual for more detailed information. 1. Press POWER. 4. Turn the cycle selector knob to specific sections of fire, electric shock, or injury to adjust how dry you want the load. Please refer to the desired cycle. Do not dry anything that has ever..., the control senses the dryness of the load. Failure to follow these instructions can result in death or fire. Your dryer may automatically vary from dryer. DRYER USE Explosion Hazard Keep flammable materials and vapors, such as gasoline, away from the default time based on it (including ...
... screen before operating this manual for more detailed information. 1. Press POWER. 4. Turn the cycle selector knob to specific sections of fire, electric shock, or injury to adjust how dry you want the load. Please refer to the desired cycle. Do not dry anything that has ever..., the control senses the dryness of the load. Failure to follow these instructions can result in death or fire. Your dryer may automatically vary from dryer. DRYER USE Explosion Hazard Keep flammable materials and vapors, such as gasoline, away from the default time based on it (including ...
Use and Care Guide
Page 19
...amount of time that is displayed is especially important for a guide to handle and reduces wrinkling. Adjust the temperature of selecting the cycle, the dryer automatically shuts off . For more details, see "Options." 6. (OPTIONAL STEP) If desired, press CYCLE SIGNAL. Be sure the door is ...drying cycle after pressing Start, press STOP twice. Press STOP twice to end your load. Select new cycle settings before restarting the dryer. Select the correct cycle and dryness level or temperature for Time, Temperature, WRINKLE GUARD _ and Cycle Signal. Cool Down tumbles the...
...amount of time that is displayed is especially important for a guide to handle and reduces wrinkling. Adjust the temperature of selecting the cycle, the dryer automatically shuts off . For more details, see "Options." 6. (OPTIONAL STEP) If desired, press CYCLE SIGNAL. Be sure the door is ...drying cycle after pressing Start, press STOP twice. Press STOP twice to end your load. Select new cycle settings before restarting the dryer. Select the correct cycle and dryness level or temperature for Time, Temperature, WRINKLE GUARD _ and Cycle Signal. Cool Down tumbles the...
Use and Care Guide
Page 20
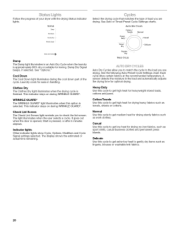
Cool Down The Cool Down light illuminates during the cool down part of your dryer with the drying Status indicator lights. This indicator stays on during WRINKLE GUARD ®. See Auto or Timed Preset Cycle Settings charts. Heavy Duty Use ...
Cool Down The Cool Down light illuminates during the cool down part of your dryer with the drying Status indicator lights. This indicator stays on during WRINKLE GUARD ®. See Auto or Timed Preset Cycle Settings charts. Heavy Duty Use ...
Use and Care Guide
Page 21
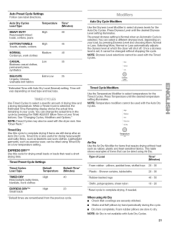
... adjusts the dryness level at which the dryer will vary depending on your cycle. High Medium low Extlslow Air Dry Temperature tabsr__u (,cus Air Dry Use the Air Dry Modifier for the Auto Dry Cycles. Shower curtains, tablecloths 20 - 30 Rubber-backed rugs 40 - 50 Olefin, polypropylene, ...Time Remaining display shows the actual time remaining in the cycle by pressing the TIME ADJUST (More Time or Less Time) buttons. See "Dryer Rack." EXPRESS DRY TM Use this cycle to dry. More Dryness Level Timed Cycle Modifiers Use the Temperature Modifier to select a specific amount ...
... adjusts the dryness level at which the dryer will vary depending on your cycle. High Medium low Extlslow Air Dry Temperature tabsr__u (,cus Air Dry Use the Air Dry Modifier for the Auto Dry Cycles. Shower curtains, tablecloths 20 - 30 Rubber-backed rugs 40 - 50 Olefin, polypropylene, ...Time Remaining display shows the actual time remaining in the cycle by pressing the TIME ADJUST (More Time or Less Time) buttons. See "Dryer Rack." EXPRESS DRY TM Use this cycle to dry. More Dryness Level Timed Cycle Modifiers Use the Temperature Modifier to select a specific amount ...
Use and Care Guide
Page 22
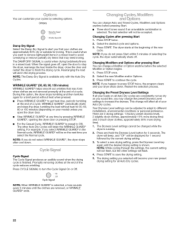
...;to get heat-free, periodic tumbling at the end of a cycle. Promptly removing clothes at any time by pressing WRINKLE GUARD ®, opening the dryer door or pressing STOR • For the Casual Cycle, WRINKLE GUARD ® is preset to remove lightweight items in a mixed load. You can ...WRINKLE GUARD ® in the drying process. Rearranging the load will aid in the Normal cycle, WRINKLE GUARD ®will be changed while the dryer is useful when drying bedsheets/linens in a mixed load to press STOP twice, the program clears and your cycles by the current drying setting....
...;to get heat-free, periodic tumbling at the end of a cycle. Promptly removing clothes at any time by pressing WRINKLE GUARD ®, opening the dryer door or pressing STOR • For the Casual Cycle, WRINKLE GUARD ® is preset to remove lightweight items in a mixed load. You can ...WRINKLE GUARD ® in the drying process. Rearranging the load will aid in the Normal cycle, WRINKLE GUARD ®will be changed while the dryer is useful when drying bedsheets/linens in a mixed load to press STOP twice, the program clears and your cycles by the current drying setting....
Use and Care Guide
Page 23
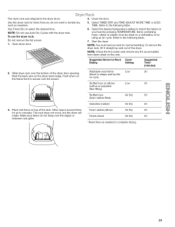
...wet items on a clothesline or by pressing TEMPERATURE. Refer to select the desired time. Use the dryer rack for normal tumbling. Open dryer door. 2. Push clown on the frame front to shape and lay flat on rack) Stuffed toys or pillows Low 30 (cotton or polyester fiber filling) Stuffed toys (foam...50 Tennis shoes Air Dry 20 *Reset time as sweaters. NOTE: Check the lint screen and remove any lint accumulated from items dried on the dryer back ledge. Close the door. 5. NOTE: You must be dried on top of the rack. Use Timed Dry to the following table. 6. ...
...wet items on a clothesline or by pressing TEMPERATURE. Refer to select the desired time. Use the dryer rack for normal tumbling. Open dryer door. 2. Push clown on the frame front to shape and lay flat on rack) Stuffed toys or pillows Low 30 (cotton or polyester fiber filling) Stuffed toys (foam...50 Tennis shoes Air Dry 20 *Reset time as sweaters. NOTE: Check the lint screen and remove any lint accumulated from items dried on the dryer back ledge. Close the door. 5. NOTE: You must be dried on top of the rack. Use Timed Dry to the following table. 6. ...


