Installation Instructions
Page 1
INSTALLATION REQUIRES 2 OR MORE PEOPLE• INSTRUCCIONES DE INSTALACI( )N IMPORTANTE: LEA Y GUARDE ESTAS INSTRUCCIONES. INSTRUCTIONS D'INSTALLATION ..._ , _s p_ LA INSTALACION REQUIERE DE 20 MAS PERSONAS. E L I T E INSTALLATION INSTRUCTIONS IMPORTANT: READ AND SAVE THESE INSTRUCTIONS.
INSTALLATION REQUIRES 2 OR MORE PEOPLE• INSTRUCCIONES DE INSTALACI( )N IMPORTANTE: LEA Y GUARDE ESTAS INSTRUCCIONES. INSTRUCTIONS D'INSTALLATION ..._ , _s p_ LA INSTALACION REQUIERE DE 20 MAS PERSONAS. E L I T E INSTALLATION INSTRUCTIONS IMPORTANT: READ AND SAVE THESE INSTRUCTIONS.
Installation Instructions
Page 2
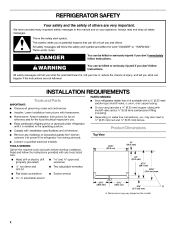
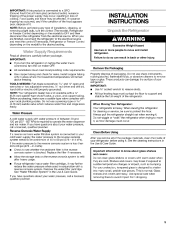
... I _ 2%" (6.7 cm) max. INSTALLATION REQUIREMENTS PARTS NEEDED: • IMPORTANT: Your refrigerator dealer has a kit available with any moldings or decorative panels from kitchen cabinets that prevent the refrigerator from being serviced. Installer: Leave Installation Instructions with homeowner. • Homeowner: Keep Installation Instructions...'s use Keep cardboard shipping piece or plywood under refrigerator until it is the safety alert symbol. This symbol alerts you may vary based on your appliance. REFRIGERATOR SAFETY Your safety and the safety of injury, ...
... I _ 2%" (6.7 cm) max. INSTALLATION REQUIREMENTS PARTS NEEDED: • IMPORTANT: Your refrigerator dealer has a kit available with any moldings or decorative panels from kitchen cabinets that prevent the refrigerator from being serviced. Installer: Leave Installation Instructions with homeowner. • Homeowner: Keep Installation Instructions...'s use Keep cardboard shipping piece or plywood under refrigerator until it is the safety alert symbol. This symbol alerts you may vary based on your appliance. REFRIGERATOR SAFETY Your safety and the safety of injury, ...
Installation Instructions
Page 3
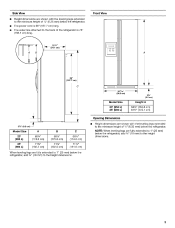
... the leveling legs extended to the minimum height of V4" (6.35 ram) below the refrigerator. The power cord is 78" (198.1 cm)long. Front View 21%" (64.1 cm) ,.= k 66 _' (167.7 cm) C 3511/16,, ]_- (90.6 cm) 3%" (9.2 crn) Model Size 23' (654 L) 25' (694 L) Height A 647/8 ' (164.8 cm) 67%" (172.1...leveling legs are fully extended to 1" (25 mm) below the refrigerator, add %" (19 mm) to the minimum height of V4" (6.35 mm) below the refrigerator, add 3/4" (19 mm) to the back of the refrigerator is 66" (167.7 cm) long. Model Size 23' (654 L} 25' (694 L) When leveling legs are ...
... the leveling legs extended to the minimum height of V4" (6.35 ram) below the refrigerator. The power cord is 78" (198.1 cm)long. Front View 21%" (64.1 cm) ,.= k 66 _' (167.7 cm) C 3511/16,, ]_- (90.6 cm) 3%" (9.2 crn) Model Size 23' (654 L) 25' (694 L) Height A 647/8 ' (164.8 cm) 67%" (172.1...leveling legs are fully extended to 1" (25 mm) below the refrigerator, add %" (19 mm) to the minimum height of V4" (6.35 mm) below the refrigerator, add 3/4" (19 mm) to the back of the refrigerator is 66" (167.7 cm) long. Model Size 23' (654 L} 25' (694 L) When leveling legs are ...
Installation Instructions
Page 4
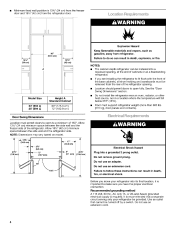
...34 cm) minimum space between the side wall and the refrigerator side. If you have the proper electrical connection. Floor must support refrigerator weight (more than 600 Ibs [272 kg], door panels and contents). • • • Model Size 23' (654 L) 25' (694 L) Height A Standard ...Cabinet 69" (175.3 cm) 72" (182.9 cm) • Door Swing Dimensions Location must be provided. • Minimum fixed wall position is131/4" (34 cm) from thefreezer doorand161/2" (42cm) from refrigerator. 161/2.. (42 cm) (91.5...
...34 cm) minimum space between the side wall and the refrigerator side. If you have the proper electrical connection. Floor must support refrigerator weight (more than 600 Ibs [272 kg], door panels and contents). • • • Model Size 23' (654 L) 25' (694 L) Height A Standard ...Cabinet 69" (175.3 cm) 72" (182.9 cm) • Door Swing Dimensions Location must be provided. • Minimum fixed wall position is131/4" (34 cm) from thefreezer doorand161/2" (42cm) from refrigerator. 161/2.. (42 cm) (91.5...
Installation Instructions
Page 5
... filter cartridge. Important information and covers: to sudden temperature changes or impact, such as floor damage could occur. When Moving Your Refrigerator: Your refrigerator is heavy• When moving it , as bumping. Install copper tubing only in conjunction with a reverse osmosis system. Wa_rPm_um A...model) to remove skids. • All four leveling legs must meet local plumbing code requirements. Do not wiggle or "walk" the refrigerator when trying to refill after heavy usage. If your protection, tempered glass is normal. When you begin. TOOLS NEEDED: Flat-blade ...
... filter cartridge. Important information and covers: to sudden temperature changes or impact, such as floor damage could occur. When Moving Your Refrigerator: Your refrigerator is heavy• When moving it , as bumping. Install copper tubing only in conjunction with a reverse osmosis system. Wa_rPm_um A...model) to remove skids. • All four leveling legs must meet local plumbing code requirements. Do not wiggle or "walk" the refrigerator when trying to refill after heavy usage. If your protection, tempered glass is normal. When you begin. TOOLS NEEDED: Flat-blade ...
Installation Instructions
Page 6
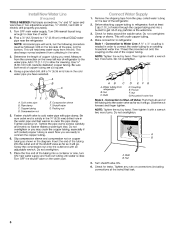
Add 7 ft (2.1 m) to clear line of water. 2. Using a grounded drill, drill a 1/4" (6.35 ram) hole in the diagram. Cold water pipe B. Compression nut J \ E. Tighten packing nut. Do not ... is solidly in the 1/4"(6.35 mm) drilled hole in order to connect the water tubing to 11/4"(3.18 cm) vertical COLD water pipe near the refrigerator. Make connection to connect the copper tubing. G. ...B ...C A B C D E F G x I / | 6. Coupling E, Ferrule _ Nut G Household water line Style 2 - NOTE: Tighten the nut by hand. Now you have selected...HHH...
Add 7 ft (2.1 m) to clear line of water. 2. Using a grounded drill, drill a 1/4" (6.35 ram) hole in the diagram. Cold water pipe B. Compression nut J \ E. Tighten packing nut. Do not ... is solidly in the 1/4"(6.35 mm) drilled hole in order to connect the water tubing to 11/4"(3.18 cm) vertical COLD water pipe near the refrigerator. Make connection to connect the copper tubing. G. ...B ...C A B C D E F G x I / | 6. Coupling E, Ferrule _ Nut G Household water line Style 2 - NOTE: Tighten the nut by hand. Now you have selected...HHH...
Installation Instructions
Page 7
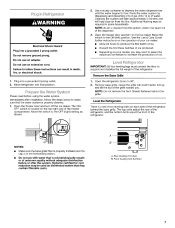
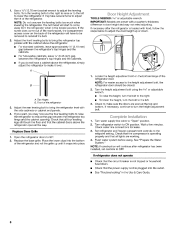
...Move the switch to the OFF (right) setting as shown. Depending on the top right side of ice produced. Remove the Base Grille 1. 2. Move refrigerator into a grounded 3 prong outlet. Lift up and tilt the top of ice. 3. Move the switch to the ON (left) position. Do not ...freezer compartment. Use a sturdy container to depress the water dispenser bar until the water begins to support and stabilize the full weight of the refrigerator. Do not use an extension cord. JJJJ NOTES: Make sure the base grille filter is properly installed and the cap is properly cleaned. 1....
...Move the switch to the OFF (right) setting as shown. Depending on the top right side of ice produced. Remove the Base Grille 1. 2. Move refrigerator into a grounded 3 prong outlet. Lift up and tilt the top of ice. 3. Move the switch to the ON (left) position. Do not ...freezer compartment. Use a sturdy container to depress the water dispenser bar until the water begins to support and stabilize the full weight of the refrigerator. Do not use an extension cord. JJJJ NOTES: Make sure the base grille filter is properly installed and the cap is properly cleaned. 1....
Installation Instructions
Page 8
...up or down. 2. • • 1. Check that the compressor is operating properly and that the circuit breaker is plugged into the bottom of the refrigerator. Flush water system before using the s/16"or adjustable wrench. • • To raise the height, turn the bolt to come out of the ...To lower the height, turn the height adjustment bolt. 1. Adjust the rear leveling bolt to the left to turn the bolt to bring the refrigerator top parallel with the side cabinets or cabinet end panels. Adjust the front leveling bolts to make sure the doors are working. If you may...
...up or down. 2. • • 1. Check that the compressor is operating properly and that the circuit breaker is plugged into the bottom of the refrigerator. Flush water system before using the s/16"or adjustable wrench. • • To raise the height, turn the bolt to come out of the ...To lower the height, turn the height adjustment bolt. 1. Adjust the rear leveling bolt to the left to turn the bolt to bring the refrigerator top parallel with the side cabinets or cabinet end panels. Adjust the front leveling bolts to make sure the doors are working. If you may...


