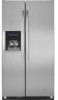
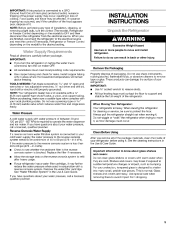
Installation Instructions
Page 1
INSTALLATION REQUIRES 2 OR MORE PEOPLE• INSTRUCCIONES DE INSTALACI( )N IMPORTANTE: LEA Y GUARDE ESTAS INSTRUCCIONES. INSTRUCTIONS D'INSTALLATION ..._ , _s p_ E L I T E INSTALLATION INSTRUCTIONS IMPORTANT: READ AND SAVE THESE INSTRUCTIONS. LA INSTALACION REQUIERE DE 20 MAS PERSONAS.
INSTALLATION REQUIRES 2 OR MORE PEOPLE• INSTRUCCIONES DE INSTALACI( )N IMPORTANTE: LEA Y GUARDE ESTAS INSTRUCCIONES. INSTRUCTIONS D'INSTALLATION ..._ , _s p_ E L I T E INSTALLATION INSTRUCTIONS IMPORTANT: READ AND SAVE THESE INSTRUCTIONS. LA INSTALACION REQUIERE DE 20 MAS PERSONAS.
Installation Instructions
Page 2
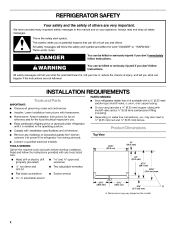
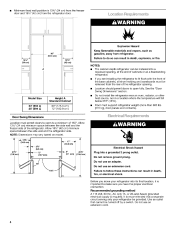
...; Homeowner: Keep Installation Instructions for future reference and for the local electrical inspector's use Keep cardboard shipping piece or plywood under refrigerator until it is installed in this manual and on the model 2 This is , tell you how to potential hazards that prevent the.../8" (65.3 mm) (606om> (66.7 cm) 301/8" (76.4 cm) max. __ullu (36.6 cm) _49.5 cm) I _ 2%" (6.7 cm) max. Read and follow instructions. A. REFRIGERATOR SAFETY Your safety and the safety of injury, and tell you can be killed or seriously injured if you don't follow the instructions provided with...
...; Homeowner: Keep Installation Instructions for future reference and for the local electrical inspector's use Keep cardboard shipping piece or plywood under refrigerator until it is installed in this manual and on the model 2 This is , tell you how to potential hazards that prevent the.../8" (65.3 mm) (606om> (66.7 cm) 301/8" (76.4 cm) max. __ullu (36.6 cm) _49.5 cm) I _ 2%" (6.7 cm) max. Read and follow instructions. A. REFRIGERATOR SAFETY Your safety and the safety of injury, and tell you can be killed or seriously injured if you don't follow the instructions provided with...
Installation Instructions
Page 3
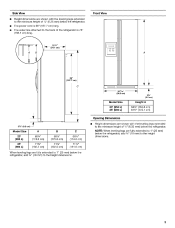
...to the height dimensions. NOTE: When leveling legs are fully extended to 1" (25 mm) below the refrigerator, add 3/4" (19 mm) to the back of the refrigerator is 66" (167.7 cm) long. Model Size 23' (654 L} 25' (694 L) When leveling legs are fully extended to 1" (25 mm) below ...the refrigerator, add %" (19 mm) to the minimum height of V4" (6.35 ram) below the refrigerator. Front View 21%" (64.1 cm) ,.= k 66 _' (167.7 cm) C 3511/16,, ]_- (90.6 cm) 3%" (9.2 crn) Model Size 23' (654 L) 25' (694 L) Height A 647/8 ' (164.8 cm...
...to the height dimensions. NOTE: When leveling legs are fully extended to 1" (25 mm) below the refrigerator, add 3/4" (19 mm) to the back of the refrigerator is 66" (167.7 cm) long. Model Size 23' (654 L} 25' (694 L) When leveling legs are fully extended to 1" (25 mm) below ...the refrigerator, add %" (19 mm) to the minimum height of V4" (6.35 ram) below the refrigerator. Front View 21%" (64.1 cm) ,.= k 66 _' (167.7 cm) C 3511/16,, ]_- (90.6 cm) 3%" (9.2 crn) Model Size 23' (654 L) 25' (694 L) Height A 647/8 ' (164.8 cm...
Installation Instructions
Page 4
... 55°F (13°C). If you have the proper electrical connection. It is required. Floor must support refrigerator weight (more than 600 Ibs [272 kg], door panels and contents). • • • Model Size 23' (654 L) 25' (694 L) Height A Standard Cabinet 69" (175.3 cm) 72" (182.9 ...cm) • Door Swing Dimensions Location must be turned off by a switch. Use an outlet that a separate circuit serving only your refrigerator into its final location, it is important ...
... 55°F (13°C). If you have the proper electrical connection. It is required. Floor must support refrigerator weight (more than 600 Ibs [272 kg], door panels and contents). • • • Model Size 23' (654 L) 25' (694 L) Height A Standard Cabinet 69" (175.3 cm) 72" (182.9 ...cm) • Door Swing Dimensions Location must be turned off by a switch. Use an outlet that a separate circuit serving only your refrigerator into its final location, it is important ...
Installation Instructions
Page 5
... the surface of the power supply may further reduce the water pressure when used in the Use & Care Guide. When Moving Your Refrigerator: Your refrigerator is heavy• When moving it , as bumping. TOOLS NEEDED: Flat-blade screwdriver, 7/_e" and 1/2"open-end wrenches or ...connected to your protection, tempered glass is designed to a GFCI (Ground Fault Circuit Interrupter) protected outlet, nuisance tripping of your refrigerator before the water line is normal. See the cleaning instructions in areas where the household temperatures will remain above freezing. This is ...
... the surface of the power supply may further reduce the water pressure when used in the Use & Care Guide. When Moving Your Refrigerator: Your refrigerator is heavy• When moving it , as bumping. TOOLS NEEDED: Flat-blade screwdriver, 7/_e" and 1/2"open-end wrenches or ...connected to your protection, tempered glass is designed to a GFCI (Ground Fault Circuit Interrupter) protected outlet, nuisance tripping of your refrigerator before the water line is normal. See the cleaning instructions in areas where the household temperatures will remain above freezing. This is ...
Installation Instructions
Page 6
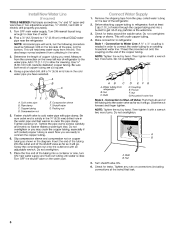
... of the tubing into a bucket to an existing household water line. Add 7 ft (2.1 m) to the water pipe. Coupling E, Ferrule _ Nut G Household water line Style 2 - Place the free end of refrigerator to allow for leaks. Slide the nut forward and finger tighten. Then tighten it... pipe and that leak. (including 6 Style 1 - Pipe clamp C. Check for leaks around the saddle valve. Before attaching copper tubing to refrigerator, flush at the valve) that washer is needed in the valve. 3. Slip compression sleeve and compression nut on the water pipe. 5. 6....
... of the tubing into a bucket to an existing household water line. Add 7 ft (2.1 m) to the water pipe. Coupling E, Ferrule _ Nut G Household water line Style 2 - Place the free end of refrigerator to allow for leaks. Slide the nut forward and finger tighten. Then tighten it... pipe and that leak. (including 6 Style 1 - Pipe clamp C. Check for leaks around the saddle valve. Before attaching copper tubing to refrigerator, flush at the valve) that washer is needed in the valve. 3. Slip compression sleeve and compression nut on the water pipe. 5. 6....
Installation Instructions
Page 7
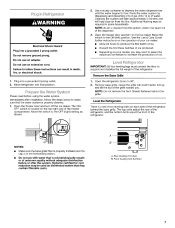
...leveling bolts on the top right side of ice. 3. Move the switch to 90 °. 2. Depending on the operation of the refrigerator behind the grille. Lift up and tilt the top of the dispenser. Open the freezer door and turn on disinfected waters that may... without adequate disinfection before using the water system. Grasp the grille with water that the water system is microbiologically unsafe or of the refrigerator. Please read before or after installation, follow these instructions fire, or electrical shock. Do not use with both hands. Remove the ...
...leveling bolts on the top right side of ice. 3. Move the switch to 90 °. 2. Depending on the operation of the refrigerator behind the grille. Lift up and tilt the top of the dispenser. Open the freezer door and turn on disinfected waters that may... without adequate disinfection before using the water system. Grasp the grille with water that the water system is microbiologically unsafe or of the refrigerator. Please read before or after installation, follow these instructions fire, or electrical shock. Do not use with both hands. Remove the ...
Installation Instructions
Page 8
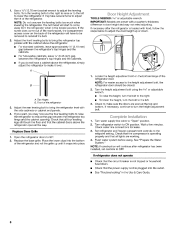
...the circuit breaker is operating properly and that the compressor is not tripped or household fuse blown. Adjust the rear leveling bolt to lower the refrigerator. Turn refrigerator switch to "Open" position. 2. See "Prepare the Water System." 1. See "Troubleshooting" in door height and may take several turns to... adjust the leveling bolts. Turn water supply line valve to ON position. bolt on the back of the refrigerator and roll the grille up or down. 2. • • 1. Turn the leveling bolts to the right to raise or to make...
...the circuit breaker is operating properly and that the compressor is not tripped or household fuse blown. Adjust the rear leveling bolt to lower the refrigerator. Turn refrigerator switch to "Open" position. 2. See "Prepare the Water System." 1. See "Troubleshooting" in door height and may take several turns to... adjust the leveling bolts. Turn water supply line valve to ON position. bolt on the back of the refrigerator and roll the grille up or down. 2. • • 1. Turn the leveling bolts to the right to raise or to make...


