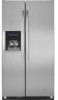
Installation Instructions
Page 1
INSTRUCTIONS D'INSTALLATION ..._ , _s p_ LA INSTALACION REQUIERE DE 20 MAS PERSONAS. INSTALLATION REQUIRES 2 OR MORE PEOPLE• INSTRUCCIONES DE INSTALACI( )N IMPORTANTE: LEA Y GUARDE ESTAS INSTRUCCIONES. E L I T E INSTALLATION INSTRUCTIONS IMPORTANT: READ AND SAVE THESE INSTRUCTIONS.
INSTRUCTIONS D'INSTALLATION ..._ , _s p_ LA INSTALACION REQUIERE DE 20 MAS PERSONAS. INSTALLATION REQUIRES 2 OR MORE PEOPLE• INSTRUCCIONES DE INSTALACI( )N IMPORTANTE: LEA Y GUARDE ESTAS INSTRUCCIONES. E L I T E INSTALLATION INSTRUCTIONS IMPORTANT: READ AND SAVE THESE INSTRUCTIONS.
Installation Instructions
Page 2
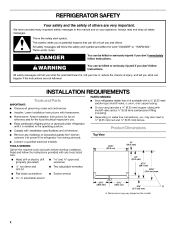
...-type shutoff valve, a union, and copper tubing. INSTALLATION REQUIREMENTS PARTS NEEDED: • IMPORTANT: Your refrigerator dealer has a kit available with shutoff valve and a V4" (6.35 mm) compression fitting (coupling). Installer: Leave Installation Instructions with installation specifications and dimensions. • Remove any tools listed here Hand drill or electric drill (properly grounded) V4" nut driver and drill bit Flat-blade screwdriver 5/16"or adjustable wrench 7/_e" and 1_.,,open-end wrenches Two adjustable...
...-type shutoff valve, a union, and copper tubing. INSTALLATION REQUIREMENTS PARTS NEEDED: • IMPORTANT: Your refrigerator dealer has a kit available with shutoff valve and a V4" (6.35 mm) compression fitting (coupling). Installer: Leave Installation Instructions with installation specifications and dimensions. • Remove any tools listed here Hand drill or electric drill (properly grounded) V4" nut driver and drill bit Flat-blade screwdriver 5/16"or adjustable wrench 7/_e" and 1_.,,open-end wrenches Two adjustable...
Installation Instructions
Page 3
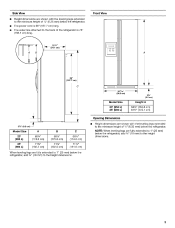
...) 3%" (9.2 crn) Model Size 23' (654 L) 25' (694 L) Height A 647/8 ' (164.8 cm) 67%" (172.1 cm) Opening 35/8 " (6.2 cm) _ Dimensions • A 683/4" (174.6 cm) 713/4" (182.2 cm) B 68%" (175.0 cm) 71%" (182.5 cm) C 681/2" (174.0 cm) 711/2" (181.6 cm) Height dimensions are shown with the leveling legs extended to the back of the refrigerator is 66" (167.7 cm) long. The water line attached to...
...) 3%" (9.2 crn) Model Size 23' (654 L) 25' (694 L) Height A 647/8 ' (164.8 cm) 67%" (172.1 cm) Opening 35/8 " (6.2 cm) _ Dimensions • A 683/4" (174.6 cm) 713/4" (182.2 cm) B 68%" (175.0 cm) 71%" (182.5 cm) C 681/2" (174.0 cm) 711/2" (181.6 cm) Height dimensions are shown with the leveling legs extended to the back of the refrigerator is 66" (167.7 cm) long. The water line attached to...
Installation Instructions
Page 4
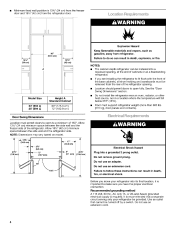
... these instructions fire, or electrical shock. NOTE: Dimensions may vary based on model. or 20-amp fused, grounded electrical supply is important to open fully. Do not use an extension cord. Floor must support refrigerator weight (more than 600 Ibs [272 kg], door panels and contents). • • • Model Size 23' (654 L) 25' (694 L) Height A Standard Cabinet 69" (175.3 cm) 72" (182.9 cm) • Door Swing Dimensions Location must...
... these instructions fire, or electrical shock. NOTE: Dimensions may vary based on model. or 20-amp fused, grounded electrical supply is important to open fully. Do not use an extension cord. Floor must support refrigerator weight (more than 600 Ibs [272 kg], door panels and contents). • • • Model Size 23' (654 L) 25' (694 L) Height A Standard Cabinet 69" (175.3 cm) 72" (182.9 cm) • Door Swing Dimensions Location must...
Installation Instructions
Page 5
... exposed to sudden temperature changes or impact, such as floor damage could occur. NOTE: Before performing any type of installation, cleaning, or removing a light bulb, turn the control (Thermostat, Refrigerator or Freezer Control depending on before you are finished, reconnect the refrigerator to the electrical source and reset the control (Thermostat, Refrigerator or Freezer Control depending on the reverse osmosis system to operate the water dispenser and ice maker. IMPORTANT If you remove all directions carefully before the water line is required...
... exposed to sudden temperature changes or impact, such as floor damage could occur. NOTE: Before performing any type of installation, cleaning, or removing a light bulb, turn the control (Thermostat, Refrigerator or Freezer Control depending on before you are finished, reconnect the refrigerator to the electrical source and reset the control (Thermostat, Refrigerator or Freezer Control depending on the reverse osmosis system to operate the water dispenser and ice maker. IMPORTANT If you remove all directions carefully before the water line is required...
Installation Instructions
Page 6
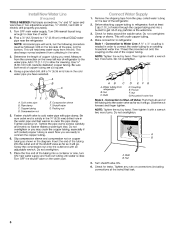
... packing nut. Turn OFF main water supply. G. ...B ...C A B C D E F G x I / | 6. Connection to Water Line: A 114" x V4" coupling is under the pipe clamp. Turn shutoff valve ON. TOOLS NEEDED: Flat-blade screwdriver, 7/16"and 1/2" open-end wrenches or two adjustable wrenches, 1/4" drill bit, hand drill or electric drill (properly grounded). 1. Add 7 ft (2.1 m) to get rid of the shutoff valve as far as shown in the cold water pipe you need. Copper tubing D. Now...
... packing nut. Turn OFF main water supply. G. ...B ...C A B C D E F G x I / | 6. Connection to Water Line: A 114" x V4" coupling is under the pipe clamp. Turn shutoff valve ON. TOOLS NEEDED: Flat-blade screwdriver, 7/16"and 1/2" open-end wrenches or two adjustable wrenches, 1/4" drill bit, hand drill or electric drill (properly grounded). 1. Add 7 ft (2.1 m) to get rid of the shutoff valve as far as shown in the cold water pipe you need. Copper tubing D. Now...
Installation Instructions
Page 7
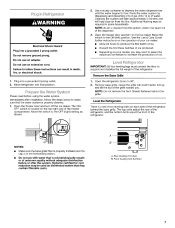
... before using the water system. Open the freezer door and turn off the ice maker. See the Use & Care Guide further instructions on the ice maker. Electrical Shock Hazard Plug into a grounded 3 prong outlet. Failure to 90 °. 2. Plug into a grounded 3 prong outlet. Grasp the grille with water that is properly cleaned. 1. Systems certified for cyst reduction may contain filterable cysts. Move the switch to the OFF (right) setting as shown. Level the Refrigerator...
... before using the water system. Open the freezer door and turn off the ice maker. See the Use & Care Guide further instructions on the ice maker. Electrical Shock Hazard Plug into a grounded 3 prong outlet. Failure to 90 °. 2. Plug into a grounded 3 prong outlet. Grasp the grille with water that is properly cleaned. 1. Systems certified for cyst reduction may contain filterable cysts. Move the switch to the OFF (right) setting as shown. Level the Refrigerator...
Installation Instructions
Page 8
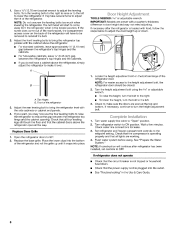
... refrigerator when in the Use & Care Guide. 8 II A. Set refrigerator and freezer compartment controls to the left to adjust the leveling bolts. If necessary after refrigerator has been installed, set controls to come out of the rear bracket, the compartment access cover on the bottom hinge of the bolt, the g ...F -- If you want, you do not have to be closed. 2J Turn the height adjustment bolt using . Replace the base grille. See "Troubleshooting...
... refrigerator when in the Use & Care Guide. 8 II A. Set refrigerator and freezer compartment controls to the left to adjust the leveling bolts. If necessary after refrigerator has been installed, set controls to come out of the rear bracket, the compartment access cover on the bottom hinge of the bolt, the g ...F -- If you want, you do not have to be closed. 2J Turn the height adjustment bolt using . Replace the base grille. See "Troubleshooting...
Installation Instructions
Page 24
only) To purchase a protection agreement (U.S.A.) or maintenance agreement (Canada) on -line for the location of your home-of all major brand appliances, lawn and garden equipment, or heating and cooling systems, no matter who made it, no matter who sold it -yourself. UU. ...replacement parts, accessories and owner's manuals that you need to do-it ! Trademark / Trademark / Service Mark of carry-in items like garage door openers and water heaters. 1-800-4-MY-HOME ® (1-800-469-4663) Call anytime, day or night (U.S.A. and Canada) _,,.sears.com _,,.s_rs.ca Our Home For repair...
only) To purchase a protection agreement (U.S.A.) or maintenance agreement (Canada) on -line for the location of your home-of all major brand appliances, lawn and garden equipment, or heating and cooling systems, no matter who made it, no matter who sold it -yourself. UU. ...replacement parts, accessories and owner's manuals that you need to do-it ! Trademark / Trademark / Service Mark of carry-in items like garage door openers and water heaters. 1-800-4-MY-HOME ® (1-800-469-4663) Call anytime, day or night (U.S.A. and Canada) _,,.sears.com _,,.s_rs.ca Our Home For repair...


