
Use and Care Guide
Page 3
...sufficient time to cool. drawer of injury, and tell you how to reduce the chance of this appliance. Among these instructions for warming up electrical power to the appliance at the circuit breaker or heating up the room. To check if the bracket(s) is in use , do not ...areas are not followed. Wear proper apparelmLoose=fitting or hanging properly installed anti-tip bracket(s) provided with the National Electrical Code ANSI/ Do not store items of tipping, the range oven must be left alone or unattended in the area where appliance is installed properly, remove the lower panel or...
...sufficient time to cool. drawer of injury, and tell you how to reduce the chance of this appliance. Among these instructions for warming up electrical power to the appliance at the circuit breaker or heating up the room. To check if the bracket(s) is in use , do not ...areas are not followed. Wear proper apparelmLoose=fitting or hanging properly installed anti-tip bracket(s) provided with the National Electrical Code ANSI/ Do not store items of tipping, the range oven must be left alone or unattended in the area where appliance is installed properly, remove the lower panel or...
Use and Care Guide
Page 4
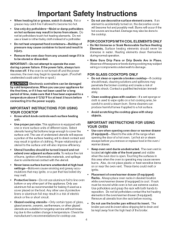
...place oven racks in burns from the rack before moving. • Do not use aluminum foil to line oven bottom or any unused range if it closely. Do not let potholders touch hot heating elements. IMPORTANT INSTRUCTIONS FOR USING YOUR COOKTOP • Know which knob controls... placed on hot surfaces may result in desired location while oven/warmer drawer (if equipped) is equipped with one or more surface units of electric shock. FOR COOKTOPSWITH COIL ELEMENTS ONLY • Do Not immerse or Soak Removable Surface Heating Elements. Contact a qualified technician immediately. •...
...place oven racks in burns from the rack before moving. • Do not use aluminum foil to line oven bottom or any unused range if it closely. Do not let potholders touch hot heating elements. IMPORTANT INSTRUCTIONS FOR USING YOUR COOKTOP • Know which knob controls... placed on hot surfaces may result in desired location while oven/warmer drawer (if equipped) is equipped with one or more surface units of electric shock. FOR COOKTOPSWITH COIL ELEMENTS ONLY • Do Not immerse or Soak Removable Surface Heating Elements. Contact a qualified technician immediately. •...
Use and Care Guide
Page 7
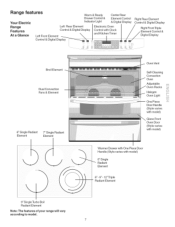
Glass Front Oven Door (Style varies with model) Warmer Drawer with One Piece Door Handle (Style varies with model) ...ii.i...... Range features Warm & Ready Drawer Control & Center Rear Element Control Your Electric Range Features At a Glance Left Front Element Indicator Light & Digital Display Left Rear Element Control & Digital Display Electronic Oven Control with Clock...One Piece Door Handle (Style varies with model) 6" Single Radiant Element 6"- 9"- 12"Triple Radiant Element 9" Single Turbo Boil Radiant Element Note: The features of your range will vary according to model. 7
Glass Front Oven Door (Style varies with model) Warmer Drawer with One Piece Door Handle (Style varies with model) ...ii.i...... Range features Warm & Ready Drawer Control & Center Rear Element Control Your Electric Range Features At a Glance Left Front Element Indicator Light & Digital Display Left Rear Element Control & Digital Display Electronic Oven Control with Clock...One Piece Door Handle (Style varies with model) 6" Single Radiant Element 6"- 9"- 12"Triple Radiant Element 9" Single Turbo Boil Radiant Element Note: The features of your range will vary according to model. 7
Use and Care Guide
Page 32
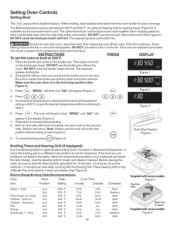
.... turn off the oven. Figure4 ..... If the food you are broiling is not listed in the table, follow the instructions provided in the display (Figure 2). 7. Electric Range Broiling Table Recommendations Food Rack Temp Cook Time Item Position Setting 1st side 2ndside Doneness Steak 1" thick 2nd 2nd Pork Chops 3/4" thick 2nd Chicken - Bone...
.... turn off the oven. Figure4 ..... If the food you are broiling is not listed in the table, follow the instructions provided in the display (Figure 2). 7. Electric Range Broiling Table Recommendations Food Rack Temp Cook Time Item Position Setting 1st side 2ndside Doneness Steak 1" thick 2nd 2nd Pork Chops 3/4" thick 2nd Chicken - Bone...

Use and Care Guide
Page 44
... & Cleaning (cont'd) Removing and Replacing Warmer (Warm & Ready TM) Drawer ""___, in opposite order and manner of removal. Disconnect appliance from the range. Turn power off at the main source. 2. Push the drawer into the drawer cavity until glide levers "click" (approximately 2"). The glass shield can leave... of the drawer with your bare fingers. Wear a leather-faced glove for protection against possible broken glass. 3. Pull the drawer away from electric _power before removing the warmer 2. If you do not hear the glide levers "click" or the drawer does not feel seated remove the...
... & Cleaning (cont'd) Removing and Replacing Warmer (Warm & Ready TM) Drawer ""___, in opposite order and manner of removal. Disconnect appliance from the range. Turn power off at the main source. 2. Push the drawer into the drawer cavity until glide levers "click" (approximately 2"). The glass shield can leave... of the drawer with your bare fingers. Wear a leather-faced glove for protection against possible broken glass. 3. Pull the drawer away from electric _power before removing the warmer 2. If you do not hear the glide levers "click" or the drawer does not feel seated remove the...

Use and Care Guide
Page 45
It may burn easily. Contact your local electric company for service, review this Before You Call checklist. ...ii.i...... Power outage. Check house lights to correct the problem. Check steps under General Care & ... built in the installationinstructionsi,fyou are square and have been used. Carpeting interferes with time. Make sure cord/plug is level and can adequately support range. Irregular glowing effect is not complete. Be sure to use proper cookware. Poor installation. Call your Sears Service Center, installing agent or qualified servicer. e...
It may burn easily. Contact your local electric company for service, review this Before You Call checklist. ...ii.i...... Power outage. Check house lights to correct the problem. Check steps under General Care & ... built in the installationinstructionsi,fyou are square and have been used. Carpeting interferes with time. Make sure cord/plug is level and can adequately support range. Irregular glowing effect is not complete. Be sure to use proper cookware. Poor installation. Call your Sears Service Center, installing agent or qualified servicer. e...

Installation Instructions
Page 1
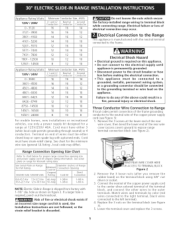
... (76.2 cm) Min. (See Note 3) Min. TOTAL DEPTH WIDTH TO FRONT OF • RANGE IE; CUTOUT WIDTH*** _Countertop and cabinet) 31 5/I6" (79.5 cm) 28 5/I6" (71,9 cm) 30±1/I 6" (76,2±0,15cm) F. pages 1-12 EspaF_ol- iMPORTANT: SAVE FOR LOCAL ELECTRICAL iNSPECTOR'S USE. A. CUTOUT DEPTH " ' G: HEIGHT OF COUNTERTOP 21 3/4" (55,2 cm} Min. 22...
... (76.2 cm) Min. (See Note 3) Min. TOTAL DEPTH WIDTH TO FRONT OF • RANGE IE; CUTOUT WIDTH*** _Countertop and cabinet) 31 5/I6" (79.5 cm) 28 5/I6" (71,9 cm) 30±1/I 6" (76,2±0,15cm) F. pages 1-12 EspaF_ol- iMPORTANT: SAVE FOR LOCAL ELECTRICAL iNSPECTOR'S USE. A. CUTOUT DEPTH " ' G: HEIGHT OF COUNTERTOP 21 3/4" (55,2 cm} Min. 22...

Installation Instructions
Page 4
...1. Observe all packing material from the oven and the drawer compartments before connecting the electrical supply to the "off" position after using a programmable timing operation. installer or service • This range must be Injuryto secured by properly persons could installed anti-tip bracket result. (s) provided... local codes or, in their absence, with the National Electrical Code ANSI/NFPA No. 70--latest edition. Do not install the range over heated surface units, cabinet storage space above the range. rear edge of the range and carefully tilt it ) or by means of all...
...1. Observe all packing material from the oven and the drawer compartments before connecting the electrical supply to the "off" position after using a programmable timing operation. installer or service • This range must be Injuryto secured by properly persons could installed anti-tip bracket result. (s) provided... local codes or, in their absence, with the National Electrical Code ANSI/NFPA No. 70--latest edition. Do not install the range over heated surface units, cabinet storage space above the range. rear edge of the range and carefully tilt it ) or by means of all...
Installation Instructions
Page 5
... must be connected to the grounding terminal or wire lead on the terminal block (see Figure 2). NOTE: Electric Slide-in a fire, personal injury or electrical shock. Risk of the rear wire cover (access cover) upward to expose range terminal connection block (see Figure 3). 5. Match wires and terminals by color (red wires connected to the...
... must be connected to the grounding terminal or wire lead on the terminal block (see Figure 2). NOTE: Electric Slide-in a fire, personal injury or electrical shock. Risk of the rear wire cover (access cover) upward to expose range terminal connection block (see Figure 3). 5. Match wires and terminals by color (red wires connected to the...

Installation Instructions
Page 6
..., use flexible, armored or nonmetallic sheathed copper cable (with the ground screw, using a 3/8" nut driver or socket. 3. Direct Electrical Connection to the Circuit Breaker, Fuse Box or Junction Box If the appliance is connected directly to the center silver-colored terminal of the... Hole. Punch out knockout Figure 3 for 1-3/8" Dia. Remove the ground strap from the terminal block and from Range Conduit Connector (or CSA listed) Figure 5 3-Wire (Grounded Neutral) Electrical System (ExampJe: Junction Box) Punch out knockout for I /8" Dia. Connect the ground wire (green) of the...
..., use flexible, armored or nonmetallic sheathed copper cable (with the ground screw, using a 3/8" nut driver or socket. 3. Direct Electrical Connection to the Circuit Breaker, Fuse Box or Junction Box If the appliance is connected directly to the center silver-colored terminal of the... Hole. Punch out knockout Figure 3 for 1-3/8" Dia. Remove the ground strap from the terminal block and from Range Conduit Connector (or CSA listed) Figure 5 3-Wire (Grounded Neutral) Electrical System (ExampJe: Junction Box) Punch out knockout for I /8" Dia. Connect the ground wire (green) of the...
Installation Instructions
Page 7
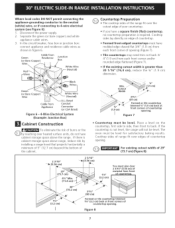
... cable wires as shown in figure 6. Cooktop sides lay directly on the countertop, first side to side, then front to 4-wire electrical system (see Figure 6): 1. Black Green (or Bare Copper) Wire Cable from Appliance White Wire (Neutral) U.L.-listed Conduit Connector (or CSA ... over heated surface units, do not have a square finish (flat) countertop, no countertop preparation is cabinet storage space above the range. If the countertop is greater than 30 1/16" (76,4 cm), reduce the 3A" (1.9 cm) dimension. Figure 8 Separate the green (or bare copper) and white appliance...
... cable wires as shown in figure 6. Cooktop sides lay directly on the countertop, first side to side, then front to 4-wire electrical system (see Figure 6): 1. Black Green (or Bare Copper) Wire Cable from Appliance White Wire (Neutral) U.L.-listed Conduit Connector (or CSA ... over heated surface units, do not have a square finish (flat) countertop, no countertop preparation is cabinet storage space above the range. If the countertop is greater than 30 1/16" (76,4 cm), reduce the 3A" (1.9 cm) dimension. Figure 8 Separate the green (or bare copper) and white appliance...
Installation Instructions
Page 11
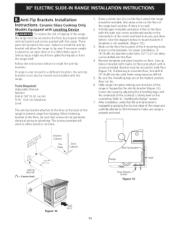
... drilled into place making sure structure of the cooktop is not available. (Figure 12)) 3. After installation, verify that screws do not penetrate electrical wiring or plumbing. Draw a center line (CL) on floor. Mark on the floor the location of the center and back lines you just... mounting holes shown on an open door or if a child climbs upon it flat on the countertop. Slide range into the floor. 4. pilot holes using masonry drill bit. 5. The screws provided will allow the range to locate brackets if template is sitting level on the floor with 4 screws provided.
... drilled into place making sure structure of the cooktop is not available. (Figure 12)) 3. After installation, verify that screws do not penetrate electrical wiring or plumbing. Draw a center line (CL) on floor. Mark on the floor the location of the center and back lines you just... mounting holes shown on an open door or if a child climbs upon it flat on the countertop. Slide range into the floor. 4. pilot holes using masonry drill bit. 5. The screws provided will allow the range to locate brackets if template is sitting level on the floor with 4 screws provided.
Installation Instructions
Page 12
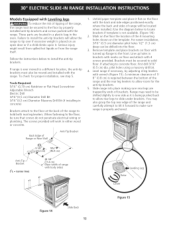
...) (CL = Center line Figure 14 Slide Back 12 Figure 15 Range may also grasp the top rear edge of the range and carefully attempt to tilt it . Tools Required: 5/16" (0,79 cm) Nutdriver or Flat Head Screwdriver Adjustable Wrench Electric Drill 3/16"(0,5 cm) Diameter Drill Bit...mounting holes shown on floor with 4 screws provided. Brackets must be sure that screws do not penetrate electrical wiring or plumbing. Follow the instructions below to slide under brackets. Slide range into the floor. 3. pilot holes using a masonry drill bit. 4. Remove template and place brackets ...
...) (CL = Center line Figure 14 Slide Back 12 Figure 15 Range may also grasp the top rear edge of the range and carefully attempt to tilt it . Tools Required: 5/16" (0,79 cm) Nutdriver or Flat Head Screwdriver Adjustable Wrench Electric Drill 3/16"(0,5 cm) Diameter Drill Bit...mounting holes shown on floor with 4 screws provided. Brackets must be sure that screws do not penetrate electrical wiring or plumbing. Follow the instructions below to slide under brackets. Slide range into the floor. 3. pilot holes using a masonry drill bit. 4. Remove template and place brackets ...


