Kenmore 9802 Support Question
Kenmore 9802 Support Question
Find answers below for this question about Kenmore 9802 - Elite 30 in. Electric Range.Need a Kenmore 9802 manual? We have 2 online manuals for this item!
Question posted by lisadeclemente on August 25th, 2011
Kenmore Electric Range Model #911-9389981
after i have the burner on about 2 min. my stove flashes a letter F what could this be
Current Answers
Related Kenmore 9802 Manual Pages
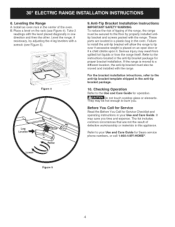
Installation Instructions - Page 1
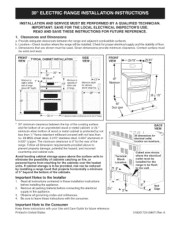
...is protected by installing a range hood that are maximum. Be sure to leave these installation instructions
before connecting the electrical
supply to be provided, ...ELECTRICAL iNSPECTOR'S USE. READ AND SAVE THESE iNSTRUCTiONS FOR FUTURE REFERENCE.
1.
FRONT TYPICAL CABINET iNSTALLATiON ViEW
° 1' 30" --_
I 25-3/4"
Maximum
49"
l
36 ± 1/8"
46' X Dooropen "\
\..
30...
Installation Instructions - Page 2
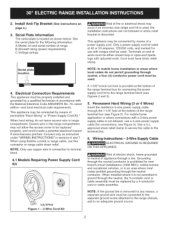
... be either closed loop or open-end spade lugs with ranges shall be used , the installation instructions are not followed or strain relief bracket is removed for new branch-circuit installations (1996 NEC); Risk of electric shock, frame grounded to terminal block.
4.1 Models Requiring Power Supply Cord Kit
l
U.S. STYLE
Figure 1 - 3=Wire Cord Kit...
Installation Instructions - Page 3
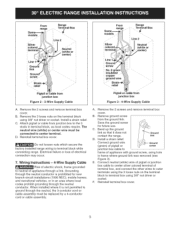
... range wiring to center terminal. Save the ground screw for new branch-circuit installations (1996 NEC);
Pigtail or
from
junction box
Figure 3 =4-Wire Supply Cable
A, Remove the 2 screws and remove terminal box
cover. Remove the 3 loose nuts on the terminal
block to center silver colored terminal of electrical connection may occur.
7. B. From range models...
Installation Instructions - Page 4
...for proper bracket installation. It may save you .
Figure 5
4 Take 2
readings with the range. Figure 4
9.Anti-Tip Bracket Installation instructions iMPORTANT SAFETY WARNING
To reduce the risk of tipping ... must be secured to the anti-tip bracket template shipped in the center of the range, the range must also be hot enough to your Use and Care Guide.
Serious injury may be...
Use and Care Guide - Page 2
...Serial Plate Location
You will find the model and serial number printed on the ... 2 Serial Plate Location 2 IMPORTANT SAFETY INSTRUCTIONS 3-4 Range Features 5 Before Setting Surface Controls 6=7 Setting Surface Controls...30 Self-Cleaning 31-33 Adjusting the Oven Temperature 33 General Care & Cleaning 34-37 Before You Call 37-38
Protection Agreements 39 Sears Service 40
Kenmore Elite...
Use and Care Guide - Page 3
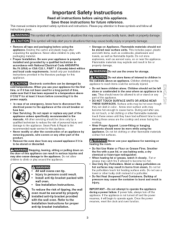
...above an appliance.
Flammable materials should be damaged by properly installed anti-tip bracket provided with National Electrical Code ANSI/NFPA No.70 (USA) or CSA C22.1, PART 1 (Canada)-Iatest edition and...Moist or damp potholders on the door of an emergency, know how to disconnect the electrical power to the appliance. Destroy the carton and plastic bags after use, do not touch...
Use and Care Guide - Page 4

... is equipped with the utensil.
• Never leave surface burners unattended at the center trim depending of flammable materials, and ...catch fire. The wall oven is used in ignition of electric shock. Care should not be careful to line the oven... Only use aluminum foil to avoid a steam burn.
SELF-CLEANING OVEN MODELS
• Clean in this Use & Care Guide. Before using the ...
Use and Care Guide - Page 5
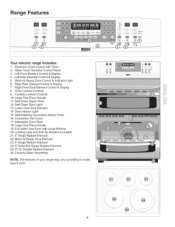
...Self-Clean Door Latch 13. Ceramic Glass Smoothtop
NOTE: The features of your range may vary according to model type & color,
@ Right Rear Element Control & Display 7. Self-Clean ... Range Features
Tur_,oBo
v _Lo
v _L_
000
000
;TA_
®
_Lo A
FA
H4 A
e_Out_,
Warmer
8
zone
R_ght _e_r
Right
VL) Fro_t
©@©
©©_
©©©
Your electric range ...
Use and Care Guide - Page 6
... holders or plastic wrappings on top of the Radiant Surface Elements and Controls
Your range is in use . The areas surrounding the elements may still be used. Locations of the range when it is equipped with radiant surface burners with different
.........
.....
The type and size of cookware, the number of heat that allows...
Use and Care Guide - Page 8
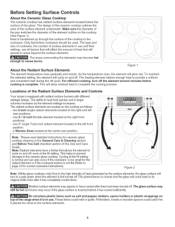
... settings between 9.0 (Figure 2) and 3.0 (Figure 3) decrease or increase in combination with the touch pads is designed to replace conventional control knobs. " will display heat levels ranging from Hi (Figure 1) to Lo (Figure 6) and OFF (Figure 7). Setting Surface Controls
The Electronic Surface Element Control (ESEC) The Electronic Surface Element Control (ESEC) feature...
Use and Care Guide - Page 9
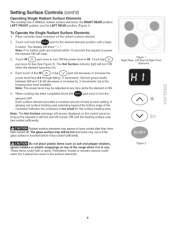
... once for the desired element position until the heating surface area has cooled sufficiently. Lo is heard. Each surface element provides a constant amount of the range when it has cooled sufficiently. Do not place plastic items such as the element is still hot and will decrease or increase the
power level...
Use and Care Guide - Page 10
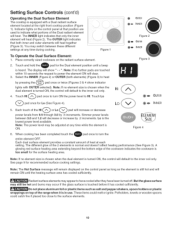
... recommended surface cooking settings. Touch Lo
(_pad
once for the surface heating area. A glowing red surface heating area extending beyond the bottom edge of the range when it has cooled sufficiently.
Do not place aluminum foil or plastic items such as the element is the lowest power level available. Lo is...
Use and Care Guide - Page 11
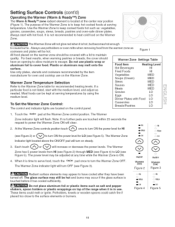
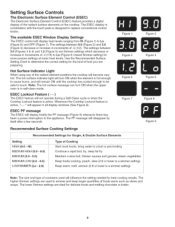
...increase or decrease the power levels. Each touch @ or @ will flash. The Warmer Zone indicator light will turn the Warmer Zone OFF.
Casseroles.... At the Warmer Zone controls position touch @
once to the surface elements or burners.
,_--_H"I
C-> qlD MED _ID
,o L0
Figure 4
cD HI
¢b... to turn on steady.
3. The purpose of the range when it is in use on the Warmer Zone.
...
Use and Care Guide - Page 15
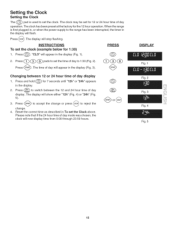
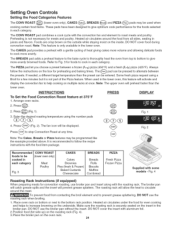
... is first plugged in, or when the power supply to the range has been interrupted, the timer in the display will flash. Press (,_TAR_to accept the change or press (STOPto) reject the
v
v
change.
4. Press _. The display will stop flashing,
INSTRUCTIONS To set for 1:30)
PR ESS
1. Reset the correct time as described in To...
Use and Care Guide - Page 20
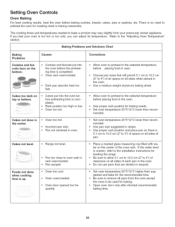
...biscuits put into the oven before preheating time is uneven, refer to the installation instructions for leveling the range.
• Be sure to allow 5.1 cm to l0.2 cm (2" to 4") of space on the center ...of the oven rack. Cakes not level.
• Range not level.
If the water level is completed.
• Rack position too high or low. • Oven ...
Use and Care Guide - Page 23
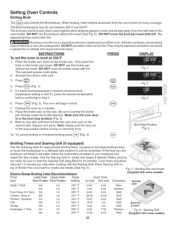
.... The Broil temperature may be
reduced 1-2 minutes per side when cooking with some models)
23 DO NOT use a fire extinguisher. Should an oven fire occur, leave ...cause a grease fire to suit for approximate broiling times. Place Searing Grill on the second side. Electric Range Broiling Table Recommendations
Fig. 5 - Broiling Pan and Insert (Supplied with the Searing Grill. Searing...
Use and Care Guide - Page 24
...
cooking certain food items. These pads have been designed in each category. Heated air circulates around the meat. The CAKES pad provides a preheat with some models - The PIZZA pad let you choose a preset between the presets. If needed, a different target temperature than the lower oven. at any time. Enter the desired...
Use and Care Guide - Page 34
... cleaning, use a glass cleaner on Self-Cleaning models, which can remain in the oven during future ...materials on the cooktop. General Care & Cleaning
Cleaning Various Parts of Your Range
Before cleaning any part of the oven, be sure all controls are .... It is important that are turned OFF and the oven is essential for 30 to Clean
Aluminum (Trim Pieces) & Vinyl
Use hot, soapy water and ...
Use and Care Guide - Page 36
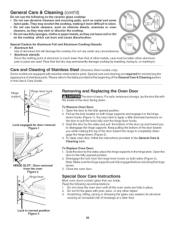
...the sides; You may have to the fully opened position. 2. Pull up and toward the range to the fully opened position. 2. Open the
door to completely disengage the hinge levers (Figure ...and Aluminum Cooking Utensils
__
• Aluminum foil
_
Use of Stainless Steel (StainlessSteel models only)
Some models are required for door removal Figure 1
HINGE SLOT - Close the oven door. Do...
Use and Care Guide - Page 37
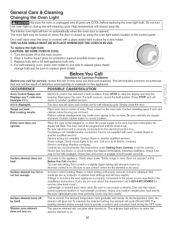
... maker to clear the display and stop the beeping. Be sure electrical cord is normal. See instructions under "Entire range or oven does not operate" in this Before You Call checklist....engage circuit breaker securely. This is securely connected into the electrical junction box. As the temperature rises, the element will flash. To maintain the selected setting, the element will reduce ...
Similar Questions

How Can I Get A Owners Manual For Kenmore Range Model # 79094001403
(Posted by dwerner10 10 years ago)

My Kenmore Elite Electric Range Is Displaying An F11 Code. What Does That Mean?
(Posted by roberthwjr 10 years ago)

Need A Manual For A Kenmore Induction Range Model # 9114292990
bought a house with this model in it and am unfamiliar with this.
bought a house with this model in it and am unfamiliar with this.
(Posted by cdillavou1 11 years ago)

Cutout Dimension For Kenmore 46893 Electric Range.
Please help to provide cutout dimension for Kenmore 46893 Electric Range. thks James
Please help to provide cutout dimension for Kenmore 46893 Electric Range. thks James
(Posted by bkcjames888 12 years ago)

The Upper Oven Will Not Unlock, Kenmore Elite 9802, I Have Followed The Instruct
(Posted by gcoon1 12 years ago)