Kenmore 4102 Support Question
Kenmore 4102 Support Question
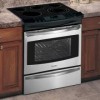
Find answers below for this question about Kenmore 4102 - Elite 30 in. Slide-In Electric Range.Need a Kenmore 4102 manual? We have 2 online manuals for this item!
Question posted by karmie13 on August 15th, 2011
Removing Sabath Mode From Range
Hi we have a kenmore c970-4409 range and it is locked in Sabath mode. How do you unlock it?
Current Answers
Related Kenmore 4102 Manual Pages
Use and Care Guide - Page 2
... year from state to state. Table of Contents
Slide-in RangeWarranty 2 IMPORTANT SAFETY INSTRUCTIONS 3=5 Product Record 5 Protection Agreements 6 Range Features 7 Setting Surface Controls 8-12 Surface Cooking ...& Cleaning 4144
Before you call 45=46
Notes
47
Sears Service 48
Kenmore Elite Warranty When installed, operated and maintained according to all instructions supplied with...
Use and Care Guide - Page 3

... installed anti-tip bracket(s) provided with the National Electrical Code ANSI/
Do not store items of the appliance unless specifically recommended in serious
range. To check if the bracket(s) is engaged.
...the product. drawer of hazards that the anti-tip bracket(s) is installed properly, remove the lower panel or storage drawer
appliance. Both surface and oven heating
elements may...
Use and Care Guide - Page 4
... unused range if it has not been used as recommended for baking if used for a long period of electric shock. FOR COOKTOPSWITH COIL ELEMENTS ONLY
• Do Not immerse or Soak Removable Surface...
unit.
• Use proper pan size. Any other glazed utensils are touched. Absence of electric shock or fire or short circuit.
Touching the surfaces in a risk of these pans or ...
Use and Care Guide - Page 13
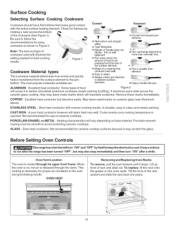
... Flat bottom and straight sides.
• Tight fitting lids.
• Weight of the rack upward and slide the rack back into place.
13 o Curved and warped pan bottoms.
® Pan overhangs element by ...cooking results.
OVEN VENT
Removing and Replacing Oven Racks
To remove, pull the rack forward until it may also stop immediately and then turn "ON" after the range has been turned "OFF",...
Use and Care Guide - Page 16

...Figure 2 Figure 3 Figure 4 Figure 5 Figure 6 Figure 7
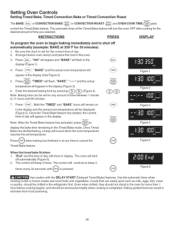
16 When the range is first plugged in, or when the power supply to the range has been interrupted, the timer in the display will appear in the display indicating...set the time of day to set for 1:30) 1. The display will stay in To set the clock (example below for 12 or 24 hour time of day mode was chosen, the clock will now display ...
Use and Care Guide - Page 26
...on
in the display (Figure 3).
6. Eating spoiled food can be removed promptly when cooking is set for the correct time of time you ...timer of day will turn the oven OFF after cooking for 30 minutes)
1. INSTRUCTIONS
PR ESS
DISPLAY
To program the oven ... oven rack(s) and place the food in the Timed Bake mode.
Setting Oven Controls
Setting Timed Bake, Timed Convection Bake or...
Use and Care Guide - Page 32
...3
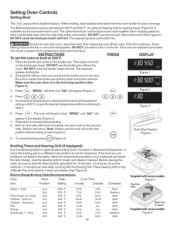
6. Broil on the broiler pan insert. Use the Searing Grill for approximate broiling times. Electric Range Broiling Table Recommendations
Food
Rack
Temp
Cook Time
Item
Position
Setting
1st side
2ndside
Doneness
Steak ...is available via the enclosed mail-in the broil stop position before turning or removing food.
9. Press@@@. If a lower broil temperature is desired (minimum broil ...
Use and Care Guide - Page 41
...cycle or when the rack becomes difficult to slide.
...ii.i...... To remove control knobs, turn all controls are especially ...in the oven during heating that are turned OFF and the range is important that the sides of the oven racks always ...
CLEDAONOR
Gentle scouring with an ammonia-soaked paper towel for 30 to OFF and remove the control knobs. If necessary, cover difficult spots with ...
Use and Care Guide - Page 42
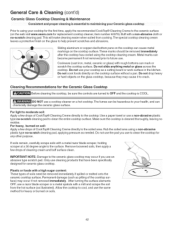
...(cast iron, metal, ceramic or glass) with a metal razor blade scraper, holding scraper at a 30 degree angle to the surface. IMPORTANT NOTE: Damage to the ceramic glass cooktop may occur if you use...Creme to the ceramic surface (on the cooktop surface.
Sliding aluminum or copper clad bottom pans on the cooktop can be removed immediately if spilled or melted onto the
ceramic cooktop surface....
Use and Care Guide - Page 43
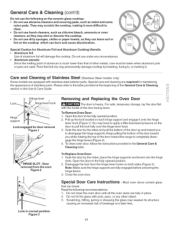
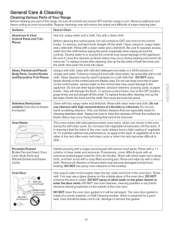
...Removing and Replacing the Oven Door
The door is much lower than that of Stainless Steel (StainlessSteel models only)
Some models are fully engaged before unlocking...Remove Oven Door: 1. Pull up and toward you while rotating the top of the door toward the range ...Hinge lever
J
Hinge lever hook
Hinc
support
_,..,
Lock engaged for door removal Figure 1
HINGE SLOT - For safe, temporary ...
Use and Care Guide - Page 44

... or death. Disconnect appliance from the range. Pull the drawer away from electric _power before removing the warmer
2. The glass shield can...modes
Figure 2
Changing the Oven Light The oven lights will automatically turn ON when the oven door is covered with a glass shield. Turn the power off before cleEalneicntgricaalndSsheorcvkiciHngaztahred wcaarnmeorccdurrawanedr. result
To Remove...
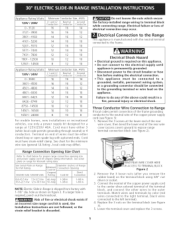
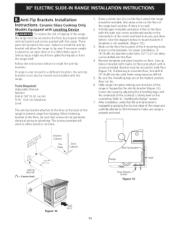
Installation Instructions - Page 1

...),
30"...
28 5/I6" (71,9 cm)
30±1/I 6" (76,2±0,15cm)
F....For existing 29" (73.7 cm) cutout wide opening, you must
30" Min. Shave Raised Edge To Clear
Spacefor 31 5/16"
(81cm... Min. TOTAL DEPTH
WIDTH
TO FRONT OF
•
RANGE
IE; P/N 318201610 (0604) Rev. paginas 13-24...
HEIGHT (Under Cooktop)
B.WIDTH
35 518" (90.5 cm) -
30"
36 518" (93 cm}
(76,2 cm)
Printed in United ...
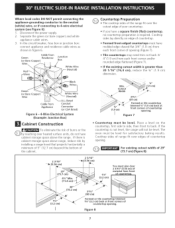
Installation Instructions - Page 3

...counter-top around the cut -out.
Level the range using the four (4)leveling legs so that the uni is... counter.
cabinet measurement by the cooktop glass. Illustration 2 Remove the protective channels on illustration 1).
Before installing the unit,... NOT directly touch the countertop (see illustration 2). Illustration 1
Slide the unit into the cabinet. Make sure the center of...
Installation Instructions - Page 4

..., safe use gasoline or other utensils before connecting the electrical supply to the Consumer Keep these instructions with your range is responsible for Manufactured Home
Installation 1982 (Manufactured Home Sites...WITH SELF-CLEAN FEATURE: • Remove broiler pan, food and other flammable vapors and liquids near this range can result in use your range for the minimum wire size (...
Installation Instructions - Page 5
...(see Figure 3): I /8" dia.
Range Connection Opening Size Chart
Refer to the left terminal).
4.
Remove the 3 loose nuts (after you remove the rubber band) on figure 3....range wiring
while connecting range. Connect the neutral of the copper power supply cord to expose range terminal connection block (see Figure 3).
5.
NOTE: Electric Slide-in a fire, personal injury or electrical...
Installation Instructions - Page 6

... (white) wire
(see Figure 4) on the Cord Mounting Plate.
Remove the 3 loose nuts (after you remove the rubber band) on the terminal block (see Figure 2). 2. Remove the ground strap from the terminal block and from Range
Conduit Connector
(or CSA listed)
Figure 5 3-Wire (Grounded Neutral) Electrical System
(ExampJe: Junction Box) Punch out knockout for I . grounding...
Installation Instructions - Page 7
...of countertop
opening. The oven must be level for satisfactory baking results. If there is greater than 30 1/16" (76,4 cm), reduce the 3A" (1.9 cm) dimension. Figure 7
• ...or CSA listed)
Figure 6 - 4-Wire Electrical System
(Example: Junction Box)
Cabinet Construction
(__
To eliminate the risk of burns or fire
by
installing a range hood that projects horizontally a
minimum of 5"...
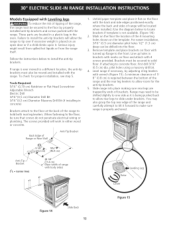
Installation Instructions - Page 8
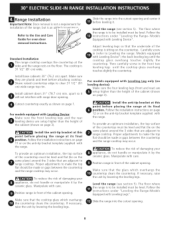
... equipped with range door opening . Position range in the front two leveling legs until the cooktop glass overhang touches slightly the countertop. Range
Installation
Important Note: Door removal is not a requirement for oven door removal instructions. Make sure that the cooktop glass which overhangs the countertop clears the countertop. Install base cabinets 30" (762 cm) apart...
Installation Instructions - Page 11
...Slide range into the floor.
4.
Draw a center line (CL) on floor and attach with marks on the floor where the range should be drilled into place making sure structure of the range... at
the range back position ...to "Levelling the Range" section. 7. ...range...range,
the range...range...range...range...range. Remove template and place bracket on the countertop. Bracket must also be . 6. Lower the range...
Installation Instructions - Page 12
... LeveJJng Jeg_s
To reduce the risk of tipping of range
" with body sides)
(CL = Center line
Figure 14
Slide Back
12
Figure 15
Remove template and place brackets on floor and attach with the range.
You may need to be sure that screws do not penetrate electrical wiring or plumbing. A minimum clearance of 1/ 8" (0.8 cm) is...
Similar Questions

Removing Oven From Cabinet Without Mounting Brackets
How can I remove my elite electric wall oven WITHOUT mounting brackets ever having been installed? I...
How can I remove my elite electric wall oven WITHOUT mounting brackets ever having been installed? I...
(Posted by antybea 9 years ago)
Noisy Range While Cooking
What I would assume is a cooling fan while the oven is on , top elements as well, is now sounding li...
What I would assume is a cooling fan while the oven is on , top elements as well, is now sounding li...
(Posted by kenjcrossley 9 years ago)

How To Remove The Top Off Of A 40 Inch Dual Fuel Kenmore Elite Range
(Posted by Tiffsugar 10 years ago)

Range Door Sharp!
I have a stainless steel range. The stainless wraps around to the side from the front. Once whil...
I have a stainless steel range. The stainless wraps around to the side from the front. Once whil...
(Posted by Kklukes 11 years ago)

I Am Getting An Error Code Eo30 With My Kenmore Elite Slide In Range.
The range has already been replaced once and I am still havingthe same error messagewith the second ...
The range has already been replaced once and I am still havingthe same error messagewith the second ...
(Posted by spletting 14 years ago)