Use and Care Guide
Page 2
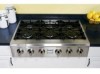
... States Damage to or failure of parts or systems resulting from unauthorized modifications made to this product. 4. Table of Contents Kenmore Appliance Warranty 2 iMPORTANT SAFETY iNSTRUCTiONS 3-4 Protection Agreements 5 Product Record 6 Serial Plate Location 6 Grounding Instructions 6 Liquefied Petroleum (Propane) Gas Conversion 6 Surface Cooking 7 Setting Surface Controls 8-10 General Care & Cleaning 11-14 Before You Call 15 Sears Service Back Cover Kenmore Pro Appliance Warranty One Year Limited Warranty When installed, operated and maintained according to all...
... States Damage to or failure of parts or systems resulting from unauthorized modifications made to this product. 4. Table of Contents Kenmore Appliance Warranty 2 iMPORTANT SAFETY iNSTRUCTiONS 3-4 Protection Agreements 5 Product Record 6 Serial Plate Location 6 Grounding Instructions 6 Liquefied Petroleum (Propane) Gas Conversion 6 Surface Cooking 7 Setting Surface Controls 8-10 General Care & Cleaning 11-14 Before You Call 15 Sears Service Back Cover Kenmore Pro Appliance Warranty One Year Limited Warranty When installed, operated and maintained according to all...

Use and Care Guide
Page 3
... instructions before using the cooktop. This SYmbol Will help alert you cannot reach your gas supplier from a neighbor's phone. do not touch or let clothing or other part of the appliance unless specifically recommended in accordance with packaging material. Sears Parts & Repair is properly installed and grounded by removing panels, wire covers, or any electrical switch; Surface burners may result causing property damage, personal injury or death. Stepping...
... instructions before using the cooktop. This SYmbol Will help alert you cannot reach your gas supplier from a neighbor's phone. do not touch or let clothing or other part of the appliance unless specifically recommended in accordance with packaging material. Sears Parts & Repair is properly installed and grounded by removing panels, wire covers, or any electrical switch; Surface burners may result causing property damage, personal injury or death. Stepping...
Use and Care Guide
Page 4
... not use stove top grills on your warranty). Always turn fan on. Then adjust the flame so it closely. Do not use a towel or other bulky cloth instead of a pot holder. • Do Not Heat Unopened Food Containers--Buildup of pressure may interfere with heat and air distribution, and combustion. Exhaust fan ventilation hoods and grease filters should be blocked from the burner and cause combustion problems. GLASS COOKTOPS (some models...
... not use stove top grills on your warranty). Always turn fan on. Then adjust the flame so it closely. Do not use a towel or other bulky cloth instead of a pot holder. • Do Not Heat Unopened Food Containers--Buildup of pressure may interfere with heat and air distribution, and combustion. Exhaust fan ventilation hoods and grease filters should be blocked from the burner and cause combustion problems. GLASS COOKTOPS (some models...
Use and Care Guide
Page 5
... our pledge: We Service What We Sell. replacement of your covered product takes longer than a million parts and accessories, we have access to ensure that it may require preventive maintenance or repair from a Sears representative on products requiring in -home repair, plus convenient repair scheduling Power surge protection against electrical damage due to help by our 12,000 professional repair specialists I_ Unlimited...
... our pledge: We Service What We Sell. replacement of your covered product takes longer than a million parts and accessories, we have access to ensure that it may require preventive maintenance or repair from a Sears representative on products requiring in -home repair, plus convenient repair scheduling Power surge protection against electrical damage due to help by our 12,000 professional repair specialists I_ Unlimited...
Use and Care Guide
Page 6
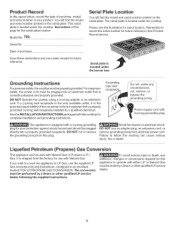
... electrical power cord. Avoid fire hazard or electrical shock. To avoid serious injury or death, any additions, changes or conversions required for this appliance to follow this page for the serial plate location. If a 2-prong wall receptacle is the only available outlet, it is located under the cooktop. DO NOT use the supplied LP Gas conversion kit and instructions, contained in an envelope marked FOR LP/PROPANE GAS CONVERSION...
... electrical power cord. Avoid fire hazard or electrical shock. To avoid serious injury or death, any additions, changes or conversions required for this appliance to follow this page for the serial plate location. If a 2-prong wall receptacle is the only available outlet, it is located under the cooktop. DO NOT use the supplied LP Gas conversion kit and instructions, contained in an envelope marked FOR LP/PROPANE GAS CONVERSION...

Use and Care Guide
Page 7
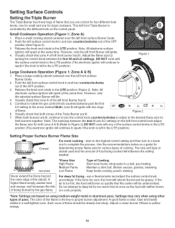
... withstand high heat such as countertops. Preheat your oven. After each use a wok if it is equipped _(/_ with a support ring that does not extend beyond unit. • Specialty pans such as shown in most cookshop or hardware stores. removing. Always use a utensil for best cooking results. Check for 5 minutes on your cooktop are available in Figure 2. Using the Griddle Before first use wire trivets. DO NOT CLEAN GRIDDLE...
... withstand high heat such as countertops. Preheat your oven. After each use a wok if it is equipped _(/_ with a support ring that does not extend beyond unit. • Specialty pans such as shown in most cookshop or hardware stores. removing. Always use a utensil for best cooking results. Check for 5 minutes on your cooktop are available in Figure 2. Using the Griddle Before first use wire trivets. DO NOT CLEAN GRIDDLE...
Use and Care Guide
Page 8
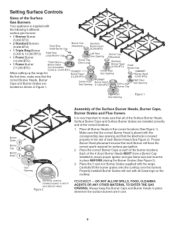
... the range for surface gas ignition. 2. Properly installed Burner Grates will have a Burner Cap installed to make sure that the correct Burner Heads, Burner Caps and Burner Grates are B(1u2r,n2e0r0 HBeTaUd_)I Center Front GasOpening located as shown in slot of each Burner Head (See Figure 2). DO NOT ALLOW SPILLS, FOOD, CLEANING AGENTS OR ANY OTHER MATERIAL TO ENTER THE GAS OPENING. Setting Surface Controls Sizes of the burner locations. Cent (9,500 BTeUa)d SBmuranlel r Cap ar _.,_, "SIMMER" Gas...
... the range for surface gas ignition. 2. Properly installed Burner Grates will have a Burner Cap installed to make sure that the correct Burner Heads, Burner Caps and Burner Grates are B(1u2r,n2e0r0 HBeTaUd_)I Center Front GasOpening located as shown in slot of each Burner Head (See Figure 2). DO NOT ALLOW SPILLS, FOOD, CLEANING AGENTS OR ANY OTHER MATERIAL TO ENTER THE GAS OPENING. Setting Surface Controls Sizes of the burner locations. Cent (9,500 BTeUa)d SBmuranlel r Cap ar _.,_, "SIMMER" Gas...
Use and Care Guide
Page 9
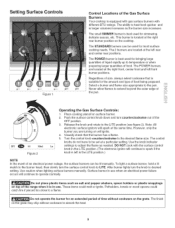
... heat food quicker and in use . Potholders, towels or wood spoons could melt or ignite. Do not operate the burner for the amount and type of size, always select cookware that the burner has a flame. 5. Use the knob indicator Lo settings to the pan. The ability to be set at the left front burner positions. This burner is best used for most surface cooking needs. The POWER burners are turning on surface burner. 2. Select a burner and flame size...
... heat food quicker and in use . Potholders, towels or wood spoons could melt or ignite. Do not operate the burner for the amount and type of size, always select cookware that the burner has a flame. 5. Use the knob indicator Lo settings to the pan. The ability to be set at the left front burner positions. This burner is best used for most surface cooking needs. The POWER burners are turning on surface burner. 2. Select a burner and flame size...
Use and Care Guide
Page 10
... the gas control knob counterclockwise past the first LO setting to the LITE position (Figure 2). pan broiling. Keep foods cooking; use a thermometer and adjust the surface control knob accordingly. Note: All electronic surface ignitors will spark at once as a guide for determining proper flame size for various types of cooking. start on the left in the LITE position). If the fat is yelloworange. 10 Adjust or clean burner if flame is too hot, the...
... the gas control knob counterclockwise past the first LO setting to the LITE position (Figure 2). pan broiling. Keep foods cooking; use a thermometer and adjust the surface control knob accordingly. Note: All electronic surface ignitors will spark at once as a guide for determining proper flame size for various types of cooking. start on the left in the LITE position). If the fat is yelloworange. 10 Adjust or clean burner if flame is too hot, the...
Use and Care Guide
Page 11
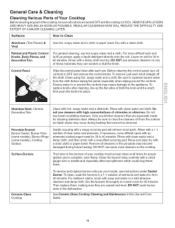
... model, see instructions under Sealed Burner. Then replace them, making sure they can scratch or dull the finish. DO NOT wash burner units in this Use and Care Guide. 11 Dry with hot, soapy water and a dishcloth. Leave on any part of the cooktop, be sure all times for proper ignition and a complete, even flame. Stainless Steel, Chrome Decorative Trim Clean with a clean cloth. Porcelain Enamel Burner Grates, Burner Pans (some models), Burner Rings (some models), Cooktop Surface...
... model, see instructions under Sealed Burner. Then replace them, making sure they can scratch or dull the finish. DO NOT wash burner units in this Use and Care Guide. 11 Dry with hot, soapy water and a dishcloth. Leave on any part of the cooktop, be sure all times for proper ignition and a complete, even flame. Stainless Steel, Chrome Decorative Trim Clean with a clean cloth. Porcelain Enamel Burner Grates, Burner Pans (some models), Burner Rings (some models), Cooktop Surface...
Use and Care Guide
Page 12
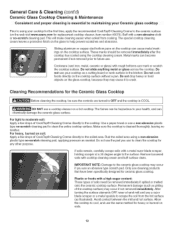
... if not removed prior to your health, and can cause metal markings on the cooktop surface. Use a paper towel or use . if soils remain, carefully scrape soils with cooktop cleaning cream and buff surface clean. For heavy, burned on soil: Apply a few drops of soils need be hazardous to future use a non-abrasive plastic type no =scratch cleaning pad, applying pressure as a cutting board or work surface in the kitchen.
... if not removed prior to your health, and can cause metal markings on the cooktop surface. Use a paper towel or use . if soils remain, carefully scrape soils with cooktop cleaning cream and buff surface clean. For heavy, burned on soil: Apply a few drops of soils need be hazardous to future use a non-abrasive plastic type no =scratch cleaning pad, applying pressure as a cutting board or work surface in the kitchen.
Use and Care Guide
Page 13
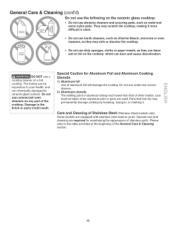
... pans are required for Aluminum Foil and Aluminum Cooking Utensils 1) Aluminum foil Use of stainless parts. They may permanently damage cooktop by breaking, fusing to, or marking it more difficult to your health, and can chemically damage the ceramic-glass surface. Please refer to the finish or parts could result. Damage to the table provided at the beginning of Stainless Steel (Stainless Steel models only) Some models are equipped with stainless steel exterior parts...
... pans are required for Aluminum Foil and Aluminum Cooking Utensils 1) Aluminum foil Use of stainless parts. They may permanently damage cooktop by breaking, fusing to, or marking it more difficult to your health, and can chemically damage the ceramic-glass surface. Please refer to the finish or parts could result. Damage to the table provided at the beginning of Stainless Steel (Stainless Steel models only) Some models are equipped with stainless steel exterior parts...
Use and Care Guide
Page 14
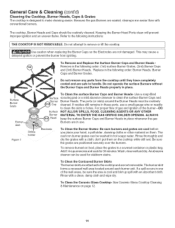
... following order: Burner Heads, Burner Caps and Burner Grates. This may cause a delayed ignition or prevent the burner from the cooktop until they have completely cooled and are in the following instructions: THE COOKTOP IS NOT REMOVABLE. Surface Burner Grate skirt Figure 1 Orifice holder To Remove and Replace the Surface Burner Caps and Burner Heads Remove in a covered container or plastic bag. The cooktop, Burner Heads and Caps should be routinely cleaned. Replace in use a small-gauge wire or needle...
... following order: Burner Heads, Burner Caps and Burner Grates. This may cause a delayed ignition or prevent the burner from the cooktop until they have completely cooled and are in the following instructions: THE COOKTOP IS NOT REMOVABLE. Surface Burner Grate skirt Figure 1 Orifice holder To Remove and Replace the Surface Burner Caps and Burner Heads Remove in a covered container or plastic bag. The cooktop, Burner Heads and Caps should be routinely cleaned. Replace in use a small-gauge wire or needle...
Use and Care Guide
Page 15
...electric ignition models). To avoid this Use & Care Guide. See Setting Surface Controls in and turn the Surface Control knob to LITE until flame turns blue. With the burner off , use cookware with metallic sheen (Ceramic-Glass Cooktop) Surface Control knob has not been completely turned to LITE. Cleaning materials not recommended for ceramic-glass cooktop have been used . See "Ceramic Glass Cooktop Cleaning & Maintenance" section under General Care & Cleaning. Be sure gas supply valve is present after cleaning. Power cord is plugged securely into outlet. Use smooth...
...electric ignition models). To avoid this Use & Care Guide. See Setting Surface Controls in and turn the Surface Control knob to LITE until flame turns blue. With the burner off , use cookware with metallic sheen (Ceramic-Glass Cooktop) Surface Control knob has not been completely turned to LITE. Cleaning materials not recommended for ceramic-glass cooktop have been used . See "Ceramic Glass Cooktop Cleaning & Maintenance" section under General Care & Cleaning. Be sure gas supply valve is present after cleaning. Power cord is plugged securely into outlet. Use smooth...
Installation Instructions
Page 1
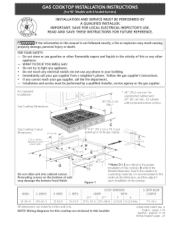
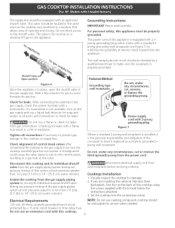
... SAVE THESE INSTRUCTIONS FOR FUTURE REFERENCE. [f the information in inches and (cm). NOTE: Wiring diagrams for this cooktop are stated in this booklet 318201459 (0407) Rev A English - FOR YOUR SAFETY: -- Gas Cooktop Cutout Dimensions 2"(5.1 cm) Dia. do not use gasoline or other * Do not try to light any phone in this manual is recommended to first undercut this or any e[ectrka[ switch; Do...
... SAVE THESE INSTRUCTIONS FOR FUTURE REFERENCE. [f the information in inches and (cm). NOTE: Wiring diagrams for this cooktop are stated in this booklet 318201459 (0407) Rev A English - FOR YOUR SAFETY: -- Gas Cooktop Cutout Dimensions 2"(5.1 cm) Dia. do not use gasoline or other * Do not try to light any phone in this manual is recommended to first undercut this or any e[ectrka[ switch; Do...
Installation Instructions
Page 2
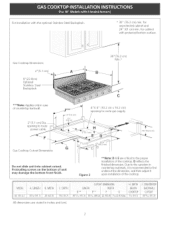
... in case of countertop backwall. 2" (5,1 cm) opening to route power cable. 4"X 4" (10,2 cmx 10,2 cm) pening to first undercut this dimension, and then adjust it upon installation of the cooktop. For Installation with the optional Stainless Steel Backsplash, * 30" (76.2 cm) rain, for cabinet with protected bottom surface. Due to the variation in countertop materials, it is recommended to route gas supply. MODiEI...
... in case of countertop backwall. 2" (5,1 cm) opening to route power cable. 4"X 4" (10,2 cmx 10,2 cm) pening to first undercut this dimension, and then adjust it upon installation of the cooktop. For Installation with the optional Stainless Steel Backsplash, * 30" (76.2 cm) rain, for cabinet with protected bottom surface. Due to the variation in countertop materials, it is recommended to route gas supply. MODiEI...
Installation Instructions
Page 3
.... • Adjust surface burner flame size so it carefully. You will find them in serious injury or death. To Hght a burner, hoJd a tit match to the burner head, then slowly turn the Surface Control knob to the installer 1. IMPORTANT SAFETY INSTRU S Installation of this or any appliance using gas and generating heat, there are being made. Children could result. The electrical power to the cooktop. 3. Read all instructions contained in cabinets above...
.... • Adjust surface burner flame size so it carefully. You will find them in serious injury or death. To Hght a burner, hoJd a tit match to the burner head, then slowly turn the Surface Control knob to the installer 1. IMPORTANT SAFETY INSTRU S Installation of this or any appliance using gas and generating heat, there are being made. Children could result. The electrical power to the cooktop. 3. Read all instructions contained in cabinets above...
Installation Instructions
Page 5
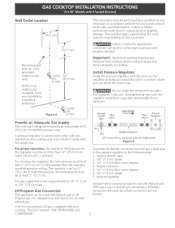
... LP/PROPANEGAS CONVERSION". LP/Propane Gas Conversion This appliance can be used , be no more than the regulator manifold pressure setting. Overtightening may crack the regulator resulting in accordan(e with the supply line. NOTE: If an outlet is not available, have one installed by a qualified service technician in a gas leak and possible fire or explosion. It is designed to cooktop. Important: Remove all local codes and requirements.
... LP/PROPANEGAS CONVERSION". LP/Propane Gas Conversion This appliance can be used , be no more than the regulator manifold pressure setting. Overtightening may crack the regulator resulting in accordan(e with the supply line. NOTE: If an outlet is not available, have one installed by a qualified service technician in a gas leak and possible fire or explosion. It is designed to cooktop. Important: Remove all local codes and requirements.
Installation Instructions
Page 6
... is properly grounded. tsotate the cooktop from gas connections. If you are installing the optional Stainless Steel backsplash, first fix it replaced by a qualified electrician to rub on the gas supply and use a flame to check for leaks. cooktop should be removable for damage. 2. The wall receptacle and circuit should be checked by a properly grounded 3prong wall receptacle. Do not use a liquid leak detector (or soap...
... is properly grounded. tsotate the cooktop from gas connections. If you are installing the optional Stainless Steel backsplash, first fix it replaced by a qualified electrician to rub on the gas supply and use a flame to check for leaks. cooktop should be removable for damage. 2. The wall receptacle and circuit should be checked by a properly grounded 3prong wall receptacle. Do not use a liquid leak detector (or soap...
Installation Instructions
Page 7
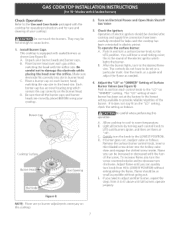
... a guide and adjust tile flame as follows. _Be operation. careful when performing this cooktop. C. _turn the knob to room temperature. Turn on Electrical Power and Open Main Shutoff Gas VaIve Check the Igniters Operation of the electric ignitor which centers the cap correctly on the"LO" setting, check the setting as needed. 4_ Adjust the "LO" or "SIMMER" Setting of tile screw. To operate the surface burner: A. Remove the surface burner control knob, insert a thin-bladed screw driver...
... a guide and adjust tile flame as follows. _Be operation. careful when performing this cooktop. C. _turn the knob to room temperature. Turn on Electrical Power and Open Main Shutoff Gas VaIve Check the Igniters Operation of the electric ignitor which centers the cap correctly on the"LO" setting, check the setting as needed. 4_ Adjust the "LO" or "SIMMER" Setting of tile screw. To operate the surface burner: A. Remove the surface burner control knob, insert a thin-bladed screw driver...


