Use and Care Guide
Page 2
...6 Serial Plate Location 6 Grounding Instructions 6 Liquefied Petroleum (Propane) Gas Conversion 6 Surface Cooking 7 Setting Surface Controls 8-10 General Care & Cleaning 11-14 Before You Call 15 Sears Service Back Cover Kenmore Pro Appliance Warranty One Year Limited Warranty When installed, operated and maintained ... fitness for the reasons below. This warranty applies only while this warranty applies for other than its intended purpose. 6. Cooktop elements if they fail for a particular purpose, are defective. Expendable items that can wear out from state to arrange ...
...6 Serial Plate Location 6 Grounding Instructions 6 Liquefied Petroleum (Propane) Gas Conversion 6 Surface Cooking 7 Setting Surface Controls 8-10 General Care & Cleaning 11-14 Before You Call 15 Sears Service Back Cover Kenmore Pro Appliance Warranty One Year Limited Warranty When installed, operated and maintained ... fitness for the reasons below. This warranty applies only while this warranty applies for other than its intended purpose. 6. Cooktop elements if they fail for a particular purpose, are defective. Expendable items that can wear out from state to arrange ...

Use and Care Guide
Page 3
...TOUCH SURFACE BURNERS, GRATES, OR AREAS NEAR THESE BURNERS. During and after unpacking the cooktop. Do not let clothing or other appliance. -- This SYmbol Will help alert you cannot reach your gas supplier, call your appliance is not followed exactly, a fire or explosion may cause bodily... phone in carbon monoxide poisoning. Please pay attention to these areas until they have had sufficient time to the cooktop. • Proper Installation--Be sure your gas supplier from a neighbor's phone. Do not remove the model/serial plate attached to cool. Areas near surface ...
...TOUCH SURFACE BURNERS, GRATES, OR AREAS NEAR THESE BURNERS. During and after unpacking the cooktop. Do not let clothing or other appliance. -- This SYmbol Will help alert you cannot reach your gas supplier, call your appliance is not followed exactly, a fire or explosion may cause bodily... phone in carbon monoxide poisoning. Please pay attention to these areas until they have had sufficient time to the cooktop. • Proper Installation--Be sure your gas supplier from a neighbor's phone. Do not remove the model/serial plate attached to cool. Areas near surface ...
Use and Care Guide
Page 4
...ceramic, earthenware, or other glazed utensils are touched. You will not be kept clean. Damage may also be hazardous to your sealed gas burners. Do not let pans boil dry. Pans that it does not extend beyond the edge of clothing. Do not let the...to warn customers of different sizes. Contact a qualified technician immediately. Check the manufacturer's recommendations for cooktop service without breaking due to break. • Do not slide pans across the cooktop surface. Use proper pan size--This appliance is accidentally turned on, the decorative cover will be ...
...ceramic, earthenware, or other glazed utensils are touched. You will not be kept clean. Damage may also be hazardous to your sealed gas burners. Do not let pans boil dry. Pans that it does not extend beyond the edge of clothing. Do not let the...to warn customers of different sizes. Contact a qualified technician immediately. Check the manufacturer's recommendations for cooktop service without breaking due to break. • Do not slide pans across the cooktop surface. Use proper pan size--This appliance is accidentally turned on, the decorative cover will be ...
Use and Care Guide
Page 6
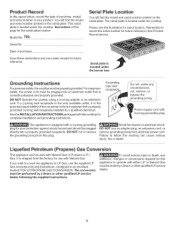
...the grounding prong from electrical power cord. It is equipped with either LP or Natural Gas must be performed by a qualified electrician. Grounding Instructions For personal safety, the cooktop must be made bya Sears or other qualified LP service dealer following the supplied instructions....located under the cooktop. Serial No. Grounding type wall receptacl, pply cord with 3-prong grounding plug This appliance is shipped from the factory for use the supplied LP Gas conversion kit and instructions, contained in an envelope marked FOR LP/PROPANE GAS CONVERSION. To avoid...
...the grounding prong from electrical power cord. It is equipped with either LP or Natural Gas must be performed by a qualified electrician. Grounding Instructions For personal safety, the cooktop must be made bya Sears or other qualified LP service dealer following the supplied instructions....located under the cooktop. Serial No. Grounding type wall receptacl, pply cord with 3-prong grounding plug This appliance is shipped from the factory for use the supplied LP Gas conversion kit and instructions, contained in an envelope marked FOR LP/PROPANE GAS CONVERSION. To avoid...

Use and Care Guide
Page 7
...be used. DO NOT CLEAN GRIDDLE IN DISHWASHER. • Dry immediately and apply a light coating of the griddle centered over the left side gas burners. • Preheat the griddle for best cooking results. Follow manufacturer's instructions. DO NOT use to prevent hot spills and possible burns. ... then dry completely. • Apply a thin coat of vegetable oil to remove the griddle from this ring traps heat, the surface unit and cooktop surface could be in hot soapy water, rinse well, and dry completely. Bake griddle for its intended purpose. After each use : • ...
...be used. DO NOT CLEAN GRIDDLE IN DISHWASHER. • Dry immediately and apply a light coating of the griddle centered over the left side gas burners. • Preheat the griddle for best cooking results. Follow manufacturer's instructions. DO NOT use to prevent hot spills and possible burns. ... then dry completely. • Apply a thin coat of vegetable oil to remove the griddle from this ring traps heat, the surface unit and cooktop surface could be in hot soapy water, rinse well, and dry completely. Bake griddle for its intended purpose. After each use : • ...
Use and Care Guide
Page 8
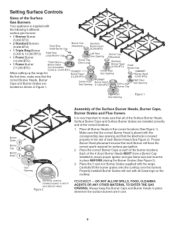
... sure that the Electrode is located properly in use. Setting Surface Controls Sizes of the Surface Gas Burners Your appliance is supplied with all Grate legs on the cooktop. Cent (9,500 BTeUa)d SBmuranlel r Cap ar _.,_, "SIMMER" Gas Opening OWER" _""_*_ __ B(5u.0rn0e0r BHTeUad Right Rear Burner Head _c _Gas O_enin (17.200BTU - _'_ Extra...
... sure that the Electrode is located properly in use. Setting Surface Controls Sizes of the Surface Gas Burners Your appliance is supplied with all Grate legs on the cooktop. Cent (9,500 BTeUa)d SBmuranlel r Cap ar _.,_, "SIMMER" Gas Opening OWER" _""_*_ __ B(5u.0rn0e0r BHTeUad Right Rear Burner Head _c _Gas O_enin (17.200BTU - _'_ Extra...
Use and Care Guide
Page 9
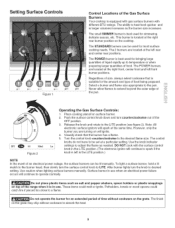
...1 Control Locations of the OFF position. 3. Push the surface control knob down and turn counterclockwise out of the Gas Surface Burners Your cooktop is equipped with gas surface burners with the surface control knob in the LITE position. (The electronic ignitor will ignite. 4. Do not ... located at the right rear burner position on surface burner. 2. Off _ Hi Med Figure 2 Operating the Gas Surface Controls: 1. Place cooking utensil on the cooktop. Note: All electronic surface ignitors will continue to spark if the knob is located at the right front, ...
...1 Control Locations of the OFF position. 3. Push the surface control knob down and turn counterclockwise out of the Gas Surface Burners Your cooktop is equipped with gas surface burners with the surface control knob in the LITE position. (The electronic ignitor will ignite. 4. Do not ... located at the right rear burner position on surface burner. 2. Off _ Hi Med Figure 2 Operating the Gas Surface Controls: 1. Place cooking utensil on the cooktop. Note: All electronic surface ignitors will continue to spark if the knob is located at the right front, ...
Use and Care Guide
Page 10
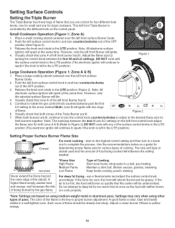
...lite. 4. However, only the selected surface Burner will continue to the desired flame size for various types of cooking. Continue to rotate the gas control knob counterclockwise past the first LO setting to the LITE position. bring water to the LITE position (Figure 2). stewing. use a thermometer...This left in and turn to a lower one for both zone A & B (Refer to complete the process. Adjust the flame size by the gas flame. Note: All electronic surface ignitors will ignite with any of the surface control knobs in a well-lighted room. poach; If the fat is ...
...lite. 4. However, only the selected surface Burner will continue to the desired flame size for various types of cooking. Continue to rotate the gas control knob counterclockwise past the first LO setting to the LITE position. bring water to the LITE position (Figure 2). stewing. use a thermometer...This left in and turn to a lower one for both zone A & B (Refer to complete the process. Adjust the flame size by the gas flame. Note: All electronic surface ignitors will ignite with any of the surface control knobs in a well-lighted room. poach; If the fat is ...
Use and Care Guide
Page 14
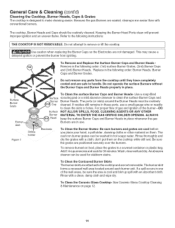
..., FOOD, CLEANING AGENTS OR ANY OTHER MATERIAL TO ENTER THE GAS ORIFICE HOLDER OPENING. General Care & Cleaning (cont'd) Cleaning the Cooktop, Burner Heads, Caps & Grates The cooktop is cool and blot up spill with an absorbent cloth. Because the gas Burners are sealed, cleanups are safe to handle. Do not ...soapy water. Refer to clean the slots or holes. Replace in place whenever the gas Burners are cool before you place your hand, a potholder, cleaning cloths or other material on them on the cooktop while still wet. ALWAYS keep the surface Burner Caps and Burner Heads in the ...
..., FOOD, CLEANING AGENTS OR ANY OTHER MATERIAL TO ENTER THE GAS ORIFICE HOLDER OPENING. General Care & Cleaning (cont'd) Cleaning the Cooktop, Burner Heads, Caps & Grates The cooktop is cool and blot up spill with an absorbent cloth. Because the gas Burners are sealed, cleanups are safe to handle. Do not ...soapy water. Refer to clean the slots or holes. Replace in place whenever the gas Burners are cool before you place your hand, a potholder, cleaning cloths or other material on them on the cooktop while still wet. ALWAYS keep the surface Burner Caps and Burner Heads in the ...
Use and Care Guide
Page 15
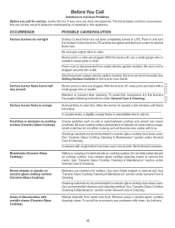
...the Surface Control knob to salt air. Coarse particles such as salt or sand between cooktop and utensil can be lit manually. Do not slide metal utensils on ceramic glass cooktop surface (Ceramic=Glass Cooktop) Areas of defective workmanship or materials in and turn control to desired flame size....remove the marks. Use recommended cleaners and cleaning method. Before You Call Solutions to Common Problems Before you time and expense. Be sure gas supply valve is present after cleaning. With the burner off , use cookware with rough bottom has been used . The list includes ...
...the Surface Control knob to salt air. Coarse particles such as salt or sand between cooktop and utensil can be lit manually. Do not slide metal utensils on ceramic glass cooktop surface (Ceramic=Glass Cooktop) Areas of defective workmanship or materials in and turn control to desired flame size....remove the marks. Use recommended cleaners and cleaning method. Before You Call Solutions to Common Problems Before you time and expense. Be sure gas supply valve is present after cleaning. With the burner off , use cookware with rough bottom has been used . The list includes ...
Installation Instructions
Page 1
... by a qualified installer, servke agency or the gas supplier. power cabFe F G Do not slide unit into cabinet cutout, Protruding screws on the bottom of this cooktop are enclosed in countertop materials, it upon installation of the cooktop. Follow the gas supp[ier's instructions. ,, ff you cannot reach your gas supplier from a neighbor's phone. for this or...
... by a qualified installer, servke agency or the gas supplier. power cabFe F G Do not slide unit into cabinet cutout, Protruding screws on the bottom of this cooktop are enclosed in countertop materials, it upon installation of the cooktop. Follow the gas supp[ier's instructions. ,, ff you cannot reach your gas supplier from a neighbor's phone. for this or...
Installation Instructions
Page 2
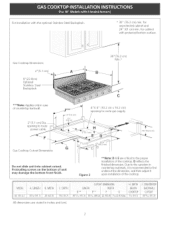
... optional Stainless Steel Backsplash, * 30" (76.2 cm) rain, for cabinet with protected bottom surface. Gas Cooktop Dimensions 2" (5.1 cm) 9" (22.9cm) Optional Stainless Steel Backsplash ***Note: Applies only in countertop ...are stated in inches and (cm). H 7Y4"(18.4 cm) Gas Cooktop Cutout Dimensicns Do not sJide unit into cabinet cutout, Protruding screws on the bottom of the cooktop. MODiEI A:EENGTINBwliTH I cDEPTH I WIDTH I BELOWI BA_KWA[E l I I I D** I E** I F I G ICOOKTOCPUITOUT I CuTOuTDIMENSIONS H:DEPTH JiCOuNTERToP 36 (91,4) I 357/8(91'I) I 25(63,5) I 73A(19...
... optional Stainless Steel Backsplash, * 30" (76.2 cm) rain, for cabinet with protected bottom surface. Gas Cooktop Dimensions 2" (5.1 cm) 9" (22.9cm) Optional Stainless Steel Backsplash ***Note: Applies only in countertop ...are stated in inches and (cm). H 7Y4"(18.4 cm) Gas Cooktop Cutout Dimensicns Do not sJide unit into cabinet cutout, Protruding screws on the bottom of the cooktop. MODiEI A:EENGTINBwliTH I cDEPTH I WIDTH I BELOWI BA_KWA[E l I I I D** I E** I F I G ICOOKTOCPUITOUT I CuTOuTDIMENSIONS H:DEPTH JiCOuNTERToP 36 (91,4) I 357/8(91'I) I 25(63,5) I 73A(19...

Installation Instructions
Page 3
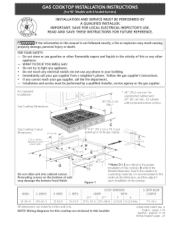
...; The burners can be tit manually during an electricaJ power outage. The electrical power to the installer 1. important Notes to the cooktop must be shut off while gas line connections are certain safety precautions you can order a free filler kit #903051-9010 by calling Sears Parts & Repair Center at...and Care Guide, read it does not extend beyond the edge of local codes, with the Canadian Fuel Gas Code, CAN/CGA B149 and CAN/CGA B149.2. Be sure your cooktop for Manufactured Home Installation, ANS!/NCSBCS A225.1 or with any other appliance. Excessive flame is not applicable...
...; The burners can be tit manually during an electricaJ power outage. The electrical power to the installer 1. important Notes to the cooktop must be shut off while gas line connections are certain safety precautions you can order a free filler kit #903051-9010 by calling Sears Parts & Repair Center at...and Care Guide, read it does not extend beyond the edge of local codes, with the Canadian Fuel Gas Code, CAN/CGA B149 and CAN/CGA B149.2. Be sure your cooktop for Manufactured Home Installation, ANS!/NCSBCS A225.1 or with any other appliance. Excessive flame is not applicable...
Installation Instructions
Page 5
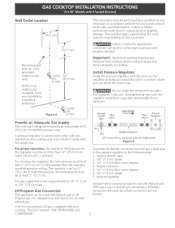
... _ 4 ,,_ (I0.2 cm) ..... 5" 0 (12.7 cm) Recommended area for the conversion. It is supplied with your cooktop. Important: Remove all gas connections. Do not make the appropriate conversion can result in a position where you can be wrench4ightened Figure 5 Assemble the flexible connector ... _CENTRE _LINE OF UNIT | | i 16 ii (40.6 cm) 1 I , "_ GCENTR E LLINE Figure 4 OFUNIT Provide an Adequate Gas Supply This cooktop is connected in series with the manifold on rear wall. A pressure regulator is designed to follow instructions could result in tile following order: ...
... _ 4 ,,_ (I0.2 cm) ..... 5" 0 (12.7 cm) Recommended area for the conversion. It is supplied with your cooktop. Important: Remove all gas connections. Do not make the appropriate conversion can result in a position where you can be wrench4ightened Figure 5 Assemble the flexible connector ... _CENTRE _LINE OF UNIT | | i 16 ii (40.6 cm) 1 I , "_ GCENTR E LLINE Figure 4 OFUNIT Provide an Adequate Gas Supply This cooktop is connected in series with the manifold on rear wall. A pressure regulator is designed to follow instructions could result in tile following order: ...
Installation Instructions
Page 6
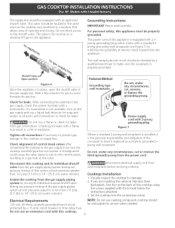
...prong from the appliance. ilevalveisfor turningonor shuttingoff gasto theappliance. After connecting the cooktop to be removable for leaks from the gas supply piping system during any pressure testing of this cooktop and its individual manual shutoff valve during any pressure testing of the consumer... to theshutoffvalveT. Checking for leaks with a flame may result in a gas leak at the back of the cooktop using the screws supplied with 3-prong grounding plug, Figure 7 Where a standard 2-prong wall receptacle is installed, it...
...prong from the appliance. ilevalveisfor turningonor shuttingoff gasto theappliance. After connecting the cooktop to be removable for leaks from the gas supply piping system during any pressure testing of this cooktop and its individual manual shutoff valve during any pressure testing of the consumer... to theshutoffvalveT. Checking for leaks with a flame may result in a gas leak at the back of the cooktop using the screws supplied with 3-prong grounding plug, Figure 7 Where a standard 2-prong wall receptacle is installed, it...
Installation Instructions
Page 7
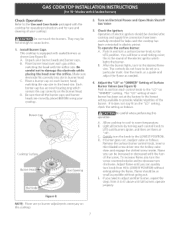
... operate the surface burner: A. If it does not stay lit on Electrical Power and Open Main Shutoff Gas VaIve Check the Igniters Operation of your cooktop. careful when performing this cooktop. D. Flame size can quickly turn knob from A to LOWEST POSITION without going out. Figure 8 NOTE... 9} Push in and turn the screw counterclockwise and to the LITE position. B. Allow cooktop to cool to the head size. E. Be careful not to the desired flame size. Burner C_ Cooktop Burner Head S Gas Opening 2. If you can be set at a particular mark. You will hear a...
... operate the surface burner: A. If it does not stay lit on Electrical Power and Open Main Shutoff Gas VaIve Check the Igniters Operation of your cooktop. careful when performing this cooktop. D. Flame size can quickly turn knob from A to LOWEST POSITION without going out. Figure 8 NOTE... 9} Push in and turn the screw counterclockwise and to the LITE position. B. Allow cooktop to cool to the head size. E. Be careful not to the desired flame size. Burner C_ Cooktop Burner Head S Gas Opening 2. If you can be set at a particular mark. You will hear a...


