
Owners Manual
Page 1
wwwosears.com Part No. CAUTION: Read and follow all safety and operating instructions before first use of this product- CO1ZDDY20UO0-KCO1ZDDYZOUO Printed in Mexico Sears, Roebuck and Co., Hoffman Estates, IL 60179 U.S.A. Owner's Manual ® Vacuum Cleaner Model I16.27514 116.27515 IMPORTANT Before returning this product. Sears Parts and Repair Center (1-800-488-1222) Anytime, day or night (UoS,A, only) For a_p_y_oibeirssue co_Qtact.: Vacuum Cleaner Help Line (1=877-531-7321) 8:00am-5:00pm EST, M-F (US.A_ and Canada) --.-.
wwwosears.com Part No. CAUTION: Read and follow all safety and operating instructions before first use of this product- CO1ZDDY20UO0-KCO1ZDDYZOUO Printed in Mexico Sears, Roebuck and Co., Hoffman Estates, IL 60179 U.S.A. Owner's Manual ® Vacuum Cleaner Model I16.27514 116.27515 IMPORTANT Before returning this product. Sears Parts and Repair Center (1-800-488-1222) Anytime, day or night (UoS,A, only) For a_p_y_oibeirssue co_Qtact.: Vacuum Cleaner Help Line (1=877-531-7321) 8:00am-5:00pm EST, M-F (US.A_ and Canada) --.-.

Owners Manual
Page 2
...Sears store You will help you assemble and operate your new Kenmore vacuum cleaner Model No Serial No_ Date of your new Kenmore vacuum cleaner in a safe place for future reference, Attachments Attachment Use Table Performance Features ........... Before Using Your New Vacuum Cleaner 2 KenmoreVacuum CteanerWarranty .. 3 Important Safety Instructions ......... 4 Parts and Features 5_6 Assembly Instructions ........ 7-8 Pet PowerMate _ Storage Operating Instructions How to record the model number and serial number of Purchase Keep this guide, It will need...
...Sears store You will help you assemble and operate your new Kenmore vacuum cleaner Model No Serial No_ Date of your new Kenmore vacuum cleaner in a safe place for future reference, Attachments Attachment Use Table Performance Features ........... Before Using Your New Vacuum Cleaner 2 KenmoreVacuum CteanerWarranty .. 3 Important Safety Instructions ......... 4 Parts and Features 5_6 Assembly Instructions ........ 7-8 Pet PowerMate _ Storage Operating Instructions How to record the model number and serial number of Purchase Keep this guide, It will need...
Owners Manual
Page 3
... or consequential damages. Sears shall not be product repair as provided herein, implied warranties, including warranties of this vacuum cleaner is not assembled, operated or maintained according to state. A service technician to clean or maintain this product° Disclaimer of parts or systems resulting from state to all instructions supplied with the product. 7. Damage to or failure of this product if it is used in all instructionssuppliedwith...
... or consequential damages. Sears shall not be product repair as provided herein, implied warranties, including warranties of this vacuum cleaner is not assembled, operated or maintained according to state. A service technician to clean or maintain this product° Disclaimer of parts or systems resulting from state to all instructions supplied with the product. 7. Damage to or failure of this product if it is used in all instructionssuppliedwith...
Owners Manual
Page 4
... Always change the dust bag after vacuuming carpet cleaners or freshener, powders and fine dusL These products clog the bag, reduce airflow and can create a fire hazard or explosion. Keep cord away from these substances can cause the bag to bursL Failure to change bag could result in electrical shock or brush suddenly starting Do not leave vacuum cleaner when plugged in this manual Use only wtth Sears recommended attachments. Do not use the vacuum cleaner to pick...
... Always change the dust bag after vacuuming carpet cleaners or freshener, powders and fine dusL These products clog the bag, reduce airflow and can create a fire hazard or explosion. Keep cord away from these substances can cause the bag to bursL Failure to change bag could result in electrical shock or brush suddenly starting Do not leave vacuum cleaner when plugged in this manual Use only wtth Sears recommended attachments. Do not use the vacuum cleaner to pick...
Owners Manual
Page 5
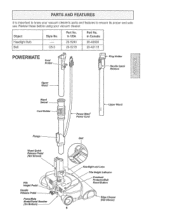
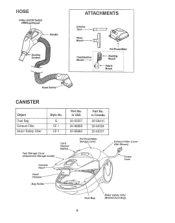
Plug Holder -- in USA Part No. CB-3 20-5240 20-52t8 20-40600 20-4.0I 18 POWERMATE Hotder._..._ _- Cord Holder L -- Upper Wand Flange Wand Quick Release Pedal (Not Shown) Pile Height Pedal Handle Release Pedal PowerMate Model/Serial Number (On Bottom) Belt ]d Lens Pile Height Indicator Protector/Belt Reset Button Edge Cleaner (Not Shown) Handle Quick Release Upper Wand Wand Swivel ,. Review these before using your vacuum cleaner's parts and features to know your vacuum cleaner° Object Style Noo Part No...
Plug Holder -- in USA Part No. CB-3 20-5240 20-52t8 20-40600 20-4.0I 18 POWERMATE Hotder._..._ _- Cord Holder L -- Upper Wand Flange Wand Quick Release Pedal (Not Shown) Pile Height Pedal Handle Release Pedal PowerMate Model/Serial Number (On Bottom) Belt ]d Lens Pile Height Indicator Protector/Belt Reset Button Edge Cleaner (Not Shown) Handle Quick Release Upper Wand Wand Swivel ,. Review these before using your vacuum cleaner's parts and features to know your vacuum cleaner° Object Style Noo Part No...
Owners Manual
Page 6
in USA 20-50557 20-86889 ......20-86883 Part No. in Canada 20-50410 2040324 '20-40'32i Pet PowerMate Storage cover Tool Storage Cover (Attachment Storage inside) Canister Hood Release Bag Holder ExlTaust Filter Cover (Not Shown) Dust Bag Motor Safety Filter (Behind Dust Bag) Flo or Combination Brush Pet PowerMa te Dusting Brush Hose Swivel CANISTER Object Dust Bag Exhaust Filter Motor Safety Filter Style No. HOSE 3-Way On/Off Switch Off/Floor/Carpet ATTACHMENTS Crevice Tool _ (L_._..__J Brush _- Q EF-I CF-I Part No.
in USA 20-50557 20-86889 ......20-86883 Part No. in Canada 20-50410 2040324 '20-40'32i Pet PowerMate Storage cover Tool Storage Cover (Attachment Storage inside) Canister Hood Release Bag Holder ExlTaust Filter Cover (Not Shown) Dust Bag Motor Safety Filter (Behind Dust Bag) Flo or Combination Brush Pet PowerMa te Dusting Brush Hose Swivel CANISTER Object Dust Bag Exhaust Filter Motor Safety Filter Style No. HOSE 3-Way On/Off Switch Off/Floor/Carpet ATTACHMENTS Crevice Tool _ (L_._..__J Brush _- Q EF-I CF-I Part No.
Owners Manual
Page 7
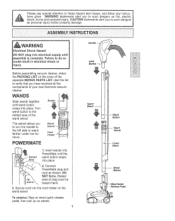
... your new Kenmore vacuum cleaner. Secure cord into the cord holder on wands, Handle _ Lock Button Upper Wand I .. To remove: Step on wand quick release pedal, then pull up on the wand swivel. Swivel -- tsiohnosck, gibvuernns aWndARpNeIrNsGonal stiantjeumrye. WANDS Slide wands together until assembly is complete, Failure to reach farther under few furniture. I m Wand Button Wand Swivel Lower Wand m Quick Release Pedal DO NOT force. Raised area of plug must be toward hand 3. Before assembling vacuum cleaner, check the PACKING LIST...
... your new Kenmore vacuum cleaner. Secure cord into the cord holder on wands, Handle _ Lock Button Upper Wand I .. To remove: Step on wand quick release pedal, then pull up on the wand swivel. Swivel -- tsiohnosck, gibvuernns aWndARpNeIrNsGonal stiantjeumrye. WANDS Slide wands together until assembly is complete, Failure to reach farther under few furniture. I m Wand Button Wand Swivel Lower Wand m Quick Release Pedal DO NOT force. Raised area of plug must be toward hand 3. Before assembling vacuum cleaner, check the PACKING LIST...
Owners Manual
Page 8
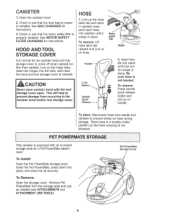
... remove: Press handle quick release button and pull up on handle, To store: Disconnect hose from wands and canister to prevent stress on -board storage area for instructions,, 3, Check to reinstall, storage cover open. Check to prevent damage from the storage area and use as needed . This canister is equipped with an on hose during storage, Store hose in place, Be sure hose is properly installed See MOTOR SAFETY FILTER CHANGING for the canister...
... remove: Press handle quick release button and pull up on handle, To store: Disconnect hose from wands and canister to prevent stress on -board storage area for instructions,, 3, Check to reinstall, storage cover open. Check to prevent damage from the storage area and use as needed . This canister is equipped with an on hose during storage, Store hose in place, Be sure hose is properly installed See MOTOR SAFETY FILTER CHANGING for the canister...
Owners Manual
Page 9
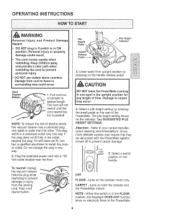
... upright position for any way 2, Plug the polarized power cord into a 120 Volt outlet located near the floor° To rewind: Unplug the vacuum cleaner Hold the plug while rewinding to prevent damage or }niury from cord to the PowerMate. Select a pile height setting by pressing on the handle release pedal t'_;i_;!t t'_/_%_i!!! b OFF FLOOR 5. OFF FLOOR - turns on the indicator See SUGGESTED PILE HEIGHT SETTINGS, Attention: Refer to install...
... upright position for any way 2, Plug the polarized power cord into a 120 Volt outlet located near the floor° To rewind: Unplug the vacuum cleaner Hold the plug while rewinding to prevent damage or }niury from cord to the PowerMate. Select a pile height setting by pressing on the handle release pedal t'_;i_;!t t'_/_%_i!!! b OFF FLOOR 5. OFF FLOOR - turns on the indicator See SUGGESTED PILE HEIGHT SETTINGS, Attention: Refer to install...
Owners Manual
Page 10
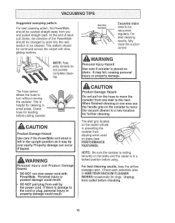
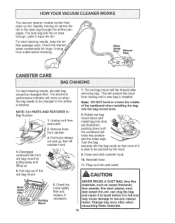
... cleaning in HOWYOUR VACUUM CLEANER WORKS occasionally for clogs Unplug from wall by the power cord. For best cleaning results, fully close the suction control, WARNING Personal Injury Hazard Use care if canister is J helpful for cleaning in the upright position as it may tip over easily. For best cleaning results, keep the airflow passage open, Check each pull stroke, the direction of each assembly area in one area use the handle...
... cleaning in HOWYOUR VACUUM CLEANER WORKS occasionally for clogs Unplug from wall by the power cord. For best cleaning results, fully close the suction control, WARNING Personal Injury Hazard Use care if canister is J helpful for cleaning in the upright position as it may tip over easily. For best cleaning results, keep the airflow passage open, Check each pull stroke, the direction of each assembly area in one area use the handle...
Owners Manual
Page 11
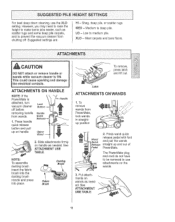
... ATTACHMENT USE TABLE. The PowerMate plug and cord do not have to be removed to use attachments on handle Handle Quick Release._ Upper Wand-- 2. This could cause sparking and damage the electrical contacts. , i,i i ,, i i ATTACHMENTS ON HANDLE NOTE: If the PowerMate is ON. Press wand quick Wand Quick Release release pedal with foot and pull the wands straight up on the wands. 3. See ATTACHMENT USE TABLE, 11 CAUTION DO NOT attach or remove handle or wands while vacuum cleaner is attached, turn vacuum cleaner off before removing handle...
... ATTACHMENT USE TABLE. The PowerMate plug and cord do not have to be removed to use attachments on handle Handle Quick Release._ Upper Wand-- 2. This could cause sparking and damage the electrical contacts. , i,i i ,, i i ATTACHMENTS ON HANDLE NOTE: If the PowerMate is ON. Press wand quick Wand Quick Release release pedal with foot and pull the wands straight up on the wands. 3. See ATTACHMENT USE TABLE, 11 CAUTION DO NOT attach or remove handle or wands while vacuum cleaner is attached, turn vacuum cleaner off before removing handle...
Owners Manual
Page 12
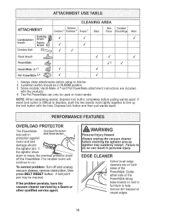
... PowerMate The canister motor will continue to run. EDGE CLEANER Active brush edge cleaners are included NOTE: When separating wands, depress lock button completely before cleaning the agitator area as agitator may be used on hose handle instructions are on fabrics_ 2. 3-position switch should the agitator jam If the agitator slows down or stops, the overload protector shuts off and unplug vacuum cleaner, remove obstruction, then press BELT RESET button. Stairs Dusting Combination brush _ 7" 7" brush Fbraubsrhic I__rt_ 7" t V" Bare CarpEted Floors FlaorslRugs...
... PowerMate The canister motor will continue to run. EDGE CLEANER Active brush edge cleaners are included NOTE: When separating wands, depress lock button completely before cleaning the agitator area as agitator may be used on hose handle instructions are on fabrics_ 2. 3-position switch should the agitator jam If the agitator slows down or stops, the overload protector shuts off and unplug vacuum cleaner, remove obstruction, then press BELT RESET button. Stairs Dusting Combination brush _ 7" 7" brush Fbraubsrhic I__rt_ 7" t V" Bare CarpEted Floors FlaorslRugs...
Owners Manual
Page 13
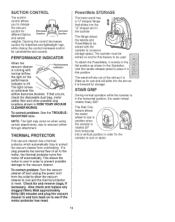
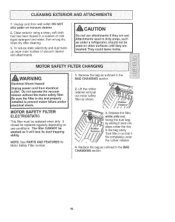
... suction for and remove clogs, if necessary. NOTE: The light may come on whenever the airflow becomes blocked, If that slides into the "U" shaped slot in the canister The flange ailows the wands and PowerMate to see if the motor protector has reset. Also check and replace any clogged filters.Wait approximately thirty (30) minutes and plug the vacuum cleaner in the horizontal position, the caster wheel...
... suction for and remove clogs, if necessary. NOTE: The light may come on whenever the airflow becomes blocked, If that slides into the "U" shaped slot in the canister The flange ailows the wands and PowerMate to see if the motor protector has reset. Also check and replace any clogged filters.Wait approximately thirty (30) minutes and plug the vacuum cleaner in the horizontal position, the caster wheel...
Owners Manual
Page 14
...;Rapidlymovingair carriesthe [[ u.-_ dirt to vacuum cleaner motor. The electronic performance indicator wiEI come on when the bag needs to be pinched by pulling away and lifting up , then lift canister hood. 4. This win prevent the hood from red bag mount by the hood, 9. Reinstall hose. 11, Plug cord into position and the holes align. NOTE: See PARTS AND FEATURES for clogs Unplug/_ U from wall...
...;Rapidlymovingair carriesthe [[ u.-_ dirt to vacuum cleaner motor. The electronic performance indicator wiEI come on when the bag needs to be pinched by pulling away and lifting up , then lift canister hood. 4. This win prevent the hood from red bag mount by the hood, 9. Reinstall hose. 11, Plug cord into position and the holes align. NOTE: See PARTS AND FEATURES for clogs Unplug/_ U from wall...
Owners Manual
Page 15
1, Unplugcordfromwalloutlet,DONOT drip water on vacuum cleaner. 2, Cleanexteriorusinga clean,soft cloth that hasbeendippedin a solutionof mild liquiddetergentand water,then wrungdry Wipedry aftercleaning. 3oTo reducestaticefectricityand dustbuildup,wipeoutersurfaceof vacuumcleaner and attachments CAUTION Do not use attachments if they are wet, Attachments used in dirty areas, such as under a refrigerator, should not be used on other surfaces until they are washed. They could leave marks, _'_ _
1, Unplugcordfromwalloutlet,DONOT drip water on vacuum cleaner. 2, Cleanexteriorusinga clean,soft cloth that hasbeendippedin a solutionof mild liquiddetergentand water,then wrungdry Wipedry aftercleaning. 3oTo reducestaticefectricityand dustbuildup,wipeoutersurfaceof vacuumcleaner and attachments CAUTION Do not use attachments if they are wet, Attachments used in dirty areas, such as under a refrigerator, should not be used on other surfaces until they are washed. They could leave marks, _'_ _
Owners Manual
Page 16
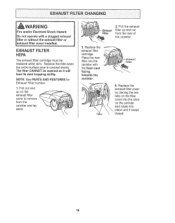
... its dust trapping ability, NOTE: See PARTS AND FEATURES for Exhaust Filter number 1, Pull out and up on the canister and rotate into the canister with a clogged exhaust filter or without the exhaust filter or exhaust filter cover installed. Replace the exhaust filter cover by placing the two tabs on the filter cover into the slots on the exhaust filter cover to remove from the canister and...
... its dust trapping ability, NOTE: See PARTS AND FEATURES for Exhaust Filter number 1, Pull out and up on the canister and rotate into the canister with a clogged exhaust filter or without the exhaust filter or exhaust filter cover installed. Replace the exhaust filter cover by placing the two tabs on the filter cover into the slots on the exhaust filter cover to remove from the canister and...
Owners Manual
Page 17
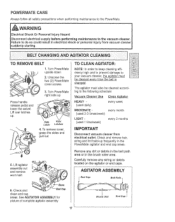
... schedule: Vacuum Cleaner Use Clean Aqitator HEAVY (used daily) every week MODERATE (used 2-3 timestweek) LIGHT (used 1 timelweek) every month every 2 months IMPORTANT Disconnect vacuum cleaner from vacuum cleaner suddenly starting, TO REMOVE BELT 1. See AGITATOR ASSEMBLY for picture of complete agitator assembly. 17 Brush Unit End Cap.I Carefully remove any dirt or debris in the belt path area or in the brush roller area. Remove any string or debris located on the agitator or end caps. Turn PowerMate upside...
... schedule: Vacuum Cleaner Use Clean Aqitator HEAVY (used daily) every week MODERATE (used 2-3 timestweek) LIGHT (used 1 timelweek) every month every 2 months IMPORTANT Disconnect vacuum cleaner from vacuum cleaner suddenly starting, TO REMOVE BELT 1. See AGITATOR ASSEMBLY for picture of complete agitator assembly. 17 Brush Unit End Cap.I Carefully remove any dirt or debris in the belt path area or in the brush roller area. Remove any string or debris located on the agitator or end caps. Turn PowerMate upside...
Owners Manual
Page 19
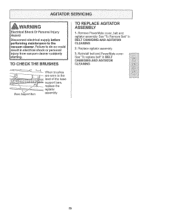
... Remove Belt" in BELT CHANGING AND AGITATOR CLEANING, cover 19 Reinstall belt and PowerMate See "]b replace belt" in BELT CHANGING AND AGITATOR CLEANING 2. Failure to do so could result in electrical shock or personal injury from vacuum cleaner suddenly starting° TO CHECKTHE BRUSHES -_:_z C'_ When brushes __ ur__ Base Support Bars level of the base are worn to the vacuum cleaner. Replace agitator assembly. 3. _WARNING Electrical Shock Or Personal Injury Hazard Disconnect electrical supply before performing maintenance to...
... Remove Belt" in BELT CHANGING AND AGITATOR CLEANING, cover 19 Reinstall belt and PowerMate See "]b replace belt" in BELT CHANGING AND AGITATOR CLEANING 2. Failure to do so could result in electrical shock or personal injury from vacuum cleaner suddenly starting° TO CHECKTHE BRUSHES -_:_z C'_ When brushes __ ur__ Base Support Bars level of the base are worn to the vacuum cleaner. Replace agitator assembly. 3. _WARNING Electrical Shock Or Personal Injury Hazard Disconnect electrical supply before performing maintenance to...
Owners Manual
Page 20
ii_ii!ii ¸:!i!:i
ii_ii!ii ¸:!i!:i
Owners Manual
Page 21
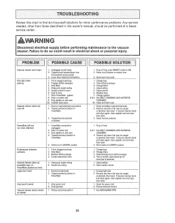
...Sears Canada at your covered product if four or more than promised, [] 10% discount off the regular price of more product failures occur within twelve months. Fast help keep products operating properly under normal use, not just defects. But like all products, it may require preventive maintenance or repair... be fixed, [_ Annual Preventive Maintenance Check at 1-800-3616665, Sears Installation Service For Sears professional installation of your request- Our coverage goes well beyond the product warranty. replacement of home appliances, garage door openers, water heaters,...
...Sears Canada at your covered product if four or more than promised, [] 10% discount off the regular price of more product failures occur within twelve months. Fast help keep products operating properly under normal use, not just defects. But like all products, it may require preventive maintenance or repair... be fixed, [_ Annual Preventive Maintenance Check at 1-800-3616665, Sears Installation Service For Sears professional installation of your request- Our coverage goes well beyond the product warranty. replacement of home appliances, garage door openers, water heaters,...


