Owners Manual
Page 2
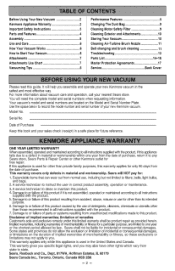
Kenmore Appliance Warranty 2. Parts and Features 4. VacuumingTips 8.. Cleaning Exteriorand Attachments 10 Storing Your Vacuum 1. 0 CleaningAir-Turbine Brush Nozzle 11 Belt changing and brush cleaning 11 Troubleshooting 1. 3 Parts List 1.4-16 Master ProtectionAgreements 17 Service... Date of your nearest Sears store. Damaqeto or failure of remedies Customeris sole and exclusive remedy under this book and your new Kenmore vacuum in a safe place for incidental or consequential damages. Damage to recordthe model number and serial number of Purchase Keep this limitedwarranty ...
Kenmore Appliance Warranty 2. Parts and Features 4. VacuumingTips 8.. Cleaning Exteriorand Attachments 10 Storing Your Vacuum 1. 0 CleaningAir-Turbine Brush Nozzle 11 Belt changing and brush cleaning 11 Troubleshooting 1. 3 Parts List 1.4-16 Master ProtectionAgreements 17 Service... Date of your nearest Sears store. Damaqeto or failure of remedies Customeris sole and exclusive remedy under this book and your new Kenmore vacuum in a safe place for incidental or consequential damages. Damage to recordthe model number and serial number of Purchase Keep this limitedwarranty ...
Owners Manual
Page 3
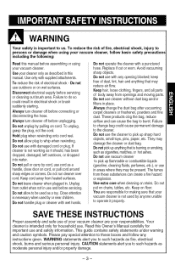
... fire, electrical shock, injury to pick up sharp hard objects,small toys, pins, paper,etc. Always changethe dust bag after vacuuming carpet cleanersor freshener, powdersand fine dust.These productsclog the bag, reduce airflow and can cause the bagto burst. Donot pickup anythingthatis... cord reel. Unplug fromoutlet whennot in place. Keep on cord, or pullcordaround sharpedgesor corners.Donot runcleanerover cord. You are your vacuum cleaner. Failureto do so could cause permanentdamage to the cleaner. Do not allowto be present.Thefumes from openings and movingparts. If...
... fire, electrical shock, injury to pick up sharp hard objects,small toys, pins, paper,etc. Always changethe dust bag after vacuuming carpet cleanersor freshener, powdersand fine dust.These productsclog the bag, reduce airflow and can cause the bagto burst. Donot pickup anythingthatis... cord reel. Unplug fromoutlet whennot in place. Keep on cord, or pullcordaround sharpedgesor corners.Donot runcleanerover cord. You are your vacuum cleaner. Failureto do so could cause permanentdamage to the cleaner. Do not allowto be present.Thefumes from openings and movingparts. If...
Owners Manual
Page 5
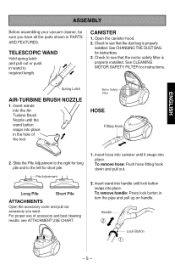
... and pull out or push in the hole of accessory and best cleaning results, see ATTACHMENT USE CHART. 2. Check to required length. Insert hose into canister until lock button snaps into place. Insert wand into handle until it snaps into place in wand to see that the motor safety filter is... handle: Press lock button in PARTS AND FEATURES. Check to the left for instructions. Safety Filter Motor _, i ;_ i ' HOSE Fitting 2. Spring Latch AIR-TURBINE BRUSH NOZZLE 1. CANISTER 1. To remove hose: Push hose fitting hook down and pull out. Before assembling your...
... and pull out or push in the hole of accessory and best cleaning results, see ATTACHMENT USE CHART. 2. Check to required length. Insert hose into canister until lock button snaps into place. Insert wand into handle until it snaps into place in wand to see that the motor safety filter is... handle: Press lock button in PARTS AND FEATURES. Check to the left for instructions. Safety Filter Motor _, i ;_ i ' HOSE Fitting 2. Spring Latch AIR-TURBINE BRUSH NOZZLE 1. CANISTER 1. To remove hose: Push hose fitting hook down and pull out. Before assembling your...
Owners Manual
Page 6
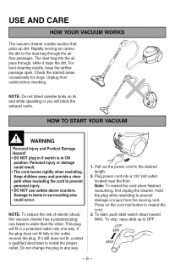
...outlet only one blade is in if switch is wider than the other. To start, push slide switch down toward MAX. NOTE: Do not stand canister body on the cord reel button to the desired length. 2. Keep children away and provide a clear path when rewinding the cord to prevent personal injury...checking. For best cleaning results, keep the airflow passage open. Damage to items in any way. NOTE: To reduce the risk of electric shock, this vacuum cleaner has a polarized plug; Do not change the plug in surrounding area could result. • The cord moves rapidly when rewinding. USE AND CARE ...
...outlet only one blade is in if switch is wider than the other. To start, push slide switch down toward MAX. NOTE: Do not stand canister body on the cord reel button to the desired length. 2. Keep children away and provide a clear path when rewinding the cord to prevent personal injury...checking. For best cleaning results, keep the airflow passage open. Damage to items in any way. NOTE: To reduce the risk of electric shock, this vacuum cleaner has a polarized plug; Do not change the plug in surrounding area could result. • The cord moves rapidly when rewinding. USE AND CARE ...
Owners Manual
Page 8
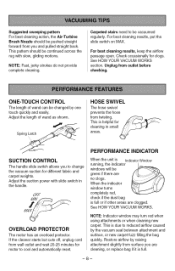
... twisting. ONE-TOUCH CONTROL The length of wand as shown. PERFORMANCE INDICATOR When the unit is due to reduced airflow caused by the vacuum seal between attachment and surface, or new carpet fuzz filling the bag quickly. Restore airflow by one touch quickly and easily. NOTE: ... are no clogs. Suggesteswdeeping pattern For best cleaning action, the Air-Turbine Brush Nozzle should be vacuumed regularly. This pattern should be pushed straight forward from you to change the vacuum suction for different fabric and carpet weights. For best cleaning results, put the slide switch on ...
... twisting. ONE-TOUCH CONTROL The length of wand as shown. PERFORMANCE INDICATOR When the unit is due to reduced airflow caused by the vacuum seal between attachment and surface, or new carpet fuzz filling the bag quickly. Restore airflow by one touch quickly and easily. NOTE: ... are no clogs. Suggesteswdeeping pattern For best cleaning action, the Air-Turbine Brush Nozzle should be vacuumed regularly. This pattern should be pushed straight forward from you to change the vacuum suction for different fabric and carpet weights. For best cleaning results, put the slide switch on ...
Owners Manual
Page 9
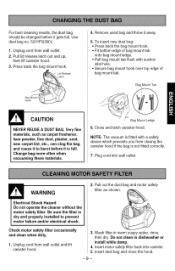
...throw it is full. NOTE: The vacuum is fitted with suction inlet hole. • Secure bag mount hook over top edge of bag mount tab. Insert dust bag and close the hood. Unplug cord from wall outlet and lift canister hood. 2. Close and latch canister hood. WARNING Electrical Shock Hazard Do ...edge of bag mount tab onto bag mount ledge. • Pull bag mount tab flush with a safety device which prevents you from closing the canister hood if the bag is dry and properly installed to burst before it gets full. Check motor safety filter occasionally and clean when dirty. 1. ...
...throw it is full. NOTE: The vacuum is fitted with suction inlet hole. • Secure bag mount hook over top edge of bag mount tab. Insert dust bag and close the hood. Unplug cord from wall outlet and lift canister hood. 2. Close and latch canister hood. WARNING Electrical Shock Hazard Do ...edge of bag mount tab onto bag mount ledge. • Pull bag mount tab flush with a safety device which prevents you from closing the canister hood if the bag is dry and properly installed to burst before it gets full. Check motor safety filter occasionally and clean when dirty. 1. ...
Owners Manual
Page 10
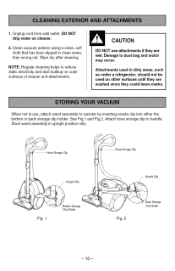
...See Fig.1 and Fig.2. Fig. 1 7 Nozzle Clip Fig. 2 Back Storage Clip Holder -10- Damage to handle. Wipe dry after cleaning. Clean vacuum exterior using a clean, soft cloth that has been dipped in use attachments if they are washed since they are wet. NOTE: Regular cleaning helps to... reduce static electricity and dust buildup on outer surfaces of cleaner and attachments. _I_ CAUTION DO NOT use , attach wand assembly to canister by inserting nozzle clip into either the bottom or back storage clip holder. Store wand assembly in dirty areas, such as under a ...
...See Fig.1 and Fig.2. Fig. 1 7 Nozzle Clip Fig. 2 Back Storage Clip Holder -10- Damage to handle. Wipe dry after cleaning. Clean vacuum exterior using a clean, soft cloth that has been dipped in use attachments if they are washed since they are wet. NOTE: Regular cleaning helps to... reduce static electricity and dust buildup on outer surfaces of cleaner and attachments. _I_ CAUTION DO NOT use , attach wand assembly to canister by inserting nozzle clip into either the bottom or back storage clip holder. Store wand assembly in dirty areas, such as under a ...
Owners Manual
Page 15
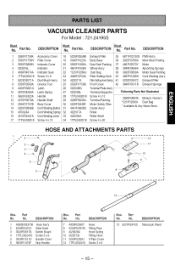
...- Part No. Part No. DESCRIPTION 1 AEM30953708 Hose Ass'y 2 4940FI3431A Slide Knob 3 3800FI3617B Switch Board 4 1TPL0302416 Screw 3 x 8 5 3550FI1511D Handle Cover 6 3650FI1474F Grip Handle Illus. Part No. VACUUM CLEANER PARTS For Model • 721.24195S Illust. No. DESCRIPTION No. Part No.
...- Part No. Part No. DESCRIPTION 1 AEM30953708 Hose Ass'y 2 4940FI3431A Slide Knob 3 3800FI3617B Switch Board 4 1TPL0302416 Screw 3 x 8 5 3550FI1511D Handle Cover 6 3650FI1474F Grip Handle Illus. Part No. VACUUM CLEANER PARTS For Model • 721.24195S Illust. No. DESCRIPTION No. Part No.

Owners Manual
Page 31
For the replacement parts, accessories and owner's manuals that you need to do-it ! For Sears professional installation of home appliances and items like vacuums, lawn equipment, and electronics, call or go on-line for the nearest Sears Parts and Repair Center. 1-800-488-1222 Anytime,day or night (U.S.Ao....
For the replacement parts, accessories and owner's manuals that you need to do-it ! For Sears professional installation of home appliances and items like vacuums, lawn equipment, and electronics, call or go on-line for the nearest Sears Parts and Repair Center. 1-800-488-1222 Anytime,day or night (U.S.Ao....


