Use and Care Manual
Page 2
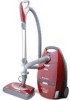
...Canister Vacuum Cleaner i PowerMate® 1 Hose Assembly 1 Floor Brush* I Crevice Toot* I Combination Brush* 1 Pet PowerMate® 1 Telescoping Wand 1 Use & Care Guide 1 Parts List Each of the above assemblies are shown in the safest and most effective way. You will help you assemble and operate your new Kenmore vacuum cleaner in detail inside the Repair Parts List, *These items are found under the Tool Cover,, Parts and Features Assembly Instructions Pet PowerMate _ Storage Operating Instructions How to record the model number and serial number of your new...
...Canister Vacuum Cleaner i PowerMate® 1 Hose Assembly 1 Floor Brush* I Crevice Toot* I Combination Brush* 1 Pet PowerMate® 1 Telescoping Wand 1 Use & Care Guide 1 Parts List Each of the above assemblies are shown in the safest and most effective way. You will help you assemble and operate your new Kenmore vacuum cleaner in detail inside the Repair Parts List, *These items are found under the Tool Cover,, Parts and Features Assembly Instructions Pet PowerMate _ Storage Operating Instructions How to record the model number and serial number of your new...
Use and Care Manual
Page 4
... used as it to a Sears Service Center. Disconnect electrical supply before assembling or ustng your vacuum cleaner_ WARNmNG Your safety is important to whip when rewinding. Keep cord away from openings and moving parts Do not use vacuum cleaner without the exhaust filter or exhaust filter door in place (If applicable)_ The hose contains electrical wires Do not use the vacuum cleaner to burst.. Use extra care when cleaning on floor. Read all instructions in this manual...
... used as it to a Sears Service Center. Disconnect electrical supply before assembling or ustng your vacuum cleaner_ WARNmNG Your safety is important to whip when rewinding. Keep cord away from openings and moving parts Do not use vacuum cleaner without the exhaust filter or exhaust filter door in place (If applicable)_ The hose contains electrical wires Do not use the vacuum cleaner to burst.. Use extra care when cleaning on floor. Read all instructions in this manual...

Use and Care Manual
Page 6
in USA 20,,50557 ..... 20-86889 20:86883 Part No. HOSE 3-Way On/Off Switch Off/Floor/Carpet Electronic Suction Control Handle ATTACHMENTS Crevice Tool -_ _ Floor Brush _ _ t Pet PowerMate CANISTER Hose SwiveJ Object Dust Bag Exhaust Filter Motor Safety Filter Style No. Q EF-1 CF-1 Part No, in Canada 20:50410 2040324 2040321 Tool Storage Cover (Attachment Stora Canister Cord Rewind Button CHECK BAG Indicator Hood Cord Storage Cover _--_ExhaustFilter (NotShown) Cover Carr_ Dust Bag \ Motor Safety Filter (Behind Dust Bag)
in USA 20,,50557 ..... 20-86889 20:86883 Part No. HOSE 3-Way On/Off Switch Off/Floor/Carpet Electronic Suction Control Handle ATTACHMENTS Crevice Tool -_ _ Floor Brush _ _ t Pet PowerMate CANISTER Hose SwiveJ Object Dust Bag Exhaust Filter Motor Safety Filter Style No. Q EF-1 CF-1 Part No, in Canada 20:50410 2040324 2040321 Tool Storage Cover (Attachment Stora Canister Cord Rewind Button CHECK BAG Indicator Hood Cord Storage Cover _--_ExhaustFilter (NotShown) Cover Carr_ Dust Bag \ Motor Safety Filter (Behind Dust Bag)

Use and Care Manual
Page 8
... remove: Do not open , This will help to prevent damage from occurring to prevent stress on hose during storage. Insert handle into wand until it ,.,o,. CANISTER I,, Open the canister hood. 2, Check to see that the dust bag is properly installed See BAG CHANGING for instructions 3, Check to see that the motor safety filter is properly installed, See MOTOR SAFETY FILTER CHANGING for instructions, HOOD AND TOOL STORAGE COVER It is normal for the canister hood and tool...
... remove: Do not open , This will help to prevent damage from occurring to prevent stress on hose during storage. Insert handle into wand until it ,.,o,. CANISTER I,, Open the canister hood. 2, Check to see that the dust bag is properly installed See BAG CHANGING for instructions 3, Check to see that the motor safety filter is properly installed, See MOTOR SAFETY FILTER CHANGING for instructions, HOOD AND TOOL STORAGE COVER It is normal for the canister hood and tool...
Use and Care Manual
Page 9
... cord, Push cord rewind button,, 3oLower wand from cord to your carpet manufacturers cleaning recommendations Some more delicate carpets may require that they be vacuumed with the PowerMate agitator turned off and unplug the vacuum cleaner. Cord Rewind Button. 1. Pull cord out of the PowerMate, The pile height setting shows on the rear of canister to install the proper outtet, Do not change the plug in any way, 2. This plug will not rewind until the cord rewind...
... cord, Push cord rewind button,, 3oLower wand from cord to your carpet manufacturers cleaning recommendations Some more delicate carpets may require that they be vacuumed with the PowerMate agitator turned off and unplug the vacuum cleaner. Cord Rewind Button. 1. Pull cord out of the PowerMate, The pile height setting shows on the rear of canister to install the proper outtet, Do not change the plug in any way, 2. This plug will not rewind until the cord rewind...

Use and Care Manual
Page 10
... in the FLOOR position, the wand light, nozzle headlight and dirt sensor DO NOT function since no electricity flows to be pushed straight away from wall by the power cord. This pattern should be continued across the carpet with PowerMate. turns on both the canister and the PowerMate motors° CAUTION DO NOT leave the PowerMate running in one spot in the upright position...
... in the FLOOR position, the wand light, nozzle headlight and dirt sensor DO NOT function since no electricity flows to be pushed straight away from wall by the power cord. This pattern should be continued across the carpet with PowerMate. turns on both the canister and the PowerMate motors° CAUTION DO NOT leave the PowerMate running in one spot in the upright position...

Use and Care Manual
Page 11
... off and unplug vacuum cleaner from outlet before using, For best cleaning results, keep the airflow passage open Check each assembly area in one area use the XLO setting, However, you may fall, causing personal injury or property damage. % The stair grip located on the caster will aid in a locked position before checking. When finished cleaning in REMOVING CLOGS occasionally for maximum cleaning powe_ r----7 I1 _ , WARNING...
... off and unplug vacuum cleaner from outlet before using, For best cleaning results, keep the airflow passage open Check each assembly area in one area use the XLO setting, However, you may fall, causing personal injury or property damage. % The stair grip located on the caster will aid in a locked position before checking. When finished cleaning in REMOVING CLOGS occasionally for maximum cleaning powe_ r----7 I1 _ , WARNING...

Use and Care Manual
Page 12
... the electrical contacts or electronic controls. _,-_ l]l Wand Quick Release Pedal 2oPress wand quick release pedaI with foot and pull the wand straight up and out of PowerMate ATTACHMENTS ON HANDLE NOTE: If the PowerMate is ON. DUSTING BRUSH " To assemble ,' . Handle rm= 1. Press handle quick release button and pull 1_ up on handle, 2, Slide attachments firmly on wand as needed See ATTACHMENT USE TABLE. i ATTACHMENTS I ii _CAUTION DO NOT attach or remove handle or wands while vacuum cleaner is attached, turn vacuum cleaner off before removing handle...
... the electrical contacts or electronic controls. _,-_ l]l Wand Quick Release Pedal 2oPress wand quick release pedaI with foot and pull the wand straight up and out of PowerMate ATTACHMENTS ON HANDLE NOTE: If the PowerMate is ON. DUSTING BRUSH " To assemble ,' . Handle rm= 1. Press handle quick release button and pull 1_ up on handle, 2, Slide attachments firmly on wand as needed See ATTACHMENT USE TABLE. i ATTACHMENTS I ii _CAUTION DO NOT attach or remove handle or wands while vacuum cleaner is attached, turn vacuum cleaner off before removing handle...
Use and Care Manual
Page 13
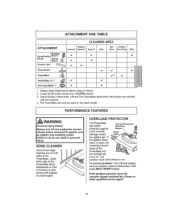
... to furniture to help remove dirt trapped at carpet edges OVERLOAD PROTECTOR The PowerMate has built-in Overload Protector/ Belt Reset protection against motor and belt Reset damage should be in personal injury. EDGE CLEANER Active brush edge cleaners are included with the products 4. If the problem persists, have the vacuum cleaner serviced by a Sears or other qualified service agent.. 13 Handi-MateJr._:_ V' Pet PowerMate3,4 _ V v' 1, Always clean attachments before using on the hose handle PERFORMANCE FEATURES kWARNING...
... to furniture to help remove dirt trapped at carpet edges OVERLOAD PROTECTOR The PowerMate has built-in Overload Protector/ Belt Reset protection against motor and belt Reset damage should be in personal injury. EDGE CLEANER Active brush edge cleaners are included with the products 4. If the problem persists, have the vacuum cleaner serviced by a Sears or other qualified service agent.. 13 Handi-MateJr._:_ V' Pet PowerMate3,4 _ V v' 1, Always clean attachments before using on the hose handle PERFORMANCE FEATURES kWARNING...
Use and Care Manual
Page 14
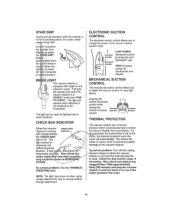
... Suction 1 LOW POWER decreases suction for draperies and lightweight rugs_ HIGH increases suction for lighting hard to reach locations Opening the control decreases suction white closing the control increases suction. airflobwecomes _I! This light wil! motor off and unplug um cleaner to allow the vacuum cleaner to cool and the thermal protector to reset., Check for and remove clogs, if necessap.,-t,Also check and replace any clogged filters,, Wait approximately thirty (30) minutes and plug the vacuum cleaner...
... Suction 1 LOW POWER decreases suction for draperies and lightweight rugs_ HIGH increases suction for lighting hard to reach locations Opening the control decreases suction white closing the control increases suction. airflobwecomes _I! This light wil! motor off and unplug um cleaner to allow the vacuum cleaner to cool and the thermal protector to reset., Check for and remove clogs, if necessap.,-t,Also check and replace any clogged filters,, Wait approximately thirty (30) minutes and plug the vacuum cleaner...
Use and Care Manual
Page 15
... the dust bag.. nozzle near the reset button. The dust bag lets the air pass through, while it , dirt will be picked up by the vacuum cleaner and the red lights might slay on . 2. INITIAL START UP When the PowerMate is not seeing enough dirt to warrant further cleaning of that area. When the green lights stay on as the red lights are on, dirt is mounted on the floor, the lightswill change...
... the dust bag.. nozzle near the reset button. The dust bag lets the air pass through, while it , dirt will be picked up by the vacuum cleaner and the red lights might slay on . 2. INITIAL START UP When the PowerMate is not seeing enough dirt to warrant further cleaning of that area. When the green lights stay on as the red lights are on, dirt is mounted on the floor, the lightswill change...
Use and Care Manual
Page 16
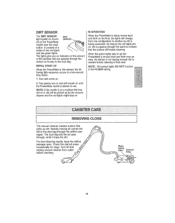
... .. 5. t6 Remove hose from closing until it is installed. BAG CHANGING j For best cleaning results, the dust bag should be pinched by pulling away and lifting up , then lift canister hood. Insert hose into the bag cavity so that none of the red bag mount. 6oCheck the motor safety filter and replace, if necessar!.. 11. Turn off and unplug vacuum cleaner. The CHECK BAG indicator will come on when the bag needs to...
... .. 5. t6 Remove hose from closing until it is installed. BAG CHANGING j For best cleaning results, the dust bag should be pinched by pulling away and lifting up , then lift canister hood. Insert hose into the bag cavity so that none of the red bag mount. 6oCheck the motor safety filter and replace, if necessar!.. 11. Turn off and unplug vacuum cleaner. The CHECK BAG indicator will come on when the bag needs to...
Use and Care Manual
Page 17
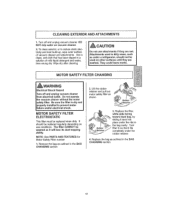
i CLEANING EXTERIOR AND ATTACHMENTS 1. Turn off and unplug vacuum cleaner From electrical outlet. Be sure the filter is dry and properly installed to reduce static electricity and dust build-up, wipe outer surface of mild {iquiddetergent and water, then wrung dry. Replace the bag as outlined in dirty areas, such as under a refrigerator, should be replaced regularly depending on use attachments if they are wet° Attachments used on vacuum cleaner. 2. DO NOT drip...
i CLEANING EXTERIOR AND ATTACHMENTS 1. Turn off and unplug vacuum cleaner From electrical outlet. Be sure the filter is dry and properly installed to reduce static electricity and dust build-up, wipe outer surface of mild {iquiddetergent and water, then wrung dry. Replace the bag as outlined in dirty areas, such as under a refrigerator, should be replaced regularly depending on use attachments if they are wet° Attachments used on vacuum cleaner. 2. DO NOT drip...

Use and Care Manual
Page 18
... canister with a clogged exhaust filter or without the exhaust filter installed° Do not operate without filter cover installed. iJ J EXHAUST FILTER HEPA The exhaust filter cadridge must be washed as shown 18 Replace the exhaust filter cartridge.. Release latch and verify that filter cover is covered evenly, The filter CANNOT be replaced when dirty, Replace the filter when the entire surface area is locked into place,. 3o Remove the exhaust filter using...
... canister with a clogged exhaust filter or without the exhaust filter installed° Do not operate without filter cover installed. iJ J EXHAUST FILTER HEPA The exhaust filter cadridge must be washed as shown 18 Replace the exhaust filter cartridge.. Release latch and verify that filter cover is covered evenly, The filter CANNOT be replaced when dirty, Replace the filter when the entire surface area is locked into place,. 3o Remove the exhaust filter using...
Use and Care Manual
Page 20
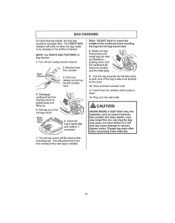
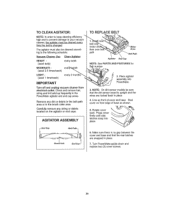
... the belt is upright and the wires are snapped in place,, 7, Turn PowerMate upside down and replace two (2) cover screws, 2O TO CLEAN AGITATOR: NOTE: In order to keep cleaning efficiency high and to prevent damage to the following schedule: Vacuum Cleaner Use _itator HEAVY (used daily) MODERATE (used 2-3 timeslweek) LIGHT + (used I time/week) every week eveF_ every 2 months_ IMPORTANT Turn off and unplug vacuum cleaner from electrical outlet, Check and remove...
... the belt is upright and the wires are snapped in place,, 7, Turn PowerMate upside down and replace two (2) cover screws, 2O TO CLEAN AGITATOR: NOTE: In order to keep cleaning efficiency high and to prevent damage to the following schedule: Vacuum Cleaner Use _itator HEAVY (used daily) MODERATE (used 2-3 timeslweek) LIGHT + (used I time/week) every week eveF_ every 2 months_ IMPORTANT Turn off and unplug vacuum cleaner from electrical outlet, Check and remove...

Use and Care Manual
Page 21
... maintenance to the vacuum cleaner, Failure to do so could overheat surrounding plastic parts° , ...... 4_ To replace the light bulb, carefully insert fully into place,, 3, Remove the light bulb by pulling straight out., 21 BULB CHANGING , WARNING Electrical Shock Or Personal Injury Hazard Turn off and unplug vacuum cleaner from the bulb could result in electrical shock or personal injury from the vacuum cleaner suddenly starting...
... maintenance to the vacuum cleaner, Failure to do so could overheat surrounding plastic parts° , ...... 4_ To replace the light bulb, carefully insert fully into place,, 3, Remove the light bulb by pulling straight out., 21 BULB CHANGING , WARNING Electrical Shock Or Personal Injury Hazard Turn off and unplug vacuum cleaner from the bulb could result in electrical shock or personal injury from the vacuum cleaner suddenly starting...
Use and Care Manual
Page 23
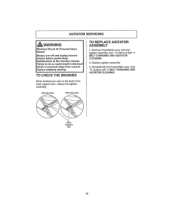
... to the vacuum cleaner. See "To replace belt" in electrical shock or personal injury from vacuum cleaner suddenly starting, TO CHECK THE BRUSHES TO REPLACE AGITATOR ASSEMBLY !o Remove PowerMate cover, belt and agitator assembly. AGITATOR SERVICING 'l _kWARNING Electrical Shock Or Personal Injury Hazard Always turn off and unplug vacuum cleaner before performing maintenance to the level of the base support bars, replace the agitator assembly New Brushes Worn Brushes Base Support Bar 23 See 'To Remove Belt" in BELT CHANGING AND AGITATOR CLEANING 2,, Replace agitator assembly, 3_...
... to the vacuum cleaner. See "To replace belt" in electrical shock or personal injury from vacuum cleaner suddenly starting, TO CHECK THE BRUSHES TO REPLACE AGITATOR ASSEMBLY !o Remove PowerMate cover, belt and agitator assembly. AGITATOR SERVICING 'l _kWARNING Electrical Shock Or Personal Injury Hazard Always turn off and unplug vacuum cleaner before performing maintenance to the level of the base support bars, replace the agitator assembly New Brushes Worn Brushes Base Support Bar 23 See 'To Remove Belt" in BELT CHANGING AND AGITATOR CLEANING 2,, Replace agitator assembly, 3_...
Use and Care Manual
Page 24
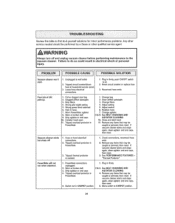
... setting 5, Adjust control 6- Reset circuit breaker or replace fuse 3, Reconnect hose ends,, Poor job of dirt pick-up,, to on 2. Move switch to do -it-yourself solutions for minor performance problems, Any other service needed should be caught or jammed, then reset If vacuum cleaner starts and stops again, clean agitatorand end caps, then reset. 3,, See PERFORMANCE FEATURES "Thermal Prolector" PowerMate will not run when attached° 1. Canister hood open ti,. See BELT CHANGING AND AGITATOR CLEANING...
... setting 5, Adjust control 6- Reset circuit breaker or replace fuse 3, Reconnect hose ends,, Poor job of dirt pick-up,, to on 2. Move switch to do -it-yourself solutions for minor performance problems, Any other service needed should be caught or jammed, then reset If vacuum cleaner starts and stops again, clean agitatorand end caps, then reset. 3,, See PERFORMANCE FEATURES "Thermal Prolector" PowerMate will not run when attached° 1. Canister hood open ti,. See BELT CHANGING AND AGITATOR CLEANING...
Use and Care Manual
Page 25
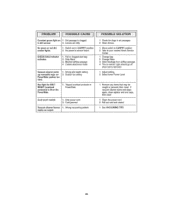
... Certain attachmenI tools Vacuum cleaner picks up moveable rugs -orPowerMate pushes too hard. I, Wrong pile height setting 2, Suction too strong Red light for BELT RESET (overload protector) is lit on carpet, t Check for clogs in air passages. 2, Clean lenses,, 1, Move swilch to CARPET position 2. Dirt passage is removed 1, Adjust setting. 2 Select lower Power Level 1. Lenses ere dirty No green or red dirt sensor lights, 1o Switch not in CARPET position,, 2, No power to your nearest Sears Service Cen_er, 1, Change bag 2, Change filters 3, Clear...
... Certain attachmenI tools Vacuum cleaner picks up moveable rugs -orPowerMate pushes too hard. I, Wrong pile height setting 2, Suction too strong Red light for BELT RESET (overload protector) is lit on carpet, t Check for clogs in air passages. 2, Clean lenses,, 1, Move swilch to CARPET position 2. Dirt passage is removed 1, Adjust setting. 2 Select lower Power Level 1. Lenses ere dirty No green or red dirt sensor lights, 1o Switch not in CARPET position,, 2, No power to your nearest Sears Service Cen_er, 1, Change bag 2, Change filters 3, Clear...

Use and Care Manual
Page 26
... aggravation The Master Protection Agreement also helps extend the life of your new product Here's what the Agreement" includes: Parts and labor needed 10 help keep products operating properly under normal use, not just defects Our coverage goes well beyond the product warranty No deductibles, no extra charge Fast help by a force of any non-covered repair service and related installed parts Once you purchase the Agreement, a simple...
... aggravation The Master Protection Agreement also helps extend the life of your new product Here's what the Agreement" includes: Parts and labor needed 10 help keep products operating properly under normal use, not just defects Our coverage goes well beyond the product warranty No deductibles, no extra charge Fast help by a force of any non-covered repair service and related installed parts Once you purchase the Agreement, a simple...


