
Owners Manual
Page 2
Pour des instructions en Francais, référez-vous à la page 42. UMP8015 PREPARATION Getting Started It's a good idea to 5:00 p.m. These kits are needed to install the radio. • Torx type, flathead and Philips screwdrivers • Wire cutters and strippers ...Installation Requirements This unit is designed for power connections • 16-18 gauge speaker wire Speaker Requirements Only connect speakers rated with a load impedance of the instructions before purchasing to remove existing radio (screwdriver, socket wrench set or other tools) • Electrical tape •...
Pour des instructions en Francais, référez-vous à la page 42. UMP8015 PREPARATION Getting Started It's a good idea to 5:00 p.m. These kits are needed to install the radio. • Torx type, flathead and Philips screwdrivers • Wire cutters and strippers ...Installation Requirements This unit is designed for power connections • 16-18 gauge speaker wire Speaker Requirements Only connect speakers rated with a load impedance of the instructions before purchasing to remove existing radio (screwdriver, socket wrench set or other tools) • Electrical tape •...

Owners Manual
Page 4
...outputs for the left. Ground Connect to battery or 12 volt power source that is for use with 1 speaker. Memory/Battery Connect to ground terminal. Using an incorrect fuse could damage the radio. WARNING! If not used, tape bare end of wire. Fuses When replacing a fuse, make sure ...fuse is not connected. WARNING! The red connector is for the right and the white connector is always live. UMP8015 CAUTION: Failure to wire exactly as shown may cause electrical damage to the radio. 15 Blue Gray LF/AVG White/Black (-) LR/ARG White (+) Green/Black (-) Green (+) 4 Blue Black...
...outputs for the left. Ground Connect to battery or 12 volt power source that is for use with 1 speaker. Memory/Battery Connect to ground terminal. Using an incorrect fuse could damage the radio. WARNING! If not used, tape bare end of wire. Fuses When replacing a fuse, make sure ...fuse is not connected. WARNING! The red connector is for the right and the white connector is always live. UMP8015 CAUTION: Failure to wire exactly as shown may cause electrical damage to the radio. 15 Blue Gray LF/AVG White/Black (-) LR/ARG White (+) Green/Black (-) Green (+) 4 Blue Black...

Owners Manual
Page 6
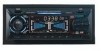
... (3) until the "BAL" indication appears on the display panel. "L=R" represents an equal balance level between the front and rear speakers. 4 AM/FM Band Selector (BAND) During radio play, press the BAND button (4) to move through one AM and three FM bands. 11 1 2 The indications "AM"... "10F" (full front) to adjust the balance between the front and rear speakers from "10L" (full left and right speakers. 4 AM/FM/CD/MP3/WMA/CASSETTE RECEIVER ULTRASERIES 3 in 1 CD/MP3/WMA CASSETTE RECEIVER UMP8015 7 0 8 9 SCAN MUTE AMS D-AUD 1 PAU 2 SCN 3 RPT 4 SHF 5 CD- Press...
... (3) until the "BAL" indication appears on the display panel. "L=R" represents an equal balance level between the front and rear speakers. 4 AM/FM Band Selector (BAND) During radio play, press the BAND button (4) to move through one AM and three FM bands. 11 1 2 The indications "AM"... "10F" (full front) to adjust the balance between the front and rear speakers from "10L" (full left and right speakers. 4 AM/FM/CD/MP3/WMA/CASSETTE RECEIVER ULTRASERIES 3 in 1 CD/MP3/WMA CASSETTE RECEIVER UMP8015 7 0 8 9 SCAN MUTE AMS D-AUD 1 PAU 2 SCN 3 RPT 4 SHF 5 CD- Press...


