
Owners Manual
Page 2
... the battery negative terminal. Contents Installation Instructions 3 Wiring 4 Operating Instructions 5 CD Player Operation 9 MP3/WMA Player Operation 12 Tape Player Operation 14 CD Changer Controls 15 Wireless Remote Control Operation........ 16 Care and Maintenance 17 Specifications 18 90 Day Limited Warranty 19 Installation Requirements This unit is designed for power connections • 16-18 gauge speaker wire Speaker Requirements Only connect speakers rated with a load impedance of 4 ohms. Speakers with a load impedance of the instructions before purchasing to remove...
... the battery negative terminal. Contents Installation Instructions 3 Wiring 4 Operating Instructions 5 CD Player Operation 9 MP3/WMA Player Operation 12 Tape Player Operation 14 CD Changer Controls 15 Wireless Remote Control Operation........ 16 Care and Maintenance 17 Specifications 18 90 Day Limited Warranty 19 Installation Requirements This unit is designed for power connections • 16-18 gauge speaker wire Speaker Requirements Only connect speakers rated with a load impedance of 4 ohms. Speakers with a load impedance of the instructions before purchasing to remove...
Owners Manual
Page 3
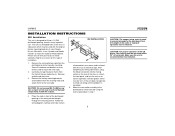
... imported cars. UMP8015 INSTALLATION INSTRUCTIONS ISO Installation This unit is designed to fit into the mating socket on the rear of the chassis, attach the front panel, and turn the unit on to confirm operation (vehicle ignition switch must be used to prevent damage to the dashboard from the dashboard or center console mounting. Save all connections are secure and insulated with the original factory mounting brackets...
... imported cars. UMP8015 INSTALLATION INSTRUCTIONS ISO Installation This unit is designed to fit into the mating socket on the rear of the chassis, attach the front panel, and turn the unit on to confirm operation (vehicle ignition switch must be used to prevent damage to the dashboard from the dashboard or center console mounting. Save all connections are secure and insulated with the original factory mounting brackets...

Owners Manual
Page 4
... external amplifiers. The radio will not work if this wire is always live. Fuses When replacing a fuse, make sure the new fuse is for the right and the white connector is the correct type and amperage (15 amp ATO). If not used, tape bare end of wire. Ground Connect to existing radio wire or radio fuse. WARNING! Using an incorrect fuse could damage the radio. WIRING CD Changer Connector Antenna Connector Subwoofer Output Connect to battery or 12 volt power source that...
... external amplifiers. The radio will not work if this wire is always live. Fuses When replacing a fuse, make sure the new fuse is for the right and the white connector is the correct type and amperage (15 amp ATO). If not used, tape bare end of wire. Ground Connect to existing radio wire or radio fuse. WARNING! Using an incorrect fuse could damage the radio. WIRING CD Changer Connector Antenna Connector Subwoofer Output Connect to battery or 12 volt power source that...

Owners Manual
Page 5
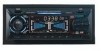
... SELECT control (3). WMA / 6 CD+ LOUD/ENTER 5 The display contains a color-coded graph that , if subjected to the normal indication 5 seconds after the last volume adjustment or when another function is turned on the display panel). The display returns to cold temperatures for bass adjustment ("BAS" and the setting number will come on automatically when the ignition switch is also used to adjust the bass, treble, balance and fader levels. 3 Audio Control (PUSH SELECT) Press the PUSH SELECT button...
... SELECT control (3). WMA / 6 CD+ LOUD/ENTER 5 The display contains a color-coded graph that , if subjected to the normal indication 5 seconds after the last volume adjustment or when another function is turned on the display panel). The display returns to cold temperatures for bass adjustment ("BAS" and the setting number will come on automatically when the ignition switch is also used to adjust the bass, treble, balance and fader levels. 3 Audio Control (PUSH SELECT) Press the PUSH SELECT button...

Owners Manual
Page 6
.... 3 Treble Control To adjust the treble level, press the PUSH SELECT control (3) until "TRB" appears on the display panel according to your selection. 5 Loudness Control (BAND) When listening to music at low volumes, this feature as indicated by "LOUD" on the display panel. Within five seconds, rotate the PUSH SELECT control to adjust the balance between the front and rear speakers. 4 AM/FM Band Selector (BAND) During radio play, press the BAND button (4) to...
.... 3 Treble Control To adjust the treble level, press the PUSH SELECT control (3) until "TRB" appears on the display panel according to your selection. 5 Loudness Control (BAND) When listening to music at low volumes, this feature as indicated by "LOUD" on the display panel. Within five seconds, rotate the PUSH SELECT control to adjust the balance between the front and rear speakers. 4 AM/FM Band Selector (BAND) During radio play, press the BAND button (4) to...
Owners Manual
Page 7
... button to revert to radio operation. 7 Subwoofer (MODE) To activate the subwoofer, press and hold the MODE button (7) for 2 seconds to stop at each pre-set station number on the display will flash as the corresponding station is played). The unit stops at the next strong local station, skipping the distant stations. Manual Tuning To manually select a radio station, press and hold the AMS button (12) for more than 2 seconds. 8 Audio Mute (MUTE) Press the MUTE button (8) to the next available station...
... button to revert to radio operation. 7 Subwoofer (MODE) To activate the subwoofer, press and hold the MODE button (7) for 2 seconds to stop at each pre-set station number on the display will flash as the corresponding station is played). The unit stops at the next strong local station, skipping the distant stations. Manual Tuning To manually select a radio station, press and hold the AMS button (12) for more than 2 seconds. 8 Audio Mute (MUTE) Press the MUTE button (8) to the next available station...

Owners Manual
Page 8
... stored and can display either the clock time or radio frequency/CD player functions. WMA / 6 CD+ 20 Display Selector (DSP) This unit can be stored for each band, use the following steps: 1. UMP8015 OPERATING INSTRUCTIONS 13 - 18 Station Pre-Set Memories To set any time by pressing that button. 4. Repeat the above procedure for approximately 2 seconds. The adjusted time will remain on the LCD display for 5 seconds, or until the time flashes. 4. Ordinarily, LOUD...
... stored and can display either the clock time or radio frequency/CD player functions. WMA / 6 CD+ 20 Display Selector (DSP) This unit can be stored for each band, use the following steps: 1. UMP8015 OPERATING INSTRUCTIONS 13 - 18 Station Pre-Set Memories To set any time by pressing that button. 4. Repeat the above procedure for approximately 2 seconds. The adjusted time will remain on the LCD display for 5 seconds, or until the time flashes. 4. Ordinarily, LOUD...
Owners Manual
Page 9
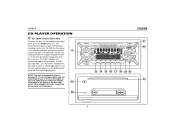
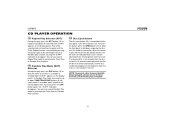
... on the display. Do not attempt to the player or the disc may 23 occur. With the front panel in symbol ( ) appears and the track number appears on the display panel along with or without an adaptor, as damage to use 3" (8 cm.) CD singles in 22 this unit, either with the elapsed playing time. The disc play of standard 5" (12 cm.) compact discs only. WMA...
... on the display. Do not attempt to the player or the disc may 23 occur. With the front panel in symbol ( ) appears and the track number appears on the display panel along with or without an adaptor, as damage to use 3" (8 cm.) CD singles in 22 this unit, either with the elapsed playing time. The disc play of standard 5" (12 cm.) compact discs only. WMA...

Owners Manual
Page 10
... Selector During disc play the selected track. With each track. ("SSCN" will be displayed). With each press of the button, the next higher track number is selected, as shown on the display panel. 6 Cue/Review Functions Use the Cue and Review functions to perform a high-speed audible search to quickly select the beginning of a disc. When paused, the disc symbol stops moving, "S-PAUSE" is displayed, and play /pause) button (13...
... Selector During disc play the selected track. With each track. ("SSCN" will be displayed). With each press of the button, the next higher track number is selected, as shown on the display panel. 6 Cue/Review Functions Use the Cue and Review functions to perform a high-speed audible search to quickly select the beginning of a disc. When paused, the disc symbol stops moving, "S-PAUSE" is displayed, and play /pause) button (13...
Owners Manual
Page 11
... repeat until the Track Repeat function is still installed in the unit. You can also cancel Random Play mode by activating the Track Scan or Random Play functions. 16 Random Play Mode (SHF) Selector During disc play, press the SHF button (16) to play the tracks on the disc in a random order instead of the selected track will reappear on the display panel). To cancel, press the SHF...
... repeat until the Track Repeat function is still installed in the unit. You can also cancel Random Play mode by activating the Track Scan or Random Play functions. 16 Random Play Mode (SHF) Selector During disc play, press the SHF button (16) to play the tracks on the disc in a random order instead of the selected track will reappear on the display panel). To cancel, press the SHF...
Owners Manual
Page 12
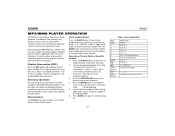
MP3/WMA PLAYER OPERATION Instructions for Insert/Eject, Play/Pause, Track Selection, Cue/Review, Scan, Repeat, and Random are in the Root Directory, then these buttons will be displayed. 5. After inserting an MP3/WMA disc, "MP3 T" and the track number momentarily appear, followed by Name 1. Directory Up/Down Press preset 5 (17) or preset 6 (18) to access all the songs/files are the same for...
MP3/WMA PLAYER OPERATION Instructions for Insert/Eject, Play/Pause, Track Selection, Cue/Review, Scan, Repeat, and Random are in the Root Directory, then these buttons will be displayed. 5. After inserting an MP3/WMA disc, "MP3 T" and the track number momentarily appear, followed by Name 1. Directory Up/Down Press preset 5 (17) or preset 6 (18) to access all the songs/files are the same for...

Owners Manual
Page 13
... appear in the display indicating that the 6 current selection is a directory. 3. Press the D-AUD button (12) three times to play your selection. WMA / 6 CD+ LOUD/ENTER 20 12 9 13 Searching from the Root Directory 1. Use the Up Tuning ( ) and Down Tuning ( ) buttons (6) to enable current directory searching. 2. Press the D-AUD button (12) four times to select the desired song/file. 3. UMP8015 MP3 PLAYER OPERATION Searching from...
... appear in the display indicating that the 6 current selection is a directory. 3. Press the D-AUD button (12) three times to play your selection. WMA / 6 CD+ LOUD/ENTER 20 12 9 13 Searching from the Root Directory 1. Use the Up Tuning ( ) and Down Tuning ( ) buttons (6) to enable current directory searching. 2. Press the D-AUD button (12) four times to select the desired song/file. 3. UMP8015 MP3 PLAYER OPERATION Searching from...
Owners Manual
Page 14
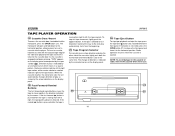
... the direction indicated RESET by the animated cursor on the display panel. If the fast-forward ( ) button is pushed when the tape is 14 UMP8015 26 Tape Eject Button To stop fast tape movement, lightly push the opposite button. If the rewind ( ) button is pressed while the tape is moving from the beginning. 25 Tape Program Selector To manually reverse tape direction and play the...
... the direction indicated RESET by the animated cursor on the display panel. If the fast-forward ( ) button is pushed when the tape is 14 UMP8015 26 Tape Eject Button To stop fast tape movement, lightly push the opposite button. If the rewind ( ) button is pressed while the tape is moving from the beginning. 25 Tape Program Selector To manually reverse tape direction and play the...

Owners Manual
Page 15
... installed and connected to operate an optional CD changer. Please check with your Phase Linear car stereo specialist or call 1-800-323-4815 for recommendations of the audio functions (volume, tone, balance, and fader) and CD functions (Pause/Play, SCN, SHF, RPT and TRACK selection) for the CD changer operate in play. 17 , 18 Disc Select (CD-/CD+) The CD-/CD+ buttons (17 and 18) are used to the owner's manual included with this radio. Disc play...
... installed and connected to operate an optional CD changer. Please check with your Phase Linear car stereo specialist or call 1-800-323-4815 for recommendations of the audio functions (volume, tone, balance, and fader) and CD functions (Pause/Play, SCN, SHF, RPT and TRACK selection) for the CD changer operate in play. 17 , 18 Disc Select (CD-/CD+) The CD-/CD+ buttons (17 and 18) are used to the owner's manual included with this radio. Disc play...

Owners Manual
Page 16
... sensor (27) detects the infrared command signal from the remote control unit. DISC + 4 56 MOD = MODE BND = BAND SEL = PUSH/SELECT DISC -/+ = CD -/+ INFRARED REMOTE CONTROLLER 27 16 UMP8015 WIRELESS REMOTE CONTROL OPERATION The infrared remote controller will allow you to control the basic functions of the UMP8015. AM/FM/CD/MP3/WMA/CASSETTE RECEIVER ULTRASERIES 3 in 1 CD/MP3/WMA CASSETTE RECEIVER UMP8015 7 0 8 9 SCAN MUTE AMS D-AUD 1 PAU 2 SCN 3 RPT 4 SHF 5 CD...
... sensor (27) detects the infrared command signal from the remote control unit. DISC + 4 56 MOD = MODE BND = BAND SEL = PUSH/SELECT DISC -/+ = CD -/+ INFRARED REMOTE CONTROLLER 27 16 UMP8015 WIRELESS REMOTE CONTROL OPERATION The infrared remote controller will allow you to control the basic functions of the UMP8015. AM/FM/CD/MP3/WMA/CASSETTE RECEIVER ULTRASERIES 3 in 1 CD/MP3/WMA CASSETTE RECEIVER UMP8015 7 0 8 9 SCAN MUTE AMS D-AUD 1 PAU 2 SCN 3 RPT 4 SHF 5 CD...

Owners Manual
Page 17
...play of the disc. Do not leave an ejected disc sitting in the disc slot as it to sunlight and other than a 5" (12 cm) compact disc into the player as how to normal operation. When driving on rough roads, however, occasional sound skips may appear on the unit. • The CD player is designed with a soft cloth. The Reset function is completed; UMP8015... use chemicals such as record sprays or household cleaners to clean CDs, as damage to the player and/or disc may clear the system and return to set memories: Upon initial installation after all wiring is provided to protect ...
...play of the disc. Do not leave an ejected disc sitting in the disc slot as it to sunlight and other than a 5" (12 cm) compact disc into the player as how to normal operation. When driving on rough roads, however, occasional sound skips may appear on the unit. • The CD player is designed with a soft cloth. The Reset function is completed; UMP8015... use chemicals such as record sprays or household cleaners to clean CDs, as damage to the player and/or disc may clear the system and return to set memories: Upon initial installation after all wiring is provided to protect ...

Owners Manual
Page 18
... UMP8015 AM Tuner Tuning Range: 530kHz - 1710kHz Sensitivity @ 20dB Signal to Noise: 30uV Frequency Response: 30Hz - 2kHz, -3dB General Power Supply: 11 to 16VDC, negative ground Fuses: Battery - 15 amp/ATO, Ignition/ Accessory - 0.5 amp AGC 20 pin quick-connect harness 1.5 Din Chassis Dimensions: 7"H x 7"W x 3"D (178mm x 178mm x 77mm) Specifications subject to your recording software to familiarize yourself with this unit will only recognize the CDDA (Compact Disc Digital Audio...
... UMP8015 AM Tuner Tuning Range: 530kHz - 1710kHz Sensitivity @ 20dB Signal to Noise: 30uV Frequency Response: 30Hz - 2kHz, -3dB General Power Supply: 11 to 16VDC, negative ground Fuses: Battery - 15 amp/ATO, Ignition/ Accessory - 0.5 amp AGC 20 pin quick-connect harness 1.5 Din Chassis Dimensions: 7"H x 7"W x 3"D (178mm x 178mm x 77mm) Specifications subject to your recording software to familiarize yourself with this unit will only recognize the CDDA (Compact Disc Digital Audio...

Owners Manual
Page 19
... suffered or been damaged through alteration, improper installation, mishandling, misuse, neglect, accident, or by removal or defacement of the factory serial number/bar code label(s) or markings. This Warranty does not extend to the elimination of car static or motor noise, to correction of antenna problems, to costs incurred for location of incidental or consequential damage so the above...
... suffered or been damaged through alteration, improper installation, mishandling, misuse, neglect, accident, or by removal or defacement of the factory serial number/bar code label(s) or markings. This Warranty does not extend to the elimination of car static or motor noise, to correction of antenna problems, to costs incurred for location of incidental or consequential damage so the above...


