Owners Manual
Page 2
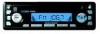
...cases, a special installation kit will be required to mount the radio to 7:00 p.m. These kits are needed to install the radio. • Torx type, flathead and Philips screwdrivers • Wire cutters and strippers • Tools to read all of less than 4 ohms could damage the unit... instructions en Francais, référez-vous à la page 34. UCD200 PREPARATION Getting Started It's a good idea to remove existing radio (screwdriver, socket wrench set or other tools) • Electrical tape • Crimping tool • Volt meter/test light • Crimp connections • 18 gauge...
...cases, a special installation kit will be required to mount the radio to 7:00 p.m. These kits are needed to install the radio. • Torx type, flathead and Philips screwdrivers • Wire cutters and strippers • Tools to read all of less than 4 ohms could damage the unit... instructions en Francais, référez-vous à la page 34. UCD200 PREPARATION Getting Started It's a good idea to remove existing radio (screwdriver, socket wrench set or other tools) • Electrical tape • Crimping tool • Volt meter/test light • Crimp connections • 18 gauge...
Owners Manual
Page 3
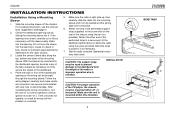
...or bow. Attach one end of the perforated support strap (supplied) to disengage it into position, use the removal tools (supplied) to the screw stud on "). Test the radio using the screw provided. CAUTION: The support strap must be mounted within this limitation. PCD160U / AM / FM /...the radio using the Operating Instructions that follow. After completing the wiring connections, turn the unit on to confirm operation (vehicle ignition must be brought through the mounting sleeve. Bend the strap to position it to a secure part of the tabs outward as necessary. 7. UCD200 ...
...or bow. Attach one end of the perforated support strap (supplied) to disengage it into position, use the removal tools (supplied) to the screw stud on "). Test the radio using the screw provided. CAUTION: The support strap must be mounted within this limitation. PCD160U / AM / FM /...the radio using the Operating Instructions that follow. After completing the wiring connections, turn the unit on to confirm operation (vehicle ignition must be brought through the mounting sleeve. Bend the strap to position it to a secure part of the tabs outward as necessary. 7. UCD200 ...