Owners Manual
Page 2
Contents Installation Instructions 3 Wiring Diagram 3 Operating Instructions 5 Care and Maintenance 7 Specifications 7 90 Day Limited Warranty 8 Installation Requirements This unit is designed for power connections • 16-18 gauge speaker wire Speaker Requirements Only connect speakers rated with a load impedance of 4 ohms. Speakers with a load impedance of the instructions before purchasing to read all of less than 4 ohms could damage the unit. Disconnect Battery Before you require assistance, contact Technical Support at 1-800...
Contents Installation Instructions 3 Wiring Diagram 3 Operating Instructions 5 Care and Maintenance 7 Specifications 7 90 Day Limited Warranty 8 Installation Requirements This unit is designed for power connections • 16-18 gauge speaker wire Speaker Requirements Only connect speakers rated with a load impedance of 4 ohms. Speakers with a load impedance of the instructions before purchasing to read all of less than 4 ohms could damage the unit. Disconnect Battery Before you require assistance, contact Technical Support at 1-800...
Owners Manual
Page 3
... wiring until the problem is corrected, then turn unit off. 4. Never ground negative speaker leads to ground terminal. The Trimmer should only need an installation kit. 1. Fuses When replacing a fuse, make sure the new fuse is made to cover the existing dashboard opening . 2. Inspect the radio opening , you need adjusting when the radio is first installed and when a change is the correcttype (AGC) and amperage. Adjust the AM Antenna Trimmer, located...
... wiring until the problem is corrected, then turn unit off. 4. Never ground negative speaker leads to ground terminal. The Trimmer should only need an installation kit. 1. Fuses When replacing a fuse, make sure the new fuse is made to cover the existing dashboard opening . 2. Inspect the radio opening , you need adjusting when the radio is first installed and when a change is the correcttype (AGC) and amperage. Adjust the AM Antenna Trimmer, located...

Owners Manual
Page 4
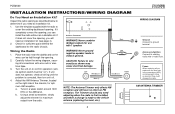
... the instructions of Dash Trimplate Dashboard 4 Adjust the shaft nuts behind the dashboard with the front of the radio must be supported with the kit. 2. INSTALLATION INSTRUCTIONS Mounting the Radio 1. Install the knobs on the radio using the hex nut provided. Shaft Nut CAUTION: The rear of the trimplate. 4. Install the radio/mounting plate assembly to the sub-dashboard according to the radio and dashboard as necessary. 6. Metal Part...
... the instructions of Dash Trimplate Dashboard 4 Adjust the shaft nuts behind the dashboard with the front of the radio must be supported with the kit. 2. INSTALLATION INSTRUCTIONS Mounting the Radio 1. Install the knobs on the radio using the hex nut provided. Shaft Nut CAUTION: The rear of the trimplate. 4. Install the radio/mounting plate assembly to the sub-dashboard according to the radio and dashboard as necessary. 6. Metal Part...
Owners Manual
Page 5
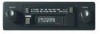
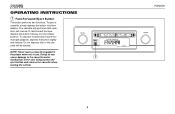
... it into the cassette door. PCR2500 OPERATING INSTRUCTIONS 1 On-Off Switch/Volume Control Rotate the ON/VOL knob (1) to the right to the DX setting (in position). For normal reception conditions and when receiving a wide range of the strong signal area, return the switch to turn the unit on frequency, you could experience noise and reception problems. The dial pointer will move...
... it into the cassette door. PCR2500 OPERATING INSTRUCTIONS 1 On-Off Switch/Volume Control Rotate the ON/VOL knob (1) to the right to the DX setting (in position). For normal reception conditions and when receiving a wide range of the strong signal area, return the switch to turn the unit on frequency, you could experience noise and reception problems. The dial pointer will move...
Owners Manual
Page 6
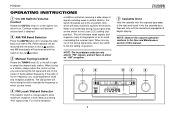
... will resume.To fast-forward the tape, depress the button half-way into the locked position. ON/VOL NOTE: Never leave a cassette engaged in the player when not in use. Always press the eject button and remove the cassette when leaving the vehicle. To eject a cassette, simply depress the button fully then release. OPERATING INSTRUCTIONS 7 Fast-Forward/Eject Button This button performs two functions.
... will resume.To fast-forward the tape, depress the button half-way into the locked position. ON/VOL NOTE: Never leave a cassette engaged in the player when not in use. Always press the eject button and remove the cassette when leaving the vehicle. To eject a cassette, simply depress the button fully then release. OPERATING INSTRUCTIONS 7 Fast-Forward/Eject Button This button performs two functions.
Owners Manual
Page 7
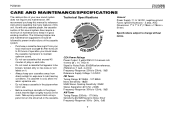
.... • Purchase a cassette cleaning kit from direct sunlight or exposure to sub-freezing conditions. If a cassette is tightly wound on it. • Always keep your cassettes away from your new sound system does not require any cassette player, the cassette section of this unit. Technical Specifications CEA Power Ratings Power Output: 3 watts RMS X 2 channels into 4-ohms @ < 1% THD+N Signal to Noise...
.... • Purchase a cassette cleaning kit from direct sunlight or exposure to sub-freezing conditions. If a cassette is tightly wound on it. • Always keep your cassettes away from your new sound system does not require any cassette player, the cassette section of this unit. Technical Specifications CEA Power Ratings Power Output: 3 watts RMS X 2 channels into 4-ohms @ < 1% THD+N Signal to Noise...
Owners Manual
Page 8
...installation, mishandling, misuse, neglect, accident, or by removal or defacement of the factory serial number/bar code... for location of all other than expressed herein in connection with ...specific legal rights and you . This Warranty does not extend to the elimination of car static or motor noise, to correction of antenna problems, to costs incurred for parts and repair labor. This Warranty is in lieu of warranty station...part thereof, under normal use and conditions, be proven defective in material or workmanship within the terms of this Warranty, the product is to be repaired or replaced...
...installation, mishandling, misuse, neglect, accident, or by removal or defacement of the factory serial number/bar code... for location of all other than expressed herein in connection with ...specific legal rights and you . This Warranty does not extend to the elimination of car static or motor noise, to correction of antenna problems, to costs incurred for parts and repair labor. This Warranty is in lieu of warranty station...part thereof, under normal use and conditions, be proven defective in material or workmanship within the terms of this Warranty, the product is to be repaired or replaced...


