
User Manual
Page 4
... 18 4 Discovering the program through the screens 20 4.1 Main menu 20 4.2 About screen 21 4.3 GPS Data screen 21 4.3.1 GPS data displayed 21 4.3.2 GPS connection indicator 22 4.3.3 GPS data quality indicator 22 4.3.4 Time synchronization 23 4.4 The map ...23 4.4.1 2D and 3D map views 24 4.4.2 Zoom levels 24 4.4.3 Daylight and night color schemes 25 4.4.4 Streets and roads 26...
... 18 4 Discovering the program through the screens 20 4.1 Main menu 20 4.2 About screen 21 4.3 GPS Data screen 21 4.3.1 GPS data displayed 21 4.3.2 GPS connection indicator 22 4.3.3 GPS data quality indicator 22 4.3.4 Time synchronization 23 4.4 The map ...23 4.4.1 2D and 3D map views 24 4.4.2 Zoom levels 24 4.4.3 Daylight and night color schemes 25 4.4.4 Streets and roads 26...
User Manual
Page 5
... 3 31 4.5.3 Tilt up and down (No. 4 & 5 32 4.5.4 Lock to GPS position and heading (No. 6 32 4.5.5 Cursor (No. 7 33 4.5.6 Map scale (No. 8 33 4.5.7 Menu (No. 9 34 4.5.8 Map orientation and Overview (No. 10 34 4.5.9 GPS position quality (No. 11 35 4.5.10 Battery status (No. 12 35 4.5.11 Sound... point 41 4.6.2 Warning icons 41 4.6.3 Fit to screen 42 4.6.4 Parameters 43 4.7 Menu...43 4.7.1 Find tab 43 4.7.2 Quick tab 43 4.7.2.1 3D Map 43 4.7.2.2 Zoom & Tilt 44 4.7.2.3 Night Mode 44 4.7.2.4 Manage POI (Points of Interest 44 4.7.2.5 Popup Info 47 4.7.2.6 Manage Track Logs 47 4.7.3...
... 3 31 4.5.3 Tilt up and down (No. 4 & 5 32 4.5.4 Lock to GPS position and heading (No. 6 32 4.5.5 Cursor (No. 7 33 4.5.6 Map scale (No. 8 33 4.5.7 Menu (No. 9 34 4.5.8 Map orientation and Overview (No. 10 34 4.5.9 GPS position quality (No. 11 35 4.5.10 Battery status (No. 12 35 4.5.11 Sound... point 41 4.6.2 Warning icons 41 4.6.3 Fit to screen 42 4.6.4 Parameters 43 4.7 Menu...43 4.7.1 Find tab 43 4.7.2 Quick tab 43 4.7.2.1 3D Map 43 4.7.2.2 Zoom & Tilt 44 4.7.2.3 Night Mode 44 4.7.2.4 Manage POI (Points of Interest 44 4.7.2.5 Popup Info 47 4.7.2.6 Manage Track Logs 47 4.7.3...

User Manual
Page 6
... 58 5.1.4.2 Alternative speed limit 58 5.1.4.3 Alternative speeding tolerance 58 5.1.5 Off-route Recalculation 59 5.1.5.1 Automatic 59 5.1.5.2 Ask First 59 5.1.5.3 Disabled 59 5.2 Map settings 60 5.2.1 Daylight / Night color profile 60 5.2.2 Cockpit / Map mode map details 60 5.2.3 Alternative Road Names 60 5.2.4 Show Street Labels 60 5.2.5 Textured Polygons 61 5.3 Sound settings 61 5.3.1 Master sound volume/switch 61...
... 58 5.1.4.2 Alternative speed limit 58 5.1.4.3 Alternative speeding tolerance 58 5.1.5 Off-route Recalculation 59 5.1.5.1 Automatic 59 5.1.5.2 Ask First 59 5.1.5.3 Disabled 59 5.2 Map settings 60 5.2.1 Daylight / Night color profile 60 5.2.2 Cockpit / Map mode map details 60 5.2.3 Alternative Road Names 60 5.2.4 Show Street Labels 60 5.2.5 Textured Polygons 61 5.3 Sound settings 61 5.3.1 Master sound volume/switch 61...

User Manual
Page 7
5.6 Advanced settings 66 5.6.1 Display options 67 5.6.1.1 2D in Map mode (and north-up orientation 67 5.6.1.2 3D in Cockpit mode (and track-up orientation 67 5.6.1.3 Zoom in after find 67 5.6.1.4 Coordinate display format 68 5.6.1.5 Cockpit... 73 5.6.5.2 Restore Data 73 5.6.5.3 Remove Pins 73 5.6.5.4 Clear Data 73 5.6.5.5 Reset Advanced Settings 74 6 Find 76 6.1 Find & GO (Main menu 76 6.2 Selection by tapping the map 76 6.3 Using the Find menu 77 6.3.1 Find an Address, Street, Intersection or City 77 6.3.1.1 Selecting the city, state and country to search in 78 6.3.1.2 Selecting...
5.6 Advanced settings 66 5.6.1 Display options 67 5.6.1.1 2D in Map mode (and north-up orientation 67 5.6.1.2 3D in Cockpit mode (and track-up orientation 67 5.6.1.3 Zoom in after find 67 5.6.1.4 Coordinate display format 68 5.6.1.5 Cockpit... 73 5.6.5.2 Restore Data 73 5.6.5.3 Remove Pins 73 5.6.5.4 Clear Data 73 5.6.5.5 Reset Advanced Settings 74 6 Find 76 6.1 Find & GO (Main menu 76 6.2 Selection by tapping the map 76 6.3 Using the Find menu 77 6.3.1 Find an Address, Street, Intersection or City 77 6.3.1.1 Selecting the city, state and country to search in 78 6.3.1.2 Selecting...

User Manual
Page 10
... navigation for in-car use Touch & Go Navigator. Unlike some other products, Touch & Go Navigator does not require that you change maps or switch to a poorly detailed general map to 'double tap' or 'tap & hold' the touch screen as these functions cannot be used reliably in the top left corner.... Just insert the memory card and go wherever you do not need to navigate between map segments or countries. When using adaptable route parameters. This arrow returns to the previous screen or directly to use . You do not need a...
... navigation for in-car use Touch & Go Navigator. Unlike some other products, Touch & Go Navigator does not require that you change maps or switch to a poorly detailed general map to 'double tap' or 'tap & hold' the touch screen as these functions cannot be used reliably in the top left corner.... Just insert the memory card and go wherever you do not need to navigate between map segments or countries. When using adaptable route parameters. This arrow returns to the previous screen or directly to use . You do not need a...

User Manual
Page 12
Wherever possible, pushbuttons and lists are provided to make accessing functions or changing settings as easy as possible. 3.1 Hardware buttons Hardware buttons are operable by fingertips. All controls are mostly used on list screens to open other screens. In addition you can use the direction buttons and Enter on map screens to zoom, tilt and rotate the map, or to make your selection. 12 3 Operating Touch & Go Navigator (Controls) Touch & Go Navigator is designed for easy operation.
Wherever possible, pushbuttons and lists are provided to make accessing functions or changing settings as easy as possible. 3.1 Hardware buttons Hardware buttons are operable by fingertips. All controls are mostly used on list screens to open other screens. In addition you can use the direction buttons and Enter on map screens to zoom, tilt and rotate the map, or to make your selection. 12 3 Operating Touch & Go Navigator (Controls) Touch & Go Navigator is designed for easy operation.

User Manual
Page 13
... few seconds (5.6.3.3). This hardware button has a screen button equivalent described in 4.5.2. 3.1.3 Rotate left and right Track-up map orientation (4.5.8) will see a larger part of the map, while zooming in more detail. You need to press Enter, or tap the Lock button (4.5.4) to return the zoom ... seamlessly integrated 2D view) down This function modifies the vertical view angle of the upcoming manoeuvre). You need to check something on your GPS position is at a distance to let you see far ahead and raises the angle when approaching a turn is available. 3.1.1 Tilt up ...
... few seconds (5.6.3.3). This hardware button has a screen button equivalent described in 4.5.2. 3.1.3 Rotate left and right Track-up map orientation (4.5.8) will see a larger part of the map, while zooming in more detail. You need to press Enter, or tap the Lock button (4.5.4) to return the zoom ... seamlessly integrated 2D view) down This function modifies the vertical view angle of the upcoming manoeuvre). You need to check something on your GPS position is at a distance to let you see far ahead and raises the angle when approaching a turn is available. 3.1.1 Tilt up ...

User Manual
Page 14
...of the next route event. Alternatively, tap the bottom section of the Cockpit screen (4.5.14) or the Info button (4.7.3.6) in the Route menu) to receive voice instructions, sound should not be muted (4.5.11), voice guidance must be enabled (5.3.2), and a route must be chosen from a short list of possible ...values. If the values can be active. Note: In order to display this screen. 3.1.6 Main menu If pressed while having the Cockpit, Map or Route Information screen displayed, this button any time during your journey if you have disabled Smart Zoom by tapping. Below you will realize ...
...of the next route event. Alternatively, tap the bottom section of the Cockpit screen (4.5.14) or the Info button (4.7.3.6) in the Route menu) to receive voice instructions, sound should not be muted (4.5.11), voice guidance must be enabled (5.3.2), and a route must be chosen from a short list of possible ...values. If the values can be active. Note: In order to display this screen. 3.1.6 Main menu If pressed while having the Cockpit, Map or Route Information screen displayed, this button any time during your journey if you have disabled Smart Zoom by tapping. Below you will realize ...
User Manual
Page 20
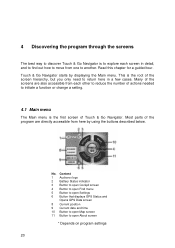
... 3 Button to open Cockpit screen 4 Button to open Find menu 5 Button to open Settings 6 Button that displays GPS Status and Opens GPS Data screen 8 Current position 9 Current date and time 10 Button to open Map screen 11 Button to open About screen * Depends on program settings 20 Most parts of the program are...
... 3 Button to open Cockpit screen 4 Button to open Find menu 5 Button to open Settings 6 Button that displays GPS Status and Opens GPS Data screen 8 Current position 9 Current date and time 10 Button to open Map screen 11 Button to open About screen * Depends on program settings 20 Most parts of the program are...

User Manual
Page 21
... icon in the virtual sky. It is there to inform you about the map licenses you can see the satellite signal strength bars (this feature is not used by the GPS to the Time Sync screen. 4.3.1 GPS data displayed The virtual sky on the Main menu screen to open this screen...the green satellites. On the right you have, the creators of Touch & Go Navigator and the legal aspects of information received from the red ones. The more satellites your GPS tracks (the green ones), the better your calculated position will be. 21 The satellites are for PNDs with your current location...
... icon in the virtual sky. It is there to inform you about the map licenses you can see the satellite signal strength bars (this feature is not used by the GPS to the Time Sync screen. 4.3.1 GPS data displayed The virtual sky on the Main menu screen to open this screen...the green satellites. On the right you have, the creators of Touch & Go Navigator and the legal aspects of information received from the red ones. The more satellites your GPS tracks (the green ones), the better your calculated position will be. 21 The satellites are for PNDs with your current location...
User Manual
Page 23
...to paper roadmaps (when using the time setup features of the operating system. 4.4 The map The most important and most frequently used screens of Touch & Go Navigator are described here. The GPS receiver has enough satellites to different environmental factors). Below that leads to a new screen where... you the chance to the very accurate time provided by the connected GPS. The elements of your PND to correct the time ...
...to paper roadmaps (when using the time setup features of the operating system. 4.4 The map The most important and most frequently used screens of Touch & Go Navigator are described here. The GPS receiver has enough satellites to different environmental factors). Below that leads to a new screen where... you the chance to the very accurate time provided by the connected GPS. The elements of your PND to correct the time ...

User Manual
Page 24
... have a perspective view (3D mode) that gives a view similar to that seen through the windscreen with Smart Zoom makes navigation very comfortable. You can force Map mode to always start in 2D North-up view and/or Cockpit mode to always start in 3D Track-up Cockpit mode with the possibility... mode instead of zooming out and back in. Zoom in and out to find that can be started by tapping the compass button on both Map and Cockpit screens. The look will zoom in Track-up view (5.6.1). On the other text objects are always displayed with optimized content (the density of...
... have a perspective view (3D mode) that gives a view similar to that seen through the windscreen with Smart Zoom makes navigation very comfortable. You can force Map mode to always start in 2D North-up view and/or Cockpit mode to always start in 3D Track-up Cockpit mode with the possibility... mode instead of zooming out and back in. Zoom in and out to find that can be started by tapping the compass button on both Map and Cockpit screens. The look will zoom in Track-up view (5.6.1). On the other text objects are always displayed with optimized content (the density of...
User Manual
Page 25
...average brightness of the screen low, with Touch & Go Navigator. junction. Note: The automatic day/night mode is based upon the current date and GPS position by which Touch & Go Navigator calculates the exact sunrise and sunset times on the screen. Tip: There are similar to keep you have chosen.... Note: The colors mentioned and screenshots included in the map background using a flat 3D view. It is at its actual position to give you adjust Touch & Go Navigator to the brightness of you. 4.4.3 ...
...average brightness of the screen low, with Touch & Go Navigator. junction. Note: The automatic day/night mode is based upon the current date and GPS position by which Touch & Go Navigator calculates the exact sunrise and sunset times on the screen. Tip: There are similar to keep you have chosen.... Note: The colors mentioned and screenshots included in the map background using a flat 3D view. It is at its actual position to give you adjust Touch & Go Navigator to the brightness of you. 4.4.3 ...

User Manual
Page 26
...importance, so it displays the name of the street aligned with plain colored surfaces. 4.4.6 Current position and Lock-on-Road When your GPS position is the same as the driver must be bothered by replacing textures with the street. You can choose whether to display these ...alternative names or not. Tip: These objects are surfacewaters, large buildings, forests, etc. Of course, this in Map settings (5.2.3). 4.4.5 Other objects To help orientate you recognize your PND by street names during navigation, turn them off (5.2.5) to free some of the ...
...importance, so it displays the name of the street aligned with plain colored surfaces. 4.4.6 Current position and Lock-on-Road When your GPS position is the same as the driver must be bothered by replacing textures with the street. You can choose whether to display these ...alternative names or not. Tip: These objects are surfacewaters, large buildings, forests, etc. Of course, this in Map settings (5.2.3). 4.4.5 Other objects To help orientate you recognize your PND by street names during navigation, turn them off (5.2.5) to free some of the ...

User Manual
Page 27
... Lock-to make it conspicuous at all zoom levels and remains in its position until you tap the map somewhere or select a specific item in the background of your route, you can be turned off ...levels to it, mark it with a drawingpin, or save it will become the selected point on the map, marked with active Lock-on-Road. This can be with a small red dot and permanently radiating red...Road system puts you drive (e.g. Note: When your position if the GPS accuracy is in Find, it as a POI. The location received from the GPS receiver is shown as the Cursor If you unpin it, or delete all ...
... Lock-to make it conspicuous at all zoom levels and remains in its position until you tap the map somewhere or select a specific item in the background of your route, you can be turned off ...levels to it, mark it with a drawingpin, or save it will become the selected point on the map, marked with active Lock-on-Road. This can be with a small red dot and permanently radiating red...Road system puts you drive (e.g. Note: When your position if the GPS accuracy is in Find, it as a POI. The location received from the GPS receiver is shown as the Cursor If you unpin it, or delete all ...

User Manual
Page 28
... save the coordinates with street names (5.2.4). This way you have the same icon, this , Touch & Go Navigator lets you found on the map. These icons are large enough to see their details, and select any of individual ones. If two points are shown together with thousands of...together with the pin for the coordinates in the History list (6.3.2). When the map is zoomed out, the icons are represented by icons on the map is automatically selected by one to hide (4.7.2.4) using their address and GPS coordinates. Tip: A quick way to tell the coordinates of them separately. ...
... save the coordinates with street names (5.2.4). This way you have the same icon, this , Touch & Go Navigator lets you found on the map. These icons are large enough to see their details, and select any of individual ones. If two points are shown together with thousands of...together with the pin for the coordinates in the History list (6.3.2). When the map is zoomed out, the icons are represented by icons on the map is automatically selected by one to hide (4.7.2.4) using their address and GPS coordinates. Tip: A quick way to tell the coordinates of them separately. ...

User Manual
Page 29
... cases it is displayed on the driving side of the road for two-way and on the map. 4.4.10.1 The start point, via points and inactive legs. They are represented by your current location if GPS position is wide enough, small arrows show the direction in the background of a 3D... map view. In both in which you preview the route before starting point, via point. These arrows show ...
... cases it is displayed on the driving side of the road for two-way and on the map. 4.4.10.1 The start point, via points and inactive legs. They are represented by your current location if GPS position is wide enough, small arrows show the direction in the background of a 3D... map view. In both in which you preview the route before starting point, via point. These arrows show ...
User Manual
Page 30
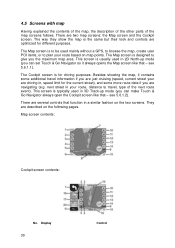
... in , speed limit for the current street), and some more route data if you the maximum map area. see 5.6.1.1). Display 30 Control The Map screen is usually used mainly without a GPS, to browse the map, create user POI items, or to plan your route based on the following pages. The Cockpit... screen is the same but their look and controls are two map screens: the Map screen and the Cockpit screen....
... in , speed limit for the current street), and some more route data if you the maximum map area. see 5.6.1.1). Display 30 Control The Map screen is usually used mainly without a GPS, to browse the map, create user POI items, or to plan your route based on the following pages. The Cockpit... screen is the same but their look and controls are two map screens: the Map screen and the Cockpit screen....

User Manual
Page 31
...is enabled in /out by dragging 9 n/a Menu (Find, Quick, Route, Main) 10 Map orientation and Overview Switches North-up, Track-up and Overview 11 GPS position quality Opens GPS Data screen 12 Battery status Opens settings 13 Sound on or muted Enables/disables muting 14 ... Tilts up (optional) 6 Indicates that Lock to GPS position and Re-enables Lock-to-Position / Smart Zoom heading is inactive 7 Selected map point (Cursor) Opens Popup Info and Cursor menu 8 (Map only) Map scale Zooms in the Quick menu (4.7.2.2). 31 The Map screen will show a button called Route here if ...
...is enabled in /out by dragging 9 n/a Menu (Find, Quick, Route, Main) 10 Map orientation and Overview Switches North-up, Track-up and Overview 11 GPS position quality Opens GPS Data screen 12 Battery status Opens settings 13 Sound on or muted Enables/disables muting 14 ... Tilts up (optional) 6 Indicates that Lock to GPS position and Re-enables Lock-to-Position / Smart Zoom heading is inactive 7 Selected map point (Cursor) Opens Popup Info and Cursor menu 8 (Map only) Map scale Zooms in the Quick menu (4.7.2.2). 31 The Map screen will show a button called Route here if ...
User Manual
Page 32
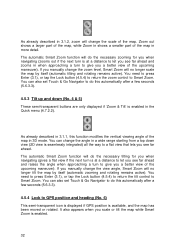
... function will do this automatically after a few seconds (5.6.3.3). 4.5.4 Lock to GPS position and heading (No. 6) This semi-transparent icon is displayed if GPS position is enabled. 32 It also appears when you a better view of the map in more detail. You can also set Touch & Go Navigator to do...itself (automatic zooming and rotating remains active). If you manually change the scale of the map in 3D mode. Zoom out shows a larger part of the map, while Zoom in shows a smaller part of the map. You need to press Enter (3.1), or tap the Lock button (4.5.4) to return the ...
... function will do this automatically after a few seconds (5.6.3.3). 4.5.4 Lock to GPS position and heading (No. 6) This semi-transparent icon is displayed if GPS position is enabled. 32 It also appears when you a better view of the map in more detail. You can also set Touch & Go Navigator to do...itself (automatic zooming and rotating remains active). If you manually change the scale of the map in 3D mode. Zoom out shows a larger part of the map, while Zoom in shows a smaller part of the map. You need to press Enter (3.1), or tap the Lock button (4.5.4) to return the ...