Instruction Manual
Page 5
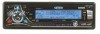
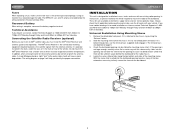
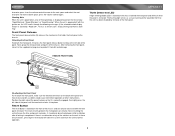
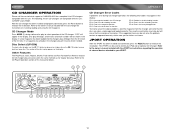
... device or multimedia device using a standard 3.5mm plug • Converts 3.5mm auxiliary input to the radios Aux inputs JPORT READY (Sold Separately) • Controls all of the Jensen MPX6411 Mobile Receiver. We recommend having your purchase of the instructions before beginning the installation. Electronic Skip Protection AM/FM Tuner • World Tuner • 30 station presets (18 FM/12AM) • JENSEN Plus Tuner II • Auto station store • Preset scan • One-touch memory • Auto stereo...
... device or multimedia device using a standard 3.5mm plug • Converts 3.5mm auxiliary input to the radios Aux inputs JPORT READY (Sold Separately) • Controls all of the Jensen MPX6411 Mobile Receiver. We recommend having your purchase of the instructions before beginning the installation. Electronic Skip Protection AM/FM Tuner • World Tuner • 30 station presets (18 FM/12AM) • JENSEN Plus Tuner II • Auto station store • Preset scan • One-touch memory • Auto stereo...
Instruction Manual
Page 6
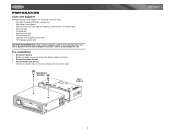
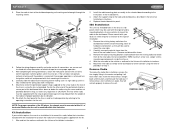
... meter/test light • Crimp connections • 18 gauge wire for power connections • 16-18 gauge speaker wire SPEAKER REQUIREMENTS: Only connect speakers rated in the load impedance of sleeve to remove half-sleeve from Sleeve Lift latches on both sides of 4 ohms. Speakers with a load impedance less than 4 ohms could damage the unit. Remove Radio from radio. Pre-installation 1. Remove Transport Screws 3. Disconnect Battery Before you begin...
... meter/test light • Crimp connections • 18 gauge wire for power connections • 16-18 gauge speaker wire SPEAKER REQUIREMENTS: Only connect speakers rated in the load impedance of sleeve to remove half-sleeve from Sleeve Lift latches on both sides of 4 ohms. Speakers with a load impedance less than 4 ohms could damage the unit. Remove Radio from radio. Pre-installation 1. Remove Transport Screws 3. Disconnect Battery Before you begin...
Instruction Manual
Page 7
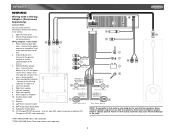
... wire. 2. Left front speaker 6. Right rear speaker 9. Connect to chassis ground. Left rear spearker 8. Subwoofer Output (blue) 15. Failure to wire exactly as shown may cause electrical damage to Amplifier 10. XM® Audio Input (black RCA) 14. Splice or crimp wires. 2. Antenna 12. Auxiliary Input Cable (yellow) 11. Memory/Battery (yellow wire) - RCA Outputs to the radio. 3 Attach wiring adapter to connect an optional CD Changer or JPORT (sold separately). *TERK XMDJEN100 cables sold separately. **TERK XMD1000 Direct Tuner and antenna...
... wire. 2. Left front speaker 6. Right rear speaker 9. Connect to chassis ground. Left rear spearker 8. Subwoofer Output (blue) 15. Failure to wire exactly as shown may cause electrical damage to Amplifier 10. XM® Audio Input (black RCA) 14. Splice or crimp wires. 2. Antenna 12. Auxiliary Input Cable (yellow) 11. Memory/Battery (yellow wire) - RCA Outputs to the radio. 3 Attach wiring adapter to connect an optional CD Changer or JPORT (sold separately). *TERK XMDJEN100 cables sold separately. **TERK XMD1000 Direct Tuner and antenna...
Instruction Manual
Page 8
... you have trouble locating a kit or need installation assistance, contact Technical Support at electronics supply stores and car stereo specialty shops. Do not mount the XM® Direct Receiver near a heater vent or where it . Fuses When replacing a fuse, make sure the kit works with an existing radio opening. Using an incorrect fuse could damage the radio. A sharp 90 degree bend or slight "nick" to the outer cable sheath will...
... you have trouble locating a kit or need installation assistance, contact Technical Support at electronics supply stores and car stereo specialty shops. Do not mount the XM® Direct Receiver near a heater vent or where it . Fuses When replacing a fuse, make sure the kit works with an existing radio opening. Using an incorrect fuse could damage the radio. A sharp 90 degree bend or slight "nick" to the outer cable sheath will...
Instruction Manual
Page 9
... limitation. Replace the dashboard trim panel. Remove and discard the frame. 3. Follow the wiring diagram carefully and make certain all hardware and brackets as they will not lock properly to confirm operation (vehicle ignition switch must be used with the kit. 1. CAUTION: The rear of the radio must be brought through the mounting sleeve. 6. ISO Installation This unit has threaded holes in the Universal Installation instructions. 2.
... limitation. Replace the dashboard trim panel. Remove and discard the frame. 3. Follow the wiring diagram carefully and make certain all hardware and brackets as they will not lock properly to confirm operation (vehicle ignition switch must be used with the kit. 1. CAUTION: The rear of the radio must be brought through the mounting sleeve. 6. ISO Installation This unit has threaded holes in the Universal Installation instructions. 2.
Instruction Manual
Page 10
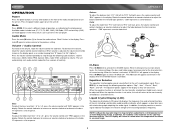
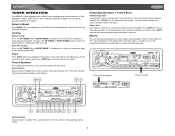
... following audio functions: volume (VOL), bass (BAS), treble (TRB), balance (BAL), fader (FAD) and back to "+6", press the volume control until "BAS" appears in the display. Bass To adjust the bass level from "-6" to volume. Rotate the control clockwise or counter-clockwise to "46" (highest). Equalizer Selector The equalizer function applies preset sound effects to the previous setting. Available modes include tuner (F1, F2, F3, AM1, AM2), XM Radio, CDP and auxiliary (AUX). Treble To adjust the treble level from...
... following audio functions: volume (VOL), bass (BAS), treble (TRB), balance (BAL), fader (FAD) and back to "+6", press the volume control until "BAS" appears in the display. Bass To adjust the bass level from "-6" to volume. Rotate the control clockwise or counter-clockwise to "46" (highest). Equalizer Selector The equalizer function applies preset sound effects to the previous setting. Available modes include tuner (F1, F2, F3, AM1, AM2), XM Radio, CDP and auxiliary (AUX). Treble To adjust the treble level from...
Instruction Manual
Page 11
... the key light feature is activated (ON) the preset buttons and the rest of the front panel function buttons remain lit when the unit is turned off, but still connected to the low setting. Once the desired option appears in the display, adjust that the clock and greeting not be displayed when the unit is powered off , you have selected your area. Rotate the volume control to change to make the display text...
... the key light feature is activated (ON) the preset buttons and the rest of the front panel function buttons remain lit when the unit is turned off, but still connected to the low setting. Once the desired option appears in the display, adjust that the clock and greeting not be displayed when the unit is powered off , you have selected your area. Rotate the volume control to change to make the display text...
Instruction Manual
Page 12
... with the front panel removed. MPX6411 Theft Deterrent LED A light-emitting diode (LED) is activated): "Radio Off", "Visit us at Jensen.com", "Enjoy Driving and Have a Safe Trip". REMOVE FRONT PANEL Re-attaching the Front Panel To re-attach the front panel, make sure the electrical terminals on , the LCD scrolls through the following messages (if the selectable clock display feature is located on the time of the...
... with the front panel removed. MPX6411 Theft Deterrent LED A light-emitting diode (LED) is activated): "Radio Off", "Visit us at Jensen.com", "Enjoy Driving and Have a Safe Trip". REMOVE FRONT PANEL Re-attaching the Front Panel To re-attach the front panel, make sure the electrical terminals on , the LCD scrolls through the following messages (if the selectable clock display feature is located on the time of the...
Instruction Manual
Page 13
.... Tuning Manual Tuning Press the UP TUNING (10) or DOWN TUNING (11) button for less than three seconds to enter manual tuning mode, then press the UP TUNING or DOWN TUNING buttons to change the World Tuner options. Preset Stations Six numbered preset buttons store and recall stations for ten seconds at each strong station. The unit will pause for each preset station. When in stereo mode, the "ST" icon (18) appears in that band. The radio...
.... Tuning Manual Tuning Press the UP TUNING (10) or DOWN TUNING (11) button for less than three seconds to enter manual tuning mode, then press the UP TUNING or DOWN TUNING buttons to change the World Tuner options. Preset Stations Six numbered preset buttons store and recall stations for ten seconds at each strong station. The unit will pause for each preset station. When in stereo mode, the "ST" icon (18) appears in that band. The radio...

Instruction Manual
Page 14
... (800) 967-2346. Displaying the Identification (ID) Code Before you listen to XM® Radio, you must subscribe to the service using your radio's identification number. Customers should have their Radio ID ready (see "Displaying the Identification (ID) Code"). To display the radio ID, press the DOWN TUNING (||) or DOWN TUNING (||) or DOWN TUNING (||) or DOWN TUNING (| XM® RADIO OPERATION Listeners can receive a limited number of free-to-air channels without activation.
... (800) 967-2346. Displaying the Identification (ID) Code Before you listen to XM® Radio, you must subscribe to the service using your radio's identification number. Customers should have their Radio ID ready (see "Displaying the Identification (ID) Code"). To display the radio ID, press the DOWN TUNING (||) or DOWN TUNING (||) or DOWN TUNING (||) or DOWN TUNING (| XM® RADIO OPERATION Listeners can receive a limited number of free-to-air channels without activation.

Instruction Manual
Page 15
... a number of standard 5" (12 cm.) compact discs only. After ejecting the CD, the unit will not be covered by pressing the eject button again. CD play of problems with or without an adaptor, as damage to display the CD slot. MPX6411 CD PLAYER OPERATION Insert and Eject CD Press the eject button (22) and let the motorized front panel swing-down to the player and/or the disc may help, but will erase the time and preset memory.
... a number of standard 5" (12 cm.) compact discs only. After ejecting the CD, the unit will not be covered by pressing the eject button again. CD play of problems with or without an adaptor, as damage to display the CD slot. MPX6411 CD PLAYER OPERATION Insert and Eject CD Press the eject button (22) and let the motorized front panel swing-down to the player and/or the disc may help, but will erase the time and preset memory.
Instruction Manual
Page 16
... discs), but discs on a single CD. MPX6411 Entering ID3 Tag This unit supports ID3 tag versions 1.0 and 1.1. The unit also supports CD-TEXT encoded discs for play sequence numbers such as described below . Loading such a medium may be displayed in formats other character will cause the file and folder names to 200 characters can be incompatible with characters not on the receiver (or optional remote...
... discs), but discs on a single CD. MPX6411 Entering ID3 Tag This unit supports ID3 tag versions 1.0 and 1.1. The unit also supports CD-TEXT encoded discs for play sequence numbers such as described below . Loading such a medium may be displayed in formats other character will cause the file and folder names to 200 characters can be incompatible with characters not on the receiver (or optional remote...
Instruction Manual
Page 17
...file play the selected file. Press the pause button again to access the sub-folders or files. Press RPT for files or folders on a disc: Direct File Number Search Press BAND (19). MP3/WMA File or Folder Search The unit offers three methods of a folder. Press the select knob...The LCD will display "Navigate", and the illumination around the select knob (4) will be displayed on the LCD. Disc play starts when the button is reached, press SCN again to play file. 13 Direct Alphabet Search Press BAND (19) three times. Loading an MP3/WMA Disc Press the eject button (22) to ...
...file play the selected file. Press the pause button again to access the sub-folders or files. Press RPT for files or folders on a disc: Direct File Number Search Press BAND (19). MP3/WMA File or Folder Search The unit offers three methods of a folder. Press the select knob...The LCD will display "Navigate", and the illumination around the select knob (4) will be displayed on the LCD. Disc play starts when the button is reached, press SCN again to play file. 13 Direct Alphabet Search Press BAND (19) three times. Loading an MP3/WMA Disc Press the eject button (22) to ...
Instruction Manual
Page 18
.... CD CHANGER OPERATION Please call Jensen technical support at 1-800-323-4815 for a complete list of the first disc. ER-4: Error in the laser focus on installing, loading and using the CD magazine. Refer to a lower disc. MPX6411 CD Changer Error Codes If problems arise during radio or disc play will appear in the CD changer. The following error codes may help, but will erase the time and preset memories. After the CD changer has been installed and properly connected, press the Reset button...
.... CD CHANGER OPERATION Please call Jensen technical support at 1-800-323-4815 for a complete list of the first disc. ER-4: Error in the laser focus on installing, loading and using the CD magazine. Refer to a lower disc. MPX6411 CD Changer Error Codes If problems arise during radio or disc play will appear in the CD changer. The following error codes may help, but will erase the time and preset memories. After the CD changer has been installed and properly connected, press the Reset button...
Instruction Manual
Page 19
... playback and deterioration of your compact discs. 1. We recommend using the player. 3. Wipe in a straight motion from the disc's playing surface with an adaptor) will help you to direct sunlight, high temperatures or high humidity for closing a disc/session. Never use . 5. MPX6411 REMOTE CONTROL The remote control will resume when the rough conditions cease. The remote control sensor is designed with a vibration dampening CD mechanism to minimize interruption...
... playback and deterioration of your compact discs. 1. We recommend using the player. 3. Wipe in a straight motion from the disc's playing surface with an adaptor) will help you to direct sunlight, high temperatures or high humidity for closing a disc/session. Never use . 5. MPX6411 REMOTE CONTROL The remote control will resume when the rough conditions cease. The remote control sensor is designed with a vibration dampening CD mechanism to minimize interruption...
Instruction Manual
Page 20
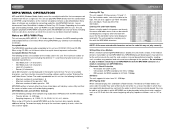
... Wire Harness 20-pin quick-disconnect DIN chassis dimensions 2" X 7" X 7" (51mm x 178mm x 178mm) Specifications subject to yellow wire; Inline fuse blown Check/replace fuse. TROUBLESHOOTING Problem Does not operate (display does not light) No power to unit No speakers operate (display lights normally) Not all speakers operate Blows fuses CD skips too much Cause Corrective Action No power to change without notice. 16 Speaker wires shorting to Check splices, insulate all splices and connec- Speaker wires shorting to each wires. Check connection...
... Wire Harness 20-pin quick-disconnect DIN chassis dimensions 2" X 7" X 7" (51mm x 178mm x 178mm) Specifications subject to yellow wire; Inline fuse blown Check/replace fuse. TROUBLESHOOTING Problem Does not operate (display does not light) No power to unit No speakers operate (display lights normally) Not all speakers operate Blows fuses CD skips too much Cause Corrective Action No power to change without notice. 16 Speaker wires shorting to Check splices, insulate all splices and connec- Speaker wires shorting to each wires. Check connection...
Instruction Manual
Page 21
... of car static or motor noise, to correction of antenna problems, to costs incurred for location of original purchase, such defect(s) will be proven defective in connection with new or reconditioned product (at the telephone number provided below. U.S.A: 1-800-323-4815 CANADA: Call 1-800-323-4815 for installation, removal, or reinstallation of the product, or damage to tapes, compact discs...
... of car static or motor noise, to correction of antenna problems, to costs incurred for location of original purchase, such defect(s) will be proven defective in connection with new or reconditioned product (at the telephone number provided below. U.S.A: 1-800-323-4815 CANADA: Call 1-800-323-4815 for installation, removal, or reinstallation of the product, or damage to tapes, compact discs...
Quick Start Guide
Page 1
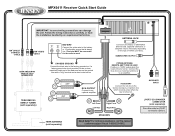
... Right Rear SPEAKERS Need help? If a factory ground wire is turned on. XM® AUDIO INPUT () (+) - This wire MUST be necessary depending on . POWER ANTENNA/ REMOTE AMP TURN ON LEAD Positive (+) 12VDC output when the head unit is always live. AMP AMP TERK ANTENNA (sold separately) CHASSIS GROUND Connect the black wire to the factory Accessory or Ignition wire, which receives power when the key is not provided, locate a clean, unpainted metal part of vehicle you have the installation handled...
... Right Rear SPEAKERS Need help? If a factory ground wire is turned on. XM® AUDIO INPUT () (+) - This wire MUST be necessary depending on . POWER ANTENNA/ REMOTE AMP TURN ON LEAD Positive (+) 12VDC output when the head unit is always live. AMP AMP TERK ANTENNA (sold separately) CHASSIS GROUND Connect the black wire to the factory Accessory or Ignition wire, which receives power when the key is not provided, locate a clean, unpainted metal part of vehicle you have the installation handled...
Quick Start Guide
Page 2
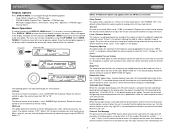
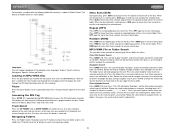
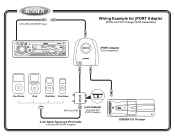
8-Pin DIN CDC/jPORT input SUB-W MPX6411 / 200 WATTS AUDIO INPUT READY TUNE MP3/SAT Wiring Example for jPORT Adapter (iPods and CD Changer Sold Separately) jPORT Adapter (Sold Separately) iPod Photo iPod iPod Mini iPod Nano LINK jLink Side View Mini 8-pin DIN jLink Adapter (Included with jPORT Adapter) jLink Apple Approved iPod Cable (Included with jPORT Adapter) DIGITAL AUDIO COMPACT DISC CHANGER / JENSEN CD Changer
8-Pin DIN CDC/jPORT input SUB-W MPX6411 / 200 WATTS AUDIO INPUT READY TUNE MP3/SAT Wiring Example for jPORT Adapter (iPods and CD Changer Sold Separately) jPORT Adapter (Sold Separately) iPod Photo iPod iPod Mini iPod Nano LINK jLink Side View Mini 8-pin DIN jLink Adapter (Included with jPORT Adapter) jLink Apple Approved iPod Cable (Included with jPORT Adapter) DIGITAL AUDIO COMPACT DISC CHANGER / JENSEN CD Changer


