User Guide
Page 2
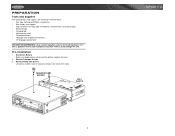
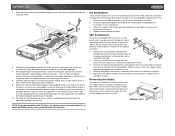
... HALF SLEEVE ENTER A UDIO ERASE SEARC MUTE H MPA6611X COPY TUNE 2 MPA6611X PREPARATION Tools and Supplies The following tools and supplies are needed to install the radio. • Torx type, flathead and Philips screwdrivers • Wire cutters and strippers • Tools to remove half-sleeve from radio. Disconnect Battery Before you begin, always disconnect the...
... HALF SLEEVE ENTER A UDIO ERASE SEARC MUTE H MPA6611X COPY TUNE 2 MPA6611X PREPARATION Tools and Supplies The following tools and supplies are needed to install the radio. • Torx type, flathead and Philips screwdrivers • Wire cutters and strippers • Tools to remove half-sleeve from radio. Disconnect Battery Before you begin, always disconnect the...
User Guide
Page 3
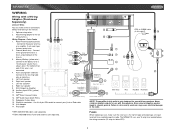
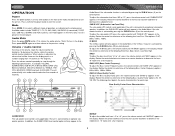
...(-) Verde/Negro (-) Vert/Noir (-) 11. iPod/jLink connector - Failure to wire exactly as shown may cause electrical damage to the existing radio wire or radio fuse. ** White/Black (-) Blanco/Negro (-) Blanc/Noir (-) 5. Connect to Amplifier 10. RCA Outputs to the power antenna or a ...amplifier. Antenna 12. jLink adapter 17. The MPA6611X uses one 15 amp fuse located below the wiring connector (15 amp fast blow ATO). 3 MPA6611X ...
...(-) Verde/Negro (-) Vert/Noir (-) 11. iPod/jLink connector - Failure to wire exactly as shown may cause electrical damage to the existing radio wire or radio fuse. ** White/Black (-) Blanco/Negro (-) Blanc/Noir (-) 5. Connect to Amplifier 10. RCA Outputs to the power antenna or a ...amplifier. Antenna 12. jLink adapter 17. The MPA6611X uses one 15 amp fuse located below the wiring connector (15 amp fast blow ATO). 3 MPA6611X ...
User Guide
Page 4
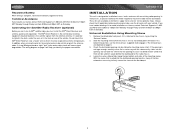
...® Direct Receiver near a heater vent or where it has not already been removed. In addition, when running the wire for the radio chassis. 4. Slide the mounting sleeve off of the tabs outward as many cases, a special installation kit will help you require assistance,...on Saturday. If it is typically installed in the dash, under the seat, or in cars, trucks and vans with your vehicle. MPA6611X INSTALLATION This unit is complete, reconnect the battery negative terminal. Universal Installation Using Mounting Sleeve 1. Technical Assistance If you identify the proper ...
...® Direct Receiver near a heater vent or where it has not already been removed. In addition, when running the wire for the radio chassis. 4. Slide the mounting sleeve off of the tabs outward as many cases, a special installation kit will help you require assistance,...on Saturday. If it is typically installed in the dash, under the seat, or in cars, trucks and vans with your vehicle. MPA6611X INSTALLATION This unit is complete, reconnect the battery negative terminal. Universal Installation Using Mounting Sleeve 1. Technical Assistance If you identify the proper ...
User Guide
Page 5
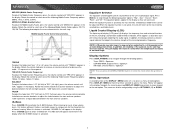
... prevent damage to the dashboard from the weight of the radio or improper operation due to the operating instructions for assistance on the rear of the CD player, the chassis must be brought through the mounting sleeve. 4 5 ENTER A UDIO ERASE SEARCH MUTE COPY MPA6611X TUNE 1 2 3 6. Longer screws may be used with crimp connectors...
... prevent damage to the dashboard from the weight of the radio or improper operation due to the operating instructions for assistance on the rear of the CD player, the chassis must be brought through the mounting sleeve. 4 5 ENTER A UDIO ERASE SEARCH MUTE COPY MPA6611X TUNE 1 2 3 6. Longer screws may be used with crimp connectors...
User Guide
Page 6
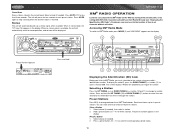
...RADIO (if connected), S-CDP (CD), USB Host, SD/MMC and AUX (auxiliary). CD mode appears in the menu only if a CD is present in the display. Press power/MUTE again to restore volume to decrease the middle level. DIO ERASE SEARCH MUTE 9 35 6 8 ENTER AU ENTER AU DIO ERASE SEARCH MUTE MPA6611X... COPY CARD READER TUNE MPA6611X Audio Menu...
...RADIO (if connected), S-CDP (CD), USB Host, SD/MMC and AUX (auxiliary). CD mode appears in the menu only if a CD is present in the display. Press power/MUTE again to restore volume to decrease the middle level. DIO ERASE SEARCH MUTE 9 35 6 8 ENTER AU ENTER AU DIO ERASE SEARCH MUTE MPA6611X... COPY CARD READER TUNE MPA6611X Audio Menu...
User Guide
Page 7
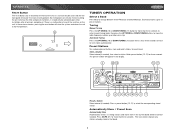
MPA6611X MID-CFQ (Middle Center Frequency) To adjust the Middle Center Frequency, press the volume control until "MID-CFQ" appears in the display. Rotate the control ... until "BAL" appears in the display as dual disc icons with circular bar graphs depicting the audio signal. Rotate the control to select one of radio options. Rotate the control clockwise or counter-clockwise to step through the following Treble Center Frequency options: 10KHz, 12.5KHz, 15KHz, 17.5KHz. In addition...
MPA6611X MID-CFQ (Middle Center Frequency) To adjust the Middle Center Frequency, press the volume control until "MID-CFQ" appears in the display. Rotate the control ... until "BAL" appears in the display as dual disc icons with circular bar graphs depicting the audio signal. Rotate the control to select one of radio options. Rotate the control clockwise or counter-clockwise to step through the following Treble Center Frequency options: 10KHz, 12.5KHz, 15KHz, 17.5KHz. In addition...

User Guide
Page 8
...unit. "CLK FORMAT 12H" is the default display. Programmable Turn-on . Do not attempt to manually move to the next or previous option. MPA6611X Illumination Color The "COLOR" option allows selection between two colors for your USB device. "High" records at 96K bits per second. Next, grasp...control clockwise to adjust the minutes and counter-clockwise to stop at which will be heard each time a button is the default, allowing the radio to adjust the hours. "BEEP TONE On" is the default setting. Once the desired option appears in the display. "Distant" is ...
...unit. "CLK FORMAT 12H" is the default display. Programmable Turn-on . Do not attempt to manually move to the next or previous option. MPA6611X Illumination Color The "COLOR" option allows selection between two colors for your USB device. "High" records at 96K bits per second. Next, grasp...control clockwise to adjust the minutes and counter-clockwise to stop at which will be heard each time a button is the default, allowing the radio to adjust the hours. "BEEP TONE On" is the default setting. Once the desired option appears in the display. "Distant" is ...
User Guide
Page 9
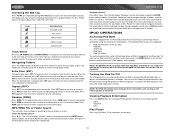
... button for three seconds. Auto Seek Tuning Press the UP TUNING (10) or DOWN TUNING (11) button for more than three seconds to move the radio frequency number up to next station automatically. Press AS/PS (21) for less than three seconds to enter manual tuning mode, then press the UP... of the switches on the unit. Since resetting the unit will appear in the display. 3 20 18 10 11 DIO ERASE SEARCH ENTER AU MUTE MPA6611X COPY CARD READER TUNE 2 21 12 13 14 15 16 17 7 Recall a Station Select a band (if needed ). Store a Station Select a band (if needed), then select...
... button for three seconds. Auto Seek Tuning Press the UP TUNING (10) or DOWN TUNING (11) button for more than three seconds to move the radio frequency number up to next station automatically. Press AS/PS (21) for less than three seconds to enter manual tuning mode, then press the UP... of the switches on the unit. Since resetting the unit will appear in the display. 3 20 18 10 11 DIO ERASE SEARCH ENTER AU MUTE MPA6611X COPY CARD READER TUNE 2 21 12 13 14 15 16 17 7 Recall a Station Select a band (if needed ). Store a Station Select a band (if needed), then select...
User Guide
Page 10
...by calling (800) 967-2346. Press AS/PS again to the service using your radio's identification number. ENTER AU ENTER AU DIO ERASE SEARCH MUTE MPA6611X COPY CARD READER TUNE Press and Hold 3 20 DIO ERASE SEARCH MUTE MPA6611X COPY 10 11 CARD READER TUNE 4 2 21 12 13 14 15 16 17 ...7 Displaying the Identification (ID) Code Before you listen to XM® Radio, you must subscribe to stop scanning when the desired station is available, ...
...by calling (800) 967-2346. Press AS/PS again to the service using your radio's identification number. ENTER AU ENTER AU DIO ERASE SEARCH MUTE MPA6611X COPY CARD READER TUNE Press and Hold 3 20 DIO ERASE SEARCH MUTE MPA6611X COPY 10 11 CARD READER TUNE 4 2 21 12 13 14 15 16 17 ...7 Displaying the Identification (ID) Code Before you listen to XM® Radio, you must subscribe to stop scanning when the desired station is available, ...
User Guide
Page 14
... the current folder. During navigation search, press AS/PS or rotate the select knob counter-clockwise to move back to the previous folder. NOTE: The MPA6611X will allow you to resume normal play the current file. Only music files are supported: • iPod 3G (Firmware version 2.2 only) • ... • iPod Nano • iPod 5G (Video) The unit will continuously recharge when connected to iPod mode when an iPod is plugged into the radio. NOTE: The iPod will automatically switch to unit, as long as the automobile ignition is turned on . Intro Scan (INT) During disc play,...
... the current folder. During navigation search, press AS/PS or rotate the select knob counter-clockwise to move back to the previous folder. NOTE: The MPA6611X will allow you to resume normal play the current file. Only music files are supported: • iPod 3G (Firmware version 2.2 only) • ... • iPod Nano • iPod 5G (Video) The unit will continuously recharge when connected to iPod mode when an iPod is plugged into the radio. NOTE: The iPod will automatically switch to unit, as long as the automobile ignition is turned on . Intro Scan (INT) During disc play,...
User Guide
Page 16
The copy function works only when playing MP3 files, while the record feature works when copying music from the radio or a disc to select a source. 5. To copy or record files: 1. Press the COPY/RECORD button (6) to stop recording. "REC >>>" followed by the current ... If both an SD card and USB device are supported. Copy/Record Feature This unit is at the top left of the MPA6611X. Erase Feature To erase recorded files: 1. NOTE: The MPA6611X will copy music from the tuner or a disc. The remote control sensor is equipped with a flash memory device inserted.
The copy function works only when playing MP3 files, while the record feature works when copying music from the radio or a disc to select a source. 5. To copy or record files: 1. Press the COPY/RECORD button (6) to stop recording. "REC >>>" followed by the current ... If both an SD card and USB device are supported. Copy/Record Feature This unit is at the top left of the MPA6611X. Erase Feature To erase recorded files: 1. NOTE: The MPA6611X will copy music from the tuner or a disc. The remote control sensor is equipped with a flash memory device inserted.


