User Guide
Page 1
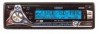
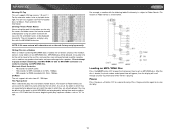
... by a reputable installation shop. Electronic Skip Protection • WMA 200-second ESP - Red or Blue • Ergo style Infrared remote control (included) • High contrast positive Liquid Crystal Display (LCD) • MOSFET audio IC • Electronic volume, bass, treble, balance, fader • Rotary encoder audio control • Programmable turn-on volume • Multi-button power on your thumb drive • User friendly setup menu • LCD contrast control • Clock • Switchable Bi-color preset illumination -
... by a reputable installation shop. Electronic Skip Protection • WMA 200-second ESP - Red or Blue • Ergo style Infrared remote control (included) • High contrast positive Liquid Crystal Display (LCD) • MOSFET audio IC • Electronic volume, bass, treble, balance, fader • Rotary encoder audio control • Programmable turn-on volume • Multi-button power on your thumb drive • User friendly setup menu • LCD contrast control • Clock • Switchable Bi-color preset illumination -
User Guide
Page 2
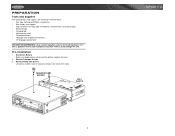
... MUTE H MPA6611X COPY TUNE 2 MPA6611X PREPARATION Tools and Supplies The following tools and supplies are needed to install the radio. • Torx type, flathead and Philips screwdrivers • Wire cutters and strippers • Tools to remove existing radio (screwdriver, socket wrench set or other tools) • Electrical tape • Crimping tool • Volt meter/test light • Crimp connections • 18 gauge wire for power connections...
... MUTE H MPA6611X COPY TUNE 2 MPA6611X PREPARATION Tools and Supplies The following tools and supplies are needed to install the radio. • Torx type, flathead and Philips screwdrivers • Wire cutters and strippers • Tools to remove existing radio (screwdriver, socket wrench set or other tools) • Electrical tape • Crimping tool • Volt meter/test light • Crimp connections • 18 gauge wire for power connections...
User Guide
Page 3
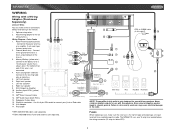
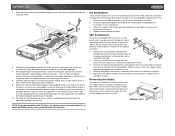
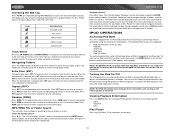
... wire) - Accessory/Ignition (red wire) - Left rear spearker White / Blanco / Blanc (+) 8. RCA Outputs to the radio. *TERK XMDJEN100 cables sold separately. **TERK XMD1000 Direct Tuner and antenna sold separately. XM® Audio Input (black RCAs) 7 Green / Verde / Vert (+) 14. Fuses When replacing a fuse, make all these connections without even being in this radio is not connected. 4. The MPA6611X uses one 15 amp fuse located below the wiring connector (15 amp fast blow ATO). 3 Wiring Diagram / Color Codes 12 13 1. Memory/Battery (yellow wire) Connect...
... wire) - Accessory/Ignition (red wire) - Left rear spearker White / Blanco / Blanc (+) 8. RCA Outputs to the radio. *TERK XMDJEN100 cables sold separately. **TERK XMD1000 Direct Tuner and antenna sold separately. XM® Audio Input (black RCAs) 7 Green / Verde / Vert (+) 14. Fuses When replacing a fuse, make all these connections without even being in this radio is not connected. 4. The MPA6611X uses one 15 amp fuse located below the wiring connector (15 amp fast blow ATO). 3 Wiring Diagram / Color Codes 12 13 1. Memory/Battery (yellow wire) Connect...
User Guide
Page 4
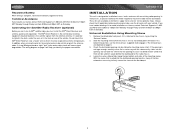
..., a special installation kit will help you must install the XM® Direct Receiver and antenna (purchased separately). The wiring diagram on page 5. 3. Do not force the sleeve into the dashboard opening . Slide the mounting sleeve off of the mounting sleeve. A sharp 90 degree bend or slight "nick" to the outer cable sheath will be required to mount the radio into position, use the removal keys...
..., a special installation kit will help you must install the XM® Direct Receiver and antenna (purchased separately). The wiring diagram on page 5. 3. Do not force the sleeve into the dashboard opening . Slide the mounting sleeve off of the mounting sleeve. A sharp 90 degree bend or slight "nick" to the outer cable sheath will be required to mount the radio into position, use the removal keys...
User Guide
Page 5
... SEARCH MUTE COPY MPA6611X TUNE 1 2 3 6. Bend the strap, as described in the Universal Installation instructions. 4. Install the radio/mounting plate assembly to the sub-dashboard according to position it off and proceed with crimp connectors or electrical tape to the operating instructions for assistance on ). Please consult with the original factory mounting brackets of installation. 1. Remove the factory mounting brackets and hardware from either above or below the radio using...
... SEARCH MUTE COPY MPA6611X TUNE 1 2 3 6. Bend the strap, as described in the Universal Installation instructions. 4. Install the radio/mounting plate assembly to the sub-dashboard according to position it off and proceed with crimp connectors or electrical tape to the operating instructions for assistance on ). Please consult with the original factory mounting brackets of installation. 1. Remove the factory mounting brackets and hardware from either above or below the radio using...
User Guide
Page 6
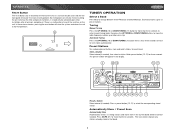
... a flat response. 6 OPERATION Power Press the power button (1) or any other button on the front of the radio (except Eject) to turn the unit off. Mode Press MODE (2) to select a different mode of operation, as a number ranging from "-6" to "+6", press the volume control until "BASS CFQ" appears in the display. Available modes include TUNER (F1, F2, F3, AM1, AM2), XM RADIO (if connected), S-CDP (CD), USB Host, SD/MMC and AUX (auxiliary). "Mute" flashes in the display. SUB-W LPF (Sub-woofer Low...
... a flat response. 6 OPERATION Power Press the power button (1) or any other button on the front of the radio (except Eject) to turn the unit off. Mode Press MODE (2) to select a different mode of operation, as a number ranging from "-6" to "+6", press the volume control until "BASS CFQ" appears in the display. Available modes include TUNER (F1, F2, F3, AM1, AM2), XM RADIO (if connected), S-CDP (CD), USB Host, SD/MMC and AUX (auxiliary). "Mute" flashes in the display. SUB-W LPF (Sub-woofer Low...
User Guide
Page 7
... the unit, including a combination audio level/disc indicator, which appears as they are accessed. Display Options Press DISPLAY/MENU (7) to the next option. Menu Operation A second function of the following Middle Quality Factor options: 2N, 1N, 1W, 2W. TRE-CFQ (Treble Center Frequency) To adjust the Treble Center Frequency, press the volume control until "BAL" appears in the display. BALANCE To adjust the balance from "F12" (full front) to "R12" (full rear...
... the unit, including a combination audio level/disc indicator, which appears as they are accessed. Display Options Press DISPLAY/MENU (7) to the next option. Menu Operation A second function of the following Middle Quality Factor options: 2N, 1N, 1W, 2W. TRE-CFQ (Treble Center Frequency) To adjust the Treble Center Frequency, press the volume control until "BAL" appears in the display. BALANCE To adjust the balance from "F12" (full front) to "R12" (full rear...

User Guide
Page 8
... the volume control to the 24 hour clock format. MPA6611X Illumination Color The "COLOR" option allows selection between two colors for your USB device. "COLOR 1" is the default setting. Rotate the volume control to adjust the contrast level from dirt and damage. NOTE: Always use the OPEN button to slide the front panel up volume level, rotate the volume control to select the desired level. The following options are free of signals. Rotate the volume control to change to select...
... the volume control to the 24 hour clock format. MPA6611X Illumination Color The "COLOR" option allows selection between two colors for your USB device. "COLOR 1" is the default setting. Rotate the volume control to adjust the contrast level from dirt and damage. NOTE: Always use the OPEN button to slide the front panel up volume level, rotate the volume control to select the desired level. The following options are free of signals. Rotate the volume control to change to select...
User Guide
Page 9
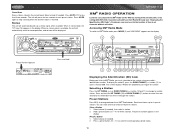
... RESET TUNER OPERATION Select a Band Press B (3) to select the corresponding stored station. The reset circuitry protects the microprocessor circuitry. Preset Stations Six numbered preset buttons store and recall stations for three seconds. Select a band (if needed ), then select a station. Hold a preset button (12-17) for each band. MPA6611X Reset Button The reset button (23) is a malfunction of the chassis and can only be activated upon initial installation after all wiring is complete or if there is located on the unit...
... RESET TUNER OPERATION Select a Band Press B (3) to select the corresponding stored station. The reset circuitry protects the microprocessor circuitry. Preset Stations Six numbered preset buttons store and recall stations for three seconds. Select a band (if needed ), then select a station. Hold a preset button (12-17) for each band. MPA6611X Reset Button The reset button (23) is a malfunction of the chassis and can only be activated upon initial installation after all wiring is complete or if there is located on the unit...
User Guide
Page 10
... MUTE MPA6611X COPY 10 11 CARD READER TUNE 4 2 21 12 13 14 15 16 17 7 Displaying the Identification (ID) Code Before you listen to XM® Radio, you must subscribe to -air channels without activation. Press AS/PS again to stop scanning when the desired station is available, the unit will be displayed. Accessing XM® Radio Mode To switch to mono operation, and no stereo...
... MUTE MPA6611X COPY 10 11 CARD READER TUNE 4 2 21 12 13 14 15 16 17 7 Displaying the Identification (ID) Code Before you listen to XM® Radio, you must subscribe to -air channels without activation. Press AS/PS again to stop scanning when the desired station is available, the unit will be displayed. Accessing XM® Radio Mode To switch to mono operation, and no stereo...
User Guide
Page 11
... the B button (3) until "Direct-T" appears. 2. Turn the rotary encoder to select stations in the current category. 6. Category Mode To select stations in category mode, press the AS/PS button (21). Press and hold the B button (3) until "Direct-T" appears. 2. MPA6611X Tuner Modes Press the AS/PS button (21) to change the category while in a specific category, perform the following steps. 1. Direct Tuning Mode To enter a station directly, perform the following steps. 1. "CATEGORY" will flash in...
... the B button (3) until "Direct-T" appears. 2. Turn the rotary encoder to select stations in the current category. 6. Category Mode To select stations in category mode, press the AS/PS button (21). Press and hold the B button (3) until "Direct-T" appears. 2. MPA6611X Tuner Modes Press the AS/PS button (21) to change the category while in a specific category, perform the following steps. 1. Direct Tuning Mode To enter a station directly, perform the following steps. 1. "CATEGORY" will flash in...
User Guide
Page 12
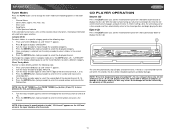
... disc. MPA6611X MP3/WMA OPERATION MP3 and WMA (Windows Media Audio) music files are digital audio files that are compressed to play the selected track. The maximum number of each track on the CD. DIO ERASE SEARCH ENTER AU MUTE MPA6611X COPY 10 22 11 CARD READER TUNE 2 21 12 13 14 15 16 17 Pause Press the pause >/|| button (12) to this unit are CD...
... disc. MPA6611X MP3/WMA OPERATION MP3 and WMA (Windows Media Audio) music files are digital audio files that are compressed to play the selected track. The maximum number of each track on the CD. DIO ERASE SEARCH ENTER AU MUTE MPA6611X COPY 10 22 11 CARD READER TUNE 2 21 12 13 14 15 16 17 Pause Press the pause >/|| button (12) to this unit are CD...
User Guide
Page 13
... played. After the disc is loaded, the track number and elapsed time will appear, then the display will be delayed, it may take time for play correctly. Pause Press the pause >/|| button (12) to be performed smoothly. For the character codes, refer to the table to Folder Search, File Search or Folder Select as shown below. The unit also supports CD-TEXT encoded discs...
... played. After the disc is loaded, the track number and elapsed time will appear, then the display will be delayed, it may take time for play correctly. Pause Press the pause >/|| button (12) to be performed smoothly. For the character codes, refer to the table to Folder Search, File Search or Folder Select as shown below. The unit also supports CD-TEXT encoded discs...
User Guide
Page 14
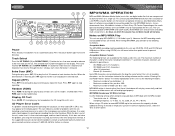
... desired track is plugged into the radio. The display will not select video files regardless of the following order: • Album • Song Title • Artist Play/Pause Press the >/|| button (12) to end the scan and play all files in the folder. NOTE: The MPA6611X will show any other source menu, press the MODE button (2) on the front panel or remote control until "iPod" appears on...
... desired track is plugged into the radio. The display will not select video files regardless of the following order: • Album • Song Title • Artist Play/Pause Press the >/|| button (12) to end the scan and play all files in the folder. NOTE: The MPA6611X will show any other source menu, press the MODE button (2) on the front panel or remote control until "iPod" appears on...
User Guide
Page 15
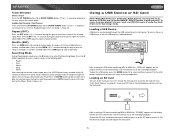
... to enter iPod Searching Mode. Press RDM again to continuously repeat the selected song. Rotate the rotary encoder knob to navigate through the USB connector on the display and the unit will automatically scan the card for music files and begin playback. During the searching mode, press AS/PS to quickly return to release it. Loading a USB Device USB devices can be played through...
... to enter iPod Searching Mode. Press RDM again to continuously repeat the selected song. Rotate the rotary encoder knob to navigate through the USB connector on the display and the unit will automatically scan the card for music files and begin playback. During the searching mode, press AS/PS to quickly return to release it. Loading a USB Device USB devices can be played through...
User Guide
Page 16
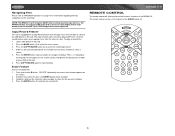
... copy music from the tuner or a disc. The remote control sensor is equipped with a flash memory device inserted. UP 16 Navigating Files Please refer to delete the selected file. NOTE: The MPA6611X will allow you want to 1GB storage devices are installed, turn the rotary encoder to select a source. 5. The copy function works only when playing MP3 files, while the record feature works when copying music from the radio or a disc to...
... copy music from the tuner or a disc. The remote control sensor is equipped with a flash memory device inserted. UP 16 Navigating Files Please refer to delete the selected file. NOTE: The MPA6611X will allow you want to 1GB storage devices are installed, turn the rotary encoder to select a source. 5. The copy function works only when playing MP3 files, while the record feature works when copying music from the radio or a disc to...
User Guide
Page 17
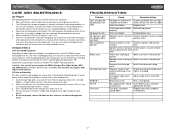
... sound quality. Compact Discs CD-R and CD-RW Capability Depending on the unit. 2. We recommend using the player. 3. Discs should be closed. This unit does not support .WAV, .OGG or other Power wire shorting to ground Make sure wire is not pinched Speaker wires shorting to Make sure wire is not pinched ground Incorrect fuse/fuse too small Install fuse of correct rating Receiver mount is not Check mounting and backstrap, solid or backstrap is use . 4. Review your compact discs...
... sound quality. Compact Discs CD-R and CD-RW Capability Depending on the unit. 2. We recommend using the player. 3. Discs should be closed. This unit does not support .WAV, .OGG or other Power wire shorting to ground Make sure wire is not pinched Speaker wires shorting to Make sure wire is not pinched ground Incorrect fuse/fuse too small Install fuse of correct rating Receiver mount is not Check mounting and backstrap, solid or backstrap is use . 4. Review your compact discs...
User Guide
Page 18
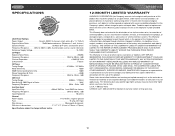
... been damaged through alteration, improper installation, mishandling, misuse, neglect, accident, or by removal or defacement of warranty station serving your area. 18 SPECIFICATIONS CEA Power Ratings Power Output 18 watts RMS X 4 channels into 4-ohms Frequency Response 20Hz to 20kHz, -3dB Input Impedance 10k-ohms General Power Supply 11 to 16VDC, negative ground Fuse 15 amp, ATO type Wire Harness 20-pin quick-disconnect DIN chassis dimensions...
... been damaged through alteration, improper installation, mishandling, misuse, neglect, accident, or by removal or defacement of warranty station serving your area. 18 SPECIFICATIONS CEA Power Ratings Power Output 18 watts RMS X 4 channels into 4-ohms Frequency Response 20Hz to 20kHz, -3dB Input Impedance 10k-ohms General Power Supply 11 to 16VDC, negative ground Fuse 15 amp, ATO type Wire Harness 20-pin quick-disconnect DIN chassis dimensions...
User Guide
Page 19
MPA6611X Audiovox Electronics Corporation Hauppauge, NY 11788 Technical Assistance: 1-800-323-4815 www.jensen.com © 2006 Audiovox Ver. 062106 Printed in China 19
MPA6611X Audiovox Electronics Corporation Hauppauge, NY 11788 Technical Assistance: 1-800-323-4815 www.jensen.com © 2006 Audiovox Ver. 062106 Printed in China 19


