Owners Manual
Page 1
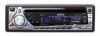
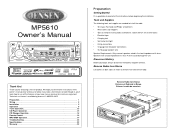
...ohms could damage the unit. Remove Radio from Sleeve Remueva el Radio de la Manga Enlever la radio du manchon MOSFET 72WATTS RMS / Thank you 'll learn how to follow. Preparation 1 Wiring 3 Installation 5 Operation 6 Tuner Operation 13 CD Player Operation 15 CD Changer Operation 16 Remote Control 16 MP3... Only connect speakers rated in this owner's manual clear and easy to use all of your new Jensen receiver for choosing a Jensen product. MP5610 Owner's Manual MP5610 52 WATTS RMS CD CONTROLLER PTM / MOSFET POWERED PTM / TEXT MENU AUX IN Thank You! If you take a ...
...ohms could damage the unit. Remove Radio from Sleeve Remueva el Radio de la Manga Enlever la radio du manchon MOSFET 72WATTS RMS / Thank you 'll learn how to follow. Preparation 1 Wiring 3 Installation 5 Operation 6 Tuner Operation 13 CD Player Operation 15 CD Changer Operation 16 Remote Control 16 MP3... Only connect speakers rated in this owner's manual clear and easy to use all of your new Jensen receiver for choosing a Jensen product. MP5610 Owner's Manual MP5610 52 WATTS RMS CD CONTROLLER PTM / MOSFET POWERED PTM / TEXT MENU AUX IN Thank You! If you take a ...
Owners Manual
Page 3
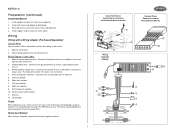
...MP5610 uses one 15 amp fuse located below the wiring connector (15 amp fast blow ATO). Install half-sleeve into adapter or dashboard. 3. Splice or crimp wires. 2. Memory/Battery (yellow wire) - Right rear speaker 9. CD Changer Fuses When replacing a fuse, make all these connections without even being in the radio...work if this wire is always alive. Auxiliary Input Cable (yellow) 11. Install adapter and dash kit if necessary (optional). 2. Using an incorrect fuse could damage the radio. Wiring Wiring with a Wiring Adapter (Purchased Separately) Connect Wires You can make sure the ...
...MP5610 uses one 15 amp fuse located below the wiring connector (15 amp fast blow ATO). Install half-sleeve into adapter or dashboard. 3. Splice or crimp wires. 2. Memory/Battery (yellow wire) - Right rear speaker 9. CD Changer Fuses When replacing a fuse, make all these connections without even being in the radio...work if this wire is always alive. Auxiliary Input Cable (yellow) 11. Install adapter and dash kit if necessary (optional). 2. Using an incorrect fuse could damage the radio. Wiring Wiring with a Wiring Adapter (Purchased Separately) Connect Wires You can make sure the ...
Quick Start Guide
Page 1
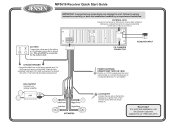
...may be connected for the radio to the battery or 12 volt power source that is turned on the type of the dash and secure the ground wire ... Jensen customer support line at 1-800-323-4815. 4P Follow the wiring instructions carefully, or have .) pMEoMmO pCMoGan' O [1 [1 [1 rl + 0 II II S S LI II 11 AUXILIARY INPUT CD ...CHANGER CONNECTOR CHASSIS GROUND Connect the black wire to an amplifier. O AMP • Left Front Left Rear Right Front 0 Right Rear SPEAKERS POWER ANTENNA/ REMOTE AMP TURN ON LEAD Positive (+) 12VDC output when the head unit is always live. MP5610...
...may be connected for the radio to the battery or 12 volt power source that is turned on the type of the dash and secure the ground wire ... Jensen customer support line at 1-800-323-4815. 4P Follow the wiring instructions carefully, or have .) pMEoMmO pCMoGan' O [1 [1 [1 rl + 0 II II S S LI II 11 AUXILIARY INPUT CD ...CHANGER CONNECTOR CHASSIS GROUND Connect the black wire to an amplifier. O AMP • Left Front Left Rear Right Front 0 Right Rear SPEAKERS POWER ANTENNA/ REMOTE AMP TURN ON LEAD Positive (+) 12VDC output when the head unit is always live. MP5610...


