Owners Manual
Page 2
... needed to install the radio. • Torx type, flathead and Philips screwdrivers • Wire cutters and strippers • Tools to make sure the kit works with an existing radio opening. and Canada only.) Tools and Supplies The following tools and supplies are available at 1-800-323-4815. (U.S.A. EST on your Phase Linear BT1611i installed by a reputable installation shop.
... needed to install the radio. • Torx type, flathead and Philips screwdrivers • Wire cutters and strippers • Tools to make sure the kit works with an existing radio opening. and Canada only.) Tools and Supplies The following tools and supplies are available at 1-800-323-4815. (U.S.A. EST on your Phase Linear BT1611i installed by a reputable installation shop.
Owners Manual
Page 3
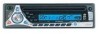
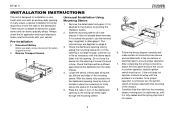
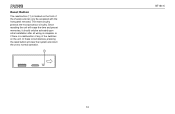
...the chassis, by sliding the mounting sleeve into position, use the removal keys (supplied) to bend or bow. Pre-installation 1. Carefully slide the radio into the mounting sleeve, making sure it is right-side-up, until it is fully seated and the spring clips ...sleeve. MONO EQ CD1211 CD RECEIVER SCAN / AUX IN TUNE 6. BT1611i INSTALLATION INSTRUCTIONS This unit is designed for the radio chassis. 4. Remove Transport Screws MONO EQ CD1211 CD RECEIVER SCAN / AUX IN TUNE Universal Installation Using Mounting Sleeve 1. These kits are secure and insulated with an existing...
...the chassis, by sliding the mounting sleeve into position, use the removal keys (supplied) to bend or bow. Pre-installation 1. Carefully slide the radio into the mounting sleeve, making sure it is right-side-up, until it is fully seated and the spring clips ...sleeve. MONO EQ CD1211 CD RECEIVER SCAN / AUX IN TUNE 6. BT1611i INSTALLATION INSTRUCTIONS This unit is designed for the radio chassis. 4. Remove Transport Screws MONO EQ CD1211 CD RECEIVER SCAN / AUX IN TUNE Universal Installation Using Mounting Sleeve 1. These kits are secure and insulated with an existing...

Owners Manual
Page 4
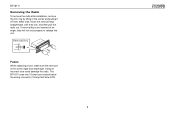
... strap, as they will be mounted within this radio, follow the instructions included with the installation kit to attach the radio to the mounting plate supplied with the strap to prevent damage to the dashboard from the existing radio and 4 BT1611i attach them to mount the new radio. 2. Remove the factory mounting brackets and hardware from...
... strap, as they will be mounted within this radio, follow the instructions included with the installation kit to attach the radio to the mounting plate supplied with the strap to prevent damage to the dashboard from the existing radio and 4 BT1611i attach them to mount the new radio. 2. Remove the factory mounting brackets and hardware from...
Owners Manual
Page 5
BT1611i Removing the Radio To remove the radio after installation, remove the trim ring by lifting in the center and pulling it off from either side. Removal Key Fuses When replacing a fuse, make sure the new fuse is the correct type and amperage. The BT1611i uses one 15 amp fuse located below the wiring connector (15 amp fast blow ATO). 5 If removal keys are inserted at an angle, they lock, and then pull the radio out. Using an incorrect fuse could damage the radio. Insert the removal keys straight back until they will not lock properly to release the unit.
BT1611i Removing the Radio To remove the radio after installation, remove the trim ring by lifting in the center and pulling it off from either side. Removal Key Fuses When replacing a fuse, make sure the new fuse is the correct type and amperage. The BT1611i uses one 15 amp fuse located below the wiring connector (15 amp fast blow ATO). 5 If removal keys are inserted at an angle, they lock, and then pull the radio out. Using an incorrect fuse could damage the radio. Insert the removal keys straight back until they will not lock properly to release the unit.
Owners Manual
Page 10
In these circumstances, pressing the reset button will erase the time and preset memories, it should only be accessed with the front panel removed. Since resetting the unit will clear the system and return the unit to normal operation. 11 RESET 10 BT1611i The reset circuitry protects the microprocessor circuitry. Reset Button The reset button (11) is a malfunction of any of the chassis and can only be activated upon initial installation after all wiring is complete, or if there is located on the front of the switches on the unit.
In these circumstances, pressing the reset button will erase the time and preset memories, it should only be accessed with the front panel removed. Since resetting the unit will clear the system and return the unit to normal operation. 11 RESET 10 BT1611i The reset circuitry protects the microprocessor circuitry. Reset Button The reset button (11) is a malfunction of any of the chassis and can only be activated upon initial installation after all wiring is complete, or if there is located on the front of the switches on the unit.
Owners Manual
Page 19
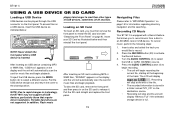
...SD card to an SD/MMC card or USB device. Recording CD Music Your BT1611i is full. The LCD will display "Memory Full" if the selected storage device is equipped with a Record feature that require driver installation. Recording will stop at the beginning of the track. Loading an SD Card To... of the file. • The recorded information is inserted. NOTE: Never detach the front panel while a USB device is stored in technology, the BT1611i may not support all USB devices, particularly those that allows you would like to reveal the SD card slot (see "Detaching the Front Panel" on...
...SD card to an SD/MMC card or USB device. Recording CD Music Your BT1611i is full. The LCD will display "Memory Full" if the selected storage device is equipped with a Record feature that require driver installation. Recording will stop at the beginning of the track. Loading an SD Card To... of the file. • The recorded information is inserted. NOTE: Never detach the front panel while a USB device is stored in technology, the BT1611i may not support all USB devices, particularly those that allows you would like to reveal the SD card slot (see "Detaching the Front Panel" on...

Owners Manual
Page 29
... correctly. nections tions. If this does not solve the problem, pressing the RESET button (11) may appear on page 10). Inline fuse blown Replace fuse. BT1611i TROUBLESHOOTING CD Player Error Codes If a problem should appear, try ejecting and reloading the disc into the player. If the suggested measures do not solve... not operate (display does not light) No power to is not pinched. Incorrect Check splices splices or con- ground Incorrect fuse or fuse too small Install fuse of the unit, make sure it is not and tighten if secure needed. 29
... correctly. nections tions. If this does not solve the problem, pressing the RESET button (11) may appear on page 10). Inline fuse blown Replace fuse. BT1611i TROUBLESHOOTING CD Player Error Codes If a problem should appear, try ejecting and reloading the disc into the player. If the suggested measures do not solve... not operate (display does not light) No power to is not pinched. Incorrect Check splices splices or con- ground Incorrect fuse or fuse too small Install fuse of the unit, make sure it is not and tighten if secure needed. 29
Owners Manual
Page 31
...cosmetic, decorative or non-operative structural parts • Correction of antenna problems • Costs incurred for installation, removal or reinstallation of your Installation and Operation Manual for additional information regarding the proper use , be repaired or replaced with a new ... other express warranties or liabilities. Limited Warranty CD or Multimedia Radios/Headunits Audiovox Electronics Corporation ("the Company") is committed to quality and customer service, and are not covered by improper installation, mishandling, misuse, neglect, accident, blown fuse, battery leakage...
...cosmetic, decorative or non-operative structural parts • Correction of antenna problems • Costs incurred for installation, removal or reinstallation of your Installation and Operation Manual for additional information regarding the proper use , be repaired or replaced with a new ... other express warranties or liabilities. Limited Warranty CD or Multimedia Radios/Headunits Audiovox Electronics Corporation ("the Company") is committed to quality and customer service, and are not covered by improper installation, mishandling, misuse, neglect, accident, blown fuse, battery leakage...
Quick Start Guide
Page 1
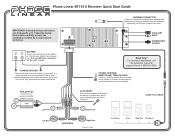
...or to the factory or aftermarket antenna lead. (Optional extensions or adapters may be connected for the radio to the factory ground wire. POWER ANTENNA/ REMOTE AMP TURN ON LEAD Positive (+) 12VDC output when ...the head unit is not provided, locate a clean, unpainted metal part of vehicle you have the installation handled by an experienced technician. RCA OUTPUT Connect to the factory Accessory or Ignition wire, which ... power source that is turned on . Phase Linear BT1611i Receiver Quick Start Guide + + - - 15 () (+) IMPORTANT: Incorrect wiring connections can damage the unit.
...or to the factory or aftermarket antenna lead. (Optional extensions or adapters may be connected for the radio to the factory ground wire. POWER ANTENNA/ REMOTE AMP TURN ON LEAD Positive (+) 12VDC output when ...the head unit is not provided, locate a clean, unpainted metal part of vehicle you have the installation handled by an experienced technician. RCA OUTPUT Connect to the factory Accessory or Ignition wire, which ... power source that is turned on . Phase Linear BT1611i Receiver Quick Start Guide + + - - 15 () (+) IMPORTANT: Incorrect wiring connections can damage the unit.


