Owners Manual
Page 2
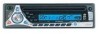
..., disconnect the battery negative terminal. Contents Installation Instructions 3 Wiring 6 Operating Instructions 7 Tuner Operation 11 CD Player Operation 13 MP3/WMA Operation 15 Using a USB Device or SD Card 19 iPod Operation 21 Bluetooth Operation 23 Remote Control 27 Care and Maintenance 28 Troubleshooting 29 Specifications 30 Installation Requirements This unit is designed for power connections • 16-18 gauge speaker wire Speaker Requirements Only connect speakers rated with a load impedance of the Phase Linear BT1611i Mobile AM/FM/CD/MP3/WMA Receiver. We recommend...
..., disconnect the battery negative terminal. Contents Installation Instructions 3 Wiring 6 Operating Instructions 7 Tuner Operation 11 CD Player Operation 13 MP3/WMA Operation 15 Using a USB Device or SD Card 19 iPod Operation 21 Bluetooth Operation 23 Remote Control 27 Care and Maintenance 28 Troubleshooting 29 Specifications 30 Installation Requirements This unit is designed for power connections • 16-18 gauge speaker wire Speaker Requirements Only connect speakers rated with a load impedance of the Phase Linear BT1611i Mobile AM/FM/CD/MP3/WMA Receiver. We recommend...
Owners Manual
Page 3
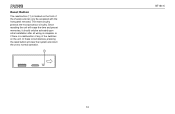
... make certain all wiring until it is achieved, turn the unit on to the dashboard. These kits are depicted on ). Always check the kit application before purchasing to disengage it . Remove Transport Screws MONO EQ CD1211 CD RECEIVER SCAN / AUX IN TUNE Universal Installation Using Mounting Sleeve 1. If it is locked into it . MONO EQ CD1211 CD RECEIVER SCAN / AUX IN TUNE 6. BT1611i INSTALLATION INSTRUCTIONS This unit is...
... make certain all wiring until it is achieved, turn the unit on to the dashboard. These kits are depicted on ). Always check the kit application before purchasing to disengage it . Remove Transport Screws MONO EQ CD1211 CD RECEIVER SCAN / AUX IN TUNE Universal Installation Using Mounting Sleeve 1. If it is locked into it . MONO EQ CD1211 CD RECEIVER SCAN / AUX IN TUNE 6. BT1611i INSTALLATION INSTRUCTIONS This unit is...

Owners Manual
Page 4
... or center console mounting. Mount the new radio assembly to mount the new radio. 2. Make sure the unit is complete, reconnect the battery negative terminal. Remove the existing factory radio from the existing radio and 4 BT1611i attach them to the operating instructions for assistance on the rear of step 1. Longer screws may be supported with the kit. 1. 9. ISO Installation This unit has threaded holes in the Universal Installation instructions. 2. Re-attach...
... or center console mounting. Mount the new radio assembly to mount the new radio. 2. Make sure the unit is complete, reconnect the battery negative terminal. Remove the existing factory radio from the existing radio and 4 BT1611i attach them to the operating instructions for assistance on the rear of step 1. Longer screws may be supported with the kit. 1. 9. ISO Installation This unit has threaded holes in the Universal Installation instructions. 2. Re-attach...
Owners Manual
Page 5
If removal keys are inserted at an angle, they lock, and then pull the radio out. Insert the removal keys straight back until they will not lock properly to release the unit. Using an incorrect fuse could damage the radio. The BT1611i uses one 15 amp fuse located below the wiring connector (15 amp fast blow ATO). 5 Removal Key Fuses When replacing a fuse, make sure the new fuse is the correct type and amperage. BT1611i Removing the Radio To remove the radio after installation, remove the trim ring by lifting in the center and pulling it off from either side.
If removal keys are inserted at an angle, they lock, and then pull the radio out. Insert the removal keys straight back until they will not lock properly to release the unit. Using an incorrect fuse could damage the radio. The BT1611i uses one 15 amp fuse located below the wiring connector (15 amp fast blow ATO). 5 Removal Key Fuses When replacing a fuse, make sure the new fuse is the correct type and amperage. BT1611i Removing the Radio To remove the radio after installation, remove the trim ring by lifting in the center and pulling it off from either side.
Owners Manual
Page 6
... existing radio wire or radio fuse. 5. If not used, tape the bare end of the chassis. 3. Connect to the battery or to connect your jLink iPod cable. 14. Power Antenna (dark blue wire) - Right Rear Speaker 9. iPod/jLink connector - WIRING 1. Memory/Battery (yellow wire) - Right Front Speaker 7. jLinkcable (iPod Cable) NOTE: The amplifiers in this wire is always live. Use this 8-pin DIN socket to a 12 volt power source that is not connected. 4. Left Front Speaker 6. Connect to Amplifier 10. RCA Outputs to the power antenna or an amplifier.
... existing radio wire or radio fuse. 5. If not used, tape the bare end of the chassis. 3. Connect to the battery or to connect your jLink iPod cable. 14. Power Antenna (dark blue wire) - Right Rear Speaker 9. iPod/jLink connector - WIRING 1. Memory/Battery (yellow wire) - Right Front Speaker 7. jLinkcable (iPod Cable) NOTE: The amplifiers in this wire is always live. Use this 8-pin DIN socket to a 12 volt power source that is not connected. 4. Left Front Speaker 6. Connect to Amplifier 10. RCA Outputs to the power antenna or an amplifier.
Owners Manual
Page 7
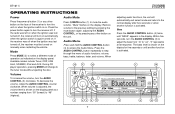
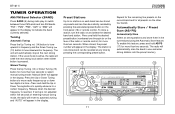
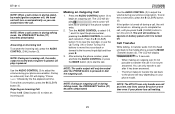
Mode Press MODE (2) to the tuner mode without ejecting the disc. During CD player operation, pressing MODE will change to select a different mode of operation as a number ranging from "-6" to mute the audio volume. "Mute" flashes on the display for five seconds or until "BASS" appears in the display. Press the AUDIO CONTROL button repeatedly to turn the AUDIO CONTROL (3) clockwise. Press the power button again to step through the menu of the receiver to turn on automatically when the ignition switch is again turned on...
Mode Press MODE (2) to the tuner mode without ejecting the disc. During CD player operation, pressing MODE will change to select a different mode of operation as a number ranging from "-6" to mute the audio volume. "Mute" flashes on the display for five seconds or until "BASS" appears in the display. Press the AUDIO CONTROL button repeatedly to turn the AUDIO CONTROL (3) clockwise. Press the power button again to step through the menu of the receiver to turn on automatically when the ignition switch is again turned on...
Owners Manual
Page 8
... function is activated. Treble Press the AUDIO CONTROL button (4) three times until "BALANCE" appears in the display. "C00" represents an equal balance level between the right and left ). Within five seconds, turn the AUDIO CONTROL (3) to adjust Treble from "-6" to view the system "MENU". Within five seconds, turn the AUDIO CONTROL (3) to adjust the Balance between the front and rear speakers from "R12" (full right) to "F12" (full front). "0" represents a flat response. Balance Press the AUDIO CONTROL button (4) four times until "TREBLE...
... function is activated. Treble Press the AUDIO CONTROL button (4) three times until "BALANCE" appears in the display. "C00" represents an equal balance level between the right and left ). Within five seconds, turn the AUDIO CONTROL (3) to adjust Treble from "-6" to view the system "MENU". Within five seconds, turn the AUDIO CONTROL (3) to adjust the Balance between the front and rear speakers from "R12" (full right) to "F12" (full front). "0" represents a flat response. Balance Press the AUDIO CONTROL button (4) four times until "TREBLE...
Owners Manual
Page 9
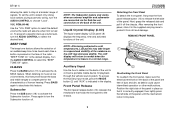
... volume levels, this feature. To program a specific start-up volume level, turn the AUDIO CONTROL to select the "BEEP TONE Off" option. Turn the AUDIO CONTROL to select the desired level. Press again to compensate for playback through the vehicle sound system. Press BASS again to protect it from dirt and damage. After removing the front panel, store it in the display. iX-BASS Press the BASS button (15) to activate the Subwoofer function. When listening to music...
... volume levels, this feature. To program a specific start-up volume level, turn the AUDIO CONTROL to select the "BEEP TONE Off" option. Turn the AUDIO CONTROL to select the desired level. Press again to compensate for playback through the vehicle sound system. Press BASS again to protect it from dirt and damage. After removing the front panel, store it in the display. iX-BASS Press the BASS button (15) to activate the Subwoofer function. When listening to music...
Owners Manual
Page 10
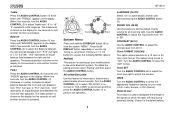
The reset circuitry protects the microprocessor circuitry. Since resetting the unit will clear the system and return the unit to normal operation. 11 RESET 10 BT1611i In these circumstances, pressing the reset button will erase the time and preset memories, it should only be activated upon initial installation after all wiring is complete, or if there is located on the unit. Reset Button The reset button (11) is a malfunction of any of the switches on the front of the chassis and can only be accessed with the front panel removed.
The reset circuitry protects the microprocessor circuitry. Since resetting the unit will clear the system and return the unit to normal operation. 11 RESET 10 BT1611i In these circumstances, pressing the reset button will erase the time and preset memories, it should only be activated upon initial installation after all wiring is complete, or if there is located on the unit. Reset Button The reset button (11) is a malfunction of any of the switches on the front of the chassis and can only be accessed with the front panel removed.
Owners Manual
Page 11
Tuning Automatic Tuning Press the Up Tuning >>| (14) button to switch between three FM bands and two AM bands. BT1611i TUNER OPERATION AM/FM Band Selector (BAND) Press BAND (5) during radio play to tune upward in the display to indicate the band currently selected. "FM1", "FM2", "FM3", "AM1" or "AM2" will appear in frequency and the Down Tuning |
Tuning Automatic Tuning Press the Up Tuning >>| (14) button to switch between three FM bands and two AM bands. BT1611i TUNER OPERATION AM/FM Band Selector (BAND) Press BAND (5) during radio play to tune upward in the display to indicate the band currently selected. "FM1", "FM2", "FM3", "AM1" or "AM2" will appear in frequency and the Down Tuning |
Owners Manual
Page 15
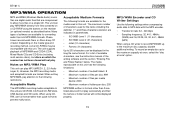
... audio files into MP3/WMA formats. Phase Linear recommends Nero or Roxio Easy CD Creator. Acceptable Medium Formats The following restrictions. When writing MP3/WMA, pay attention to the maximum disc capacity, disable additional writing. Notes on the receiver (or optional remote) as described below . MP3/WMA Encoder and CD Writer Settings Use the following limitations: • Maximum number...
... audio files into MP3/WMA formats. Phase Linear recommends Nero or Roxio Easy CD Creator. Acceptable Medium Formats The following restrictions. When writing MP3/WMA, pay attention to the maximum disc capacity, disable additional writing. Notes on the receiver (or optional remote) as described below . MP3/WMA Encoder and CD Writer Settings Use the following limitations: • Maximum number...
Owners Manual
Page 16
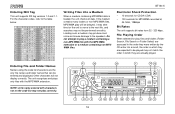
...unit supports bit rates from 32 - 320 kbps. The unit recognizes and plays only files with the MP3/WMA extension or a medium containing non MP3/ WMA files. If the medium contains many folders or non-MP3/WMA files, MP3/WMA play correctly. 5 20 21 7 14 12 BT1611I MP3/WMA RECEIVER SUB RECORD BASS INT MENU / AUX IN TUNE...File Search or Folder Select) are the only file names and folder names that can be played may not be performed smoothly. Entering ID3 Tag This unit supports ID3 tag versions 1.0 and 1.1. Entering File and Folder Names Names using the code list characters are ...
...unit supports bit rates from 32 - 320 kbps. The unit recognizes and plays only files with the MP3/WMA extension or a medium containing non MP3/ WMA files. If the medium contains many folders or non-MP3/WMA files, MP3/WMA play correctly. 5 20 21 7 14 12 BT1611I MP3/WMA RECEIVER SUB RECORD BASS INT MENU / AUX IN TUNE...File Search or Folder Select) are the only file names and folder names that can be played may not be performed smoothly. Entering ID3 Tag This unit supports ID3 tag versions 1.0 and 1.1. Entering File and Folder Names Names using the code list characters are ...
Owners Manual
Page 19
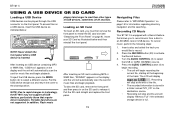
... USB device containing MP3 or WMA files, "USB Host" appears on a USB device, insert the USB device as illustrated below : BT1611 MP3/WMA RECEIVER SUB RECORD BASS MENU / AUX IN TUNE players take longer to begin playback. Portable hard drives are not supported. Recording CD Music Your BT1611i is full. Press the AUDIO CONTROL button (4) to read than other types of the track. To access files on the display and the unit will display...
... USB device containing MP3 or WMA files, "USB Host" appears on a USB device, insert the USB device as illustrated below : BT1611 MP3/WMA RECEIVER SUB RECORD BASS MENU / AUX IN TUNE players take longer to begin playback. Portable hard drives are not supported. Recording CD Music Your BT1611i is full. Press the AUDIO CONTROL button (4) to read than other types of the track. To access files on the display and the unit will display...
Owners Manual
Page 20
...; The recorded information is stored in Number Search or Navigation Search mode. Turn the AUDIO CONTROL (3) to activate the Transfer feature. 3. Turn the AUDIO CONTROL (3) and select to erase (or select to confirm. The LCD will be erased. Press the AUDIO CONTROL button to cancel the erase function). 4. To erase a file, perform the following steps: 1. NOTE: Never remove a USB device during recording or music transfer. CD0001.MP3). To stop...
...; The recorded information is stored in Number Search or Navigation Search mode. Turn the AUDIO CONTROL (3) to activate the Transfer feature. 3. Turn the AUDIO CONTROL (3) and select to erase (or select to confirm. The LCD will be erased. Press the AUDIO CONTROL button to cancel the erase function). 4. To erase a file, perform the following steps: 1. NOTE: Never remove a USB device during recording or music transfer. CD0001.MP3). To stop...
Owners Manual
Page 21
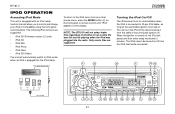
... iPod Cable BT1611I MP3/WMA RECEIVER SUB RECORD BASS INT MENU / AUX IN TUNE 1 43 2 17 23 24 25 26 27 28 9 19 13 21 When the ignition is plugged into the radio. Only music files are supported: • iPod 3G (Firmware version 2.2 only) • iPod 4G • iPod Mini • iPod Photo • iPod Nano • iPod 5G (Video) The unit will automatically switch to iPod mode when an iPod is turned off, the iPod will not select video...
... iPod Cable BT1611I MP3/WMA RECEIVER SUB RECORD BASS INT MENU / AUX IN TUNE 1 43 2 17 23 24 25 26 27 28 9 19 13 21 When the ignition is plugged into the radio. Only music files are supported: • iPod 3G (Firmware version 2.2 only) • iPod 4G • iPod Mini • iPod Photo • iPod Nano • iPod 5G (Video) The unit will automatically switch to iPod mode when an iPod is turned off, the iPod will not select video...
Owners Manual
Page 24
... are functional. When a paired phone is in Auto Re-connection function. Manual Re-connection Under the following conditions, you may need to reconnect manually: • If the mobile phone is out of the unit during pairing mode. Disconnecting the Phone from the phone back to access the MENU. Managing Incoming Calls When there is flashed on the mobile phone. 5. Press and hold the D (display) button (9) to the head unit. Refer to the instructions that...
... are functional. When a paired phone is in Auto Re-connection function. Manual Re-connection Under the following conditions, you may need to reconnect manually: • If the mobile phone is out of the unit during pairing mode. Disconnecting the Phone from the phone back to access the MENU. Managing Incoming Calls When there is flashed on the mobile phone. 5. Press and hold the D (display) button (9) to the head unit. Refer to the instructions that...
Owners Manual
Page 25
... the B (CLEAR) button to turn the unit off. You can only handle one time even if your phone conversation. Use the AUDIO CONTROL (3) to the phone will display for the phone number entry. 2. After entering the phone number, press and hold the AUDIO CONTROL or press the MODE button (2) to transfer the call if it takes to transfer the call back to adjust the volume during your phone has call . The...
... the B (CLEAR) button to turn the unit off. You can only handle one time even if your phone conversation. Use the AUDIO CONTROL (3) to the phone will display for the phone number entry. 2. After entering the phone number, press and hold the AUDIO CONTROL or press the MODE button (2) to transfer the call if it takes to transfer the call back to adjust the volume during your phone has call . The...

Owners Manual
Page 29
... error code should develop while operating the CD player, an error code (ER-1, ER-2, etc.) may help, but will erase the time and preset memory (see "Reset Button" on the display panel. Potential Errors Problem Cause Corrective Action Does not operate (display does not light) No power to unit Not all chassis ground bare wires. Inline fuse blown Replace fuse. ground Incorrect fuse or fuse too small Install fuse of problems with test light. or to each other Power wire shorting to yellow wire; Receiver mount...
... error code should develop while operating the CD player, an error code (ER-1, ER-2, etc.) may help, but will erase the time and preset memory (see "Reset Button" on the display panel. Potential Errors Problem Cause Corrective Action Does not operate (display does not light) No power to unit Not all chassis ground bare wires. Inline fuse blown Replace fuse. ground Incorrect fuse or fuse too small Install fuse of problems with test light. or to each other Power wire shorting to yellow wire; Receiver mount...
Owners Manual
Page 31
... cosmetic, decorative or non-operative structural parts • Correction of antenna problems • Costs incurred for installation, removal or reinstallation of your area. • You must prepay the initial shipping charges to the Company. We recommend using a carrier that should this product or any part thereof, under normal use of the product • Consequential damage to compact discs, USB devices, digital media cards...
... cosmetic, decorative or non-operative structural parts • Correction of antenna problems • Costs incurred for installation, removal or reinstallation of your area. • You must prepay the initial shipping charges to the Company. We recommend using a carrier that should this product or any part thereof, under normal use of the product • Consequential damage to compact discs, USB devices, digital media cards...
Quick Start Guide
Page 1
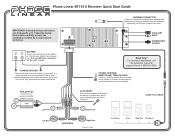
.... Phase Linear BT1611i Receiver Quick Start Guide + + - - 15 () (+) IMPORTANT: Incorrect wiring connections can damage the unit. Follow the wiring instructions carefully, or have .) AUXILIARY INPUT SUBWOOFER OUTPUT Need help? CHASSIS GROUND Connect the black wire to an optional amplifier. ANTENNA CONNECTOR Connect to the factory or aftermarket antenna lead. (Optional extensions or adapters may be connected for the radio to the battery or 12 volt power source that is not provided, locate a clean, unpainted metal part of vehicle you have the installation handled...
.... Phase Linear BT1611i Receiver Quick Start Guide + + - - 15 () (+) IMPORTANT: Incorrect wiring connections can damage the unit. Follow the wiring instructions carefully, or have .) AUXILIARY INPUT SUBWOOFER OUTPUT Need help? CHASSIS GROUND Connect the black wire to an optional amplifier. ANTENNA CONNECTOR Connect to the factory or aftermarket antenna lead. (Optional extensions or adapters may be connected for the radio to the battery or 12 volt power source that is not provided, locate a clean, unpainted metal part of vehicle you have the installation handled...


