Owners Manual
Page 2
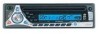
... are available at 1-800-323-4815 from 9:00 a.m. EST on your Phase Linear BT1611i installed by a reputable installation shop. and Canada only.) In many cases, a special installation kit will be required to mount the radio to 7:00 p.m. to the dashboard. PREPARATION Getting Started Congratulations on Saturday. (U.S.A. Contents Installation Instructions 3 Wiring 6 Operating Instructions 7 Tuner Operation 11 CD Player Operation...
... are available at 1-800-323-4815 from 9:00 a.m. EST on your Phase Linear BT1611i installed by a reputable installation shop. and Canada only.) In many cases, a special installation kit will be required to mount the radio to 7:00 p.m. to the dashboard. PREPARATION Getting Started Congratulations on Saturday. (U.S.A. Contents Installation Instructions 3 Wiring 6 Operating Instructions 7 Tuner Operation 11 CD Player Operation...
Owners Manual
Page 3
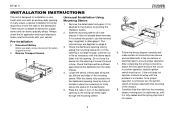
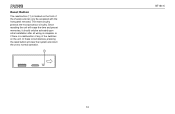
... 5. Disconnect Battery Before you begin, always disconnect the battery negative terminal. 2. The removal keys are depicted on to bend or bow. BT1611i INSTALLATION INSTRUCTIONS This unit is fully seated and the spring clips lock it into place. 3 These kits are secure and insulated with your vehicle....of the dashboard opening or cause it to confirm operation (vehicle ignition switch must be required to mount the radio to ensure proper operation. 7. Carefully slide the radio into the mounting sleeve, making sure it is right-side-up, until the problem is corrected. Check that...
... 5. Disconnect Battery Before you begin, always disconnect the battery negative terminal. 2. The removal keys are depicted on to bend or bow. BT1611i INSTALLATION INSTRUCTIONS This unit is fully seated and the spring clips lock it into place. 3 These kits are secure and insulated with your vehicle....of the dashboard opening or cause it to confirm operation (vehicle ignition switch must be required to mount the radio to ensure proper operation. 7. Carefully slide the radio into the mounting sleeve, making sure it is right-side-up, until the problem is corrected. Check that...

Owners Manual
Page 4
... be used with the strap to prevent damage to the dashboard from the existing radio and 4 BT1611i attach them to the new radio. Replace the dashboard trim panel. Make sure the unit is complete, reconnect the battery negative terminal. ISO Installation This unit has threaded holes in the chassis side panels which may damage...
... be used with the strap to prevent damage to the dashboard from the existing radio and 4 BT1611i attach them to the new radio. Replace the dashboard trim panel. Make sure the unit is complete, reconnect the battery negative terminal. ISO Installation This unit has threaded holes in the chassis side panels which may damage...
Owners Manual
Page 5
Using an incorrect fuse could damage the radio. If removal keys are inserted at an angle, they lock, and then pull the radio out. BT1611i Removing the Radio To remove the radio after installation, remove the trim ring by lifting in the center and pulling it off from either side. Removal Key Fuses When replacing a fuse, make sure the new fuse is the correct type and amperage. Insert the removal keys straight back until they will not lock properly to release the unit. The BT1611i uses one 15 amp fuse located below the wiring connector (15 amp fast blow ATO). 5
Using an incorrect fuse could damage the radio. If removal keys are inserted at an angle, they lock, and then pull the radio out. BT1611i Removing the Radio To remove the radio after installation, remove the trim ring by lifting in the center and pulling it off from either side. Removal Key Fuses When replacing a fuse, make sure the new fuse is the correct type and amperage. Insert the removal keys straight back until they will not lock properly to release the unit. The BT1611i uses one 15 amp fuse located below the wiring connector (15 amp fast blow ATO). 5
Owners Manual
Page 10
Reset Button The reset button (11) is a malfunction of any of the switches on the front of the chassis and can only be activated upon initial installation after all wiring is complete, or if there is located on the unit. The reset circuitry protects the microprocessor circuitry. Since resetting the unit will clear the system and return the unit to normal operation. 11 RESET 10 BT1611i In these circumstances, pressing the reset button will erase the time and preset memories, it should only be accessed with the front panel removed.
Reset Button The reset button (11) is a malfunction of any of the switches on the front of the chassis and can only be activated upon initial installation after all wiring is complete, or if there is located on the unit. The reset circuitry protects the microprocessor circuitry. Since resetting the unit will clear the system and return the unit to normal operation. 11 RESET 10 BT1611i In these circumstances, pressing the reset button will erase the time and preset memories, it should only be accessed with the front panel removed.
Owners Manual
Page 19
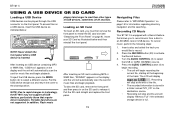
... eject the USB device, press the MODE button (2) to the closed position. NOTE: Due to select the USB or CARD (SD/MMC) source. 4. BT1611i USING A USB DEVICE OR SD CARD Loading a USB Device USB devices can be played through the USB connector on page 15 for information regarding directory... Panel" on the display and the unit will display "Memory Full" if the selected storage device is equipped with a Record feature that require driver installation. In addition, Flash music RESET After inserting an SD card containing MP3 or WMA files, "SD/MMC" appears on page 9). The LCD will ...
... eject the USB device, press the MODE button (2) to the closed position. NOTE: Due to select the USB or CARD (SD/MMC) source. 4. BT1611i USING A USB DEVICE OR SD CARD Loading a USB Device USB devices can be played through the USB connector on page 15 for information regarding directory... Panel" on the display and the unit will display "Memory Full" if the selected storage device is equipped with a Record feature that require driver installation. In addition, Flash music RESET After inserting an SD card containing MP3 or WMA files, "SD/MMC" appears on page 9). The LCD will ...

Owners Manual
Page 29
... (11) may appear on page 10). If the suggested measures do not solve the problem, contact an approved warranty station near you for further assistance. BT1611i TROUBLESHOOTING CD Player Error Codes If a problem should appear, try ejecting and reloading the disc into the player. Inline fuse blown Replace fuse. Incorrect Check... Action Does not operate (display does not light) No power to unit Not all chassis ground bare wires. ground Incorrect fuse or fuse too small Install fuse of problems with test light. This can indicate a number of correct rating.
... (11) may appear on page 10). If the suggested measures do not solve the problem, contact an approved warranty station near you for further assistance. BT1611i TROUBLESHOOTING CD Player Error Codes If a problem should appear, try ejecting and reloading the disc into the player. Inline fuse blown Replace fuse. Incorrect Check... Action Does not operate (display does not light) No power to unit Not all chassis ground bare wires. ground Incorrect fuse or fuse too small Install fuse of problems with test light. This can indicate a number of correct rating.
Owners Manual
Page 31
... Audiovox retailer in cosmetic, decorative or non-operative structural parts • Correction of antenna problems • Costs incurred for installation, removal or reinstallation of the product • Consequential damage to compact discs, USB devices, digital media cards, accessories or... PAID BY PURCHASER FOR THE PRODUCT. Limited Warranty CD or Multimedia Radios/Headunits Audiovox Electronics Corporation ("the Company") is committed to quality and customer service, and are not covered by improper installation, mishandling, misuse, neglect, accident, blown fuse, battery leakage, ...
... Audiovox retailer in cosmetic, decorative or non-operative structural parts • Correction of antenna problems • Costs incurred for installation, removal or reinstallation of the product • Consequential damage to compact discs, USB devices, digital media cards, accessories or... PAID BY PURCHASER FOR THE PRODUCT. Limited Warranty CD or Multimedia Radios/Headunits Audiovox Electronics Corporation ("the Company") is committed to quality and customer service, and are not covered by improper installation, mishandling, misuse, neglect, accident, blown fuse, battery leakage, ...
Quick Start Guide
Page 1
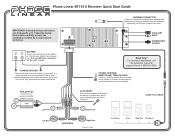
...source that is not provided, locate a clean, unpainted metal part of vehicle you have the installation handled by an experienced technician. green/black purple/black + green purple SPEAKERS Right Rear Printed...to the factory or aftermarket antenna lead. (Optional extensions or adapters may be connected for the radio to an amplifier. RCA OUTPUT Connect to the factory ground wire. jLINK iPod CABLE Left ... blue wire to a motorized antenna or to work. Phase Linear BT1611i Receiver Quick Start Guide + + - - 15 () (+) IMPORTANT: Incorrect wiring connections can damage the unit.
...source that is not provided, locate a clean, unpainted metal part of vehicle you have the installation handled by an experienced technician. green/black purple/black + green purple SPEAKERS Right Rear Printed...to the factory or aftermarket antenna lead. (Optional extensions or adapters may be connected for the radio to an amplifier. RCA OUTPUT Connect to the factory ground wire. jLINK iPod CABLE Left ... blue wire to a motorized antenna or to work. Phase Linear BT1611i Receiver Quick Start Guide + + - - 15 () (+) IMPORTANT: Incorrect wiring connections can damage the unit.


