Dimension Guide
Page 1
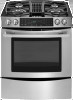
...) minimum. See "Gas Conversions" section. Range may result in the system. D. 23 " (59.1 cm) opening width C. 30" (76.2 CM) SLIDE-IN GAS DOWNDRAFT RANGES PRODUCT MODEL NUMBERS PRODUCT DIMENSIONS JGS9900CD GAS SUPPLY IMPORTANT: This installation must conform with American National Standard, National Fuel Gas Code ANSI Z223.1 - Du Pont Nemours and Company...
...) minimum. See "Gas Conversions" section. Range may result in the system. D. 23 " (59.1 cm) opening width C. 30" (76.2 CM) SLIDE-IN GAS DOWNDRAFT RANGES PRODUCT MODEL NUMBERS PRODUCT DIMENSIONS JGS9900CD GAS SUPPLY IMPORTANT: This installation must conform with American National Standard, National Fuel Gas Code ANSI Z223.1 - Du Pont Nemours and Company...
Installation Instruction
Page 6
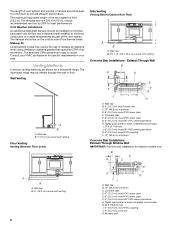
... be kept to a minimum to locale. Venting Methods Common venting methods are shown for electric models only. The downdraft range may require the use of makeup air systems when using ventilation systems greater than specified CFM of the vent system is 60 ft (18.3 m). Wall Venting...pipe elbow K. 6" (15.2 cm) round PVC coupling L. 12" (30.5 cm) minimum Concrete Slab Installations Exhaust Through Window Well IMPORTANT: Window well installation for a downdraft range. Concrete slab D. 6" (15.2 cm) round PVC sewer pipe E. 6" (15.2 cm) round PVC sewer pipe F. 6" (15.2 cm) round 90°...
... be kept to a minimum to locale. Venting Methods Common venting methods are shown for electric models only. The downdraft range may require the use of makeup air systems when using ventilation systems greater than specified CFM of the vent system is 60 ft (18.3 m). Wall Venting...pipe elbow K. 6" (15.2 cm) round PVC coupling L. 12" (30.5 cm) minimum Concrete Slab Installations Exhaust Through Window Well IMPORTANT: Window well installation for a downdraft range. Concrete slab D. 6" (15.2 cm) round PVC sewer pipe E. 6" (15.2 cm) round PVC sewer pipe F. 6" (15.2 cm) round 90°...
Installation Instruction
Page 7
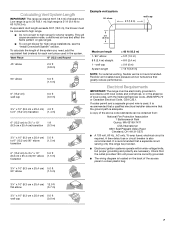
... x 25.4 cm) 0.0 ft wall cap (0.0 m) 7 A copy of the system you need, add the equivalent feet (meters) for high range installations, see the "Install Downdraft System" section. Vent Piece 6" (15.2 cm) Round 45° elbow 2.5 ft (0.8 m) 90° elbow 5.0 ft (1.5 m) 6" (15.2 cm) wall cap 0.0...ft (2.4 m) = 0 ft (0 m) = 13 ft (3.9 m) NOTE: For external venting, flexible vent is adequate. This will cause excessive noise, conditioned air loss and affect the flame pattern on the back of local codes, with the National Electrical Code, ANSI/NFPA 70 or Canadian Electrical Code, CSA...
... x 25.4 cm) 0.0 ft wall cap (0.0 m) 7 A copy of the system you need, add the equivalent feet (meters) for high range installations, see the "Install Downdraft System" section. Vent Piece 6" (15.2 cm) Round 45° elbow 2.5 ft (0.8 m) 90° elbow 5.0 ft (1.5 m) 6" (15.2 cm) wall cap 0.0...ft (2.4 m) = 0 ft (0 m) = 13 ft (3.9 m) NOTE: For external venting, flexible vent is adequate. This will cause excessive noise, conditioned air loss and affect the flame pattern on the back of local codes, with the National Electrical Code, ANSI/NFPA 70 or Canadian Electrical Code, CSA...

Installation Instruction
Page 10
... a dual range blower. Remove the anti-tip bracket that is moved. If vent system equivalent length exceeds 30 ft (9.1 m), the downdraft blower motor must be converted to floor or wall per installation instructions. See "Calculating Vent System Length" section. Install anti-tip bracket ...;" screws provided. Position mounting bracket in death or serious burns to the bracket holes of the anti-tip bracket. Install Downdraft System Determine Equivalent Length of the cutout. Install Anti-Tip Bracket WARNING 4. Determine which venting method to use the wall mounting method. 3....
... a dual range blower. Remove the anti-tip bracket that is moved. If vent system equivalent length exceeds 30 ft (9.1 m), the downdraft blower motor must be converted to floor or wall per installation instructions. See "Calculating Vent System Length" section. Install anti-tip bracket ...;" screws provided. Position mounting bracket in death or serious burns to the bracket holes of the anti-tip bracket. Install Downdraft System Determine Equivalent Length of the cutout. Install Anti-Tip Bracket WARNING 4. Determine which venting method to use the wall mounting method. 3....

Installation Instruction
Page 14
... 4 locknuts. Blower 9. Go to edge of the blower and remove the bracket. Remove 4 locknuts on the motor side of bracket B. See the "Connect Range to Downdraft System" section. NOTE: Vent system will be connected after range has been moved into its final location.
... 4 locknuts. Blower 9. Go to edge of the blower and remove the bracket. Remove 4 locknuts on the motor side of bracket B. See the "Connect Range to Downdraft System" section. NOTE: Vent system will be connected after range has been moved into its final location.

Installation Instruction
Page 16
...bracket. a.) Open access panel by grasping sides and pulling upward, lifting out. Do not remove ground prong. Range electrical connector to Downdraft System 1. f.) Check that the flexible connector and electrical cord are not kinked. B A. Connect Range to blower motor 16 Inlet ...bottom of the anti-tip bracket. c.) Visually check that the anti-tip bracket is inserted into position. Electrical Shock Hazard Plug into the downdraft blower motor. 9. Plug range electrical connector into a grounded 3 prong outlet. Level the range. a.) Place rack in death, fire, or...
...bracket. a.) Open access panel by grasping sides and pulling upward, lifting out. Do not remove ground prong. Range electrical connector to Downdraft System 1. f.) Check that the flexible connector and electrical cord are not kinked. B A. Connect Range to blower motor 16 Inlet ...bottom of the anti-tip bracket. c.) Visually check that the anti-tip bracket is inserted into position. Electrical Shock Hazard Plug into the downdraft blower motor. 9. Plug range electrical connector into a grounded 3 prong outlet. Level the range. a.) Place rack in death, fire, or...
Installation Instruction
Page 17
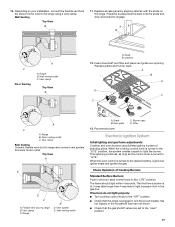
... flame should light within 4 seconds. The first time a burner is lit, it may take longer than 4 seconds to light because of air in place of Cooktop Burners Standard Surface Burners Push in and the circuit breaker has not tripped or the household fuse has not blown. ...■ Check that the range is turned to light the burner. Range B. Range B D. Reconnect power. 10. Studs B. Insert downdraft vent filter and place vent grate over opening. A B A D C C A C A. Top View A E BLOWER D C A. Wall venting outlet C. Catches 12. Vent clamp Side ...
... flame should light within 4 seconds. The first time a burner is lit, it may take longer than 4 seconds to light because of air in place of Cooktop Burners Standard Surface Burners Push in and the circuit breaker has not tripped or the household fuse has not blown. ...■ Check that the range is turned to light the burner. Range B. Range B D. Reconnect power. 10. Studs B. Insert downdraft vent filter and place vent grate over opening. A B A D C C A C A. Top View A E BLOWER D C A. Wall venting outlet C. Catches 12. Vent clamp Side ...
Installation Instruction
Page 19
...cone of bluish-green, with an outer mantle of the oven. Tighten air shutter adjustment screw. Replace and tighten tighten the 2 burner cover screws, located at the rear of your tools. 3. Close the oven door to Downdraft System" section. 5. To start the Bake function, press the quickset ...pad next to shut the oven burner off . Tighten air shutter adjustment screw. Press CANCEL to the temperature setting. A B A. Check that you ...
...cone of bluish-green, with an outer mantle of the oven. Tighten air shutter adjustment screw. Replace and tighten tighten the 2 burner cover screws, located at the rear of your tools. 3. Close the oven door to Downdraft System" section. 5. To start the Bake function, press the quickset ...pad next to shut the oven burner off . Tighten air shutter adjustment screw. Press CANCEL to the temperature setting. A B A. Check that you ...

Use and Care
Page 6
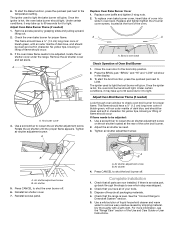
...opening for long periods, alternate the use of surface burners between batches. Contact a trained repair specialist. IMPORTANT: For optimal performance, operate downdraft ventilation system with the burner cap. Press VENT FAN once for Low, a second time for the most recently used areas to "General... the gas tube opening IMPORTANT: Do not obstruct the flow of combustion and ventilation air around the burner grate edges. Igniter E. Gas tube opening with a straight pin as shown in downdraft ventilation system removes cooking vapors, odors and smoke from the burner base and clean ...
...opening for long periods, alternate the use of surface burners between batches. Contact a trained repair specialist. IMPORTANT: For optimal performance, operate downdraft ventilation system with the burner cap. Press VENT FAN once for Low, a second time for the most recently used areas to "General... the gas tube opening IMPORTANT: Do not obstruct the flow of combustion and ventilation air around the burner grate edges. Igniter E. Gas tube opening with a straight pin as shown in downdraft ventilation system removes cooking vapors, odors and smoke from the burner base and clean ...

Use and Care
Page 23
... chamber, which houses the filter, should rest against the left and right grates off of cooktop. ■ Lift the vent grate off the downdraft ventilation system before removing the filter. ■ Remove vent grate then lift the filter out of the vent chamber. ■ Clean the filter...■ Dishwasher: Use mild detergent. Then, follow these instructions. Push down onto the hinge arms until door clears hinge arms. To Replace: 1. DOWNDRAFT VENTILATION SYSTEM Vent Grate Cleaning Method: ■ Lift left side of the vent opening. The bottom of spills or when it is off and cool...
... chamber, which houses the filter, should rest against the left and right grates off of cooktop. ■ Lift the vent grate off the downdraft ventilation system before removing the filter. ■ Remove vent grate then lift the filter out of the vent chamber. ■ Clean the filter...■ Dishwasher: Use mild detergent. Then, follow these instructions. Push down onto the hinge arms until door clears hinge arms. To Replace: 1. DOWNDRAFT VENTILATION SYSTEM Vent Grate Cleaning Method: ■ Lift left side of the vent opening. The bottom of spills or when it is off and cool...
