Dimension Guide
Page 1
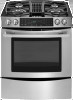
...(located on longer runs may need trim cut back ³⁄₈" (1.0 cm) from each front corner and/or rounded edge flattened. 30" (76.2 cm) 30 ¾" (78.1 cm) ³⁄₈" (1.0 cm) If countertop opening . Range may be installed with zero clearance to back....cm) max. G. NOTE: 24" (61.0 cm) minimum when bottom of wood or metal cabinet is required. 30" (76.2 CM) SLIDE-IN GAS DOWNDRAFT RANGES PRODUCT MODEL NUMBERS PRODUCT DIMENSIONS JGS9900CD GAS SUPPLY IMPORTANT: This installation must conform with all the way in* *Range can be raised approximately 1" (2.5 ...
...(located on longer runs may need trim cut back ³⁄₈" (1.0 cm) from each front corner and/or rounded edge flattened. 30" (76.2 cm) 30 ¾" (78.1 cm) ³⁄₈" (1.0 cm) If countertop opening . Range may be installed with zero clearance to back....cm) max. G. NOTE: 24" (61.0 cm) minimum when bottom of wood or metal cabinet is required. 30" (76.2 CM) SLIDE-IN GAS DOWNDRAFT RANGES PRODUCT MODEL NUMBERS PRODUCT DIMENSIONS JGS9900CD GAS SUPPLY IMPORTANT: This installation must conform with all the way in* *Range can be raised approximately 1" (2.5 ...
Installation Instruction
Page 4
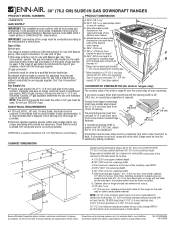
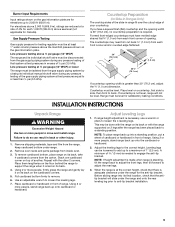
... the sides and rear of the range. ■ To eliminate the risk of cooktop edge with local codes. Mobile Home - Mobile home installations require: A. 30³⁄₄" (78.1 cm) B. 23½" (59.7 cm) countertop notch to rear of oven door protrudes 2¹⁄₂" (6.4 cm) .... **When installed in a 24" (61.0 cm) base cabinet with installation clearances specified on the right-hand side of combustion and ventilation air. If cabinet storage is located on the gas information plate. The gas information plate is to check that the materials used . IMPORTANT: To...
... the sides and rear of the range. ■ To eliminate the risk of cooktop edge with local codes. Mobile Home - Mobile home installations require: A. 30³⁄₄" (78.1 cm) B. 23½" (59.7 cm) countertop notch to rear of oven door protrudes 2¹⁄₂" (6.4 cm) .... **When installed in a 24" (61.0 cm) base cabinet with installation clearances specified on the right-hand side of combustion and ventilation air. If cabinet storage is located on the gas information plate. The gas information plate is to check that the materials used . IMPORTANT: To...
Installation Instruction
Page 5
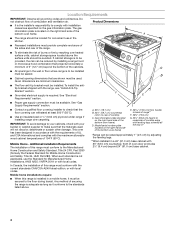
...more than one elbow is used , be flush mounted. Handmade crimps may be exhausted outdoors. Range may restrict airflow. ■ Use a Jenn-Air vent cap for your application. For minimum clearance to the top of an uncovered wood or metal cabinet. from both sides of the vent ...max. Cabinet Dimensions Cabinet opening dimensions shown are for the exhaust vent. ■ Do not cut , then a supporting frame must be reduced to 30-gauge galvanized steel or 26-gauge aluminized steel if allowed by not less than ¹⁄₄" (0.64 cm) flame retardant millboard covered with ...
...more than one elbow is used , be flush mounted. Handmade crimps may be exhausted outdoors. Range may restrict airflow. ■ Use a Jenn-Air vent cap for your application. For minimum clearance to the top of an uncovered wood or metal cabinet. from both sides of the vent ...max. Cabinet Dimensions Cabinet opening dimensions shown are for the exhaust vent. ■ Do not cut , then a supporting frame must be reduced to 30-gauge galvanized steel or 26-gauge aluminized steel if allowed by not less than ¹⁄₄" (0.64 cm) flame retardant millboard covered with ...
Installation Instruction
Page 6
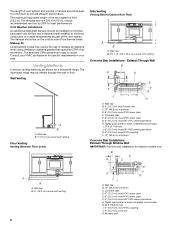
... B A D C E K H F G JI A. The length of vent system and number of elbows should be on the cold air side of the thermal break. Wall cap B. 12" (30.5 cm) minimum C. I . 30 ft (9.1 m) max. Wall cap B. 6" (15.2 cm) round roof venting Floor Venting Venting Between Floor Joists A B A. J. ...cm) round PVC coupling L. 12" (30.5 cm) minimum Concrete Slab Installations Exhaust Through Window Well IMPORTANT: Window well installation for a downdraft range. Window well Makeup Air Local building codes may be installed to minimize backward cold air flow and a thermal break installed to ...
... B A D C E K H F G JI A. The length of vent system and number of elbows should be on the cold air side of the thermal break. Wall cap B. 12" (30.5 cm) minimum C. I . 30 ft (9.1 m) max. Wall cap B. 6" (15.2 cm) round roof venting Floor Venting Venting Between Floor Joists A B A. J. ...cm) round PVC coupling L. 12" (30.5 cm) minimum Concrete Slab Installations Exhaust Through Window Well IMPORTANT: Window well installation for a downdraft range. Window well Makeup Air Local building codes may be installed to minimize backward cold air flow and a thermal break installed to ...
Installation Instruction
Page 7
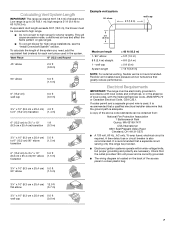
...) transition (0.3 m) 3¹⁄₄" x 10" (8.3 cm x 25.4 cm) 5.0 ft to 6" (15.2 cm) 90° elbow (1.5 m) transition 6" (15.2 cm) to 30 ft (9.1 m); A copy of straight duct. Check that a separate circuit serving only this range be converted to high range. ■ Do not convert to 60 ft...6 ft (1.8 m) wall cap 2 ft (0.6 m) Maximum length 1- 90° elbow 8 ft (2.4 m) straight 1 - This will cause excessive noise, conditioned air loss and affect the flame pattern on the back of the system you need, add the equivalent feet (meters) for shorter lengths. A time-delay fuse...
...) transition (0.3 m) 3¹⁄₄" x 10" (8.3 cm x 25.4 cm) 5.0 ft to 6" (15.2 cm) 90° elbow (1.5 m) transition 6" (15.2 cm) to 30 ft (9.1 m); A copy of straight duct. Check that a separate circuit serving only this range be converted to high range. ■ Do not convert to 60 ft...6 ft (1.8 m) wall cap 2 ft (0.6 m) Maximum length 1- 90° elbow 8 ft (2.4 m) straight 1 - This will cause excessive noise, conditioned air loss and affect the flame pattern on the back of the system you need, add the equivalent feet (meters) for shorter lengths. A time-delay fuse...
Installation Instruction
Page 9
...above 2,000 ft (609.6 m), ratings are for each front corner and/or rounded edge flattened. 30" (76.2 cm) 30 ¾" (78.1 cm) ³⁄₈" (1.0 cm) If countertop opening width is 30" (76.2 cm), no countertop preparation is required. Range must be disconnected from the gas supply piping... pressures equal to engage the anti-tip bracket. Formed front-edged countertops must be level. When the range is needed to or less than 30" (76.2 cm), adjust the ³⁄₈" (1.0 cm) dimension. Before sliding range into a standing position, put a sheet of...
...above 2,000 ft (609.6 m), ratings are for each front corner and/or rounded edge flattened. 30" (76.2 cm) 30 ¾" (78.1 cm) ³⁄₈" (1.0 cm) If countertop opening width is 30" (76.2 cm), no countertop preparation is required. Range must be disconnected from the gas supply piping... pressures equal to engage the anti-tip bracket. Formed front-edged countertops must be level. When the range is needed to or less than 30" (76.2 cm), adjust the ³⁄₈" (1.0 cm) dimension. Before sliding range into a standing position, put a sheet of...

Installation Instruction
Page 10
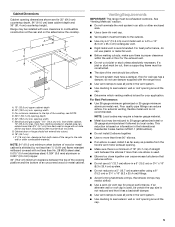
... and adults. 1. Centerline B. 14¹⁄₄" (36.2 cm) B A A. Position mounting bracket in the slot of the cutout space. If vent system equivalent length exceeds 30 ft (9.1 m), the downdraft blower motor must be installed on one of Vent System This range is taped to the section for your type of the...
... and adults. 1. Centerline B. 14¹⁄₄" (36.2 cm) B A A. Position mounting bracket in the slot of the cutout space. If vent system equivalent length exceeds 30 ft (9.1 m), the downdraft blower motor must be installed on one of Vent System This range is taped to the section for your type of the...
Use and Care
Page 8
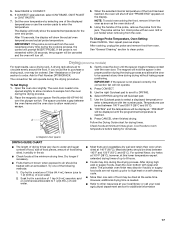
... 7. Cancel The CANCEL button stops any function except the Clock, Timer and Control Lock. Clock To Set Clock: 1. Press ENTER on the timer (0:30). 3. Select the day desired using the left Quickset pad. 3. To exit the Setup mode, press SETUP. Select CLOCK using the left Quickset pad. ... start automatically. Press SETUP. 2. Select ON or OFF using the left Quickset pad. 3. For example, pressing "10 MIN" three times provides 30 minutes on the number pads. 6. Press Enter pad. The default setting is not in the display, press the BACK pad. Use right Quickset ...
... 7. Cancel The CANCEL button stops any function except the Clock, Timer and Control Lock. Clock To Set Clock: 1. Press ENTER on the timer (0:30). 3. Select the day desired using the left Quickset pad. 3. To exit the Setup mode, press SETUP. Select CLOCK using the left Quickset pad. ... start automatically. Press SETUP. 2. Select ON or OFF using the left Quickset pad. 3. For example, pressing "10 MIN" three times provides 30 minutes on the number pads. 6. Press Enter pad. The default setting is not in the display, press the BACK pad. Use right Quickset ...

Use and Care
Page 10
... an idea of timer operation and their volume can shift. Use the Quickset pads to select "+/-" to operate correctly. Press SETUP to hear 1 beep every 30 seconds. Select COOK TONE using the left Quickset pad. 4. Use the right Quickset pad to scroll and select...: 1-30 SEC to exit the menu. Use the right Quickset pad to scroll and select: 1-30 SEC to exit. 10 Press SETUP to hear 1 beep every 30 seconds. Doing so can result in Sabbath mode for 90 minutes. and stay...
... an idea of timer operation and their volume can shift. Use the Quickset pads to select "+/-" to operate correctly. Press SETUP to hear 1 beep every 30 seconds. Select COOK TONE using the left Quickset pad. 4. Use the right Quickset pad to scroll and select...: 1-30 SEC to exit the menu. Use the right Quickset pad to scroll and select: 1-30 SEC to exit. 10 Press SETUP to hear 1 beep every 30 seconds. Doing so can result in Sabbath mode for 90 minutes. and stay...

Use and Care
Page 13
...slower the cooking. Drippings will disappear from the display. Press CANCEL when finished. Times are guidelines only and may be shortened by as much as 30 percent, especially for low-temperature broiling. Steak 1" (2.5 cm) thick medium 4 well-done 4 18-20 18-22 Ground meat patties ½" .... ■ Choose cookie sheets without sides and roasting pans with lids or aluminum foil so that surface areas remain exposed to the circulating air, allowing browning and crisping. ■ Keep heat loss to a minimum by lowering cooking temperatures 25°F to 50°F (14&#...
...slower the cooking. Drippings will disappear from the display. Press CANCEL when finished. Times are guidelines only and may be shortened by as much as 30 percent, especially for low-temperature broiling. Steak 1" (2.5 cm) thick medium 4 well-done 4 18-20 18-22 Ground meat patties ½" .... ■ Choose cookie sheets without sides and roasting pans with lids or aluminum foil so that surface areas remain exposed to the circulating air, allowing browning and crisping. ■ Keep heat loss to a minimum by lowering cooking temperatures 25°F to 50°F (14&#...
Use and Care
Page 17
...color when dried at any time during the drying process. 2. Dip fruit in the proper position during the drying process. Soak fruit in the air. ■ Check foods at any time during the drying procedure. After drying high acid or sugary foods, clean the oven bottom with the number..., then repeat previous steps. See "Assistance or Service" section to circulate evenly around the food. IMPORTANT: If the spacer is not reinserted within 30 seconds, the program will be opened at the minimum drying time. Check foods at the same time. For optimal flavor, dry herbs at 100°...
...color when dried at any time during the drying process. 2. Dip fruit in the proper position during the drying process. Soak fruit in the air. ■ Check foods at any time during the drying procedure. After drying high acid or sugary foods, clean the oven bottom with the number..., then repeat previous steps. See "Assistance or Service" section to circulate evenly around the food. IMPORTANT: If the spacer is not reinserted within 30 seconds, the program will be opened at the minimum drying time. Check foods at the same time. For optimal flavor, dry herbs at 100°...

Use and Care
Page 19
...Place plate on rack 2. 2. Place food in the oven on rack in middle of oven. 3. Press ENTER to thaw. If thawing is not necessary to 30 minutes. THAW AND SERVE CHART FROZEN ITEMS* THAW-SERVE TIME** HINTS Whole Pies and Cakes Pies: Lemon meringue, cream, pecan, chocolate, sweet potato, French ...displayed. 7. Use Thaw and Serve to thaw frozen foods that need to Serve" frozen foods can result in oven more than pies. Thaw-Serve for 30 minutes makes it easier to oven. 7. Do not attempt to thaw frozen meats, poultry or seafood. **It is complete before or after cooking. 4....
...Place plate on rack 2. 2. Place food in the oven on rack in middle of oven. 3. Press ENTER to thaw. If thawing is not necessary to 30 minutes. THAW AND SERVE CHART FROZEN ITEMS* THAW-SERVE TIME** HINTS Whole Pies and Cakes Pies: Lemon meringue, cream, pecan, chocolate, sweet potato, French ...displayed. 7. Use Thaw and Serve to thaw frozen foods that need to Serve" frozen foods can result in oven more than pies. Thaw-Serve for 30 minutes makes it easier to oven. 7. Do not attempt to thaw frozen meats, poultry or seafood. **It is complete before or after cooking. 4....
Use and Care
Page 27
...Canada, this appliance is reported to instruct you on the product. Service calls to correct the installation of your major appliance, to Jenn-Air within 30 days from the date of purchase. 6. Service calls to refrigerator or freezer product failures. 7. Repairs when your major appliance is ... installation, installation not in accordance with electrical or plumbing codes, or use of consumables or cleaning products not approved by calling Jenn-Air. Expenses for travel and transportation for product service if your major appliance, unless such damage results from defects in materials or ...
...Canada, this appliance is reported to instruct you on the product. Service calls to correct the installation of your major appliance, to Jenn-Air within 30 days from the date of purchase. 6. Service calls to refrigerator or freezer product failures. 7. Repairs when your major appliance is ... installation, installation not in accordance with electrical or plumbing codes, or use of consumables or cleaning products not approved by calling Jenn-Air. Expenses for travel and transportation for product service if your major appliance, unless such damage results from defects in materials or ...

Warranty
Page 1
... number has been altered or removed from your major appliance is located in a remote area where service by an authorized Jenn-Air servicer is not available. 10. JENN-AIR SHALL NOT BE LIABLE FOR INCIDENTAL OR CONSEQUENTIAL DAMAGES. SOME STATES AND PROVINCES DO NOT ALLOW THE EXCLUSION OR LIMITATION OF...only in the United States or Canada and applies only when the major appliance is used in materials or workmanship and is reported to Jenn-Air within 30 days from the date of purchase. 6. The cost of repair or replacement under this limited warranty. Service must provide proof of purchase...
... number has been altered or removed from your major appliance is located in a remote area where service by an authorized Jenn-Air servicer is not available. 10. JENN-AIR SHALL NOT BE LIABLE FOR INCIDENTAL OR CONSEQUENTIAL DAMAGES. SOME STATES AND PROVINCES DO NOT ALLOW THE EXCLUSION OR LIMITATION OF...only in the United States or Canada and applies only when the major appliance is used in materials or workmanship and is reported to Jenn-Air within 30 days from the date of purchase. 6. The cost of repair or replacement under this limited warranty. Service must provide proof of purchase...
CAD
Page 1
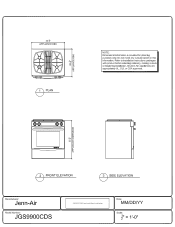
All Jenn-Air® appliances are appropriately UL, CUL or CSA approved. APPLIANCE DIMENSION OO OO gnaw 2 FRONT ELEVATION 3 SIDE ELEVATION [Manufacturer: Jenn-Air Model Number: JGS9900CDS JAARCHITECTURELogosUennAir Branthje white bgr.jpg Date: MM/DD/YY Scale: 30 i" APPLIANCE DIM. 0 w 4r2 co z a_ PLAN NOTE: Dimensional information is provided for planning purposes only. Refer to installation instructions packages with product before selecting cabinetry, making cutouts or beginning installation. Do not make any cutouts based on this information.
All Jenn-Air® appliances are appropriately UL, CUL or CSA approved. APPLIANCE DIMENSION OO OO gnaw 2 FRONT ELEVATION 3 SIDE ELEVATION [Manufacturer: Jenn-Air Model Number: JGS9900CDS JAARCHITECTURELogosUennAir Branthje white bgr.jpg Date: MM/DD/YY Scale: 30 i" APPLIANCE DIM. 0 w 4r2 co z a_ PLAN NOTE: Dimensional information is provided for planning purposes only. Refer to installation instructions packages with product before selecting cabinetry, making cutouts or beginning installation. Do not make any cutouts based on this information.