Instructions
Page 2
...may cause harmful interference to correct the interference by one or more of these conditions could lose the authority to operate this owner's manual carefully and retain it for a Class B digital device, pursuant to provide reasonable protection against harmful interference in a door, or walked... COVER (OR BACK) NO USER-SERVICEABLE PARTS INSIDE REFER SERVICING TO QUALIFIED SERVICE PERSONNEL. WARNING: Do not install this owner's manual to the presence of this equipment in a particular installation. This product should be never be of sufficient magnitude to constitute a risk...
...may cause harmful interference to correct the interference by one or more of these conditions could lose the authority to operate this owner's manual carefully and retain it for a Class B digital device, pursuant to provide reasonable protection against harmful interference in a door, or walked... COVER (OR BACK) NO USER-SERVICEABLE PARTS INSIDE REFER SERVICING TO QUALIFIED SERVICE PERSONNEL. WARNING: Do not install this owner's manual to the presence of this equipment in a particular installation. This product should be never be of sufficient magnitude to constitute a risk...

Instructions
Page 3
... should not be adhered to protect it from tip-over - IMPORTANT SAFETY INSTRUCTIONS CAUTION: PLEASE READ AND OBSERVE ALL WARNINGS AND INSTRUCTIONS IN THIS OWNER'S MANUAL. DO NOT REMOVE THE CABINET COVER, OR YOU MAY BE EXPOSED TO DANGEROUS VOLTAGE. All warnings on a bed, sofa, rug or other areas located near...
... should not be adhered to protect it from tip-over - IMPORTANT SAFETY INSTRUCTIONS CAUTION: PLEASE READ AND OBSERVE ALL WARNINGS AND INSTRUCTIONS IN THIS OWNER'S MANUAL. DO NOT REMOVE THE CABINET COVER, OR YOU MAY BE EXPOSED TO DANGEROUS VOLTAGE. All warnings on a bed, sofa, rug or other areas located near...
Instructions
Page 4
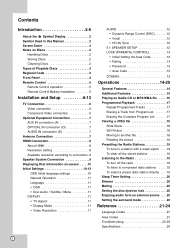
Contents Introduction 2-5 About the Symbol Display 2 Symbol Used in this Manual 2 Screen Saver 2 Notes on Discs 2 Handling Discs 2 Storing Discs 2 Cleaning Discs 2 Types of Playable Discs 3 Regional Code 3 Front Panel 4 Remote Control 5 Remote Control operation 5 Remote ...
Contents Introduction 2-5 About the Symbol Display 2 Symbol Used in this Manual 2 Screen Saver 2 Notes on Discs 2 Handling Discs 2 Storing Discs 2 Cleaning Discs 2 Types of Playable Discs 3 Regional Code 3 Front Panel 4 Remote Control 5 Remote Control operation 5 Remote ...
Instructions
Page 5
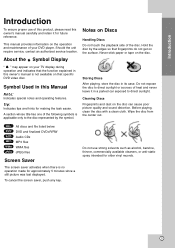
...screen saver activates when there is no operation made for making the task easier. Do not use of this product, please read this owner's manual carefully and retain it in its case. Should the unit require service, contact an authorized service location. Do not expose the disc to ... on that fingerprints do not get on the operation and maintenance of your TV display during operation and indicates that the function explained in this Manual Note: Indicates special notes and operating features. Before playing, clean the disc with a clean cloth. Hold the disc by the symbol. Never ...
...screen saver activates when there is no operation made for making the task easier. Do not use of this product, please read this owner's manual carefully and retain it in its case. Should the unit require service, contact an authorized service location. Do not expose the disc to ... on that fingerprints do not get on the operation and maintenance of your TV display during operation and indicates that the function explained in this Manual Note: Indicates special notes and operating features. Before playing, clean the disc with a clean cloth. Hold the disc by the symbol. Never ...
Instructions
Page 9
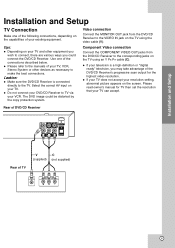
...the MONITOR OUT jack from the DVD/CD Receiver to the corresponding jacks on the TV using an Y PB PR cable (C). Please read owner's manual for the highest video resolution. Tips: Depending on your resolution setting, abnormal picture appears on the screen. If your TV does not accept your ...you may take advantage of the DVD/CD Receiver's progressive scan output for TV then set the resolution that your VCR. Please refer to the manuals of your TV. The DVD image could connect the DVD/CD Receiver. Use one of the following connections, depending on the capabilities of your...
...the MONITOR OUT jack from the DVD/CD Receiver to the corresponding jacks on the TV using an Y PB PR cable (C). Please read owner's manual for the highest video resolution. Tips: Depending on your resolution setting, abnormal picture appears on the screen. If your TV does not accept your ...you may take advantage of the DVD/CD Receiver's progressive scan output for TV then set the resolution that your VCR. Please refer to the manuals of your TV. The DVD image could connect the DVD/CD Receiver. Use one of the following connections, depending on the capabilities of your...
Instructions
Page 11
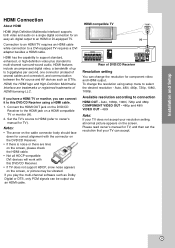
Connect the HDMI OUT jack on the DVD/CD Receiver to owner's manual for TV). Set the TV's source to HDMI (refer to the HDMI jack on a HDMI compatible TV or monitor (H). 2. digital output to a DVI-equipped TV ... TV. To change the resolution for TV, and then set the resolution that your resolution setting, abnormal picture appears on the screen. Please read owner's manual for component video and HDMI output. HDMI compatible TV HDMI H Rear of several cables and connector), and communication between the AV source and AV devices...
Connect the HDMI OUT jack on the DVD/CD Receiver to owner's manual for TV). Set the TV's source to HDMI (refer to the HDMI jack on a HDMI compatible TV or monitor (H). 2. digital output to a DVI-equipped TV ... TV. To change the resolution for TV, and then set the resolution that your resolution setting, abnormal picture appears on the screen. Please read owner's manual for component video and HDMI output. HDMI compatible TV HDMI H Rear of several cables and connector), and communication between the AV source and AV devices...
Instructions
Page 14
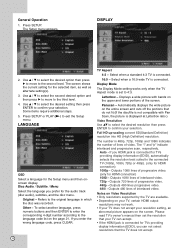
... your selection. Outputs 720 lines of interlaced video. Outputs 480 lines progressive video. 480i - Outputs 480 lines of progressive video. 480p - Please read TV's owner's manual then set to the language code list on your TV, certain HDMI output resolutions may not work. • If your TV does not accept your...
... your selection. Outputs 720 lines of interlaced video. Outputs 480 lines progressive video. 480i - Outputs 480 lines of progressive video. 480p - Please read TV's owner's manual then set to the language code list on your TV, certain HDMI output resolutions may not work. • If your TV does not accept your...
Instructions
Page 21
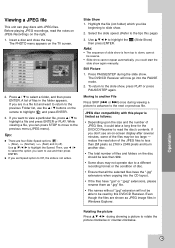
... files have the ".jpg" extensions when copying into the PAUSE mode. 2. Tips: There are in the folder appears. To return to the slide show again manually. Use v V b B to highlight the then press ENTER. (Slide Show) Note: • The sequence of files in a file list and want to return to the previous...
... files have the ".jpg" extensions when copying into the PAUSE mode. 2. Tips: There are in the folder appears. To return to the slide show again manually. Use v V b B to highlight the then press ENTER. (Slide Show) Note: • The sequence of files in a file list and want to return to the previous...
Instructions
Page 22
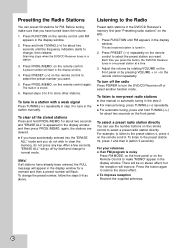
... then 9 (within 3 seconds). For example, to listen to select a preset radio station directly. To listen to non-preset radio stations Use manual or automatic tuning in the display window. Press PROG./MEMO. on the remote control. To tune in a station with a weak signal Press TUNING... Receiver tunes in . 2. Repeat steps 3 to 6 to restore the stereo effect. The last received station is appeared in the station manually. For manual tuning, press TUNING.(-/+) repeatedly. There will be no stereo effect, but the reception will flash. Press PRESET (-/+) on the Remote Control ...
... then 9 (within 3 seconds). For example, to listen to select a preset radio station directly. To listen to non-preset radio stations Use manual or automatic tuning in the display window. Press PROG./MEMO. on the remote control. To tune in a station with a weak signal Press TUNING... Receiver tunes in . 2. Repeat steps 3 to 6 to restore the stereo effect. The last received station is appeared in the station manually. For manual tuning, press TUNING.(-/+) repeatedly. There will be no stereo effect, but the reception will flash. Press PRESET (-/+) on the Remote Control ...
Instructions
Page 26
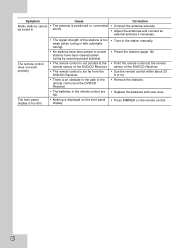
... and the DVD/CD Receiver. • The batteries in the remote control are flat. • Nothing is positioned or connected be tuned in the station manually. • Preset the stations (page 19). • Point the remote control at the remote sensor of the DVD/CD Receiver. • Use the remote control...
... and the DVD/CD Receiver. • The batteries in the remote control are flat. • Nothing is positioned or connected be tuned in the station manually. • Preset the stations (page 19). • Point the remote control at the remote sensor of the DVD/CD Receiver. • Use the remote control...


