Instructions
Page 1
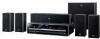
Model No. which are located either on the rear, bottom or side of XV-THD4, SP-THD5W, SP-THD5F, SP-THD5C and SP-THD5S (TH-D60 only) INSTRUCTIONS For Customer Use: Enter below the Model No. Serial No. LVT1704-001B [J,C] and Serial No. DVD DIGITAL THEATER SYSTEM TH-D60 Consists of XV-THD60, SP-THD6W, SP-THD6F, SP-THD6C and SP-THD6S TH-D50 Consists of XV-THD50, SP-THD5W, SP-THD5F, SP-THD5C and SP-THD5S TH-D5 Consists of XV-THD5, SP-THD5W, SP-THD5F, SP-THD5C and SP-THD5S TH-D4 Consists of the cabinet. Retain this information for future reference.
Model No. which are located either on the rear, bottom or side of XV-THD4, SP-THD5W, SP-THD5F, SP-THD5C and SP-THD5S (TH-D60 only) INSTRUCTIONS For Customer Use: Enter below the Model No. Serial No. LVT1704-001B [J,C] and Serial No. DVD DIGITAL THEATER SYSTEM TH-D60 Consists of XV-THD60, SP-THD6W, SP-THD6F, SP-THD6C and SP-THD6S TH-D50 Consists of XV-THD50, SP-THD5W, SP-THD5F, SP-THD5C and SP-THD5S TH-D5 Consists of XV-THD5, SP-THD5W, SP-THD5F, SP-THD5C and SP-THD5S TH-D4 Consists of the cabinet. Retain this information for future reference.

Instructions
Page 2
When installing the apparatus, ensure that the cable ground shall be remote controlled. CAUTION To reduce the risk of cable entry as practical. [European Union only] [Union européenne seulement] G-1 The power can be connected to the grounding system of the NEC which provides guidelines for proper grounding and, in any position does not disconnect the mains line. • When the system is on , the STANDBY lamp goes off ). Touche Déconnectez la fiche d'alimentation secteur pour couper l'alimentation complètement (le témoin STANDBY s'éteint). Lors de l'...
When installing the apparatus, ensure that the cable ground shall be remote controlled. CAUTION To reduce the risk of cable entry as practical. [European Union only] [Union européenne seulement] G-1 The power can be connected to the grounding system of the NEC which provides guidelines for proper grounding and, in any position does not disconnect the mains line. • When the system is on , the STANDBY lamp goes off ). Touche Déconnectez la fiche d'alimentation secteur pour couper l'alimentation complètement (le témoin STANDBY s'éteint). Lors de l'...
Instructions
Page 3
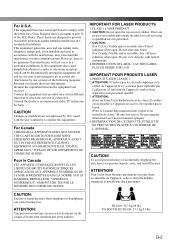
... Changes or modifications not approved by turning the equipment off and on a circuit different from earphones or headphones can be determined by JVC could void the user's authority to qualified service personnel. 3. CAUTION: (For U.S.A.) Visible and/or invisible class II laser radiation ... particular installation. Connect the equipment into beam. (For Canada) Visible and/or invisible class 1M laser radiation when open. TH-D60: 30.7 kg/68 lbs TH-D50/TH-D5/TH-D4: 23.7 kg/53 lbs G-2 IMPORTANT POUR PRODUITS LASER 1. IMPORTANT FOR LASER PRODUCTS 1. Pour éviter toute ...
... Changes or modifications not approved by turning the equipment off and on a circuit different from earphones or headphones can be determined by JVC could void the user's authority to qualified service personnel. 3. CAUTION: (For U.S.A.) Visible and/or invisible class II laser radiation ... particular installation. Connect the equipment into beam. (For Canada) Visible and/or invisible class 1M laser radiation when open. TH-D60: 30.7 kg/68 lbs TH-D50/TH-D5/TH-D4: 23.7 kg/53 lbs G-2 IMPORTANT POUR PRODUITS LASER 1. IMPORTANT FOR LASER PRODUCTS 1. Pour éviter toute ...

Instructions
Page 4
... function is available while stopped. The function is available while paused. Table of contents Before using this manual • Illustrations and button names of the TH-D60 are mainly used for explanation. • The following icons and illustrations are used to make the explanations simple and easy-to read this System...
... function is available while stopped. The function is available while paused. Table of contents Before using this manual • Illustrations and button names of the TH-D60 are mainly used for explanation. • The following icons and illustrations are used to make the explanations simple and easy-to read this System...
Instructions
Page 5
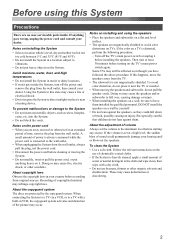
To prevent malfunctions or damage to avoid color distortions on a flat and level surface. • The speakers are away on travel or otherwise for an extended period of volume Always set at least 30 minutes before cleaning or moving the speakers and subwoofer, do not place it before starting any metallic objects, such as they could permanently damage your country before recording from the TV. • The subwoofer is level, dry and neither too hot nor too cold between 5°C and 35°C (41°F and 95°F). • Do not install the System in VCR, the copyguard ...
To prevent malfunctions or damage to avoid color distortions on a flat and level surface. • The speakers are away on travel or otherwise for an extended period of volume Always set at least 30 minutes before cleaning or moving the speakers and subwoofer, do not place it before starting any metallic objects, such as they could permanently damage your country before recording from the TV. • The subwoofer is level, dry and neither too hot nor too cold between 5°C and 35°C (41°F and 95°F). • Do not install the System in VCR, the copyguard ...

Instructions
Page 6
... Code numbers include "1." Some discs/devices/files may not be used with USB 2.0 Full-Speed. Region code of a DualDisc on this System. Playable digital devices JVC bears no responsibility for any loss of a "DualDisc" does not comply with the "Compact Disc Digital Audio" standard. Note that differ from those explained in...
... Code numbers include "1." Some discs/devices/files may not be used with USB 2.0 Full-Speed. Region code of a DualDisc on this System. Playable digital devices JVC bears no responsibility for any loss of a "DualDisc" does not comply with the "Compact Disc Digital Audio" standard. Note that differ from those explained in...
Instructions
Page 7
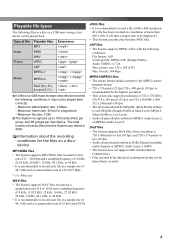
JPEG files • It is recommended to be played back correctly: - picture size: 352 x 288 (CIF) Max. DivX files • The System supports DivX files whose resolution is recommended to record each file at a sample rate of 44.1 kHz and at a data transfer rate of 128 (96*) kbps. * For WMA only WAV files • The System supports WAV files recorded at a quantization rate of 8 or 16 bit and a sampling frequency of 8 kHz, 11.025 kHz, 12 kHz, 16 kHz, 22.05 kHz, 24 kHz, 32 kHz, 44.1 kHz, or 48 kHz. • It is 720 x 480 pixels or less (30 fps), and 720 x 576 pixels or less (25 fps)....
JPEG files • It is recommended to be played back correctly: - picture size: 352 x 288 (CIF) Max. DivX files • The System supports DivX files whose resolution is recommended to record each file at a sample rate of 44.1 kHz and at a data transfer rate of 128 (96*) kbps. * For WMA only WAV files • The System supports WAV files recorded at a quantization rate of 8 or 16 bit and a sampling frequency of 8 kHz, 11.025 kHz, 12 kHz, 16 kHz, 22.05 kHz, 24 kHz, 32 kHz, 44.1 kHz, or 48 kHz. • It is 720 x 480 pixels or less (30 fps), and 720 x 576 pixels or less (25 fps)....

Instructions
Page 8
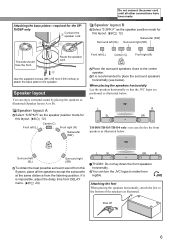
...) indicated on the rear of the remote control decreases, replace both to the center unit and to one speaker terminal. TH-D50/TH-D5/TH-D4: For front and surround speakers (x 16) • Screws (TH-D60 only): M5 x 85 mm (3-3/8 inches) (x 6) Speaker cords: : 3 m (10 ft) : 8 m (26.3 ft) Center unit To center speaker (SP-THD6C/SP... white cords to heat or flame. DO NOT connect more than those supplied for iPod (x 1) - Connecting the speaker cords Connect the speaker cords both batteries. TH-D5/TH-D4: Connection cable for iPod (x 1) Stand for iPod...
...) indicated on the rear of the remote control decreases, replace both to the center unit and to one speaker terminal. TH-D50/TH-D5/TH-D4: For front and surround speakers (x 16) • Screws (TH-D60 only): M5 x 85 mm (3-3/8 inches) (x 6) Speaker cords: : 3 m (10 ft) : 8 m (26.3 ft) Center unit To center speaker (SP-THD6C/SP... white cords to heat or flame. DO NOT connect more than those supplied for iPod (x 1) - Connecting the speaker cords Connect the speaker cords both batteries. TH-D5/TH-D4: Connection cable for iPod (x 1) Stand for iPod...
Instructions
Page 9
It is impossible, adjust the delay time from DELAY menu. ( 24) L SL SR R TH-D60: Do not lay down the front speakers horizontally. TV Surround left (SL) Surround right (SR) To obtain the best possible surround sound from the ... are positioned as illustrated below. If it is recommended to place the surround speakers horizontally (see below . Ex.: TV L R SL SR TH-D50/TH-D5/TH-D4 only: you can turn the JVC logos to the speaker. Attaching the feet When placing the speakers horizontally, attach the feet to the center speaker. Attaching the base...
It is impossible, adjust the delay time from DELAY menu. ( 24) L SL SR R TH-D60: Do not lay down the front speakers horizontally. TV Surround left (SL) Surround right (SR) To obtain the best possible surround sound from the ... are positioned as illustrated below. If it is recommended to place the surround speakers horizontally (see below . Ex.: TV L R SL SR TH-D50/TH-D5/TH-D4 only: you can turn the JVC logos to the speaker. Attaching the feet When placing the speakers horizontally, attach the feet to the center speaker. Attaching the base...
Instructions
Page 10
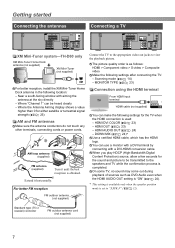
...: HDMI > Component video > S-video > Composite video Make the following location: - HDMI DVI COLOR ( 23) - Getting started Connecting the antennas Connecting a TV XM Mini-Tuner system-TH-D60 only XM Mini-Tuner Home Dock antenna (not supplied) XM Mini-Tuner (not supplied) For better reception, install the XM Mini-Tuner Home Dock...
...: HDMI > Component video > S-video > Composite video Make the following location: - HDMI DVI COLOR ( 23) - Getting started Connecting the antennas Connecting a TV XM Mini-Tuner system-TH-D60 only XM Mini-Tuner Home Dock antenna (not supplied) XM Mini-Tuner (not supplied) For better reception, install the XM Mini-Tuner Home Dock...
Instructions
Page 11
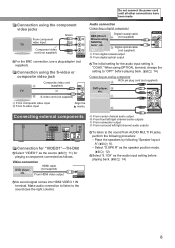
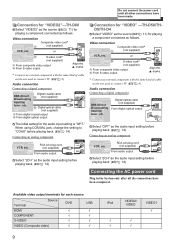
... sound (see the right column). S-video cord (not supplied) A From Composite video input B From S-video input Align the 5 marks. Connecting external components , Connection for "VIDEO1"-TH-D60 Select "VIDEO1" as the source ( 11) for the audio input setting is "COAX." Make audio connection to listen to the sound from AUDIO MULTI...
... sound (see the right column). S-video cord (not supplied) A From Composite video input B From S-video input Align the 5 marks. Connecting external components , Connection for "VIDEO1"-TH-D60 Select "VIDEO1" as the source ( 11) for the audio input setting is "COAX." Make audio connection to listen to the sound from AUDIO MULTI...
Instructions
Page 12
... coaxial cable (not supplied) Digital optical cable (not supplied) A From digital coaxial output B From digital optical output Connection for "VIDEO" -TH-D50/THD5/TH-D4 Select "VIDEO" as the source ( 11) for playing a component connected as the audio input setting before playing back. ( 14)...output B From S-video output Align the 5 marks. * Connect an external component with the same kind of cable as follows. Connection for "VIDEO2"-TH-D60 Select "VIDEO2" as the source ( 11) for playing a component connected as the one used to connect TV. ( 8) Audio connection Connecting...
... coaxial cable (not supplied) Digital optical cable (not supplied) A From digital coaxial output B From digital optical output Connection for "VIDEO" -TH-D50/THD5/TH-D4 Select "VIDEO" as the source ( 11) for playing a component connected as the audio input setting before playing back. ( 14)...output B From S-video output Align the 5 marks. * Connect an external component with the same kind of cable as follows. Connection for "VIDEO2"-TH-D60 Select "VIDEO2" as the source ( 11) for playing a component connected as the one used to connect TV. ( 8) Audio connection Connecting...
Instructions
Page 13
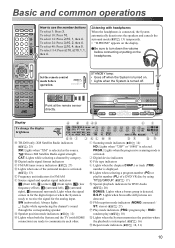
...) are detected. Be sure to receive the signal for DVD Audio ( 20) BONUS: Lights when a bonus group is displayed. Display To change the display brightness A TH-D60 only: XM Satellite Radio indicators ( 25) XM: Lights when "XM" is selected. SW (subwoofer): Always lights. _: Lights while reproducing the channel's sound through the...
...) are detected. Be sure to receive the signal for DVD Audio ( 20) BONUS: Lights when a bonus group is displayed. Display To change the display brightness A TH-D60 only: XM Satellite Radio indicators ( 25) XM: Lights when "XM" is selected. SW (subwoofer): Always lights. _: Lights while reproducing the channel's sound through the...
Instructions
Page 14
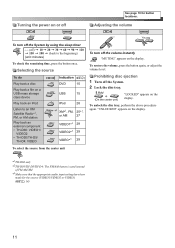
... = 30 = 60 = 90 = 120 = 150 = 180 = (back to an XM Satellite Radio*1, FM, or AM station Play back an external component • TH-D60: VIDEO1/ VIDEO2 • TH-D50/TH-D5/ TH-D4: VIDEO Indication DVD 15 USB 15 IPod 28 *2 XM*1, FM, 25*1, or AM 27 VIDEO1*3 29 VIDEO2*3 29 VIDEO*3 29 To select.../VIDEO2 or VIDEO). ( 14) 11 To unlock the disc tray, perform the above procedure again. "UNLOCKED" appears on the display. *1TH-D60 only *2TH-D50/TH-D5/TH-D4: The FM/AM button is used instead of FM/AM/XM. *3Make sure that the appropriate audio input setting have been made for button...
... = 30 = 60 = 90 = 120 = 150 = 180 = (back to an XM Satellite Radio*1, FM, or AM station Play back an external component • TH-D60: VIDEO1/ VIDEO2 • TH-D50/TH-D5/ TH-D4: VIDEO Indication DVD 15 USB 15 IPod 28 *2 XM*1, FM, 25*1, or AM 27 VIDEO1*3 29 VIDEO2*3 29 VIDEO*3 29 To select.../VIDEO2 or VIDEO). ( 14) 11 To unlock the disc tray, perform the above procedure again. "UNLOCKED" appears on the display. *1TH-D60 only *2TH-D50/TH-D5/TH-D4: The FM/AM button is used instead of FM/AM/XM. *3Make sure that the appropriate audio input setting have been made for button...
Instructions
Page 15
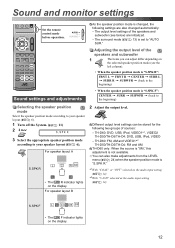
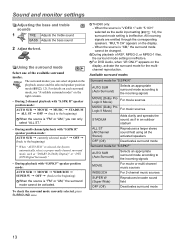
... As the speaker position mode is not available. TH-D60: FM, AM and VIDEO1*2 TH-D50/TH-D5/TH-D4: FM and AM TH-D60 only: When the source is "XM," this adjustment is changed, the following two groups of sources: - TH-D60: DVD, USB, IPod, VIDEO1*1, VIDEO2 TH-D50/TH-D5/TH-D4: DVD, USB, IPod, VIDEO - You can be...
... As the speaker position mode is not available. TH-D60: FM, AM and VIDEO1*2 TH-D50/TH-D5/TH-D4: FM and AM TH-D60 only: When the source is "XM," this adjustment is changed, the following two groups of sources: - TH-D60: DVD, USB, IPod, VIDEO1*1, VIDEO2 TH-D50/TH-D5/TH-D4: DVD, USB, IPod, VIDEO - You can be...
Instructions
Page 16
... details on each surround mode, see "Available surround modes" on the playback source and the selected speaker position mode ( 12). When the source is ineffective. TH-D60 only: - The surround modes you can select depend on the right column. • During 2-channel playback with "S.SPK R" speaker position mode: AUTO SUR = MOVIE...
... details on each surround mode, see "Available surround modes" on the playback source and the selected speaker position mode ( 12). When the source is ineffective. TH-D60 only: - The surround modes you can select depend on the right column. • During 2-channel playback with "S.SPK R" speaker position mode: AUTO SUR = MOVIE...
Instructions
Page 17
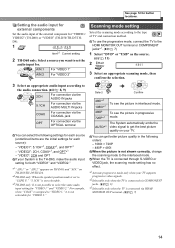
...For "VIDEO 2" Scanning mode setting Select the scanning mode according to the type of the external component for "VIDEO1/ VIDEO2" (TH-D60) or "VIDEO" (TH-D50/TH-D5/THD4). 1 Item*1 Current setting 2 TH-D60 only: Select a source you want to set to "S.SPK F," "5.1CH" is not selectable. *3TH-D60 only: It ...Select an appropriate audio input according to "VIDEO 1," it is connected via the OPTICAL terminal You can get the best picture quality on TH-D50/TH-D5/TH-D4. *2TH-D60 only: When the speaker position mode is set the audio input for button locations. Setting the audio input for ...
...For "VIDEO 2" Scanning mode setting Select the scanning mode according to the type of the external component for "VIDEO1/ VIDEO2" (TH-D60) or "VIDEO" (TH-D50/TH-D5/THD4). 1 Item*1 Current setting 2 TH-D60 only: Select a source you want to set to "S.SPK F," "5.1CH" is not selectable. *3TH-D60 only: It ...Select an appropriate audio input according to "VIDEO 1," it is connected via the OPTICAL terminal You can get the best picture quality on TH-D50/TH-D5/TH-D4. *2TH-D60 only: When the speaker position mode is set the audio input for button locations. Setting the audio input for ...

Instructions
Page 18
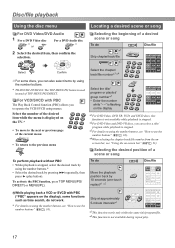
Disc/file playback The following settings before operation. Label side up When placing an 8 cm (3-3/16 inches) disc Set the remote control mode before playing back discs/ files. • Scanning mode ( 14) • MONITOR TYPE ( 23) • ON SCREEN LANGUAGE ( 23) Basic playback Playing back a disc 1 Select "DVD" as the source. ( 11) Playback starts automatically. For playback of a file on a disc or device, select the file type you want to play button) to start playback if the file is turned off. When you touch any one of files (music, picture or movie) ...
Disc/file playback The following settings before operation. Label side up When placing an 8 cm (3-3/16 inches) disc Set the remote control mode before playing back discs/ files. • Scanning mode ( 14) • MONITOR TYPE ( 23) • ON SCREEN LANGUAGE ( 23) Basic playback Playing back a disc 1 Select "DVD" as the source. ( 11) Playback starts automatically. For playback of a file on a disc or device, select the file type you want to play button) to start playback if the file is turned off. When you touch any one of files (music, picture or movie) ...
Instructions
Page 19
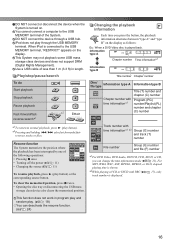
DO NOT connect the device through the USB MEMORY terminal. reverses tracks or files. For MP3, WMA, WAV, ASF, MPEG1, MPEG2, or DivX, elapsed playing time is played back. This function does not work in length. Play/stop/pause/search To do Start playback Stop playback Pause playback Fast-forward/fastreverse search*1 *2 «Hold Changing the playback information Each time you can deactivate the resume function. ( 24) 16 Track number with time information*1 *2 Group (G) number and track (T) number File number Group (G) number and file (F) number *1For DVD ...
DO NOT connect the device through the USB MEMORY terminal. reverses tracks or files. For MP3, WMA, WAV, ASF, MPEG1, MPEG2, or DivX, elapsed playing time is played back. This function does not work in length. Play/stop/pause/search To do Start playback Stop playback Pause playback Fast-forward/fastreverse search*1 *2 «Hold Changing the playback information Each time you can deactivate the resume function. ( 24) 16 Track number with time information*1 *2 Group (G) number and track (T) number File number Group (G) number and file (F) number *1For DVD ...
Instructions
Page 20
... or song To do not work. * For details on using the number buttons, see "How to operate the VCD/SVCD using the number buttons. * TH-D50/TH-D5/TH-D4: The TOP MENU/PG button is stopped, select the desired track by using the number buttons.* • Select the desired track by pressing x repeatedly...
... or song To do not work. * For details on using the number buttons, see "How to operate the VCD/SVCD using the number buttons. * TH-D50/TH-D5/TH-D4: The TOP MENU/PG button is stopped, select the desired track by using the number buttons.* • Select the desired track by pressing x repeatedly...