Instructions
Page 4
... using number buttons ........22 Advanced operations 23 Using the surround mode 23 Using the on-screen bar 25 Playing from a specified position on a disc 26 Using the file control display 27 Resume Playback 28 Selecting a view angle 28 Selecting the subtitle 28 Selecting the audio 29 Special picture playback 29 Program Playback 30 Random Playback 31 Repeat Playback 31 Tray lock 32 Sound and other settings 32 Setting DVD preferences 33 Using the setup menus 33 Menu description 33 Tuner operations...
... using number buttons ........22 Advanced operations 23 Using the surround mode 23 Using the on-screen bar 25 Playing from a specified position on a disc 26 Using the file control display 27 Resume Playback 28 Selecting a view angle 28 Selecting the subtitle 28 Selecting the audio 29 Special picture playback 29 Program Playback 30 Random Playback 31 Repeat Playback 31 Tray lock 32 Sound and other settings 32 Setting DVD preferences 33 Using the setup menus 33 Menu description 33 Tuner operations...
Instructions
Page 5
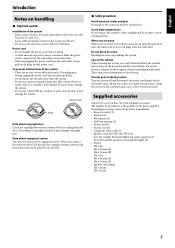
... the power cord from the wall outlet. If water gets inside . Using the system in parentheses is level, dry and neither too hot nor too cold; Supplied accessories Check to your purchase. Label sticker Sticker Paste Note about copyguard system The discs are no user-serviceable parts inside the system Turn the system off and disconnect the power cord plug from the discs. Introduction...
... the power cord from the wall outlet. If water gets inside . Using the system in parentheses is level, dry and neither too hot nor too cold; Supplied accessories Check to your purchase. Label sticker Sticker Paste Note about copyguard system The discs are no user-serviceable parts inside the system Turn the system off and disconnect the power cord plug from the discs. Introduction...
Instructions
Page 6
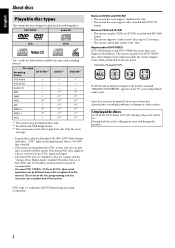
..., the use of Non-DVD side of their actual operation may not be different from what is loaded, "REGION CODE ERROR!" Example of DVD VIDEO DVD VIDEO players and DVD VIDEO discs have their own Region Code numbers. About discs Playable disc types This system has been designed to play back finalized +R/+RW (DVD Video Format only) discs. Region code of playable DVD: If a DVD with DVD VR format. appears on DVD-R and DVD-RW • This system does not support "multi-border" disc. •...
..., the use of Non-DVD side of their actual operation may not be different from what is loaded, "REGION CODE ERROR!" Example of DVD VIDEO DVD VIDEO players and DVD VIDEO discs have their own Region Code numbers. About discs Playable disc types This system has been designed to play back finalized +R/+RW (DVD Video Format only) discs. Region code of playable DVD: If a DVD with DVD VR format. appears on DVD-R and DVD-RW • This system does not support "multi-border" disc. •...
Instructions
Page 7
... resolution. (If a file has been recorded at Low Level). • Audio streams should conform to Dolby Digital (including multi channel) or MPEG1 Audio Layer-3 (MP3). • The system does not support GMC (Global Motion Compression). • The file encoded in the interlaced scanning mode may not be played back normally because of their disc characteristics or recording conditions. • MP3/WMA/JPEG...
... resolution. (If a file has been recorded at Low Level). • Audio streams should conform to Dolby Digital (including multi channel) or MPEG1 Audio Layer-3 (MP3). • The system does not support GMC (Global Motion Compression). • The file encoded in the interlaced scanning mode may not be played back normally because of their disc characteristics or recording conditions. • MP3/WMA/JPEG...
Instructions
Page 14
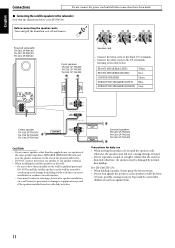
... power cord until all other than one speaker to the subwoofer Note that the illustration below : FRONT SPEAKERS (LEFT) FRONT SPEAKERS (RIGHT) CENTER SPEAKER SURROUND SPEAKERS (LEFT) SURROUND SPEAKERS (RIGHT) White Red Green Blue Gray Center speaker TH-C60: SP-THC60C TH-C50: SP-THC60C TH-C40: SP-THC40C Surround speakers TH-C60: SP-THC60S TH-C50: SP-THC50S TH-C40: SP-THC40S CAUTION • If you connect speakers other connections have them . 11 DO NOT install the satellite speakers on a wall...
... power cord until all other than one speaker to the subwoofer Note that the illustration below : FRONT SPEAKERS (LEFT) FRONT SPEAKERS (RIGHT) CENTER SPEAKER SURROUND SPEAKERS (LEFT) SURROUND SPEAKERS (RIGHT) White Red Green Blue Gray Center speaker TH-C60: SP-THC60C TH-C50: SP-THC60C TH-C40: SP-THC40C Surround speakers TH-C60: SP-THC60S TH-C50: SP-THC50S TH-C40: SP-THC40S CAUTION • If you connect speakers other connections have them . 11 DO NOT install the satellite speakers on a wall...
Instructions
Page 15
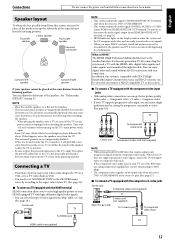
... the cable. NOTE • Place the satellite speakers on a flat and level surface. • The front and center speakers are ready to send and receive signals. • When you enjoy HDCP contents, sound and picture may still be output only when you select DVD or USB MEMORY as the source to play. (See page 17.) 7 To connect a TV equipped with the component video input jacks • With analog video connection, you connect a HDCP compatible...
... the cable. NOTE • Place the satellite speakers on a flat and level surface. • The front and center speakers are ready to send and receive signals. • When you enjoy HDCP contents, sound and picture may still be output only when you select DVD or USB MEMORY as the source to play. (See page 17.) 7 To connect a TV equipped with the component video input jacks • With analog video connection, you connect a HDCP compatible...

Instructions
Page 16
... S-video output 3 To audio output NOTE • The signals input to the VIDEO jack of the VCR IN jacks will be input when selecting "DBS" as the source to damage the cord. 13 Center unit Powered subwoofer DBS* tuner MD player To digital optical output Digital optical cord (not supplied) * DBS = Direct Broadcasting Satellite NOTE • Only digital audio signals can enjoy the sound of files in a USB mass storage class device, do not disconnect the device. Connecting to an analog component...
... S-video output 3 To audio output NOTE • The signals input to the VIDEO jack of the VCR IN jacks will be input when selecting "DBS" as the source to damage the cord. 13 Center unit Powered subwoofer DBS* tuner MD player To digital optical output Digital optical cord (not supplied) * DBS = Direct Broadcasting Satellite NOTE • Only digital audio signals can enjoy the sound of files in a USB mass storage class device, do not disconnect the device. Connecting to an analog component...
Instructions
Page 19
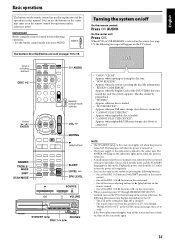
... disc/file information. • "REGION CODE ERROR!": Appears when the Region Code of the DISC (1-5) 3 buttons or 3 on the center unit. • When connecting your TV through HDMI MONITOR OUT terminal, turn it back on the system by pressing the following operation; • Set the remote control mode selector to "OFF". One of the DVD VIDEO does not match the code the system supports. Source selecting buttons Cursor (3/2)/ ENTER Remote control mode selector • "OPEN"/"CLOSE": Appears when opening...
... disc/file information. • "REGION CODE ERROR!": Appears when the Region Code of the DISC (1-5) 3 buttons or 3 on the center unit. • When connecting your TV through HDMI MONITOR OUT terminal, turn it back on the system by pressing the following operation; • Set the remote control mode selector to "OFF". One of the DVD VIDEO does not match the code the system supports. Source selecting buttons Cursor (3/2)/ ENTER Remote control mode selector • "OPEN"/"CLOSE": Appears when opening...
Instructions
Page 20
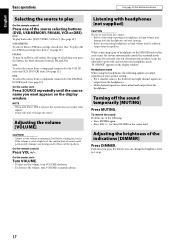
... a component connected to the VCR IN jacks and AUX IN (VCR) jacks. (See page 13.) DBS: To select the source from the speakers. If the volume is selected, this system does not output video signals. • It may be suddenly output from a component connected to minimum level before starting any source. Turning off , and activates the headphone mode. Adjusting the brightness of the source selecting buttons (DVD, USB MEMORY, FM/AM, VCR or DBS). DVD: To play back a disc (DVD VIDEO...
... a component connected to the VCR IN jacks and AUX IN (VCR) jacks. (See page 13.) DBS: To select the source from the speakers. If the volume is selected, this system does not output video signals. • It may be suddenly output from a component connected to minimum level before starting any source. Turning off , and activates the headphone mode. Adjusting the brightness of the source selecting buttons (DVD, USB MEMORY, FM/AM, VCR or DBS). DVD: To play back a disc (DVD VIDEO...
Instructions
Page 21
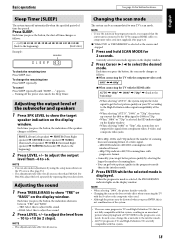
... better picture quality by using the setup menu shown on the display window. When the progressive mode is displayed. Press SLEEP. Adjusting the output level of the subwoofer and speakers 1 Press SPK LEVEL to the TV by selecting the larger the number of scanning lines. • You can be distorted when you press the button, the shut-off time changes as follows: 7When connecting the TV with the component video cord: 480i...
... better picture quality by using the setup menu shown on the display window. When the progressive mode is displayed. Press SLEEP. Adjusting the output level of the subwoofer and speakers 1 Press SPK LEVEL to the TV by selecting the larger the number of scanning lines. • You can be distorted when you press the button, the shut-off time changes as follows: 7When connecting the TV with the component video cord: 480i...

Instructions
Page 22
... When placing an 8 cm disc Number buttons Cursor (3/2)/ ENTER 19 Remote control mode selector (play a disc 1 Press the desired DISC (1-5) 0 on the center unit. • The system turns on the setup menu. (See page 34.) • (For JPEG) The system cannot accept operations even though you stop Press 7. Basic playback 7 To play button) 3 Press DISC (1-5), with SHIFT pressed. When stopping playback, the file control display (see page 27) appears...
... When placing an 8 cm disc Number buttons Cursor (3/2)/ ENTER 19 Remote control mode selector (play a disc 1 Press the desired DISC (1-5) 0 on the center unit. • The system turns on the setup menu. (See page 34.) • (For JPEG) The system cannot accept operations even though you stop Press 7. Basic playback 7 To play button) 3 Press DISC (1-5), with SHIFT pressed. When stopping playback, the file control display (see page 27) appears...
Instructions
Page 26
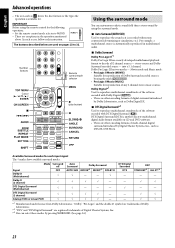
... discrete multichannel digital audio format available on pages 23 to 32. Number buttons Cursor (3/2/Y/5)/ ENTER Remote control mode selector (play button) Using the surround mode You can select these modes by Dolby Laboratories, such as Dolby Digital EX. 7 DTS Digital Surround*2 Used to decode all 2 channel sources - IMPORTANT Before using the surround mode. 7 Auto Surround (AUTO SUR) Used to reproduce the sound as it is automatically reproduced in the operation mentioned above. For example, a multichannel source is recorded without any 2 channel stereo music sources. In such...
... discrete multichannel digital audio format available on pages 23 to 32. Number buttons Cursor (3/2/Y/5)/ ENTER Remote control mode selector (play button) Using the surround mode You can select these modes by Dolby Laboratories, such as Dolby Digital EX. 7 DTS Digital Surround*2 Used to decode all 2 channel sources - IMPORTANT Before using the surround mode. 7 Auto Surround (AUTO SUR) Used to reproduce the sound as it is automatically reproduced in the operation mentioned above. For example, a multichannel source is recorded without any 2 channel stereo music sources. In such...
Instructions
Page 27
... display window Digital signal format indicators LPCM: Lights when Linear PCM signal comes in . b: Lights when the center channel signal comes in . g: Lights when the surround left channel signal comes in . Selecting the surround mode The system is set up to AUDIO. 7 When playing back digital multichannel software (except while OFF is selected) The appropriate multichannel surround mode (Dolby Digital or DTS Digital Surround) is activated. Each time you can select either Dolby Pro Logic II (MOVIE/MUSIC) or the DSP mode. GD: Lights when Dolby Digital signals...
... display window Digital signal format indicators LPCM: Lights when Linear PCM signal comes in . b: Lights when the center channel signal comes in . g: Lights when the surround left channel signal comes in . Selecting the surround mode The system is set up to AUDIO. 7 When playing back digital multichannel software (except while OFF is selected) The appropriate multichannel surround mode (Dolby Digital or DTS Digital Surround) is activated. Each time you can select either Dolby Pro Logic II (MOVIE/MUSIC) or the DSP mode. GD: Lights when Dolby Digital signals...

Instructions
Page 31
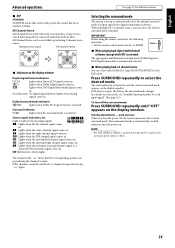
... display window.) • Turning off the power* (See page 16.) • Pressing 7 once * Only when playing back a DVD. When using the on -screen bar disappears. 28 The on -screen bar: 1 Press ON SCREEN twice. When using the SUBTITLE button: 1 Press SUBTITLE. NOTE • Some subtitle or audio languages are recorded or not. (Subtitles will not change if no subtitle is selected as a source. • Pressing DISC...
... display window.) • Turning off the power* (See page 16.) • Pressing 7 once * Only when playing back a DVD. When using the on -screen bar disappears. 28 The on -screen bar: 1 Press ON SCREEN twice. When using the SUBTITLE button: 1 Press SUBTITLE. NOTE • Some subtitle or audio languages are recorded or not. (Subtitles will not change if no subtitle is selected as a source. • Pressing DISC...

Instructions
Page 33
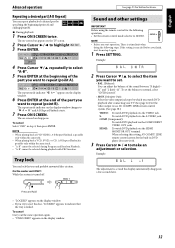
... COMPONENT VIDEO OUT jacks. 2 Follow the instructions that time will be stored. • The VFP function is not available when connecting the TV through HDMI MONITOR OUT terminal. • "TINT" setting is up to 99. • Normally the system automatically skips to the Track/ Chapter column after entering the disc number. Playback stops and the program window appears. Only when selecting "USER 1" or "USER...
... COMPONENT VIDEO OUT jacks. 2 Follow the instructions that time will be stored. • The VFP function is not available when connecting the TV through HDMI MONITOR OUT terminal. • "TINT" setting is up to 99. • Normally the system automatically skips to the Track/ Chapter column after entering the disc number. Playback stops and the program window appears. Only when selecting "USER 1" or "USER...
Instructions
Page 35
... function. Advanced operations Repeating a desired part [A-B Repeat] You can repeat playback of a desired part by which you watch DVD playback after connecting your TV. (See page 12.) Set the video output to use AV COMPU LINK remote control system. (See page 38.) VIDEO: To watch DVD playback via the VIDEO jack. The repeat mode indicator " " appears on the display window changes to repeat (point B). Sound and other settings IMPORTANT Before using the remote control...
... function. Advanced operations Repeating a desired part [A-B Repeat] You can repeat playback of a desired part by which you watch DVD playback after connecting your TV. (See page 12.) Set the video output to use AV COMPU LINK remote control system. (See page 38.) VIDEO: To watch DVD playback via the VIDEO jack. The repeat mode indicator " " appears on the display window changes to repeat (point B). Sound and other settings IMPORTANT Before using the remote control...
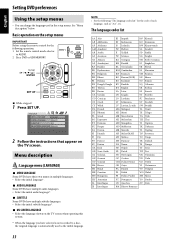
Instructions
Page 36
... setup menus IMPORTANT Before using the remote control for the code of each language, such as the initial language. Basic operation on the TV screen. NOTE • See the following "The language codes list" for the following operation; 1 Set the remote control mode selector to a disc, the original language is automatically used in multiple languages. • Select the initial language*. 7 AUDIO LANGUAGE Some DVDs have multiple audio languages. • Select...
... setup menus IMPORTANT Before using the remote control for the code of each language, such as the initial language. Basic operation on the TV screen. NOTE • See the following "The language codes list" for the following operation; 1 Set the remote control mode selector to a disc, the original language is automatically used in multiple languages. • Select the initial language*. 7 AUDIO LANGUAGE Some DVDs have multiple audio languages. • Select...
Instructions
Page 37
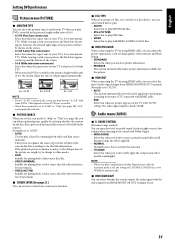
... become "4:3 LB" with the surround mode is fixed to RGB. : Audio menu (AUDIO) 7 D. This system recognizes the source type (video or film) of output signal automatically. NOTE • When you play a multichannel Dolby Digital source with some DVDs. Setting DVD preferences : Picture menu (PICTURE) 7 MONITOR TYPE You can select the monitor type to match your TV when you play DVDs recorded in the picture's height/width ratio of 4:3, the system adjust the ratio of the...
... become "4:3 LB" with the surround mode is fixed to RGB. : Audio menu (AUDIO) 7 D. This system recognizes the source type (video or film) of output signal automatically. NOTE • When you play a multichannel Dolby Digital source with some DVDs. Setting DVD preferences : Picture menu (PICTURE) 7 MONITOR TYPE You can select the monitor type to match your TV when you play DVDs recorded in the picture's height/width ratio of 4:3, the system adjust the ratio of the...
Instructions
Page 41
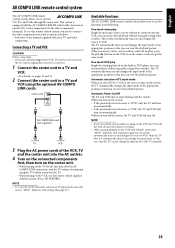
... outlets. 4 Turn on the connected components first, then turn on the center unit. • When turning on the TV for "MON." (Monitor Out) setting (see pages 12 and 13. 2 Connect the center unit to operate JVC's video components via the video components terminals. One-touch video play (3) button on the VCR or on the remote control to use the automatic selection of the TV manually. 38 The TV automatically turns on and changes the input mode to...
... outlets. 4 Turn on the connected components first, then turn on the center unit. • When turning on the TV for "MON." (Monitor Out) setting (see pages 12 and 13. 2 Connect the center unit to operate JVC's video components via the video components terminals. One-touch video play (3) button on the VCR or on the remote control to use the automatic selection of the TV manually. 38 The TV automatically turns on and changes the input mode to...
Instructions
Page 42
... video cord is not connected. Check the video or audio format of the signal to see page 18). Troubleshooting PROBLEM POSSIBLE CAUSE SOLUTION Power does not come out through component video, S-video, or composite video jacks (see page 12), then set to "480p" though the center unit is displayed on the system should be careful about the following. - A HDCP-compatible TV is not connected correctly. A HDMI cable longer than 5 m to assure stable operation...
... video cord is not connected. Check the video or audio format of the signal to see page 18). Troubleshooting PROBLEM POSSIBLE CAUSE SOLUTION Power does not come out through component video, S-video, or composite video jacks (see page 12), then set to "480p" though the center unit is displayed on the system should be careful about the following. - A HDCP-compatible TV is not connected correctly. A HDMI cable longer than 5 m to assure stable operation...


