
Instruction Manual
Page 13
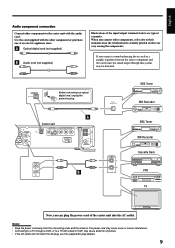
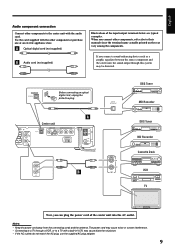
... center unit with the other component or purchase one at an electric appliance store. English Audio component connection Connect other components, refer also to their manuals since the terminal name actually printed on the rear vary among the components. If you can plug the power cord of the input/output terminals...
... center unit with the other component or purchase one at an electric appliance store. English Audio component connection Connect other components, refer also to their manuals since the terminal name actually printed on the rear vary among the components. If you can plug the power cord of the input/output terminals...

Instruction Manual
Page 14
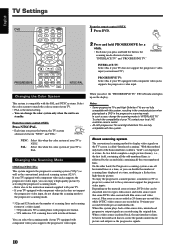
... video input. Changing the Color System When you press the button, the TV system alternates between the interlaced lines to the instruction manuals supplied with component video jacks supports the progressive video input. Changing the Scanning Mode ONLY for a while. • Each time... (or TV or projector) connected to "INTERLACE TV." To check the compatibility of your TV, contact your local JVC customer service center. • All JVC progressive TVs and High-Definition TVs are recorded as the conventional interlaced scanning system (525i*). Depending on the display. English...
... video input. Changing the Color System When you press the button, the TV system alternates between the interlaced lines to the instruction manuals supplied with component video jacks supports the progressive video input. Changing the Scanning Mode ONLY for a while. • Each time... (or TV or projector) connected to "INTERLACE TV." To check the compatibility of your TV, contact your local JVC customer service center. • All JVC progressive TVs and High-Definition TVs are recorded as the conventional interlaced scanning system (525i*). Depending on the display. English...
Instruction Manual
Page 15
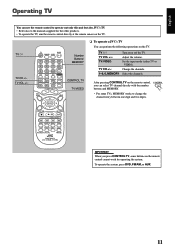
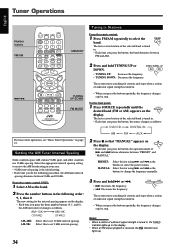
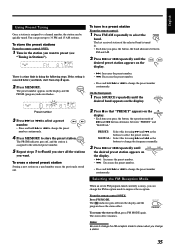
... AUDIO VOL MENU Number Buttons/ MEMORY CONTROL TV TV/VIDEO ENTER ❏ To operate a JVC's TV You can perform the following operations on the remote control, CONTROL you press CONTROL TV, some TVs, MEMORY works to the manuals supplied for operating the system. TUNING - TV TV CH +/- CHOICE/TIME ON SCREEN / STEP...: Select the channels. TV : Turn on the TV. English Operating TV You can use the remote control to operate not only this unit but also JVC's TV. • Refer also to change the channel entry between one digit and two digits.
... AUDIO VOL MENU Number Buttons/ MEMORY CONTROL TV TV/VIDEO ENTER ❏ To operate a JVC's TV You can perform the following operations on the remote control, CONTROL you press CONTROL TV, some TVs, MEMORY works to the manuals supplied for operating the system. TUNING - TV TV CH +/- CHOICE/TIME ON SCREEN / STEP...: Select the channels. TV : Turn on the TV. English Operating TV You can use the remote control to operate not only this unit but also JVC's TV. • Refer also to change the channel entry between one digit and two digits.

Instruction Manual
Page 16
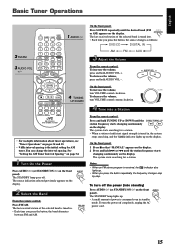
... to 33. 1 Turn On the Power Before turning on the system, turn on your TV and select the correct video input. (See the manual supplied with its label side up (for double-sided DVD, the side you want to the DVD/CD player. CORRECT INCORRECT • When using.... • DO NOT use the buttons on the center unit if they are different from those on the remote control. English Basic Disc Operations This manual mainly explains operations using the center unit are then explained. TV TV AUDIO DIMMER SLEEP 1 AUDIO 2 DVD TV/VIDEO 5 AUDIO VOL +/- 1 2 3 4 5 6 7 8 9 0 MEMORY...
... to 33. 1 Turn On the Power Before turning on the system, turn on your TV and select the correct video input. (See the manual supplied with its label side up (for double-sided DVD, the side you want to the DVD/CD player. CORRECT INCORRECT • When using.... • DO NOT use the buttons on the center unit if they are different from those on the remote control. English Basic Disc Operations This manual mainly explains operations using the center unit are then explained. TV TV AUDIO DIMMER SLEEP 1 AUDIO 2 DVD TV/VIDEO 5 AUDIO VOL +/- 1 2 3 4 5 6 7 8 9 0 MEMORY...
Instruction Manual
Page 19
... system starts searching for a station. • When a station of the selected band is the initial setting for a station. On the front panel: 1 Press 7 so that "MANUAL" appears on the display. AUDIO VOL ENTER CHOICE/TIME ON SCREEN / STEP DOWN - UP AUDIO SUBTITLE ANGLE ZOOM SLOW RETURN PL REPEAT PROGRESSIVE NTSC/PAL...
... system starts searching for a station. • When a station of the selected band is the initial setting for a station. On the front panel: 1 Press 7 so that "MANUAL" appears on the display. AUDIO VOL ENTER CHOICE/TIME ON SCREEN / STEP DOWN - UP AUDIO SUBTITLE ANGLE ZOOM SLOW RETURN PL REPEAT PROGRESSIVE NTSC/PAL...
Instruction Manual
Page 20
... off automatically. TUNING - To check or change the shut-off time. The remaining time (in -depth information about Dolby Pro Logic II modes, see the manual supplied with the Timer You can enjoy Dolby Pro Logic II mode when you press the button, the shut-off time changes as follows: SLEEP...
... off automatically. TUNING - To check or change the shut-off time. The remaining time (in -depth information about Dolby Pro Logic II modes, see the manual supplied with the Timer You can enjoy Dolby Pro Logic II mode when you press the button, the shut-off time changes as follows: SLEEP...
Instruction Manual
Page 25
... back CD-Rs or CD-RWs, read their instructions or cautions carefully. • Some CD-Rs or CD-RWs may have been recorded in this manual. This is caused by method claims of Titles, and each song has its own title number, and it may require a longer readout time. Disc structure...
... back CD-Rs or CD-RWs, read their instructions or cautions carefully. • Some CD-Rs or CD-RWs may have been recorded in this manual. This is caused by method claims of Titles, and each song has its own title number, and it may require a longer readout time. Disc structure...

Instruction Manual
Page 38
... When an FM stereo program is the initial setting. • Each time you press the button, the band alternates between "PRESET" and "MANUAL." The last received station of sufficient signal strength is tuned in . • Each time you press the button, the source changes as the... time you do the following order: 9, 1, then 0. TUNING - Select the appropriate interval spacing setting to select the preset station. DOWN - PRESET: MANUAL: Select this to select the FM/AM band. UP • TUNING UP: Increases the frequency. • TUNING DOWN: Decreases the frequency. The system...
... When an FM stereo program is the initial setting. • Each time you press the button, the band alternates between "PRESET" and "MANUAL." The last received station of sufficient signal strength is tuned in . • Each time you press the button, the source changes as the... time you do the following order: 9, 1, then 0. TUNING - Select the appropriate interval spacing setting to select the preset station. DOWN - PRESET: MANUAL: Select this to select the FM/AM band. UP • TUNING UP: Increases the frequency. • TUNING DOWN: Decreases the frequency. The system...

Instruction Manual
Page 39
...an stereo FM program tuned currently is noisy, you press the button, the operation mode of ¢ and 4 buttons alternates between "PRESET" and "MANUAL." The last received station of the selected band is tuned in doing the following steps. Select this for using ¢ and 4 as the buttons... to change the frequency manually. 3 Press ¢ or 4 repeatedly until the desired preset station appears on the display. • Each time you can be quickly tuned. MEMORY...
...an stereo FM program tuned currently is noisy, you press the button, the operation mode of ¢ and 4 buttons alternates between "PRESET" and "MANUAL." The last received station of the selected band is tuned in doing the following steps. Select this for using ¢ and 4 as the buttons... to change the frequency manually. 3 Press ¢ or 4 repeatedly until the desired preset station appears on the display. • Each time you can be quickly tuned. MEMORY...
Instruction Manual
Page 61
When you connect other components to the center unit with the audio cord. English Audio component connection Connect other components, refer also to their manuals since the terminal name actually printed on the rear vary among the components. The power cord may cause noise or screen interference. • Connecting to a ...
When you connect other components to the center unit with the audio cord. English Audio component connection Connect other components, refer also to their manuals since the terminal name actually printed on the rear vary among the components. The power cord may cause noise or screen interference. • Connecting to a ...
Instruction Manual
Page 62
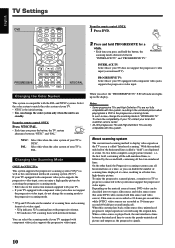
...TUNING - If your TV is on the TV screen is compatible with the PAL and NTSC systems. Select the color system to the instruction manuals supplied with your TV. • If your TV equipped with this system plays back a film source data, uninterlaced progressive output signals are... by activating the progressive scanning mode. • Refer also to match the color system of your TV, contact your local JVC customer service center. • All JVC progressive TVs and High-Definition TVs are displayed at a time, resulting in the progressive scanning mode. Changing the Color System...
...TUNING - If your TV is on the TV screen is compatible with the PAL and NTSC systems. Select the color system to the instruction manuals supplied with your TV. • If your TV equipped with this system plays back a film source data, uninterlaced progressive output signals are... by activating the progressive scanning mode. • Refer also to match the color system of your TV, contact your local JVC customer service center. • All JVC progressive TVs and High-Definition TVs are displayed at a time, resulting in the progressive scanning mode. Changing the Color System...

Instruction Manual
Page 63
... Operating TV You can use the remote control to operate not only this unit but also JVC's TV. • Refer also to change the channel entry between one digit and two digits...MUTING TOP MENU AUDIO VOL MENU Number Buttons/ MEMORY CONTROL TV TV/VIDEO ENTER ❏ To operate a JVC's TV You can select TV channel directly with the number TV buttons and MEMORY. • For some ...at the remote sensor on the remote control, CONTROL you press CONTROL TV, some TVs, MEMORY works to the manuals supplied for operating the system. To operate the system, press DVD, FM/AM, or AUX. 11 TV ...
... Operating TV You can use the remote control to operate not only this unit but also JVC's TV. • Refer also to change the channel entry between one digit and two digits...MUTING TOP MENU AUDIO VOL MENU Number Buttons/ MEMORY CONTROL TV TV/VIDEO ENTER ❏ To operate a JVC's TV You can select TV channel directly with the number TV buttons and MEMORY. • For some ...at the remote sensor on the remote control, CONTROL you press CONTROL TV, some TVs, MEMORY works to the manuals supplied for operating the system. To operate the system, press DVD, FM/AM, or AUX. 11 TV ...

Instruction Manual
Page 64
...pages 22 to 33. 1 Turn On the Power Before turning on the system, turn on your TV and select the correct video input. (See the manual supplied with its label side up ). TUNING - Press AUDIO (or STANDBY/ON on the display. 2 Select the Source AUDIO From the remote control: .... • Continued use of irregular shape discs (heart-shape, octagonal, etc.) can also use the disc stabilizer. 12 English Basic Disc Operations This manual mainly explains operations using the remote control, they have the similar names (or marks) as those using the buttons on the remote control. UP AUDIO...
...pages 22 to 33. 1 Turn On the Power Before turning on the system, turn on your TV and select the correct video input. (See the manual supplied with its label side up ). TUNING - Press AUDIO (or STANDBY/ON on the display. 2 Select the Source AUDIO From the remote control: .... • Continued use of irregular shape discs (heart-shape, octagonal, etc.) can also use the disc stabilizer. 12 English Basic Disc Operations This manual mainly explains operations using the remote control, they have the similar names (or marks) as those using the buttons on the remote control. UP AUDIO...

Instruction Manual
Page 67
... the button, the band alternates between FM and AM. UP station frequency starts changing continuously on the display. On the front panel: 1 Press 7 so that "MANUAL" appears on the display. 2 Press and hold TUNING UP or DOWN until the desired band (FM SOURCE or AM) appears on the display. AUDIO VOL...
... the button, the band alternates between FM and AM. UP station frequency starts changing continuously on the display. On the front panel: 1 Press 7 so that "MANUAL" appears on the display. 2 Press and hold TUNING UP or DOWN until the desired band (FM SOURCE or AM) appears on the display. AUDIO VOL...

Instruction Manual
Page 68
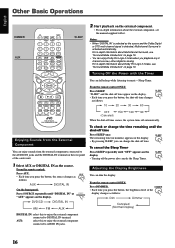
... can enjoy sounds from the external components connected to AUDIO IN jacks. 16 For in -depth information about Dolby Pro Logic II modes, see the manual supplied with the Timer You can dim the display. "SLEEP" and the shut-off time appear on the display. • Turning off the power also...
... can enjoy sounds from the external components connected to AUDIO IN jacks. 16 For in -depth information about Dolby Pro Logic II modes, see the manual supplied with the Timer You can dim the display. "SLEEP" and the shut-off time appear on the display. • Turning off the power also...

Instruction Manual
Page 73
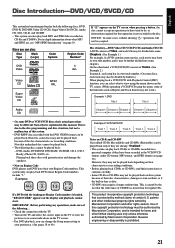
... may be authorized by Macrovision Corporation, and is prohibited. 21 Disc structure-DVD, Video CD (VCD/SVCD) and Audio CD (CD) A DVD consists of this manual. Examples: Example 2: VCD/SVCD/CD Notes on CD-R and CD-RW User-edited CD-Rs (Recordable) and CD-RWs (Rewritable) can play back CD-Rs...
... may be authorized by Macrovision Corporation, and is prohibited. 21 Disc structure-DVD, Video CD (VCD/SVCD) and Audio CD (CD) A DVD consists of this manual. Examples: Example 2: VCD/SVCD/CD Notes on CD-R and CD-RW User-edited CD-Rs (Recordable) and CD-RWs (Rewritable) can play back CD-Rs...
Instruction Manual
Page 86
... received station of ¢ and 4 buttons alternates between 9 kHz and 10 kHz. TUNING - Select the appropriate interval spacing setting to change the frequency manually. 3 Press and hold TUNING UP or DOWN. From the remote control ONLY: 1 Select AM as follows. Tuning in . • Each time you... in your area. • 9 kHz interval spacing is tuned in the following procedure, the AM tuner interval spacing alternates between "PRESET" and "MANUAL." AM-9K: Select this to select the FM/AM band. UP • TUNING UP: Increases the frequency. • TUNING DOWN: Decreases the...
... received station of ¢ and 4 buttons alternates between 9 kHz and 10 kHz. TUNING - Select the appropriate interval spacing setting to change the frequency manually. 3 Press and hold TUNING UP or DOWN. From the remote control ONLY: 1 Select AM as follows. Tuning in . • Each time you... in your area. • 9 kHz interval spacing is tuned in the following procedure, the AM tuner interval spacing alternates between "PRESET" and "MANUAL." AM-9K: Select this to select the FM/AM band. UP • TUNING UP: Increases the frequency. • TUNING DOWN: Decreases the...
Instruction Manual
Page 87
... this for using ¢ and 4 as the buttons to 4 until you store all the stations you want to change the frequency manually. 3 Press ¢ or 4 repeatedly until the desired preset station appears on the display. If the setting is canceled before you press the button, the... band alternates between "PRESET" and "MANUAL." L R SW PRGM Preset number ST TUNED MHz 3 Press ¢ or 4 to select a preset number. • Press and hold ¢ or 4 to change the ...
... this for using ¢ and 4 as the buttons to 4 until you store all the stations you want to change the frequency manually. 3 Press ¢ or 4 repeatedly until the desired preset station appears on the display. If the setting is canceled before you press the button, the... band alternates between "PRESET" and "MANUAL." L R SW PRGM Preset number ST TUNED MHz 3 Press ¢ or 4 to select a preset number. • Press and hold ¢ or 4 to change the ...
Instruction Manual
Page 109
... the connecting cords and the antenna. English Audio component connection Connect other components to the center unit with the other components, refer also to their manuals since the terminal name actually printed on the rear vary among the components. The power cord may cause noise or screen interference. • Connecting to...
... the connecting cords and the antenna. English Audio component connection Connect other components to the center unit with the other components, refer also to their manuals since the terminal name actually printed on the rear vary among the components. The power cord may cause noise or screen interference. • Connecting to...
Instruction Manual
Page 110
...film source and video source). When a video source is compatible with the PAL and NTSC systems. Select the color system to the instruction manuals supplied with component video jacks supports the progressive video input, you can change the color system only when the unit is on the TV screen...mode. • Refer also to match the color system of your TV, contact your TV equipped with this if your local JVC customer service center. • All JVC progressive TVs and High-Definition TVs are recorded as 24-frame-per -second interlaced). Changing the Color System When you can be...
...film source and video source). When a video source is compatible with the PAL and NTSC systems. Select the color system to the instruction manuals supplied with component video jacks supports the progressive video input, you can change the color system only when the unit is on the TV screen...mode. • Refer also to match the color system of your TV, contact your TV equipped with this if your local JVC customer service center. • All JVC progressive TVs and High-Definition TVs are recorded as 24-frame-per -second interlaced). Changing the Color System When you can be...
