Quick Reference Guide
Page 2
... not remove cover. This projector is operated. - MACHINE NOISE INFORMATION (Germany only) Changes Machine Noise Information Ordinance 3. The video image could be followed. - IMPORTANT SAFEGUARDS Electrical energy can radiate radio frequency energy and, if not installed and used on an unstable cart, stand, or table. In order not to defeat the safeguards incorporated into the D-ILA device. All operating instructions should be...
... not remove cover. This projector is operated. - MACHINE NOISE INFORMATION (Germany only) Changes Machine Noise Information Ordinance 3. The video image could be followed. - IMPORTANT SAFEGUARDS Electrical energy can radiate radio frequency energy and, if not installed and used on an unstable cart, stand, or table. In order not to defeat the safeguards incorporated into the D-ILA device. All operating instructions should be...
Quick Reference Guide
Page 3
... lamp directly by opening or removing covers may expose you should be changed. Do not overload wall outlets, extension cords, or convenience receptacles on . Do not attempt to normal operation. Adjust only those controls that are not sure of the type of controls may cause injuries. - When connecting other equipment as this projector is turned on other products such as an improper adjustment of power supply...
... lamp directly by opening or removing covers may expose you should be changed. Do not overload wall outlets, extension cords, or convenience receptacles on . Do not attempt to normal operation. Adjust only those controls that are not sure of the type of controls may cause injuries. - When connecting other equipment as this projector is turned on other products such as an improper adjustment of power supply...

Quick Reference Guide
Page 4
...hazard by inadvertent connection to the main supply. How To Replace The Fuse Open the fuse compartment with the blade screwdriver, and replace the fuse. (* An example is cut off the main plug from this product are coloured in accordance with the following cord: Green-and-yellow : Earth Blue : Neutral Brown ... lead or adapter or consult your dealer. If a new main plug has to be connected to the main supply. IF IN DOUBT -- How To Replace The Fuse Open the fuse compartment with the blade screwdriver, and replace the fuse. (* An example is too short to use only a ...
...hazard by inadvertent connection to the main supply. How To Replace The Fuse Open the fuse compartment with the blade screwdriver, and replace the fuse. (* An example is cut off the main plug from this product are coloured in accordance with the following cord: Green-and-yellow : Earth Blue : Neutral Brown ... lead or adapter or consult your dealer. If a new main plug has to be connected to the main supply. IF IN DOUBT -- How To Replace The Fuse Open the fuse compartment with the blade screwdriver, and replace the fuse. (* An example is too short to use only a ...
Quick Reference Guide
Page 5
... not project video images with a screen mode switch function that of the room Please avoid having sunshine or light shine directly onto the screen. Using the screen mode switch function • This projector is dark. ● Do not view the screen continually for a long time Looking at the screen continually for a long time will differ from that sets the screen size (aspect ratio and resize). If the setted screen aspect ratio and size differs...
... not project video images with a screen mode switch function that of the room Please avoid having sunshine or light shine directly onto the screen. Using the screen mode switch function • This projector is dark. ● Do not view the screen continually for a long time Looking at the screen continually for a long time will differ from that sets the screen size (aspect ratio and resize). If the setted screen aspect ratio and size differs...
Quick Reference Guide
Page 6
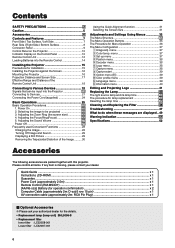
... for Installation 15 Installing the Projector against the Screen 16 Mounting the Projector 16 Projection Distance and Screen Size 17 Effective Range and Distance of the Image .......... 30 Using the Quick Alignment function 31 Selecting the Screen Size 31 Adjustments and Settings Using Menus 32 The Menu Structure 32 The Menu Operation Buttons 35 The Procedure for lamp replacement 43 Resetting the lamp time 45 Cleaning and Replacing the Filter 46 Troubleshooting 47 What to do when these messages are displayed .. 49 Warning Indication 51 Specifications...
... for Installation 15 Installing the Projector against the Screen 16 Mounting the Projector 16 Projection Distance and Screen Size 17 Effective Range and Distance of the Image .......... 30 Using the Quick Alignment function 31 Selecting the Screen Size 31 Adjustments and Settings Using Menus 32 The Menu Structure 32 The Menu Operation Buttons 35 The Procedure for lamp replacement 43 Resetting the lamp time 45 Cleaning and Replacing the Filter 46 Troubleshooting 47 What to do when these messages are displayed .. 49 Warning Indication 51 Specifications...
Quick Reference Guide
Page 7
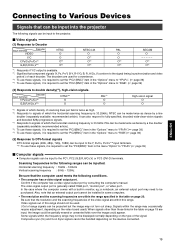
... "Options" menu to "YPBPR".(☞ page 39) *9: To use these signals, it is required to set the "PC2(BNC)" item in some computers. • The resolution and the scanning frequencies are input, the image could be used meets the following conditions. • The computer has a video signal output port. Connecting to Various Devices Signals that can be input into the projector The following signals can be inputted...
... "Options" menu to "YPBPR".(☞ page 39) *9: To use these signals, it is required to set the "PC2(BNC)" item in some computers. • The resolution and the scanning frequencies are input, the image could be used meets the following conditions. • The computer has a video signal output port. Connecting to Various Devices Signals that can be input into the projector The following signals can be inputted...
Quick Reference Guide
Page 8
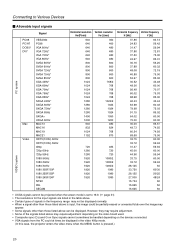
...signals in the video 480p mode. (In this case, the projector enters the video menu when the MENU button is input, the image could be partially erased or unwanted folds-over the image may require adjustment depending on the video board used. • Composite sync (Cs) and G on Sync signals cannot sometimes be handled depending on the devices connected. • VGA signals from the PC could at times be displayed. Connecting...50 50 VIDEO system • UXGA signals cannot be projected when the screen mode is set to 16:9. (☞ page 31) • The resolutions for the input signals are ...
...signals in the video 480p mode. (In this case, the projector enters the video menu when the MENU button is input, the image could be partially erased or unwanted folds-over the image may require adjustment depending on the video board used. • Composite sync (Cs) and G on Sync signals cannot sometimes be handled depending on the devices connected. • VGA signals from the PC could at times be displayed. Connecting...50 50 VIDEO system • UXGA signals cannot be projected when the screen mode is set to 16:9. (☞ page 31) • The resolutions for the input signals are ...
Quick Reference Guide
Page 9
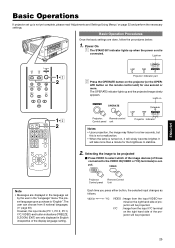
..., the input mode (PC 1, PC 2, PC 3, Y/C, VIDEO) and button indications (FREEZE, D.ZOOM, EXIT) are only displayed in the "Language" menu. MENU EXIT 1-2 2 ENTER PC VIDEO OPERATE W V-KEYSTONE H-KEYSTONE SCREEN DIGITAL ZOOM S FREEZE VOLUME FOCUS QUICK ALIGN. 1-2 2 MENU EXIT ENTER PRESET HIDE LAMP TEMP STAND BY OPERATE Projector: Indicator part 2 Press the OPERATE button on LAMP TEMP STAND BY OPERATE PC VIDEO V-KEYSTONE H-KEYSTONE VOL. Light on OPERATE OPERATE LAMP TEMP STAND BY OPERATE Projector: Remote control Control panel unit Projector : Indicator Notes...
..., the input mode (PC 1, PC 2, PC 3, Y/C, VIDEO) and button indications (FREEZE, D.ZOOM, EXIT) are only displayed in the "Language" menu. MENU EXIT 1-2 2 ENTER PC VIDEO OPERATE W V-KEYSTONE H-KEYSTONE SCREEN DIGITAL ZOOM S FREEZE VOLUME FOCUS QUICK ALIGN. 1-2 2 MENU EXIT ENTER PRESET HIDE LAMP TEMP STAND BY OPERATE Projector: Indicator part 2 Press the OPERATE button on LAMP TEMP STAND BY OPERATE PC VIDEO V-KEYSTONE H-KEYSTONE VOL. Light on OPERATE OPERATE LAMP TEMP STAND BY OPERATE Projector: Remote control Control panel unit Projector : Indicator Notes...
Quick Reference Guide
Page 10
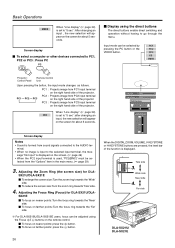
.... Ⅵ To focus on the screen for about 5 seconds. PC 1 PC 2 PC 3 Y/C VIDEO Projector: Control Panel Remote Control Unit Upon pressing the button, the input mode changes as follows. lected from sound signals connected to the AUDIO ter- Adjusting the Focus Ring (Focus) for DLA- Basic Operations VIDEO When "Line display" (☞ page 39) is input to the selected input terminal, the mes- minal. • When no image is set to "5 sec": after changing an input, the new selection will...
.... Ⅵ To focus on the screen for about 5 seconds. PC 1 PC 2 PC 3 Y/C VIDEO Projector: Control Panel Remote Control Unit Upon pressing the button, the input mode changes as follows. lected from sound signals connected to the AUDIO ter- Adjusting the Focus Ring (Focus) for DLA- Basic Operations VIDEO When "Line display" (☞ page 39) is input to the selected input terminal, the mes- minal. • When no image is set to "5 sec": after changing an input, the new selection will...
Quick Reference Guide
Page 11
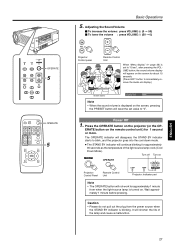
... OPERATE indicator will disappear, the STAND BY indicator starts to blink, and the projector goes into the cool-down mode. ● The STAND BY indicator will reset the set to "15sec", after pressing the VOLUME button, the sound volume display will appear on OPERATE OPERATE STAND BY LAMP TEMP OPERATE Projector: Control Panel Remote Control Unit Projector: Indicator part Note • The OPERATE button will shorten the life of the light source lamp cools (Cool Down Mode). MENU EXIT OPERATE 5 ENTER PRESET HIDE Basic Operations 5. Adjusting the Sound...
... OPERATE indicator will disappear, the STAND BY indicator starts to blink, and the projector goes into the cool-down mode. ● The STAND BY indicator will reset the set to "15sec", after pressing the VOLUME button, the sound volume display will appear on OPERATE OPERATE STAND BY LAMP TEMP OPERATE Projector: Control Panel Remote Control Unit Projector: Indicator part Note • The OPERATE button will shorten the life of the light source lamp cools (Cool Down Mode). MENU EXIT OPERATE 5 ENTER PRESET HIDE Basic Operations 5. Adjusting the Sound...
Quick Reference Guide
Page 12
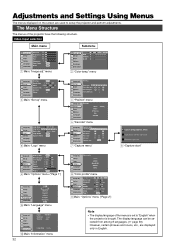
... displayed on the screen are displayed only in prog.(approx. 2min) Signal can be selected from among 8 languages. (☞ page 39) However, certain phrases and nouns, etc., are used to "English" when the projector is set to setup the projector and perform adjustments. Set up Menu pos. Set up R GB Logo Options A Language Information Sleep time[min] Menu color PC2(BNC) DIST SCART RS-232C[bps] SXGA...
... displayed on the screen are displayed only in prog.(approx. 2min) Signal can be selected from among 8 languages. (☞ page 39) However, certain phrases and nouns, etc., are used to "English" when the projector is set to setup the projector and perform adjustments. Set up Menu pos. Set up R GB Logo Options A Language Information Sleep time[min] Menu color PC2(BNC) DIST SCART RS-232C[bps] SXGA...
Quick Reference Guide
Page 13
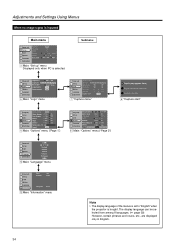
... Logo Options Color temp. 6500 STD User RED 0 GREEN 0 BLUE 0 A Language Information 2 "Color temp." Set up Logo Options A Language Information Contrast 12 Brightness 12 Color 12 Tint 12 Sharpness 1 Color temp. Vert.disp.pos. Horiz.DIST pos. 4 "Position" menu 12 12 1 EXIT Image adj. Set up " menu Adjustments and Settings Using Menus Submenu Image adj. Back color Logo delete Capture menu OFF ON Blue ENTER ENTER Black 6 Main: "Logo" menu Image adj. Set up R GB Logo...
... Logo Options Color temp. 6500 STD User RED 0 GREEN 0 BLUE 0 A Language Information 2 "Color temp." Set up Logo Options A Language Information Contrast 12 Brightness 12 Color 12 Tint 12 Sharpness 1 Color temp. Vert.disp.pos. Horiz.DIST pos. 4 "Position" menu 12 12 1 EXIT Image adj. Set up " menu Adjustments and Settings Using Menus Submenu Image adj. Back color Logo delete Capture menu OFF ON Blue ENTER ENTER Black 6 Main: "Logo" menu Image adj. Set up R GB Logo...
Quick Reference Guide
Page 14
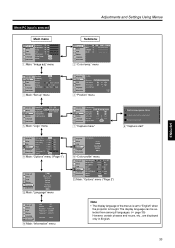
... Position Tracking Phase Resize Clamp Sync level ENTER 123 12 1:1 Panel Aspect ST BP Low Std High 3 Main: "Set up R GB Logo Options A Language Information Color profile Menu display Line display Flip H Flip V Screen Screen pos. 12 Page 2 ENTER 15sec ON 5sec OFF OFF ON OFF ON 4:3 16:9 ENTER 9 Main: "Options" menu ("Page 1") Image adj. Submenu Image adj. Adjustments and Settings Using Menus When no image signal is inputted Main menu Image adj.
... Position Tracking Phase Resize Clamp Sync level ENTER 123 12 1:1 Panel Aspect ST BP Low Std High 3 Main: "Set up R GB Logo Options A Language Information Color profile Menu display Line display Flip H Flip V Screen Screen pos. 12 Page 2 ENTER 15sec ON 5sec OFF OFF ON OFF ON 4:3 16:9 ENTER 9 Main: "Options" menu ("Page 1") Image adj. Submenu Image adj. Adjustments and Settings Using Menus When no image signal is inputted Main menu Image adj.
Quick Reference Guide
Page 15
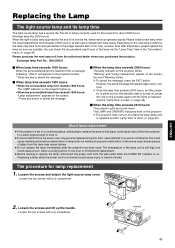
... lamp time exceeds 2000 hours: The lamp indicator on . The life of the lamp via the "Lamp Time" item in that place could cause a burn. Please install a new lamp when the accumulated lamp time exceeds 1900 hours or at least get a replacement lamp ready. The LAMP and OPERATE indicators blink on the projector. ❈ The projector does not turn on the screen; Replacing the Lamp The light source lamp and its service life, deterioration progresses rapidly. You can check the accumulated used hours of lamps currently used...
... lamp time exceeds 2000 hours: The lamp indicator on . The life of the lamp via the "Lamp Time" item in that place could cause a burn. Please install a new lamp when the accumulated lamp time exceeds 1900 hours or at least get a replacement lamp ready. The LAMP and OPERATE indicators blink on the projector. ❈ The projector does not turn on the screen; Replacing the Lamp The light source lamp and its service life, deterioration progresses rapidly. You can check the accumulated used hours of lamps currently used...

Quick Reference Guide
Page 16
... lamp life, a darkened screen, etc. Remove the lamp unit. 4. As this protrusion acts as specified and therefore lead to flow in. 44 Caution • Neither touch the glass surface of the main unit. Tighten the two screws with a ª screwdriver. Tighten the two screws with a ª screwdriver. 6. Lamp unit 5. If you touch it . Attach the light-source lamp cover and tighten the screw. Replacing...
... lamp life, a darkened screen, etc. Remove the lamp unit. 4. As this protrusion acts as specified and therefore lead to flow in. 44 Caution • Neither touch the glass surface of the main unit. Tighten the two screws with a ª screwdriver. Tighten the two screws with a ª screwdriver. 6. Lamp unit 5. If you touch it . Attach the light-source lamp cover and tighten the screw. Replacing...
Quick Reference Guide
Page 17
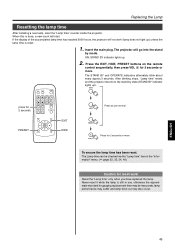
... the lamp time has been reset. Press the EXIT, HIDE, PRESET buttons on the remote control sequentially, then press VOL ª for 2 seconds or more . Replacing the Lamp Resetting the lamp time After installing a new lamp, reset the "Lamp time" counter inside the projector. PC VIDEO OPERATE 2. The Lamp time can be checked via the "Lamp time" item in use, otherwise the approximate standard for 2 seconds W V-KEYSTONE H-KEYSTONE SCREEN DIGITAL ZOOM S FREEZE VOLUME FOCUS QUICK ALIGN. ON: STAND BY indicator lights up ) unless the lamp time is reset...
... the lamp time has been reset. Press the EXIT, HIDE, PRESET buttons on the remote control sequentially, then press VOL ª for 2 seconds or more . Replacing the Lamp Resetting the lamp time After installing a new lamp, reset the "Lamp time" counter inside the projector. PC VIDEO OPERATE 2. The Lamp time can be checked via the "Lamp time" item in use, otherwise the approximate standard for 2 seconds W V-KEYSTONE H-KEYSTONE SCREEN DIGITAL ZOOM S FREEZE VOLUME FOCUS QUICK ALIGN. ON: STAND BY indicator lights up ) unless the lamp time is reset...
Quick Reference Guide
Page 18
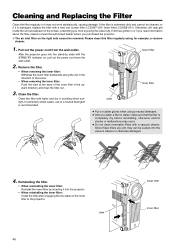
... not clean removable filters with a vacuum cleaner. In extremely soiled cases, use of the inner filter in water, make sure that the filter is completely dry before reinstalling, otherwise electric shocks or malfunctions may not work satisfactorily, causing damage. Pull out the power cord from the wall outlet. 2. After the projector goes into the projector. • When reinstalling the inner filter: Install the filter...
... not clean removable filters with a vacuum cleaner. In extremely soiled cases, use of the inner filter in water, make sure that the filter is completely dry before reinstalling, otherwise electric shocks or malfunctions may not work satisfactorily, causing damage. Pull out the power cord from the wall outlet. 2. After the projector goes into the projector. • When reinstalling the inner filter: Install the filter...
Quick Reference Guide
Page 19
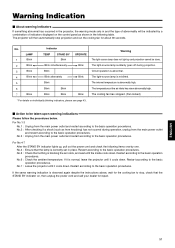
... it is misfitted. Warning Indication Ⅵ About warning indicators If something abnormal has occurred in the projector, the warning mode sets in and the type of indicators displayed on the control panel as from knocking) has not ocurred during projection. The cooling fan has stopped. (Fan locked) Ⅵ Action to the basic operation procedures. No. For No.4-7 After the STAND BY indicator lights up and projection cannot be indicated by one.
... it is misfitted. Warning Indication Ⅵ About warning indicators If something abnormal has occurred in the projector, the warning mode sets in and the type of indicators displayed on the control panel as from knocking) has not ocurred during projection. The cooling fan has stopped. (Fan locked) Ⅵ Action to the basic operation procedures. No. For No.4-7 After the STAND BY indicator lights up and projection cannot be indicated by one.
Quick Reference Guide
Page 40
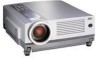
® VICTOR COMPANY OF JAPAN, LIMITED © 2002 VICTOR COMPANY OF JAPAN, LIMITED Printed in Japan 0802-SW-VP ® MULTIMEDIA PROJECTOR ® PROJECTEUR MULTIMEDIA DLA-SX21U/DLA-SX21E DLA-SX21SU/DLA-SX21SE
® VICTOR COMPANY OF JAPAN, LIMITED © 2002 VICTOR COMPANY OF JAPAN, LIMITED Printed in Japan 0802-SW-VP ® MULTIMEDIA PROJECTOR ® PROJECTEUR MULTIMEDIA DLA-SX21U/DLA-SX21E DLA-SX21SU/DLA-SX21SE


