
SR-9168U Timelapse Recorder Instruction Manual (633KB)
Page 3
...JVC is not liable for compensation for loss or damage to recordings in the event this material is a video cassette recorder able to execute timelapse recording with External VCR Activation Signal 36 7-9 How to Restore Recording After Power Failure 37 7-10 External Timer Recording...Screen Display in the Time/Date and Record Mode 14 4-2 Main Menu Display 15 4-3 Alarm Input/Power Loss Data Display ........ 16 4-4 Hour Meter Display 16 5 SETTING OF ... Input/Output 52 11-2 Specifications 53 The SR-9168U is recorded exclusively for personal use . This unit is used. Please note that ...
...JVC is not liable for compensation for loss or damage to recordings in the event this material is a video cassette recorder able to execute timelapse recording with External VCR Activation Signal 36 7-9 How to Restore Recording After Power Failure 37 7-10 External Timer Recording...Screen Display in the Time/Date and Record Mode 14 4-2 Main Menu Display 15 4-3 Alarm Input/Power Loss Data Display ........ 16 4-4 Hour Meter Display 16 5 SETTING OF ... Input/Output 52 11-2 Specifications 53 The SR-9168U is recorded exclusively for personal use . This unit is used. Please note that ...

SR-9168U Timelapse Recorder Instruction Manual (633KB)
Page 4
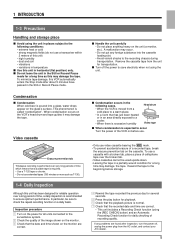
...Record mode is automatically recorded when alarm recording starts. After cleaning, the Recording Check operation is executed again automatically (Auto Recording Check function). 5 Operation lock system To prevent accidental or deliberate interference with optional SA-K97U RS-232C interface board installed) The SR-9168U...48/72/96/120/168/240 hours (Timelapse mode). Monitoring Usage Time The total operation time reached by a professional VCR in progress. The information above should be inspected periodically to the number of professional video equipment at high levels. To prevent ...
...Record mode is automatically recorded when alarm recording starts. After cleaning, the Recording Check operation is executed again automatically (Auto Recording Check function). 5 Operation lock system To prevent accidental or deliberate interference with optional SA-K97U RS-232C interface board installed) The SR-9168U...48/72/96/120/168/240 hours (Timelapse mode). Monitoring Usage Time The total operation time reached by a professional VCR in progress. The information above should be inspected periodically to the number of professional video equipment at high levels. To prevent ...
SR-9168U Timelapse Recorder Instruction Manual (633KB)
Page 5
...the unit in places subject to the following cases. • When the VCR is moved from the AC outlet, and contact your JVC dealer. 5 A malfunction may damage the tape. Video cassette Erasure prevention tab Timelapse recording is performed over the broken tab. • Video cassettes cannot be ... following conditions: • extreme heat or cold • strong magnetic fields (do not use a transceiver within 2 meters of this unit) • high humidity • dust and soil • vibrations • variations in temperature 5 Use this unit in horizontal (flat position) only. 5 Do not ...
...the unit in places subject to the following cases. • When the VCR is moved from the AC outlet, and contact your JVC dealer. 5 A malfunction may damage the tape. Video cassette Erasure prevention tab Timelapse recording is performed over the broken tab. • Video cassettes cannot be ... following conditions: • extreme heat or cold • strong magnetic fields (do not use a transceiver within 2 meters of this unit) • high humidity • dust and soil • vibrations • variations in temperature 5 Use this unit in horizontal (flat position) only. 5 Do not ...
SR-9168U Timelapse Recorder Instruction Manual (633KB)
Page 7
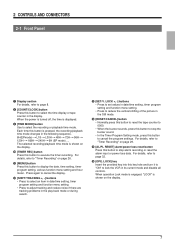
...Press this button to display the date, time setting, timer program setting, various function menu setting and hour meter. Each time this button is shown on the display. 7 Press again to cancel the display... key lnsert the provided key into this key hole and turn it to "ON" to lock the VCR in the display. 2 CONTROLS AND CONNECTORS 2-1 Front Panel 7 Display section For details, refer to... alarm recording or reset the alarm input or power loss data. For details, refer to execute the timer recording. The selected recording/playback time mode is pressed, the recording/playback time...
...Press this button to display the date, time setting, timer program setting, various function menu setting and hour meter. Each time this button is shown on the display. 7 Press again to cancel the display... key lnsert the provided key into this key hole and turn it to "ON" to lock the VCR in the display. 2 CONTROLS AND CONNECTORS 2-1 Front Panel 7 Display section For details, refer to... alarm recording or reset the alarm input or power loss data. For details, refer to execute the timer recording. The selected recording/playback time mode is pressed, the recording/playback time...
SR-9168U Timelapse Recorder Instruction Manual (633KB)
Page 8
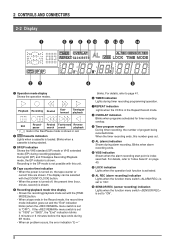
..., refer to page 41. 6 TIMER indication Lights during timer recording programming/operation. 7 REPEAT indication Lights when the VCR is set to "ON". $ SENSOR REC (sensor recording) indication Lights when the function menu switch is being recorded blinks. Blinks when a cassette is set to "180S" or...• When the power is turned off, the present time (hour, minute, second) is shown. 5 Recording/playback mode time display • Shows the recording/playback mode set to "ON". 8 During 6H (EP) and Timelapse Recording/Playback mode, the EP indicator is turned on page 40. @...
..., refer to page 41. 6 TIMER indication Lights during timer recording programming/operation. 7 REPEAT indication Lights when the VCR is set to "ON". $ SENSOR REC (sensor recording) indication Lights when the function menu switch is being recorded blinks. Blinks when a cassette is set to "180S" or...• When the power is turned off, the present time (hour, minute, second) is shown. 5 Recording/playback mode time display • Shows the recording/playback mode set to "ON". 8 During 6H (EP) and Timelapse Recording/Playback mode, the EP indicator is turned on page 40. @...
SR-9168U Timelapse Recorder Instruction Manual (633KB)
Page 9
... to the other video source. 4 [AUDIO IN] audio input connector (RCA) Receives audio signals from a connected camera or other VCR series recording signal input terminal. Release the button to lock the wire in this unit ends, a signal is output from this connector even when...audio signals. 6 [VIDEO OUT] video output connector (BNC) Outputs composite video signals. plug. Select the output signal with the menu switch. • Series recording signal output When the menu switch is set to the [CLOCK IN] terminal of the terminal. 2. 2 CONTROLS AND CONNECTORS 2-13 FRReOarNPTaPnAeNl EL 1 23 4...
... to the other video source. 4 [AUDIO IN] audio input connector (RCA) Receives audio signals from a connected camera or other VCR series recording signal input terminal. Release the button to lock the wire in this unit ends, a signal is output from this connector even when...audio signals. 6 [VIDEO OUT] video output connector (BNC) Outputs composite video signals. plug. Select the output signal with the menu switch. • Series recording signal output When the menu switch is set to the [CLOCK IN] terminal of the terminal. 2. 2 CONTROLS AND CONNECTORS 2-13 FRReOarNPTaPnAeNl EL 1 23 4...
SR-9168U Timelapse Recorder Instruction Manual (633KB)
Page 10
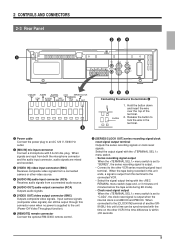
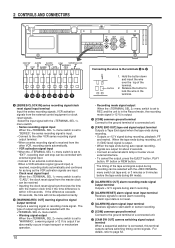
... OUT OUT IN OUT 17 16 15 14 13 12 11 10 9 9 [SERIES/CLOCK IN] series recording signal/clock reset signal input terminal Input the series recording signals, VCR activation signals from the master clock can be received. • Inputting the clock reset signal synchronizes the time... with the master clock time if the time difference is within ±30 seconds. When a VCR activation signal (ground input) is received, recording starts automatically and continues for about 2 seconds. • Connect an external alarm lamp or buzzer via an external interface....
... OUT OUT IN OUT 17 16 15 14 13 12 11 10 9 9 [SERIES/CLOCK IN] series recording signal/clock reset signal input terminal Input the series recording signals, VCR activation signals from the master clock can be received. • Inputting the clock reset signal synchronizes the time... with the master clock time if the time difference is within ±30 seconds. When a VCR activation signal (ground input) is received, recording starts automatically and continues for about 2 seconds. • Connect an external alarm lamp or buzzer via an external interface....
SR-9168U Timelapse Recorder Instruction Manual (633KB)
Page 13
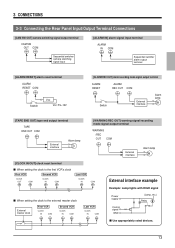
... Alarm lamp [TAPE END OUT] tape end output terminal TAPE END OUT COM External interface Alarm lamp [WARNING/REC OUT] warning signal/recording mode signal output terminal WARNING /REC OUT COM External interface Alarm lamp [CLOCK IN/OUT] clock reset terminal 5 When setting the clock... OUT COM Second VCR CLOCK IN COM Last VCR CLOCK IN COM 5 When setting the clock to the external master clock External master clock First VCR CLOCK IN COM Second VCR CLOCK IN COM Last VCR CLOCK IN COM External interface example Example: Lamp lights with HIGH signal Power supply (Lamp,...
... Alarm lamp [TAPE END OUT] tape end output terminal TAPE END OUT COM External interface Alarm lamp [WARNING/REC OUT] warning signal/recording mode signal output terminal WARNING /REC OUT COM External interface Alarm lamp [CLOCK IN/OUT] clock reset terminal 5 When setting the clock... OUT COM Second VCR CLOCK IN COM Last VCR CLOCK IN COM 5 When setting the clock to the external master clock External master clock First VCR CLOCK IN COM Second VCR CLOCK IN COM Last VCR CLOCK IN COM External interface example Example: Lamp lights with HIGH signal Power supply (Lamp,...

SR-9168U Timelapse Recorder Instruction Manual (633KB)
Page 14
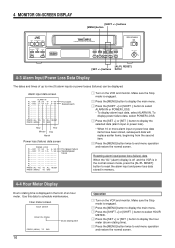
Menu switch setting • "L-UP" Hour Minute Second Recording mode 1 2 : 3 0 : 4 5 L18H 1 1 - 6 - 1999 Year Day Month • "R-UP" Recording mode L18 H 1 2 : 3 0 : 4 5 1 1 - 6 - 1999 • "R-BOTTOM" 1 1 - 6 - 1999 L18H 1 2 : 3 0 : 4 5 Recording mode • "L-BOTTOM" 1 1 - 6 - 1999 1 2 : 3 0 : 4 5 L18H Recording mode Display 5 Connect the VCR's video output connector to the monitor's video input connector. 1 Turn the power on (monitor and VCR) and engage the Stop mode...
Menu switch setting • "L-UP" Hour Minute Second Recording mode 1 2 : 3 0 : 4 5 L18H 1 1 - 6 - 1999 Year Day Month • "R-UP" Recording mode L18 H 1 2 : 3 0 : 4 5 1 1 - 6 - 1999 • "R-BOTTOM" 1 1 - 6 - 1999 L18H 1 2 : 3 0 : 4 5 Recording mode • "L-BOTTOM" 1 1 - 6 - 1999 1 2 : 3 0 : 4 5 L18H Recording mode Display 5 Connect the VCR's video output connector to the monitor's video input connector. 1 Turn the power on (monitor and VCR) and engage the Stop mode...

SR-9168U Timelapse Recorder Instruction Manual (633KB)
Page 15
... TIME MODE TIMER REC SET/V.LOCK AL/PL RESET SR-9168U OPERATE OPE. 4 MONITOR ON-SCREEN DISPLAY 4-2 Main Menu Display You can display date and time data recorded when an alarm input or power failure occurs, as well as the hour meter (drum rotating time) by selecting the desired item...menu operation and restore the normal screen, press the [MENU] button. ● PROGRAM TIMER: Displays the program setting screen for timer recording. * Timer programming is shown on the VCR and the monitor. Make sure the Stop mode is engaged. 2 Press the [MENU] button. [ The main menu screen is displayed....
... TIME MODE TIMER REC SET/V.LOCK AL/PL RESET SR-9168U OPERATE OPE. 4 MONITOR ON-SCREEN DISPLAY 4-2 Main Menu Display You can display date and time data recorded when an alarm input or power failure occurs, as well as the hour meter (drum rotating time) by selecting the desired item...menu operation and restore the normal screen, press the [MENU] button. ● PROGRAM TIMER: Displays the program setting screen for timer recording. * Timer programming is shown on the VCR and the monitor. Make sure the Stop mode is engaged. 2 Press the [MENU] button. [ The main menu screen is displayed....
SR-9168U Timelapse Recorder Instruction Manual (633KB)
Page 16
... to select ALARM IN or POWER LOSS. • To display alarm input data, select ALARM IN. Hour meter screen HOUR METER DRUM ON 02345H 16 PRESS (MENU) TO END Drum rotating time Operation 1 Turn on the VCR and monitor. Alarm input data screen ALARM IN AL-001 20:30 9- 6-99 AL-002 21... restore the normal screen. 4 MONITOR ON-SCREEN DISPLAY [SHIFT +/-] buttons [MENU] button REC STOP/EJECT REC CHECK PAUSE/ REVERSE STILL PLAY REW FF VIDEO CASSETTE RECORDER COUNT/ CLOCK MENU SHIFT/TRACKING RESET /CANCEL TIME MODE TIMER REC SET/V.LOCK AL/PL RESET SR-9168U OPERATE OPE.
... to select ALARM IN or POWER LOSS. • To display alarm input data, select ALARM IN. Hour meter screen HOUR METER DRUM ON 02345H 16 PRESS (MENU) TO END Drum rotating time Operation 1 Turn on the VCR and monitor. Alarm input data screen ALARM IN AL-001 20:30 9- 6-99 AL-002 21... restore the normal screen. 4 MONITOR ON-SCREEN DISPLAY [SHIFT +/-] buttons [MENU] button REC STOP/EJECT REC CHECK PAUSE/ REVERSE STILL PLAY REW FF VIDEO CASSETTE RECORDER COUNT/ CLOCK MENU SHIFT/TRACKING RESET /CANCEL TIME MODE TIMER REC SET/V.LOCK AL/PL RESET SR-9168U OPERATE OPE.
SR-9168U Timelapse Recorder Instruction Manual (633KB)
Page 17
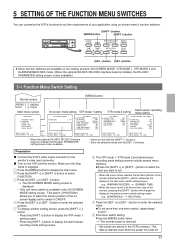
...item (top of the screen), pressing the [SHIFT -] button will change the display to the previous menu switch setting screen. Preparation 5 Connect the VCR's video output connector to the monitor's video input connector. 5 Turn on four setting screens: ON SCREEN MODE, VTR MODE 1, VTR MODE 2 ...[MENU] button [MENU] button Main menu screen On-screen mode setting VTR mode 1 setting VTR mode 2 setting Alarm/sensor recording mode setting MAIN MENU PROGRAM TIMER FUNCTION ALARM IN POWER LOSS HOUR METER CLOCK ADJUST PRESS (SHIFT, SET) PRESS (MENU) TO END ON SCREEN MODE (POSITION) L -UP ● ...
...item (top of the screen), pressing the [SHIFT -] button will change the display to the previous menu switch setting screen. Preparation 5 Connect the VCR's video output connector to the monitor's video input connector. 5 Turn on four setting screens: ON SCREEN MODE, VTR MODE 1, VTR MODE 2 ...[MENU] button [MENU] button Main menu screen On-screen mode setting VTR mode 1 setting VTR mode 2 setting Alarm/sensor recording mode setting MAIN MENU PROGRAM TIMER FUNCTION ALARM IN POWER LOSS HOUR METER CLOCK ADJUST PRESS (SHIFT, SET) PRESS (MENU) TO END ON SCREEN MODE (POSITION) L -UP ● ...
SR-9168U Timelapse Recorder Instruction Manual (633KB)
Page 19
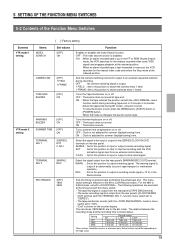
.... ON : When the tape reaches the position set to input or output a series recording signal. WARN. : Set to this position to "SERIES"). • The tape end buzzer sounds (with the VCR activation signal input from the rear panel's [CLOCK/SERIES OUT] terminal (with the TERMINAL SEL 1> ...Tape End buzzer on or off . The warning signal is fast-forwarded or rewound, the VCR searches for summer (daylight saving) time. Setting OFF 180S 360S 6H Tape end 3 minutes 6 minutes Record modes L18H L30H Tape end Tape end 9 minutes 15 minutes 18 minutes 30 minutes These...
.... ON : When the tape reaches the position set to input or output a series recording signal. WARN. : Set to this position to "SERIES"). • The tape end buzzer sounds (with the VCR activation signal input from the rear panel's [CLOCK/SERIES OUT] terminal (with the TERMINAL SEL 1> ...Tape End buzzer on or off . The warning signal is fast-forwarded or rewound, the VCR searches for summer (daylight saving) time. Setting OFF 180S 360S 6H Tape end 3 minutes 6 minutes Record modes L18H L30H Tape end Tape end 9 minutes 15 minutes 18 minutes 30 minutes These...
SR-9168U Timelapse Recorder Instruction Manual (633KB)
Page 21
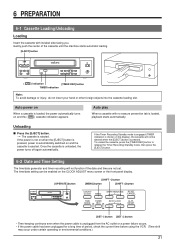
... TIMER indication Note: To avoid damage or injury, do not insert your hand or other foreign objects into the cassette loading slot. If the Timer Recording Standby mode is engaged (TIMER indication is shown on the CLOCK ADJUST menu screen or the front panel display. [OPERATE] button [SHIFT -] button...Time Setting The time/date generator and timer recording will not be enabled on the display), the cassette will not function if the date and time are not set. Gently push the center of period, check the current time before using the VCR. (Time shift may occur under certain ...
... TIMER indication Note: To avoid damage or injury, do not insert your hand or other foreign objects into the cassette loading slot. If the Timer Recording Standby mode is engaged (TIMER indication is shown on the CLOCK ADJUST menu screen or the front panel display. [OPERATE] button [SHIFT -] button...Time Setting The time/date generator and timer recording will not be enabled on the display), the cassette will not function if the date and time are not set. Gently push the center of period, check the current time before using the VCR. (Time shift may occur under certain ...
SR-9168U Timelapse Recorder Instruction Manual (633KB)
Page 22
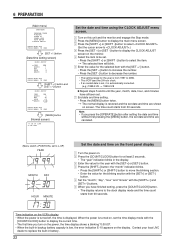
... display shows a blinking "0:00:00". • When the built-in battery. 22 Contact your local JVC dealer to replace the built-in backup battery capacity is low, the error indication E-10 appears on the VCR's display • When the power is turned off, the time is restored and the set date...number. • Press the [SET -] button to decrease the number. • The setting range for the year is from 1997 to 2096. • This VCR uses the 24-hour clock. • If an invalid date is set, it is automatically corrected. (e.g.) 1999-2-29 [ 1999-2-28 Ⅲ Repeat steps 5 and 6 until the year...
... display shows a blinking "0:00:00". • When the built-in battery. 22 Contact your local JVC dealer to replace the built-in backup battery capacity is low, the error indication E-10 appears on the VCR's display • When the power is turned off, the time is restored and the set date...number. • Press the [SET -] button to decrease the number. • The setting range for the year is from 1997 to 2096. • This VCR uses the 24-hour clock. • If an invalid date is set, it is automatically corrected. (e.g.) 1999-2-29 [ 1999-2-28 Ⅲ Repeat steps 5 and 6 until the year...

SR-9168U Timelapse Recorder Instruction Manual (633KB)
Page 25
... the display and the Pause mode is engaged. Note If the VCR is played back in the Record Pause mode for about 7 seconds Display Recording check Normal Recording Defective Auto head cleaning Recording Error indicator E-09 display 25 If the recording time is too short, Record Check cannot be performed correctly. 5 Press the [REC CHECK] button during...
... the display and the Pause mode is engaged. Note If the VCR is played back in the Record Pause mode for about 7 seconds Display Recording check Normal Recording Defective Auto head cleaning Recording Error indicator E-09 display 25 If the recording time is too short, Record Check cannot be performed correctly. 5 Press the [REC CHECK] button during...
SR-9168U Timelapse Recorder Instruction Manual (633KB)
Page 26
Main menu screen MAIN MENU PROGRAM TIMER FUNCTION ALARM IN POWER LOSS HOUR METER CLOCK ADJUST PRESS (SHIFT, SET) PRESS (MENU) TO END Daily timer program setting screen PROGRAM TIMER ( DAILY) S T A R T E N D MODE 1 H 2 H 3 H 4 H 5 H 6 H 7 H 8 H PRESS (SHIFT, SET, RESET) PRESS ... monitor. 3 Press the [SHIFT +] or [SHIFT -] button to move the cursor arrow to in place. Recording will be shown. You can be set . If the power is off, loading the cassette automatically turns the VCR on (auto power on -screen menu display. [OPERATE] button [MENU] button [SHIFT-] button [SHIFT+] button...
Main menu screen MAIN MENU PROGRAM TIMER FUNCTION ALARM IN POWER LOSS HOUR METER CLOCK ADJUST PRESS (SHIFT, SET) PRESS (MENU) TO END Daily timer program setting screen PROGRAM TIMER ( DAILY) S T A R T E N D MODE 1 H 2 H 3 H 4 H 5 H 6 H 7 H 8 H PRESS (SHIFT, SET, RESET) PRESS ... monitor. 3 Press the [SHIFT +] or [SHIFT -] button to move the cursor arrow to in place. Recording will be shown. You can be set . If the power is off, loading the cassette automatically turns the VCR on (auto power on -screen menu display. [OPERATE] button [MENU] button [SHIFT-] button [SHIFT+] button...

SR-9168U Timelapse Recorder Instruction Manual (633KB)
Page 27
... blinking) and press the [SHIFT -] button. [ The selected item stops blinking. TIMER 12 16.30.00 VCR's display 4 Select the timer program No. "Month" [ "Day"[ "Start time (hour)" [ "Start time (minute)" [ "Stop time (hour)"[ "Stop time (minute)" [ "Record mode" [ Select the next program No. • Press the [SHIFT -] button to move the cursor arrow...
... blinking) and press the [SHIFT -] button. [ The selected item stops blinking. TIMER 12 16.30.00 VCR's display 4 Select the timer program No. "Month" [ "Day"[ "Start time (hour)" [ "Start time (minute)" [ "Stop time (hour)"[ "Stop time (minute)" [ "Record mode" [ Select the next program No. • Press the [SHIFT -] button to move the cursor arrow...

SR-9168U Timelapse Recorder Instruction Manual (633KB)
Page 28
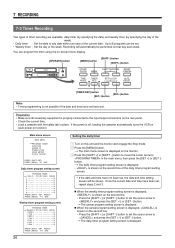
... display the timer program setting screen on the monitor. (Refer to steps 1 to 3 in the VCR's display. The start time (hour) blinks. • Press the [SET -] button. "Start time (hour)" [ "Start time (minute)" [ "Stop time (hour)" [ "Stop time (minute)"[ "Record mode" [ Select the day of the week. • Press the [SHIFT -] button to move the...
... display the timer program setting screen on the monitor. (Refer to steps 1 to 3 in the VCR's display. The start time (hour) blinks. • Press the [SET -] button. "Start time (hour)" [ "Start time (minute)" [ "Stop time (hour)" [ "Stop time (minute)"[ "Record mode" [ Select the day of the week. • Press the [SHIFT -] button to move the...
SR-9168U Timelapse Recorder Instruction Manual (633KB)
Page 29
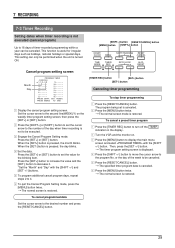
... irregular days such as holidays, national holidays or special days. The program being set the cursor arrow to the number of the day when timer recording is not to be canceled. Press the [SET+] or [SET-] button. To cancel programmed data Set the cursor arrow to 4. 6 To quit the ...cancel program setting screen. To cancel a preset timer program 1 Press the [TIMER REC] button to turn off the TIMER indication in the display. 2 Turn the VCR and the monitor on the weekly timer program setting screen, then press the [SET+] or [SET-] button. 2 Press the [SHIFT+] or [SHIFT-] button to...
... irregular days such as holidays, national holidays or special days. The program being set the cursor arrow to the number of the day when timer recording is not to be canceled. Press the [SET+] or [SET-] button. To cancel programmed data Set the cursor arrow to 4. 6 To quit the ...cancel program setting screen. To cancel a preset timer program 1 Press the [TIMER REC] button to turn off the TIMER indication in the display. 2 Turn the VCR and the monitor on the weekly timer program setting screen, then press the [SET+] or [SET-] button. 2 Press the [SHIFT+] or [SHIFT-] button to...