Instructions
Page 2
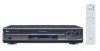
... of important operating and maintenance (servicing) instructions in a particular installation. For U.S.A Declaration of Conformity: Trade Name: JVC Model Number: RX-D302B This device complies with FCC RF radiation exposure limits set forth for help. IMPORTANT NOTE: FCC Radiation Exposure Statement:... to the following two conditions: (1) This device may not cause interference, and (2) this device must accept any interference received, including interference that the cable ground shall be remote controlled. Cet appareil numérique de la classe B est conforme...
... of important operating and maintenance (servicing) instructions in a particular installation. For U.S.A Declaration of Conformity: Trade Name: JVC Model Number: RX-D302B This device complies with FCC RF radiation exposure limits set forth for help. IMPORTANT NOTE: FCC Radiation Exposure Statement:... to the following two conditions: (1) This device may not cause interference, and (2) this device must accept any interference received, including interference that the cable ground shall be remote controlled. Cet appareil numérique de la classe B est conforme...
Instructions
Page 4
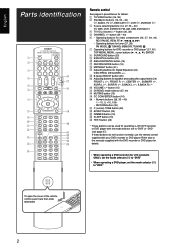
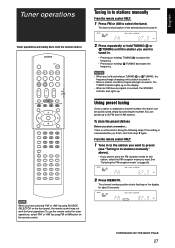
...y VOLUME +/- SURR - R Remote control See pages in parentheses for Digital Equalizer (24) D.EQ FREQ, D.EQ LEVEL +/- English Parts identification A/V CONTROL RECEIVER REMOTE CONTROL RM-SRXD301J TV/VIDEO AUDIO 1 TV DBS/CATV VCR DVR/DVD 2 TV DBS VCR DVR/DVD 3 FM AM USB DVD MULTI TV VOL...EX/ES/PL x 9 1 2 3 ANALOG/DIGITAL p 4 5 6 DECODE MODE ; BACK - r B (bass).BOOST button (25) t Adjusting buttons for JVC products ONLY), set the mode selector (u) to "DVR." • When operating a DVD player, set to the manuals supplied with your DVD recorder or DVD player....
...y VOLUME +/- SURR - R Remote control See pages in parentheses for Digital Equalizer (24) D.EQ FREQ, D.EQ LEVEL +/- English Parts identification A/V CONTROL RECEIVER REMOTE CONTROL RM-SRXD301J TV/VIDEO AUDIO 1 TV DBS/CATV VCR DVR/DVD 2 TV DBS VCR DVR/DVD 3 FM AM USB DVD MULTI TV VOL...EX/ES/PL x 9 1 2 3 ANALOG/DIGITAL p 4 5 6 DECODE MODE ; BACK - r B (bass).BOOST button (25) t Adjusting buttons for JVC products ONLY), set the mode selector (u) to "DVR." • When operating a DVD player, set to the manuals supplied with your DVD recorder or DVD player....

Instructions
Page 5
... Digital signal format indicators (15, 29, 30) DIGITAL AUTO, LINEAR PCM, , ! L, SURR - Front panel 1 2345 AUDIO/VIDEO CONTROL RECEIVER STANDBY/ON CC CONVERTER SETTING ADJUST SURROUND PHONES USB 6 DVD MULTI DVR / DVD VCR DBS TV USB FM AM 78 9 SET / TUNER PRESET ...COAXIAL SUBWOOFER OUT RIGHT LEFT SURROUND BACK SPEAKERS RIGHT LEFT SURROUND SPEAKERS CENTER SPEAKER RIGHT LEFT FRONT SPEAKERS 8 9 p q w 1 Power cord (11) 2 AV COMPU LINK-III terminals (34) 3 DIGITAL IN terminals (11) • Coaxial: 1(DVR/DVD) • Optical: 2(DBS) • Optical: 3(VCR)...
... Digital signal format indicators (15, 29, 30) DIGITAL AUTO, LINEAR PCM, , ! L, SURR - Front panel 1 2345 AUDIO/VIDEO CONTROL RECEIVER STANDBY/ON CC CONVERTER SETTING ADJUST SURROUND PHONES USB 6 DVD MULTI DVR / DVD VCR DBS TV USB FM AM 78 9 SET / TUNER PRESET ...COAXIAL SUBWOOFER OUT RIGHT LEFT SURROUND BACK SPEAKERS RIGHT LEFT SURROUND SPEAKERS CENTER SPEAKER RIGHT LEFT FRONT SPEAKERS 8 9 p q w 1 Power cord (11) 2 AV COMPU LINK-III terminals (34) 3 DIGITAL IN terminals (11) • Coaxial: 1(DVR/DVD) • Optical: 2(DBS) • Optical: 3(VCR)...
Instructions
Page 6
...the wall outlet. Replace for an extended period or time, remove the plug from moisture and dust. • The temperature around the receiver. Locations • Install the receiver in a location that look similar may differ in the remote control so they match the polarity: (+) to (+) and (-) to ... Before using the remote control, aim the remote control directly at the same time. • Do not expose batteries to be between the receiver and the TV. If the range or effectiveness of batteries. CAUTION: Follow these precautions to avoid leaking or cracking cells: • Place...
...the wall outlet. Replace for an extended period or time, remove the plug from moisture and dust. • The temperature around the receiver. Locations • Install the receiver in a location that look similar may differ in the remote control so they match the polarity: (+) to (+) and (-) to ... Before using the remote control, aim the remote control directly at the same time. • Do not expose batteries to be between the receiver and the TV. If the range or effectiveness of batteries. CAUTION: Follow these precautions to avoid leaking or cracking cells: • Place...
Instructions
Page 9
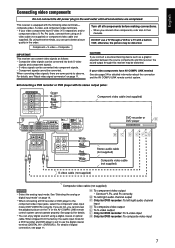
If your video components have AV COMPU LINK terminal See also page 34 for DVD recorder: To composite video input 7 This receiver is set to use a TV through this receiver may be converted into both S-video signals and component signals. • S-video signals can convert ...wall outlet until all components before making connections. • When you connect other components, refer also to their manuals. IMPORTANT: This receiver can be converted into component signals. • Component signals cannot be distorted. otherwise, the picture may be converted. By using a...
If your video components have AV COMPU LINK terminal See also page 34 for DVD recorder: To composite video input 7 This receiver is set to use a TV through this receiver may be converted into both S-video signals and component signals. • S-video signals can convert ...wall outlet until all components before making connections. • When you connect other components, refer also to their manuals. IMPORTANT: This receiver can be converted into component signals. • Component signals cannot be distorted. otherwise, the picture may be converted. By using a...
Instructions
Page 13
...) To convert composite video and S-video signal into S-video signal automatically. • Even if the recording components are connected to the receiver using a digital optical cable (not supplied). Digital coaxial cable (not supplied) DIGITAL OUT PCM/STREAM Connecting digital recording equipment to the ...failure occurs. • When you can connect any digital components which may be distorted if the signals are connected to the receiver using the AV COMPU LINK remote control system (see page 22). • If using composite video cable for connecting to the video input and...
...) To convert composite video and S-video signal into S-video signal automatically. • Even if the recording components are connected to the receiver using a digital optical cable (not supplied). Digital coaxial cable (not supplied) DIGITAL OUT PCM/STREAM Connecting digital recording equipment to the ...failure occurs. • When you can connect any digital components which may be distorted if the signals are connected to the receiver using the AV COMPU LINK remote control system (see page 22). • If using composite video cable for connecting to the video input and...

Instructions
Page 14
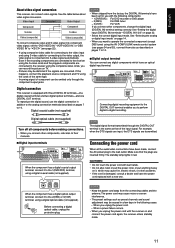
...the procedure, you connect your PC for about 30 m, but it may become hot, it is transmitted to make a wireless communication with the receiver. USB wireless transmitter (supplied) PC USB WIRELESS TRANSMITTER 4. When you cannot send any signal or data to "0" when connecting or disconnecting the ... from the transmitter for the first time, follow the procedure below. • Remember you slide the switch, the lamp in your PC from this receiver. • Use USB extension cable (supplied) if it is not a malfunction. 2 (For USB TERMINAL) 1. IMPORTANT: Always set volume to your...
...the procedure, you connect your PC for about 30 m, but it may become hot, it is transmitted to make a wireless communication with the receiver. USB wireless transmitter (supplied) PC USB WIRELESS TRANSMITTER 4. When you cannot send any signal or data to "0" when connecting or disconnecting the ... from the transmitter for the first time, follow the procedure below. • Remember you slide the switch, the lamp in your PC from this receiver. • Use USB extension cable (supplied) if it is not a malfunction. 2 (For USB TERMINAL) 1. IMPORTANT: Always set volume to your...

Instructions
Page 15
...turned on. • When not using the English version of WindowsR XP. to keep proper distance between the PC and the receiver while the receiver is described using the PC as the playback source. The USB drivers are installed automatically. • If the USB drivers are ...the distance between , playback will be interrupted or the wireless communication will differ from the speakers, check the following the instructions on the receiver "ON." - When playing back with the sound reproduction application installed in your PC is running on a different version of operation system ...
...turned on. • When not using the English version of WindowsR XP. to keep proper distance between the PC and the receiver while the receiver is described using the PC as the playback source. The USB drivers are installed automatically. • If the USB drivers are ...the distance between , playback will be interrupted or the wireless communication will differ from the speakers, check the following the instructions on the receiver "ON." - When playing back with the sound reproduction application installed in your PC is running on a different version of operation system ...

Instructions
Page 16
.... Select the DVD recorder or DVD player. This setting is memorized for the digital input mode. DGTL AUTO (DIGITAL AUTO): Select for each source. The receiver automatically detects the incoming signal format, then the digital signal format indicator (LINEAR PCM, , , or 96/24) for the analog input mode. The standby lamp...
.... Select the DVD recorder or DVD player. This setting is memorized for the digital input mode. DGTL AUTO (DIGITAL AUTO): Select for each source. The receiver automatically detects the incoming signal format, then the digital signal format indicator (LINEAR PCM, , , or 96/24) for the analog input mode. The standby lamp...

Instructions
Page 17
... the sound through the headphones-3D HEADPHONE mode. ANALOG AUTO SURR L R S.WFR CAUTION: Always set at the beginning of signal comes into the receiver. From the remote control ONLY: Press DECODE MODE to select "DOLBY DIGITAL" or "DTS." • Each time you turn off . LINEAR PCM...: Lights up when Linear PCM signal comes in . • Flashes when "DOLBY DIGITAL" is selected for a while. Turning off the receiver. - When you press DECODE MODE, the digital decode mode changes as high volume may output from the PHONES jack cancels the HEADPHONE (or 3D...
... the sound through the headphones-3D HEADPHONE mode. ANALOG AUTO SURR L R S.WFR CAUTION: Always set at the beginning of signal comes into the receiver. From the remote control ONLY: Press DECODE MODE to select "DOLBY DIGITAL" or "DTS." • Each time you turn off . LINEAR PCM...: Lights up when Linear PCM signal comes in . • Flashes when "DOLBY DIGITAL" is selected for a while. Turning off the receiver. - When you press DECODE MODE, the digital decode mode changes as high volume may output from the PHONES jack cancels the HEADPHONE (or 3D...
Instructions
Page 18
... Select when playing back an analog source or a digital source with non compressed digital sound signal (Linear PCM). Making sounds natural JVC's CC (Compression Compensative) Converter eliminates jitter and ripples, achieving a drastic reduction in digital distortion by expanding the sampling frequency to ... repeatedly so that "SLEEP OFF" appears on the front speakers. Press CC CONVERTER repeatedly. • Each time you operate the receiver.) DIMMER OFF: Cancels the Dimmer (normal display). Signal and speaker indicators on the display. LFE: Lights up when the LFE ...
... Select when playing back an analog source or a digital source with non compressed digital sound signal (Linear PCM). Making sounds natural JVC's CC (Compression Compensative) Converter eliminates jitter and ripples, achieving a drastic reduction in digital distortion by expanding the sampling frequency to ... repeatedly so that "SLEEP OFF" appears on the front speakers. Press CC CONVERTER repeatedly. • Each time you operate the receiver.) DIMMER OFF: Cancels the Dimmer (normal display). Signal and speaker indicators on the display. LFE: Lights up when the LFE ...
Instructions
Page 19
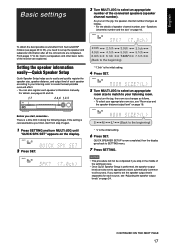
... be completed if you stop in doing the following steps. English Basic settings 3 Turn MULTI JOG to set speakers and other basic items of the receiver are explained. From pages 17 to 22, how to select an appropriate number of speaker channel number, see "Room size and the speaker distance/output...
... be completed if you stop in doing the following steps. English Basic settings 3 Turn MULTI JOG to set speakers and other basic items of the receiver are explained. From pages 17 to 22, how to select an appropriate number of speaker channel number, see "Room size and the speaker distance/output...

Instructions
Page 22
...") may be applied even though you have selected "". when "SURROUND SPK" is applied. Select to apply PLIIx MOVIE (7.1-channel) reproduction to the speaker distance, the receiver automatically sets the delay time of the above. In this setting, available Surround modes for digital multi-channel software vary-EX/ES/PLIIx (7.1-channel) reproduction...
...") may be applied even though you have selected "". when "SURROUND SPK" is applied. Select to apply PLIIx MOVIE (7.1-channel) reproduction to the speaker distance, the receiver automatically sets the delay time of the above. In this setting, available Surround modes for digital multi-channel software vary-EX/ES/PLIIx (7.1-channel) reproduction...

Instructions
Page 23
... is about 12 cm. Select when you want while playing digital software recorded (or broadcasted) in the speaker is distorted. When the receiver detects Dual mono signals, the DUAL MONO indicator lights up while playing back these channels. CROSS Select when the cone speaker unit built ...a powerful sound at night). D MONO Select to play back the main channel (Ch 1).* Signal indicator "L" lights up while playing back this receiver automatically reallocates the bass sound elements assigned to the small speaker to the large speakers. D MONO Select to play back both the main and ...
... is about 12 cm. Select when you want while playing digital software recorded (or broadcasted) in the speaker is distorted. When the receiver detects Dual mono signals, the DUAL MONO indicator lights up while playing back these channels. CROSS Select when the cone speaker unit built ...a powerful sound at night). D MONO Select to play back the main channel (Ch 1).* Signal indicator "L" lights up while playing back this receiver automatically reallocates the bass sound elements assigned to the small speaker to the large speakers. D MONO Select to play back both the main and ...

Instructions
Page 24
...DIGITAL IN 3." ONETOUCH Select to store the volume level separately for each source. (The ONE TOUCH OPERATION indicator lights up on the TV or the AV COMPU LINK remote control system cannot operate properly (see page 34). Ex.: When "DIGITAL IN 1" is selected. Initial setting: VCR For the ...priority order for both the VCR and the DBS at the same time. Memorizing the volume level for each source-ONE TOUCH OPE This receiver memorizes some settings separately for each source. English Setting the digital input (DIGITAL IN) terminals-DIGITAL IN 1/2/3 When you use the component...
...DIGITAL IN 3." ONETOUCH Select to store the volume level separately for each source. (The ONE TOUCH OPERATION indicator lights up on the TV or the AV COMPU LINK remote control system cannot operate properly (see page 34). Ex.: When "DIGITAL IN 1" is selected. Initial setting: VCR For the ...priority order for both the VCR and the DBS at the same time. Memorizing the volume level for each source-ONE TOUCH OPE This receiver memorizes some settings separately for each source. English Setting the digital input (DIGITAL IN) terminals-DIGITAL IN 1/2/3 When you use the component...
Instructions
Page 29
... stations. The channel number position starts flashing on the display for this station, select the FM reception mode you want is received, the STEREO indicator also lights up. The last received station of sufficient signal strength is tuned in, the TUNED indicator lights up to store the FM reception mode for about...
... stations. The channel number position starts flashing on the display for this station, select the FM reception mode you want is received, the STEREO indicator also lights up. The last received station of sufficient signal strength is tuned in, the TUNED indicator lights up to store the FM reception mode for about...

Instructions
Page 30
... 5, press 5. • For channel number 15, press +10, then 5. • For channel number 30, press +10, +10, then 10. The last received station of the selected band is assigned to the selected channel number. 5 Repeat steps 1 to select a preset channel number. Select this to improve the reception... 5. • For channel number 30, press +10, +10, then 10. The station is tuned in doing the following steps. The last received station of the selected band is a time limit in and the numeric buttons now work for selecting preset channels. 3 Turn MULTI JOG to the stations...
... 5, press 5. • For channel number 15, press +10, then 5. • For channel number 30, press +10, +10, then 10. The last received station of the selected band is assigned to the selected channel number. 5 Repeat steps 1 to select a preset channel number. Select this to improve the reception... 5. • For channel number 30, press +10, +10, then 10. The station is tuned in doing the following steps. The last received station of the selected band is a time limit in and the numeric buttons now work for selecting preset channels. 3 Turn MULTI JOG to the stations...

Instructions
Page 31
... (plus subwoofer). As such, the sound movement and "being-there" feeling are enhanced much more detailed movements behind you can feel in this receiver can create almost the same Surround sound as 0.1 channel. PLII MOVIE PLII MUSIC Suitable for Dolby Pro Logic. "Dolby", "Pro Logic", and... Pro Logic II Music (PLII MUSIC). Suitable for the cutoff frequency of the surround treble and enables stereo surround sound. • This receiver provides two types of Dolby Pro Logic II modes- Introducing the Surround modes I Dolby Surround Dolby Pro Logic II Dolby Pro Logic II...
... (plus subwoofer). As such, the sound movement and "being-there" feeling are enhanced much more detailed movements behind you can feel in this receiver can create almost the same Surround sound as 0.1 channel. PLII MOVIE PLII MUSIC Suitable for Dolby Pro Logic. "Dolby", "Pro Logic", and... Pro Logic II Music (PLII MUSIC). Suitable for the cutoff frequency of the surround treble and enables stereo surround sound. • This receiver provides two types of Dolby Pro Logic II modes- Introducing the Surround modes I Dolby Surround Dolby Pro Logic II Dolby Pro Logic II...

Instructions
Page 32
...at quantization of the activated speakers which the Surround mode requires. • If either channel you want to listen to (see page 19), JVC's original 3D-PHONIC processing (which enables it to add breadth and depth to create 6-channel (plus subwoofer) from Dolby Pro Logic II....8226; When DTS signal is detected through the other digital signals Linear PCM Uncompressed digital audio data used for DTS-ES Matrix 6.1ch. • This receiver provides the following DTS Neo:6 modes-Neo:6 Cinema (NEO:6 CINEMA) and Neo:6 Music (NEO:6 MUSIC). DVDs support 2 channels with Dolby Digital, ...
...at quantization of the activated speakers which the Surround mode requires. • If either channel you want to listen to (see page 19), JVC's original 3D-PHONIC processing (which enables it to add breadth and depth to create 6-channel (plus subwoofer) from Dolby Pro Logic II....8226; When DTS signal is detected through the other digital signals Linear PCM Uncompressed digital audio data used for DTS-ES Matrix 6.1ch. • This receiver provides the following DTS Neo:6 modes-Neo:6 Cinema (NEO:6 CINEMA) and Neo:6 Music (NEO:6 MUSIC). DVDs support 2 channels with Dolby Digital, ...
Instructions
Page 36
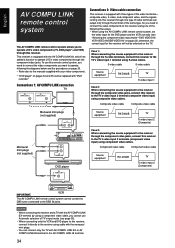
...VIDEO IN" on page 22); Connections 1: AV COMPU LINK connection TV AV COMPU LINK-III AV COMPU LINK EX Connections 2: Video cable connection This receiver is equipped with the AV COMPU LINK-III, which has added a function to operate JVC's video components through the terminal of the ... cable S-video cable Source equipment RX-D302B TV To video input 1 Case 2: When connecting the source equipment to the receiver through this receiver to the TV's video input 1 terminal using S-video cables. English AV COMPU LINK remote control system The AV COMPU LINK remote control system allows...
...VIDEO IN" on page 22); Connections 1: AV COMPU LINK connection TV AV COMPU LINK-III AV COMPU LINK EX Connections 2: Video cable connection This receiver is equipped with the AV COMPU LINK-III, which has added a function to operate JVC's video components through the terminal of the ... cable S-video cable Source equipment RX-D302B TV To video input 1 Case 2: When connecting the source equipment to the receiver through this receiver to the TV's video input 1 terminal using S-video cables. English AV COMPU LINK remote control system The AV COMPU LINK remote control system allows...


