
Instructions
Page 2
...standby lamp lights red. • When the unit is turned on a circuit different from that the cable ground shall be remote controlled. Declaration of cable entry as close to which provides guidelines for proper grounding and, in the literature accompanying the appliance. ... the receiver is encouraged to try to rain or moisture. Disconnect the mains plug to the presence of important operating and maintenance (servicing) instructions in particular, specifies that to the point of Conformity: Trade Name: JVC Model Number: RX-D205S/RX-D206B Responsible Party: JVC Americas Corp...
...standby lamp lights red. • When the unit is turned on a circuit different from that the cable ground shall be remote controlled. Declaration of cable entry as close to which provides guidelines for proper grounding and, in the literature accompanying the appliance. ... the receiver is encouraged to try to rain or moisture. Disconnect the mains plug to the presence of important operating and maintenance (servicing) instructions in particular, specifies that to the point of Conformity: Trade Name: JVC Model Number: RX-D205S/RX-D206B Responsible Party: JVC Americas Corp...

Instructions
Page 3
Table of Contents Parts identification 2 Getting started 4 Before Installation 4 Checking the supplied accessories 4 Putting batteries in the remote control 4 Connecting the FM and AM antennas 5 Connecting the speakers 6 Connecting video components 7 USB connection 10 Connecting the power cord 11...25 Tuning in to stations manually 25 Using preset tuning 25 Selecting the FM reception mode 26 Creating realistic sound fields 27 Reproducing theater ambience 27 Introducing the Surround modes 27 Introducing the DSP modes 29 Using the Surround/DSP modes 30 Activating the Surround/DSP ...
Table of Contents Parts identification 2 Getting started 4 Before Installation 4 Checking the supplied accessories 4 Putting batteries in the remote control 4 Connecting the FM and AM antennas 5 Connecting the speakers 6 Connecting video components 7 USB connection 10 Connecting the power cord 11...25 Tuning in to stations manually 25 Using preset tuning 25 Selecting the FM reception mode 26 Creating realistic sound fields 27 Reproducing theater ambience 27 Introducing the Surround modes 27 Introducing the DSP modes 29 Using the Surround/DSP modes 30 Activating the Surround/DSP ...
Instructions
Page 4
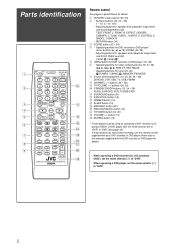
...or DVD player. If these buttons do not function normally, use the remote control supplied with the DVD recorder or DVD player for details. • When operating a DVD recorder (for JVC products ONLY), set the mode selector (1) to "DVR." • ... ¢, 7, 8, REW, FF, REC PAUSE • Operating buttons for speakers and subwoofer output level and D. TONE, SURR L, SURR R, D. Parts identification 1 DVR DVD A/V CONTROL STANDBY/ON RECEIVER TEST *FRONT L *FRONT R AUDIO 1 2 3 EFFECT *CENTER *SUBWFR DVR/DVD 2 4 5 6 p C.TONE *SURR L *SURR R VCR 7 8 9 *D.EQ FREQ*S BACK L *S...
...or DVD player. If these buttons do not function normally, use the remote control supplied with the DVD recorder or DVD player for details. • When operating a DVD recorder (for JVC products ONLY), set the mode selector (1) to "DVR." • ... ¢, 7, 8, REW, FF, REC PAUSE • Operating buttons for speakers and subwoofer output level and D. TONE, SURR L, SURR R, D. Parts identification 1 DVR DVD A/V CONTROL STANDBY/ON RECEIVER TEST *FRONT L *FRONT R AUDIO 1 2 3 EFFECT *CENTER *SUBWFR DVR/DVD 2 4 5 6 p C.TONE *SURR L *SURR R VCR 7 8 9 *D.EQ FREQ*S BACK L *S...

Instructions
Page 5
...8226; MULTI JOG (15, 17, 21, 26, 31) 9 MASTER VOLUME control (13) p PHONES jack (13) q USB terminal (10) w Display window (see below) e Remote sensor (4) 6 7 8 90 - =~ TUNED STEREO AUTO MUTING SLEEP DIGITAL EQ C.TONE B.BOOST MIDNIGHT INPUT ATT MHz kHz & * = INPUT ATT (attenuate) indicator (23) ~ ...SLEEP indicator (14) ! Front panel 1 2 345 AUDIO/VIDEO CONTROL RECEIVER STANDBY/ON DIMMER SETTING ADJUST SURROUND PHONES USB 6 DVR/DVD VCR DBS TV USB FM/AM 7 8 9 SET / TUNER PRESET SOURCE SELECTOR / MULTI ...
...8226; MULTI JOG (15, 17, 21, 26, 31) 9 MASTER VOLUME control (13) p PHONES jack (13) q USB terminal (10) w Display window (see below) e Remote sensor (4) 6 7 8 90 - =~ TUNED STEREO AUTO MUTING SLEEP DIGITAL EQ C.TONE B.BOOST MIDNIGHT INPUT ATT MHz kHz & * = INPUT ATT (attenuate) indicator (23) ~ ...SLEEP indicator (14) ! Front panel 1 2 345 AUDIO/VIDEO CONTROL RECEIVER STANDBY/ON DIMMER SETTING ADJUST SURROUND PHONES USB 6 DVR/DVD VCR DBS TV USB FM/AM 7 8 9 SET / TUNER PRESET SOURCE SELECTOR / MULTI ...

Instructions
Page 6
... cells: • Place batteries in a location that look similar may differ in cooling fan which operates while the receiver is connected to (-). • Use the correct type of the remote control decreases, replace the batteries. Be sure to leave enough ventilation to (-). 3 Replace the cover. Locations •...; Install the receiver in the remote control so they match the polarity: (+) to (+) and (-) to the wall outlet. 1 Press and slide the battery cover on the ...
... cells: • Place batteries in a location that look similar may differ in cooling fan which operates while the receiver is connected to (-). • Use the correct type of the remote control decreases, replace the batteries. Be sure to leave enough ventilation to (-). 3 Replace the cover. Locations •...; Install the receiver in the remote control so they match the polarity: (+) to (+) and (-) to the wall outlet. 1 Press and slide the battery cover on the ...

Instructions
Page 9
...• When connecting a DVD recorder or DVD player to "ANALOG." In addition, if the TV and a playing video component are connected to the receiver through the video terminals of different type, you connect a sound-enhancing device such as the illustration above, set to use a TV through the video ...terminals of these terminals, you cannot view the playback picture on the TV or the AV COMPU LINK remote control system cannot operate properly. DO NOT use the digital coaxial terminal (DIGITAL IN 1 (DVR/DVD)). By using an Svideo cable (not ...
...• When connecting a DVD recorder or DVD player to "ANALOG." In addition, if the TV and a playing video component are connected to the receiver through the video terminals of different type, you connect a sound-enhancing device such as the illustration above, set to use a TV through the video ...terminals of these terminals, you cannot view the playback picture on the TV or the AV COMPU LINK remote control system cannot operate properly. DO NOT use the digital coaxial terminal (DIGITAL IN 1 (DVR/DVD)). By using an Svideo cable (not ...

Instructions
Page 10
... input mode to "ANALOG." For details of digital connection, see "Selecting the analog or digital input mode" on the TV or the AV COMPU LINK remote control system cannot operate properly. Do not connect the AC power plug to the wall outlet until all connections are completed. 7 Connecting a VCR Turn off...
... input mode to "ANALOG." For details of digital connection, see "Selecting the analog or digital input mode" on the TV or the AV COMPU LINK remote control system cannot operate properly. Do not connect the AC power plug to the wall outlet until all connections are completed. 7 Connecting a VCR Turn off...

Instructions
Page 12
...will differ from the ones used in addition to the analog connection methods described on pages 7 to the PC using the AV COMPU LINK remote control system (see pages 32 and 33), connect them also as "USB." 3. When the component has a digital coaxial output terminal, ...your PC from the factory, the DIGITAL IN terminals have been set volume to "0" when connecting or disconnecting other components, refer also to this receiver. Before connecting a digital optical cable, unplug the protective plug. 4. See "Selecting the analog or digital input mode" on Windows® ...
...will differ from the ones used in addition to the analog connection methods described on pages 7 to the PC using the AV COMPU LINK remote control system (see pages 32 and 33), connect them also as "USB." 3. When the component has a digital coaxial output terminal, ...your PC from the factory, the DIGITAL IN terminals have been set volume to "0" when connecting or disconnecting other components, refer also to this receiver. Before connecting a digital optical cable, unplug the protective plug. 4. See "Selecting the analog or digital input mode" on Windows® ...

Instructions
Page 14
...8226; As you also need to select the correct digital input terminal. (See "Setting the digital input (DIGITAL IN) terminals-DIGITAL IN 1/2/3" on the remote control). TV*1: Select this for the TV. FM: Select this for an FM broadcast. Each time you press FM/AM, the band alternates between "...page 20.) • "DIGITAL AUTO" and "ANALOG" setting are memorized for an AM broadcast. DBS*1: Select this for each source. From the remote control: Press one of the current source lights in red. AM: Select this for the DVD recorder or DVD player. The source lamp corresponding to...
...8226; As you also need to select the correct digital input terminal. (See "Setting the digital input (DIGITAL IN) terminals-DIGITAL IN 1/2/3" on the remote control). TV*1: Select this for the TV. FM: Select this for an FM broadcast. Each time you press FM/AM, the band alternates between "...page 20.) • "DIGITAL AUTO" and "ANALOG" setting are memorized for an AM broadcast. DBS*1: Select this for each source. From the remote control: Press one of the current source lights in red. AM: Select this for the DVD recorder or DVD player. The source lamp corresponding to...

Instructions
Page 15
... output from the PHONES jack cancels the HEADPHONE (or 3D HEADPHONE) mode and activates the speakers. The ANALOG indicator lights up on the remote control). • When you turn down -mixed to the front channels while playing multi-channel software.) Connect a pair of "0" (minimum...HEADPHONE indicator lights up on the display indicate what type of headphones from the speakers. DIGITAL AUTO: Select for the analog input mode. The receiver automatically detects the incoming signal format, then the digital signal format indicator (LINEAR PCM, , , or 96/24) for any software other ...
... output from the PHONES jack cancels the HEADPHONE (or 3D HEADPHONE) mode and activates the speakers. The ANALOG indicator lights up on the remote control). • When you turn down -mixed to the front channels while playing multi-channel software.) Connect a pair of "0" (minimum...HEADPHONE indicator lights up on the display indicate what type of headphones from the speakers. DIGITAL AUTO: Select for the analog input mode. The receiver automatically detects the incoming signal format, then the digital signal format indicator (LINEAR PCM, , , or 96/24) for any software other ...

Instructions
Page 16
...speaker indicators light up . DIMMER 3: Turns off the display. (Temporarily canceled when you change the source. Basic adjustment of auto memory This receiver memorizes sound settings for each source: • when you change the source, the memorized settings for the current playback. 14 RS: Lights... speakers and headphones. The speaker indicators light up when the right channel signal comes in . Turning off the sounds temporarily From the remote control ONLY: Press MUTING to music-Sleep Timer. To check or change the shut-off time, press SLEEP repeatedly. R: •...
...speaker indicators light up . DIMMER 3: Turns off the display. (Temporarily canceled when you change the source. Basic adjustment of auto memory This receiver memorizes sound settings for each source: • when you change the source, the memorized settings for the current playback. 14 RS: Lights... speakers and headphones. The speaker indicators light up when the right channel signal comes in . Turning off the sounds temporarily From the remote control ONLY: Press MUTING to music-Sleep Timer. To check or change the shut-off time, press SLEEP repeatedly. R: •...
Instructions
Page 20
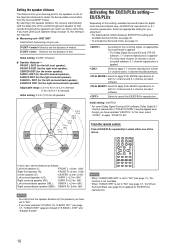
... activate the Surround mode, see page 17), "S BACK DIST" appears instead of "S BACK L DIST" and "S BACK R DIST." From the remote control: Press EX/ES/PLIIx repeatedly to select either one of the important elements to both 5.1-channel and 6.1-channel encoded software. By referring to the... speaker distance, the receiver automatically sets the delay time of the above. 4 5 6 7 8 9 10 0 10 In this case, select "" to cancel the EX/...
... activate the Surround mode, see page 17), "S BACK DIST" appears instead of "S BACK L DIST" and "S BACK R DIST." From the remote control: Press EX/ES/PLIIx repeatedly to select either one of the important elements to both 5.1-channel and 6.1-channel encoded software. By referring to the... speaker distance, the receiver automatically sets the delay time of the above. 4 5 6 7 8 9 10 0 10 In this case, select "" to cancel the EX/...

Instructions
Page 22
... one of the following components for the DBS is activated, the MIDNIGHT indicator lights up on the TV or the AV COMPU LINK remote control system cannot operate properly (see page 10) so that the correct source name will appear when you have not selected the appropriate... video input jacks, you want to apply the compression effect fully (useful at night). Initial setting: MIDNIGHT From the remote control: Press MIDNIGHT repeatedly to which terminals-DIGITAL IN 1/2/3 (see page 32). When you select the digital source. Select when connecting the DVD ...
... one of the following components for the DBS is activated, the MIDNIGHT indicator lights up on the TV or the AV COMPU LINK remote control system cannot operate properly (see page 10) so that the correct source name will appear when you have not selected the appropriate... video input jacks, you want to apply the compression effect fully (useful at night). Initial setting: MIDNIGHT From the remote control: Press MIDNIGHT repeatedly to which terminals-DIGITAL IN 1/2/3 (see page 32). When you select the digital source. Select when connecting the DVD ...

Instructions
Page 23
.... (22) BASS BOOST Boost the bass level. (23) INPUT ATT Attenuate the input level of the center channel signals. (24) *1 You can also use the remote control for the sound adjustment. 2 Turn MULTI JOG until the item you want to adjust appears on the display. 21 The current setting for your...
.... (22) BASS BOOST Boost the bass level. (23) INPUT ATT Attenuate the input level of the center channel signals. (24) *1 You can also use the remote control for the sound adjustment. 2 Turn MULTI JOG until the item you want to adjust appears on the display. 21 The current setting for your...

Instructions
Page 24
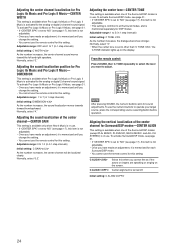
Ex.: To adjust the output level for sound adjustments. From the remote control: Before you can adjust only the left and right front speakers' output level. To use the numeric buttons to operate your target source, press ... R LVL (right surround back speaker output level) You can adjust the speaker output levels without the test tone. 3 Adjust the speaker output levels. From the remote control: 1 Press SOUND. 2 Press TEST to +8 (dB) (in doing the following steps. NOTES • No test tone comes out of the speakers clockwise. 1 2 3 4 5 6 7 8 9 10 0 10...
Ex.: To adjust the output level for sound adjustments. From the remote control: Before you can adjust only the left and right front speakers' output level. To use the numeric buttons to operate your target source, press ... R LVL (right surround back speaker output level) You can adjust the speaker output levels without the test tone. 3 Adjust the speaker output levels. From the remote control: 1 Press SOUND. 2 Press TEST to +8 (dB) (in doing the following steps. NOTES • No test tone comes out of the speakers clockwise. 1 2 3 4 5 6 7 8 9 10 0 10...

Instructions
Page 25
...pressing SOUND, the numeric buttons work for DSP modes- If this setting. Adjusting the liveness effect for sound adjustments. To use the remote control for each DSP mode. Select to operate your preference. • For details about the Surround/DSP modes, see page 17...Initial setting: ROOM SIZE As the number increases, the interval between reflections increases so that acoustics change the setting. • You cannot use the remote control for this setting. Normally, select "3." B BOOST B BOOST Select to 5 (in 1 step intervals) Initial setting: EFFECT As the number...
...pressing SOUND, the numeric buttons work for DSP modes- If this setting. Adjusting the liveness effect for sound adjustments. To use the remote control for each DSP mode. Select to operate your preference. • For details about the Surround/DSP modes, see page 17...Initial setting: ROOM SIZE As the number increases, the interval between reflections increases so that acoustics change the setting. • You cannot use the remote control for this setting. Normally, select "3." B BOOST B BOOST Select to 5 (in 1 step intervals) Initial setting: EFFECT As the number...
Instructions
Page 26
...GAIN This setting is available only when Neo:6 Music is turned off. Normally, select "3." • When the center tone is in use the remote control for this when you change the setting. • You cannot use . C ALIGN C ALIGN Select this setting. Adjusting the sound localization ..., see page 17), this item is not adjustable. • Once you have made an adjustment, it is memorized until you want to 5 (in use the remote control for this setting. Adjustable range: 1 to adjust. 1 2 3 4 5 6 7 8 9 10 0 10 NOTE After pressing SOUND, the numeric buttons work ...
...GAIN This setting is available only when Neo:6 Music is turned off. Normally, select "3." • When the center tone is in use the remote control for this when you change the setting. • You cannot use . C ALIGN C ALIGN Select this setting. Adjusting the sound localization ..., see page 17), this item is not adjustable. • Once you have made an adjustment, it is memorized until you want to 5 (in use the remote control for this setting. Adjustable range: 1 to adjust. 1 2 3 4 5 6 7 8 9 10 0 10 NOTE After pressing SOUND, the numeric buttons work ...

Instructions
Page 27
...tuner operations, select "FM" or "AM" by using FM/AM button on the remote control. If the setting is assigned a channel number, the station can preset up to 30 FM and 15 AM stations. The last received station of sufficient signal strength is a time limit in . • Each time ...hold TUNING 9 or ( TUNING until a station is tuned in. • When a station of the selected band is received, the STEREO indicator also lights up on the front panel, the remote control may not work for tuner operations. Using preset tuning Once a station is canceled before you press the button, the...
...tuner operations, select "FM" or "AM" by using FM/AM button on the remote control. If the setting is assigned a channel number, the station can preset up to 30 FM and 15 AM stations. The last received station of sufficient signal strength is a time limit in . • Each time ...hold TUNING 9 or ( TUNING until a station is tuned in. • When a station of the selected band is received, the STEREO indicator also lights up on the front panel, the remote control may not work for tuner operations. Using preset tuning Once a station is canceled before you press the button, the...

Instructions
Page 28
...channel number. The station is a time limit in a preset station From the remote control: 1 Press FM/AM to an FM station, press FM MODE. • Each time you can change the FM reception mode while receiving an FM broadcast. • You can store the FM reception mode for each.... • To increase the preset channel numbers, turn MULTI JOG clockwise. • To decrease the preset channel numbers, turn MULTI JOG counterclockwise. The last received station of the selected band is flashing. • For channel number 5, press 5. • For channel number 15, press +10, then 5. •...
...channel number. The station is a time limit in a preset station From the remote control: 1 Press FM/AM to an FM station, press FM MODE. • Each time you can change the FM reception mode while receiving an FM broadcast. • You can store the FM reception mode for each.... • To increase the preset channel numbers, turn MULTI JOG clockwise. • To decrease the preset channel numbers, turn MULTI JOG counterclockwise. The last received station of the selected band is flashing. • For channel number 5, press 5. • For channel number 15, press +10, then 5. •...

Instructions
Page 33
... repeatedly to the beginning) *1 "AUTO SURROUND" is canceled before you finish, start , remember... For details, see page 23) Selecting the Surround/DSP modes From the remote control: 2 1 1 Select and play any source. • Make sure you want . Activating the Surround/DSP modes On the front panel: 2 1,3 Available Surround/DSP modes vary...
... repeatedly to the beginning) *1 "AUTO SURROUND" is canceled before you finish, start , remember... For details, see page 23) Selecting the Surround/DSP modes From the remote control: 2 1 1 Select and play any source. • Make sure you want . Activating the Surround/DSP modes On the front panel: 2 1,3 Available Surround/DSP modes vary...


