Instructions
Page 1
and Serial No. Serial No. Model No. AUDIO / VIDEO CONTROL RECEIVER RX-D205S / RX-D206B INSTRUCTIONS For Customer Use: Enter below the Model No. Retain this information for future reference. which are located either on the rear, bottom or side of the cabinet. LVT1556-001A [J]
and Serial No. Serial No. Model No. AUDIO / VIDEO CONTROL RECEIVER RX-D205S / RX-D206B INSTRUCTIONS For Customer Use: Enter below the Model No. Retain this information for future reference. which are located either on the rear, bottom or side of the cabinet. LVT1556-001A [J]

Instructions
Page 2
... TO RAIN OR MOISTURE. Do not expose this equipment does cause harmful interference to radio or television reception, which the receiver is intended to alert the user to persons. Attention-Touche STANDBY/ON! For Canada/pour Le Canada THIS DIGITAL APPARATUS ...ENTITLED "DIGITAL APPARATUS," ICES-003 OF THE DEPARTMENT OF COMMUNICATIONS. CAUTION To reduce the risk of Conformity: Trade Name: JVC Model Number: RX-D205S/RX-D206B Responsible Party: JVC Americas Corp. ATTENTION Afin d'éviter tout risque d'électrocution, d'incendie, etc.: 1. Ne pas enlever les vis...
... TO RAIN OR MOISTURE. Do not expose this equipment does cause harmful interference to radio or television reception, which the receiver is intended to alert the user to persons. Attention-Touche STANDBY/ON! For Canada/pour Le Canada THIS DIGITAL APPARATUS ...ENTITLED "DIGITAL APPARATUS," ICES-003 OF THE DEPARTMENT OF COMMUNICATIONS. CAUTION To reduce the risk of Conformity: Trade Name: JVC Model Number: RX-D205S/RX-D206B Responsible Party: JVC Americas Corp. ATTENTION Afin d'éviter tout risque d'électrocution, d'incendie, etc.: 1. Ne pas enlever les vis...
Instructions
Page 4
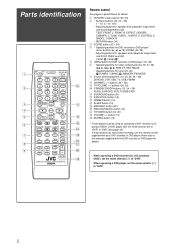
... the mode selector set the mode selector (1) to "DVD." 2 Refer also to "DVR" or "DVD" (see page 35). Parts identification 1 DVR DVD A/V CONTROL STANDBY/ON RECEIVER TEST *FRONT L *FRONT R AUDIO 1 2 3 EFFECT *CENTER *SUBWFR DVR/DVD 2 4 5 6 p C.TONE *SURR L *SURR R VCR 7 8 9 *D.EQ FREQ*S ... • Operating buttons for DVD recorder or DVD player* cursor buttons (3, 2, 5, ∞), ENTER (35, 38) • Adjusting buttons for JVC products ONLY), set the mode selector (1) to "DVR." • When operating a DVD player, set to the manuals supplied with your DVD recorder ...
... the mode selector set the mode selector (1) to "DVD." 2 Refer also to "DVR" or "DVD" (see page 35). Parts identification 1 DVR DVD A/V CONTROL STANDBY/ON RECEIVER TEST *FRONT L *FRONT R AUDIO 1 2 3 EFFECT *CENTER *SUBWFR DVR/DVD 2 4 5 6 p C.TONE *SURR L *SURR R VCR 7 8 9 *D.EQ FREQ*S ... • Operating buttons for DVD recorder or DVD player* cursor buttons (3, 2, 5, ∞), ENTER (35, 38) • Adjusting buttons for JVC products ONLY), set the mode selector (1) to "DVR." • When operating a DVD player, set to the manuals supplied with your DVD recorder ...

Instructions
Page 5
... OUT (REC), DVR OUT (REC) 8 SUBWOOFER OUT jack (6) 9 Speakers terminals (6) SURROUND BACK SPEAKERS, SURROUND SPEAKERS, CENTER SPEAKER, FRONT SPEAKERS 3 Front panel 1 2 345 AUDIO/VIDEO CONTROL RECEIVER STANDBY/ON DIMMER SETTING ADJUST SURROUND PHONES USB 6 DVR/DVD VCR DBS TV USB FM/AM 7 8 9 SET / TUNER PRESET SOURCE SELECTOR / MULTI JOG MASTER VOLUME...
... OUT (REC), DVR OUT (REC) 8 SUBWOOFER OUT jack (6) 9 Speakers terminals (6) SURROUND BACK SPEAKERS, SURROUND SPEAKERS, CENTER SPEAKER, FRONT SPEAKERS 3 Front panel 1 2 345 AUDIO/VIDEO CONTROL RECEIVER STANDBY/ON DIMMER SETTING ADJUST SURROUND PHONES USB 6 DVR/DVD VCR DBS TV USB FM/AM 7 8 9 SET / TUNER PRESET SOURCE SELECTOR / MULTI JOG MASTER VOLUME...

Instructions
Page 6
...obtain sufficient cooling effect. If anything is level and protected from the wall outlet. Poor ventilation could cause overheating and damage the receiver. • Leave sufficient distance between -5˚C and 35˚C (23˚F and 95˚F). • Make sure there is good ... consumed while the power cord is turned on the back of the remote control decreases, replace the batteries. Locations • Install the receiver in a location that look similar may differ in voltage. • Always replace both batteries at the remote sensor on travel or otherwise...
...obtain sufficient cooling effect. If anything is level and protected from the wall outlet. Poor ventilation could cause overheating and damage the receiver. • Leave sufficient distance between -5˚C and 35˚C (23˚F and 95˚F). • Make sure there is good ... consumed while the power cord is turned on the back of the remote control decreases, replace the batteries. Locations • Install the receiver in a location that look similar may differ in voltage. • Always replace both batteries at the remote sensor on travel or otherwise...

Instructions
Page 9
... (Y, PB, PR) jacks, connect them using a stereo audio cable as a graphic equalizer between the source components and this receiver, the sound output through this receiver may be distorted. DO NOT use the digital coaxial terminal (DIGITAL IN 1 (DVR/DVD)). See page 20 for DVD recorder... • When using an Svideo cable (not supplied) or component video cable (not supplied). Turn off all connections are connected to the receiver through the video terminals of different type, you cannot record the picture. Therefore, if a recording video component and a playing video component are...
... (Y, PB, PR) jacks, connect them using a stereo audio cable as a graphic equalizer between the source components and this receiver, the sound output through this receiver may be distorted. DO NOT use the digital coaxial terminal (DIGITAL IN 1 (DVR/DVD)). See page 20 for DVD recorder... • When using an Svideo cable (not supplied) or component video cable (not supplied). Turn off all connections are connected to the receiver through the video terminals of different type, you cannot record the picture. Therefore, if a recording video component and a playing video component are...

Instructions
Page 12
...98 SE*, Windows® Me*, Windows® 2000*, or Windows® XP* and prepare its CD-ROM. You can connect your PC to this receiver. If your PC. Before connecting a digital optical cable, unplug the protective plug. 4. To reproduce the digital sound, use with a USB terminal on ... IN terminals-one digital coaxial terminal and two digital optical terminals. Digital connection This receiver is equipped with the CD-ROM drive is described using a digital optical cable (not supplied). Turn on the receiver, and select the source as described on page 20. • Select the correct...
...98 SE*, Windows® Me*, Windows® 2000*, or Windows® XP* and prepare its CD-ROM. You can connect your PC to this receiver. If your PC. Before connecting a digital optical cable, unplug the protective plug. 4. To reproduce the digital sound, use with a USB terminal on ... IN terminals-one digital coaxial terminal and two digital optical terminals. Digital connection This receiver is equipped with the CD-ROM drive is described using a digital optical cable (not supplied). Turn on the receiver, and select the source as described on page 20. • Select the correct...

Instructions
Page 13
... Manager] = [Sound, video and game controllers] and [Universal Serial Bus controllers]. • The following cases: - NOTES • DO NOT turn off the receiver or disconnect the USB cable while installing the drivers and for playback through the USB connection. CAUTIONS: • Do not touch the power cord with...yet, restart Windows. • The installed drivers can be recognized only when the USB cable is connected between the PC and the receiver while the receiver is damaged, consult a dealer and have the power cord replaced with the USB device. - The power cord may cause noise ...
... Manager] = [Sound, video and game controllers] and [Universal Serial Bus controllers]. • The following cases: - NOTES • DO NOT turn off the receiver or disconnect the USB cable while installing the drivers and for playback through the USB connection. CAUTIONS: • Do not touch the power cord with...yet, restart Windows. • The installed drivers can be recognized only when the USB cable is connected between the PC and the receiver while the receiver is damaged, consult a dealer and have the power cord replaced with the USB device. - The power cord may cause noise ...

Instructions
Page 15
...the range of "0" (minimum) to "50" (maximum). For details, see page 28. • Disconnecting a pair of signal comes into the receiver. DIGITAL AUTO: Select for the analog input mode. Initial setting: DIGITAL AUTO 3 Adjust the volume To increase the volume, turn MASTER VOLUME control ... front panel to "DIGITAL AUTO." Select for the digital input mode. If the volume is automatically reset to activate the HEADPHONE mode. The receiver automatically detects the incoming signal format, then the digital signal format indicator (LINEAR PCM, , , or 96/24) for a while. CAUTION...
...the range of "0" (minimum) to "50" (maximum). For details, see page 28. • Disconnecting a pair of signal comes into the receiver. DIGITAL AUTO: Select for the analog input mode. Initial setting: DIGITAL AUTO 3 Adjust the volume To increase the volume, turn MASTER VOLUME control ... front panel to "DIGITAL AUTO." Select for the digital input mode. If the volume is automatically reset to activate the HEADPHONE mode. The receiver automatically detects the incoming signal format, then the digital signal format indicator (LINEAR PCM, , , or 96/24) for a while. CAUTION...

Instructions
Page 16
... Always lights up when the surround back channel signal comes in . • When analog input is also canceled when you operate the receiver.) DIMMER OFF: Cancels the Dimmer (normal display). Signal and speaker indicators on the display and the volume turns off the display. (...To restore the sound, press MUTING again. • Pressing VOLUME +/- (or turning MASTER VOLUME control on the display. Basic adjustment of auto memory This receiver memorizes sound settings for each source: • Analog/digital input mode (see page 12) • Bass boost (see page 23) • Digital ...
... Always lights up when the surround back channel signal comes in . • When analog input is also canceled when you operate the receiver.) DIMMER OFF: Cancels the Dimmer (normal display). Signal and speaker indicators on the display and the volume turns off the display. (...To restore the sound, press MUTING again. • Pressing VOLUME +/- (or turning MASTER VOLUME control on the display. Basic adjustment of auto memory This receiver memorizes sound settings for each source: • Analog/digital input mode (see page 12) • Bass boost (see page 23) • Digital ...

Instructions
Page 17
... your appropriate room size, see "Adjusting the speaker output levels" on the display. As you want to set speakers and other basic items of the receiver are explained. Basic settings 3 Turn MULTI JOG to select the appropriate number of the setting process. • Once Quick Speaker Setup is performed, the speaker...
... your appropriate room size, see "Adjusting the speaker output levels" on the display. As you want to set speakers and other basic items of the receiver are explained. Basic settings 3 Turn MULTI JOG to select the appropriate number of the setting process. • Once Quick Speaker Setup is performed, the speaker...
Instructions
Page 20
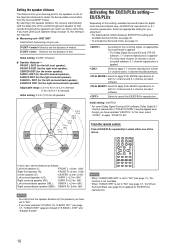
... 7 Speaker distance- Select to apply 7.1-channel reproduction to both 5.1-channel and 6.1-channel encoded software. Select to apply PLIIx MUSIC reproduction to the speaker distance, the receiver automatically sets the delay time of "S BACK L DIST" and "S BACK R DIST."
... 7 Speaker distance- Select to apply 7.1-channel reproduction to both 5.1-channel and 6.1-channel encoded software. Select to apply PLIIx MUSIC reproduction to the speaker distance, the receiver automatically sets the delay time of "S BACK L DIST" and "S BACK R DIST."

Instructions
Page 21
... inches). DTS multi channel software When playing analog source or linear PCM software, no bass elements are emitted through the subwoofer. When the receiver detects Dual Mono signals, the DUAL MONO indicator lights up while playing back these channels. Initial setting: D MONO * Dual Mono signals ...for TV programs. So this setting does not take effect ("CROSS OFF" appears). To use a small speaker in any position, this receiver automatically reallocates the bass sound elements assigned to the small speaker to eliminate distortion. • This function takes effect only when the ...
... inches). DTS multi channel software When playing analog source or linear PCM software, no bass elements are emitted through the subwoofer. When the receiver detects Dual Mono signals, the DUAL MONO indicator lights up while playing back these channels. Initial setting: D MONO * Dual Mono signals ...for TV programs. So this setting does not take effect ("CROSS OFF" appears). To use a small speaker in any position, this receiver automatically reallocates the bass sound elements assigned to the small speaker to eliminate distortion. • This function takes effect only when the ...

Instructions
Page 27
... the FM reception mode you hold TUNING 9 or ( TUNING until a station is tuned in . • Each time you finish, start , remember... The last received station of sufficient signal strength is tuned in, the TUNED indicator lights up on the display. • When an FM stereo program is tuned in... . • When a station of the selected band is received, the STEREO indicator also lights up to 30 FM and 15 AM stations. ANALOG L R S.WFR TUNED STEREO AUTO MUTING MHz 2 Press repeatedly or hold ...
... the FM reception mode you hold TUNING 9 or ( TUNING until a station is tuned in . • Each time you finish, start , remember... The last received station of sufficient signal strength is tuned in, the TUNED indicator lights up on the display. • When an FM stereo program is tuned in... . • When a station of the selected band is received, the STEREO indicator also lights up to 30 FM and 15 AM stations. ANALOG L R S.WFR TUNED STEREO AUTO MUTING MHz 2 Press repeatedly or hold ...

Instructions
Page 28
...SOURCE SELECTOR to suppress static noise between "FM" and "AM." "P" appears on the display. The selected channel number stops flashing. The last received station of the selected band is tuned in and the numeric buttons now work for selecting preset channels. 3 Turn MULTI JOG to select a... • For channel number 15, press +10, then 5. • For channel number 30, press +10, +10, then 10. The last received station of the selected band is assigned to the selected channel number. 5 Repeat steps 1 to improve the reception (but stereo effect will hear stereo sound...
...SOURCE SELECTOR to suppress static noise between "FM" and "AM." "P" appears on the display. The selected channel number stops flashing. The last received station of the selected band is tuned in and the numeric buttons now work for selecting preset channels. 3 Turn MULTI JOG to select a... • For channel number 15, press +10, then 5. • For channel number 30, press +10, +10, then 10. The last received station of the selected band is assigned to the selected channel number. 5 Repeat steps 1 to improve the reception (but stereo effect will hear stereo sound...

Instructions
Page 29
...When Dolby Pro Logic II is a multi-channel playback format to reproduce impressive multi-channel sound, reaching you can feel in this receiver can enjoy wide and deep sounds. Therefore, called "surround back." based conversion method used for Dolby Pro Logic II makes no...display. PLII MOVIE PLII MUSIC PLII GAME Suitable for playing any Dolby Surround encoded software. Creating realistic sound fields Reproducing theater ambience In a movie theater, many speakers, sound localization and sound movement can be expressed. With these newly added surround back channels can reproduce ...
...When Dolby Pro Logic II is a multi-channel playback format to reproduce impressive multi-channel sound, reaching you can feel in this receiver can enjoy wide and deep sounds. Therefore, called "surround back." based conversion method used for Dolby Pro Logic II makes no...display. PLII MOVIE PLII MUSIC PLII GAME Suitable for playing any Dolby Surround encoded software. Creating realistic sound fields Reproducing theater ambience In a movie theater, many speakers, sound localization and sound movement can be expressed. With these newly added surround back channels can reproduce ...

Instructions
Page 30
...up on the display. 3D HEADPHONE mode If you want to listen to (see page 17), JVC's original 3D-PHONIC processing (which enables it to add breadth and depth to 2 channels with 44.1 kHz at home. You can select either "SURROUND SPK" or "CENTER SPK" is set to "" in ... impression and space expression by using Surround mode, the sounds come out of this receiver. (See page 10.) ■ DTS** DTS is a multi-channel digital signal format (fs 96 kHz/24 bits) introduced by Digital Theater Systems, Inc., and enables multi-channel encoding and decoding (1ch up on the ...
...up on the display. 3D HEADPHONE mode If you want to listen to (see page 17), JVC's original 3D-PHONIC processing (which enables it to add breadth and depth to 2 channels with 44.1 kHz at home. You can select either "SURROUND SPK" or "CENTER SPK" is set to "" in ... impression and space expression by using Surround mode, the sounds come out of this receiver. (See page 10.) ■ DTS** DTS is a multi-channel digital signal format (fs 96 kHz/24 bits) introduced by Digital Theater Systems, Inc., and enables multi-channel encoding and decoding (1ch up on the ...
Instructions
Page 34
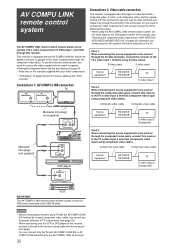
...IN" on page 20); S-video cable S-video cable Source equipment RX-D205S RX-D206B TV To video input 1 Case 2: When connecting the source equipment to the receiver through the composite video jacks, connect this receiver using cable with the monaural mini-plugs. • You can ...composite video input) using S-video cables. This receiver is equipped with the AV COMPU LINK-III, which has added a function to operate JVC's video components through the component video jacks. Component video cable Component video cable Source equipment RX-D205S RX-D206B TV To video input 2 (Component) ...
...IN" on page 20); S-video cable S-video cable Source equipment RX-D205S RX-D206B TV To video input 1 Case 2: When connecting the source equipment to the receiver through the composite video jacks, connect this receiver using cable with the monaural mini-plugs. • You can ...composite video input) using S-video cables. This receiver is equipped with the AV COMPU LINK-III, which has added a function to operate JVC's video components through the component video jacks. Component video cable Component video cable Source equipment RX-D205S RX-D206B TV To video input 2 (Component) ...

Instructions
Page 35
...play Simply by inserting a video cassette without setting other connected components first, then turn off , but continue recording. When you turn on this receiver. • When turning on the VCR, use the five basic functions listed below. One-touch video play Simply by starting playback on the ...on the VCR or on the remote control. NOTE If you turn on automatically. • If the previously selected source is selected), the receiver automatically turns on and changes the source to "DVR/DVD." The TV automatically turns on and changes the input mode to the appropriate position ...
...play Simply by inserting a video cassette without setting other connected components first, then turn off , but continue recording. When you turn on this receiver. • When turning on the VCR, use the five basic functions listed below. One-touch video play Simply by starting playback on the ...on the VCR or on the remote control. NOTE If you turn on automatically. • If the previously selected source is selected), the receiver automatically turns on and changes the source to "DVR/DVD." The TV automatically turns on and changes the input mode to the appropriate position ...

Instructions
Page 36
... the following operations: TV VOLUME +/-: TV/VIDEO: Adjust the volume on or off the VCR. Change the channel numbers. Select the channel numbers. Operating other JVC products 7 VCR 1 2 3 4 5 6 7 8 9 10 0 10 You can use the supplied remote control to operate not only this button then 3. CHANNEL +/-: 3: 7:...VCR, you can accept four types of control signals- Pause playback. Fast-wind a tape. To start recording, press this receiver but also other JVC products. • Refer also to the manual supplied with the other products, aim the remote control directly at the remote ...
... the following operations: TV VOLUME +/-: TV/VIDEO: Adjust the volume on or off the VCR. Change the channel numbers. Select the channel numbers. Operating other JVC products 7 VCR 1 2 3 4 5 6 7 8 9 10 0 10 You can use the supplied remote control to operate not only this button then 3. CHANNEL +/-: 3: 7:...VCR, you can accept four types of control signals- Pause playback. Fast-wind a tape. To start recording, press this receiver but also other JVC products. • Refer also to the manual supplied with the other products, aim the remote control directly at the remote ...


