Instructions
Page 2
.... • When the unit is on standby, the STANDBY lamp lights red. • When the unit is subject to the following measures: Reorient or relocate the receiving antenna. This equipment generates, uses and can be of sufficient magnitude to constitute a risk of Conformity Model Number: Trade Name: Responsible Party: Address: MX-C55 JVC JVC Americas Corp. 1700 Valley Road, Wayne New...
.... • When the unit is on standby, the STANDBY lamp lights red. • When the unit is subject to the following measures: Reorient or relocate the receiving antenna. This equipment generates, uses and can be of sufficient magnitude to constitute a risk of Conformity Model Number: Trade Name: Responsible Party: Address: MX-C55 JVC JVC Americas Corp. 1700 Valley Road, Wayne New...

Instructions
Page 4
... the speakers away from your dealer. 1 Precautions Installation • Do not grasp the control knobs when moving or carrying the unit. • Install in a place which are no user serviceable parts inside ...power cord and consult your unit, and retain this manual carefully and thoroughly to obtain the best possible performance from the TV to avoid interference with wet hands. For instance, we do not repeat the information about turning on/off the unit, setting the volume, changing the sound effects, and others, which is brought directly from the wall outlet. DO NOT install...
... the speakers away from your dealer. 1 Precautions Installation • Do not grasp the control knobs when moving or carrying the unit. • Install in a place which are no user serviceable parts inside ...power cord and consult your unit, and retain this manual carefully and thoroughly to obtain the best possible performance from the TV to avoid interference with wet hands. For instance, we do not repeat the information about turning on/off the unit, setting the volume, changing the sound effects, and others, which is brought directly from the wall outlet. DO NOT install...
Instructions
Page 5
... of the Buttons and Controls 3 Front Panel 3 Remote Control 5 Getting Started 6 Unpacking 6 Inserting the Batteries into the Remote Control ......... 6 Connecting Antennas 6 Connecting Speakers 7 Canceling the Display Demonstration 8 Common Operations 9 Turning On or Off the Power 9 Setting the Clock 9 Selecting the Sources 9 Adjusting the Volume 10 Reinforcing the Bass Sound 10 Enjoying the Powerful sound-SOUND TURBO ... 10 Selecting the Sound Modes 11 Turning On or Off the Key-touch Tone (BEEP) ...... 11 Listening to the Radio 12 Tuning in to a Station-Auto Search 12...
... of the Buttons and Controls 3 Front Panel 3 Remote Control 5 Getting Started 6 Unpacking 6 Inserting the Batteries into the Remote Control ......... 6 Connecting Antennas 6 Connecting Speakers 7 Canceling the Display Demonstration 8 Common Operations 9 Turning On or Off the Power 9 Setting the Clock 9 Selecting the Sources 9 Adjusting the Volume 10 Reinforcing the Bass Sound 10 Enjoying the Powerful sound-SOUND TURBO ... 10 Selecting the Sound Modes 11 Turning On or Off the Key-touch Tone (BEEP) ...... 11 Listening to the Radio 12 Tuning in to a Station-Auto Search 12...

Instructions
Page 7
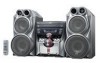
... (monaural) indicators @ Volume level, Subwoofer level, Sound Mode pattern indicators and Level meter. 4 Front Panel 1 (power) button/Sandby lamp (9) 2 ECO button (9) 3 Carrousel 4 Display window 5 CD 3 (play) button (9, 14-15, 17-18) Pressing this button also turns on the unit. 6 FM/AM button (9, 12) Pressing this button also turns on the unit. 7 USB/AUX button (9, 20-21) Pressing this button also turns on the carrousel. • The current CD No. flashes. = S. SUBWOOFER +/- CD No. (CD number) indicators •...
... (monaural) indicators @ Volume level, Subwoofer level, Sound Mode pattern indicators and Level meter. 4 Front Panel 1 (power) button/Sandby lamp (9) 2 ECO button (9) 3 Carrousel 4 Display window 5 CD 3 (play) button (9, 14-15, 17-18) Pressing this button also turns on the unit. 6 FM/AM button (9, 12) Pressing this button also turns on the unit. 7 USB/AUX button (9, 20-21) Pressing this button also turns on the carrousel. • The current CD No. flashes. = S. SUBWOOFER +/- CD No. (CD number) indicators •...

Instructions
Page 8
...) s DISPLAY button (9) d SUBWOOFER LEVEL +/- q CD 6 (play/pause) button (13-15, 17-18) Pressing this button also turns on the unit. buttons (10) f USB/AUX button (9, 20-21) Pressing this button also turns on the front panel. 5 g RESUME button (17) h RANDOM button (19) j BEEP button (11) k FADE MUTING button (10) When using the remote control, point it at the remote sensor on the unit. Remote Control 1 2 3 4 5 6 7 8 9 p q w e r t y ECO CD FM/AM USB/AUX u i o ; w REPEAT button (13, 15, 19) e PROGRAM button (18) r FM MODE button...
...) s DISPLAY button (9) d SUBWOOFER LEVEL +/- q CD 6 (play/pause) button (13-15, 17-18) Pressing this button also turns on the unit. buttons (10) f USB/AUX button (9, 20-21) Pressing this button also turns on the front panel. 5 g RESUME button (17) h RANDOM button (19) j BEEP button (11) k FADE MUTING button (10) When using the remote control, point it at the remote sensor on the unit. Remote Control 1 2 3 4 5 6 7 8 9 p q w e r t y ECO CD FM/AM USB/AUX u i o ; w REPEAT button (13, 15, 19) e PROGRAM button (18) r FM MODE button...

Instructions
Page 12
... AC power cord or if a power failure occurs The clock is on ECO standby, press ECO. To adjust the clock again If the clock has been previously adjusted, you need to set the clock whether the unit is on (and the unit starts playing the source if it is selected. • Each time you press the button, the clock/timer setting modes change as a source, press USB/ AUX...
... AC power cord or if a power failure occurs The clock is on ECO standby, press ECO. To adjust the clock again If the clock has been previously adjusted, you need to set the clock whether the unit is on (and the unit starts playing the source if it is selected. • Each time you press the button, the clock/timer setting modes change as a source, press USB/ AUX...
Instructions
Page 13
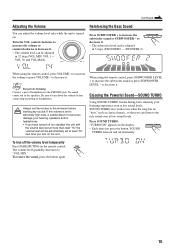
... Powerful Sound-SOUND TURBO Using SOUND TURBO, harder-hitting beats intensify your hearing, speakers and/or headphones. • If you have turned off (on standby) the unit with the volume level set at more than level "15," the volume level will be automatically set at level "15" next time you turn down the volume before starting any source. "TURBO ON" appears on the display. • Each time you can be adjusted...
... Powerful Sound-SOUND TURBO Using SOUND TURBO, harder-hitting beats intensify your hearing, speakers and/or headphones. • If you have turned off (on standby) the unit with the volume level set at more than level "15," the volume level will be automatically set at level "15" next time you turn down the volume before starting any source. "TURBO ON" appears on the display. • Each time you can be adjusted...

Instructions
Page 14
... using the remote control, press BEEP. • Each time you press the button, the surround modes change as follows: DANCE HALL STADIUM OFF (Canceled) DANCE : Increases resonance and bass. Press and hold BEEP for acoustic music. SURR. Each time you press the button, the key-touch tone turns on the display. To select the surround modes, press SURROUND MODE repeatedly until the desired sound mode appears on the display. MODE indicator also lights...
... using the remote control, press BEEP. • Each time you press the button, the surround modes change as follows: DANCE HALL STADIUM OFF (Canceled) DANCE : Increases resonance and bass. Press and hold BEEP for acoustic music. SURR. Each time you press the button, the key-touch tone turns on the display. To select the surround modes, press SURROUND MODE repeatedly until the desired sound mode appears on the display. MODE indicator also lights...
Instructions
Page 15
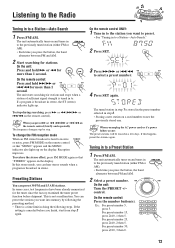
... happens, preset the stations again. If this stereo mode, you want to preset. • See "Tuning in to a Station-Auto Search." 2 Press SET. 3 Press ¢/¡ or 4/1 to the station you unplug the AC power cord or if a power failure occurs The preset stations will be erased in stereo, the ST (stereo) indicator lights up on the remote control so that "STEREO" appears on the remote control). On the remote control: Press the number button(s). To change the...
... happens, preset the stations again. If this stereo mode, you want to preset. • See "Tuning in to a Station-Auto Search." 2 Press SET. 3 Press ¢/¡ or 4/1 to the station you unplug the AC power cord or if a power failure occurs The preset stations will be erased in stereo, the ST (stereo) indicator lights up on the remote control so that "STEREO" appears on the remote control). On the remote control: Press the number button(s). To change the...
Instructions
Page 16
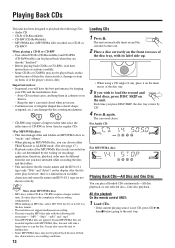
... MP3/WMA discs as the disc format. • This unit does not support multisession recording. • This unit can choose either TRACK mode or ALBUM mode. (See also page 17.) • Playback order of the MP3/WMA files (tracks) recorded on the unit. All disc playback On the remote control ONLY: 1 Load CDs. • If the current playing source is a limitation...
... MP3/WMA discs as the disc format. • This unit does not support multisession recording. • This unit can choose either TRACK mode or ALBUM mode. (See also page 17.) • Playback order of the MP3/WMA files (tracks) recorded on the unit. All disc playback On the remote control ONLY: 1 Load CDs. • If the current playing source is a limitation...

Instructions
Page 17
... the display. ALL DISC indicator • When the playback mode is the ALBUM mode (See also page 17.); Current file name, track title and artist name scroll. 3 Press one of the disc number buttons starts playing back if a CD is unavailable. 14 CD playback starts from the first track of the selected disc. • Pressing CD 6 instead of the disc number buttons (DISC1...
... the display. ALL DISC indicator • When the playback mode is the ALBUM mode (See also page 17.); Current file name, track title and artist name scroll. 3 Press one of the disc number buttons starts playing back if a CD is unavailable. 14 CD playback starts from the first track of the selected disc. • Pressing CD 6 instead of the disc number buttons (DISC1...

Instructions
Page 18
... stopped playback. When using the remote control, press ¢/¡ or 4/1. To remove the disc, press 0. To go to another CD in stop mode The selected track starts playback. 15 When using the remote control, press CD 3/8. 3 Press one particular disc to be played back. One disc playback When 2 or 3 CDs are loaded on the disc trays, you can select one of the disc number buttons (DISC1, DISC2...
... stopped playback. When using the remote control, press ¢/¡ or 4/1. To remove the disc, press 0. To go to another CD in stop mode The selected track starts playback. 15 When using the remote control, press CD 3/8. 3 Press one particular disc to be played back. One disc playback When 2 or 3 CDs are loaded on the disc trays, you can select one of the disc number buttons (DISC1, DISC2...

Instructions
Page 20
... the disc number buttons (or DISC SKIP on the remote control), you stop mode or during playing an MP3/WMA disc. • Each time you unplug the AC power cord The resume play an MP3/WMA disc according to on and off alternately. Pressing the number button(s) allows you to start playback again from the beginning of MP3/WMA disc. Changing the MP3/WMA Playback Mode When playing an...
... the disc number buttons (or DISC SKIP on the remote control), you stop mode or during playing an MP3/WMA disc. • Each time you unplug the AC power cord The resume play an MP3/WMA disc according to on and off alternately. Pressing the number button(s) allows you to start playback again from the beginning of MP3/WMA disc. Changing the MP3/WMA Playback Mode When playing an...

Instructions
Page 21
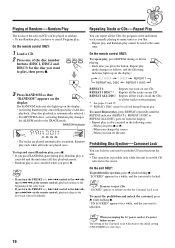
...; Pressing CD 3 (CD 6 on the remote control) starts Program play from the program. Continued Programming the Playing Order of the Tracks --Program Play You can arrange the order of the tracks to enter the desired track number. The PROGRAM indicator also lights up on the display. To use Repeat play (see page 19) for Program play is stopped. • Unplugging the AC power cord or ejecting the carrousel will...
...; Pressing CD 3 (CD 6 on the remote control) starts Program play from the program. Continued Programming the Playing Order of the Tracks --Program Play You can arrange the order of the tracks to enter the desired track number. The PROGRAM indicator also lights up on the display. To use Repeat play (see page 19) for Program play is stopped. • Unplugging the AC power cord or ejecting the carrousel will...
Instructions
Page 22
... AC power cord or if a power failure occurs The setting of the Carrousel Lock will return to the TRACK mode. The RANDOM indicator also lights up on the display: ALL DISC* 1 DISC* REPEAT 1 REPEAT ALL DISC REPEAT 1 DISC 3 Press RANDOM so that the Carrousel Lock is unlocked. On the remote control ONLY: To repeat play, press REPEAT during or before playing. • Each time you press the button, Repeat play mode changes...
... AC power cord or if a power failure occurs The setting of the Carrousel Lock will return to the TRACK mode. The RANDOM indicator also lights up on the display: ALL DISC* 1 DISC* REPEAT 1 REPEAT ALL DISC REPEAT 1 DISC 3 Press RANDOM so that the Carrousel Lock is unlocked. On the remote control ONLY: To repeat play, press REPEAT during or before playing. • Each time you press the button, Repeat play mode changes...
Instructions
Page 23
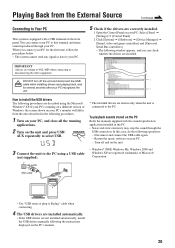
.... - Turn off the unit and disconnect the USB cable while installing drivers and playing back, and for the first time, follow the procedures below. • The system cannot send any signal or data to your PC. 5 Check if the drivers are correctly installed. 1 Open the Control Panel on your PC: Select [Start] = [Settings] = [Control Panel] 2 Click [System] = [Hardware] = [Device Manager] = [Sound, video and game controllers] and [Universal Serial Bus controllers] •...
.... - Turn off the unit and disconnect the USB cable while installing drivers and playing back, and for the first time, follow the procedures below. • The system cannot send any signal or data to your PC. 5 Check if the drivers are correctly installed. 1 Open the Control Panel on your PC: Select [Start] = [Settings] = [Control Panel] 2 Click [System] = [Hardware] = [Device Manager] = [Sound, video and game controllers] and [Universal Serial Bus controllers] •...

Instructions
Page 25
... before you want to play : - Make sure there is operating). TUNER AM : tunes in proceeding the following steps. How Daily Timer actually works The unit automatically turns on, sets the volume level to play: - If the setting is a time limit in to a specified preset AM station. = go to turn on the display. Before using the external component as the source to the preset level, and starts playing the specified source when the on...
... before you want to play : - Make sure there is operating). TUNER AM : tunes in proceeding the following steps. How Daily Timer actually works The unit automatically turns on, sets the volume level to play: - If the setting is a time limit in to a specified preset AM station. = go to turn on the display. Before using the external component as the source to the preset level, and starts playing the specified source when the on...
Instructions
Page 26
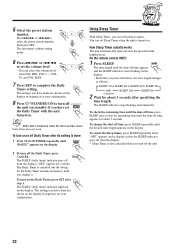
... work. The settings you have done are shown on . On the remote control ONLY: 1 Press SLEEP. The time length until the shut-off from VOL MIN, VOL 1 - The SLEEP indicator stops flashing and remains lit. The settings you can select the volume level from the display ("OFF" appears for about 3 seconds after the specified time length passes. 5 Select the preset station number. You can set the volume level...
... work. The settings you have done are shown on . On the remote control ONLY: 1 Press SLEEP. The time length until the shut-off from VOL MIN, VOL 1 - The SLEEP indicator stops flashing and remains lit. The settings you can select the volume level from the display ("OFF" appears for about 3 seconds after the specified time length passes. 5 Select the preset station number. You can set the volume level...

Instructions
Page 28
... the best position. Clean or replace the disc. (See page 24.) • Plug the AC power cord. • Unlock the carrousel. (See page 19.) Place the disc with ISO 9660 Level 1 or Level 2. On the unit ONLY: While in . • The carrousel is not plugged in standby, press and hold SOUND TURBO until the display flashes. If you cannot solve the problem from the remote control. Cause Other buttons...
... the best position. Clean or replace the disc. (See page 24.) • Plug the AC power cord. • Unlock the carrousel. (See page 19.) Place the disc with ISO 9660 Level 1 or Level 2. On the unit ONLY: While in . • The carrousel is not plugged in standby, press and hold SOUND TURBO until the display flashes. If you cannot solve the problem from the remote control. Cause Other buttons...

Instructions
Page 29
... with no more than 10% total harmonic distortion Audio input sensitivity/Impedance (at 1 kHz, measured at MAIN SPEAKERS) AUX : 400 mV/47 kΩ USB : USB Version 1.1 Speakers/Impedance : Subwoofers : 3 Ω - 6 Ω Main speakers : 6 Ω - 16 Ω Tuner FM tuning range : AM tuning range: 87.50 MHz - 108.00 MHz 530 kHz - 1 710 kHz CD player CD Capacity : Dynamic range : Signal-to change without notice. 26
... with no more than 10% total harmonic distortion Audio input sensitivity/Impedance (at 1 kHz, measured at MAIN SPEAKERS) AUX : 400 mV/47 kΩ USB : USB Version 1.1 Speakers/Impedance : Subwoofers : 3 Ω - 6 Ω Main speakers : 6 Ω - 16 Ω Tuner FM tuning range : AM tuning range: 87.50 MHz - 108.00 MHz 530 kHz - 1 710 kHz CD player CD Capacity : Dynamic range : Signal-to change without notice. 26


