
Instructions
Page 1
Staple your television (located at the rear of this user's guide in a convenient place for future use. LCD Television Users Guide LT-42X579 LT-47X579 LT-42EM59 LT-47EM59 1080p HDTV Important Note: In the spaces below, enter the model and serial number of your sales receipt or invoice to the inside cover of the television cabinet). Keep the carton and original packaging for future reference. Serial Number: Model Number: LCT2387-001A-A 0208KTH-II-IM Keep this guide.
Staple your television (located at the rear of this user's guide in a convenient place for future use. LCD Television Users Guide LT-42X579 LT-47X579 LT-42EM59 LT-47EM59 1080p HDTV Important Note: In the spaces below, enter the model and serial number of your sales receipt or invoice to the inside cover of the television cabinet). Keep the carton and original packaging for future reference. Serial Number: Model Number: LCT2387-001A-A 0208KTH-II-IM Keep this guide.
Instructions
Page 2
...Mode 30 Auto Scan 30 Add Channel 31 Edit Channel 31 V-Chip 31 Guide 31 TV (V-Chip 32 Password 33 MPAA 33 Can. Fre 35 TVPG 36 Sound 37 MTS...41 Auto Demo 41 Optical Out 41 Connecting Your Devices . . . . . 42 Troubleshooting 47 Specifications 49 Warranty 50 2 Table of Contents Warnings 3 Precautions 6 Remote Control 10 TV Basic Controls 12 Setup 16 Initial Setup 16 Key Features 18 Remote Control Functions .... Sound 20 Video 20 Guide 21 SUB CH 21 ML/MTS 21 Customizing your TV 22 Picture 23 Video Status 23 Color Temp 24 Color Management 24 Dynamic Gamma 24...
...Mode 30 Auto Scan 30 Add Channel 31 Edit Channel 31 V-Chip 31 Guide 31 TV (V-Chip 32 Password 33 MPAA 33 Can. Fre 35 TVPG 36 Sound 37 MTS...41 Auto Demo 41 Optical Out 41 Connecting Your Devices . . . . . 42 Troubleshooting 47 Specifications 49 Warranty 50 2 Table of Contents Warnings 3 Precautions 6 Remote Control 10 TV Basic Controls 12 Setup 16 Initial Setup 16 Key Features 18 Remote Control Functions .... Sound 20 Video 20 Guide 21 SUB CH 21 ML/MTS 21 Customizing your TV 22 Picture 23 Video Status 23 Color Temp 24 Color Management 24 Dynamic Gamma 24...

Instructions
Page 3
...serviceable parts inside. The exclamation point within the product's enclosure that this TV set for energy efficiency. 3 Operate only from the AC outlet and antenna...the blades can be fully inserted to prevent blade exposure. • As an "ENERGY STAR®" partner, JVC has determined that may be sure to constitute a risk of trouble, unplug the unit and call a service ... where good ventilation is intended to alert the user to persons. Changes or modifications not approved by JVC could void the warranty. * When you don't use this polarized plug with arrowhead symbol, within an...
...serviceable parts inside. The exclamation point within the product's enclosure that this TV set for energy efficiency. 3 Operate only from the AC outlet and antenna...the blades can be fully inserted to prevent blade exposure. • As an "ENERGY STAR®" partner, JVC has determined that may be sure to constitute a risk of trouble, unplug the unit and call a service ... where good ventilation is intended to alert the user to persons. Changes or modifications not approved by JVC could void the warranty. * When you don't use this polarized plug with arrowhead symbol, within an...
Instructions
Page 4
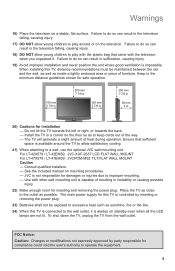
Install in accordance with the manufacturer's instructions. 8) Do not install near water. 6) Clean only with the apparatus. A grounding type plug has two blades and a third grounding prong. Servicing is required when the apparatus has been damaged in your community due to avoid injury from being walked on the apparatus. 4 For disposal or recycling information, please contact your local authorities or for USA, the Electronic Industries Alliance: http://www.eiae.org IMPORTANT SAFETY INSTRUCTIONS 1) Read these instructions. 2) Keep these materials may be placed on or pinched particularly...
Install in accordance with the manufacturer's instructions. 8) Do not install near water. 6) Clean only with the apparatus. A grounding type plug has two blades and a third grounding prong. Servicing is required when the apparatus has been damaged in your community due to avoid injury from being walked on the apparatus. 4 For disposal or recycling information, please contact your local authorities or for USA, the Electronic Industries Alliance: http://www.eiae.org IMPORTANT SAFETY INSTRUCTIONS 1) Read these instructions. 2) Keep these materials may be placed on or pinched particularly...
Instructions
Page 5
... be maintained between the set and the wall, as well as possible. Consult qualified installers. - To shut down the TV, unplug the TV from the wall outlet. For LT-42X579 / LT-42EM59: JVC-XUF-2637 LCD FLAT WALL MOUNT For LT-47X579 / LT-47EM59: JVCPCM-MS2 TILT/FLAT WALL MOUNT Caution - Place the... TV as close to the wall outlet, it . Keep to the minimum distance guidelines shown for safe operation. 150 mm 5 7/8 in 200 mm 7 ...
... be maintained between the set and the wall, as well as possible. Consult qualified installers. - To shut down the TV, unplug the TV from the wall outlet. For LT-42X579 / LT-42EM59: JVC-XUF-2637 LCD FLAT WALL MOUNT For LT-47X579 / LT-47EM59: JVCPCM-MS2 TILT/FLAT WALL MOUNT Caution - Place the... TV as close to the wall outlet, it . Keep to the minimum distance guidelines shown for safe operation. 150 mm 5 7/8 in 200 mm 7 ...

Instructions
Page 6
... will likely mean there are not limited to scan or "surf". To avoid this, mix your cable company for their JVC TV remote control to select channels. TV on your television's Channel Summary and they will appear in between those that this may cause but it is receiving through...be marked as available for any inconvenience this is not a malfunction of time can contact your viewing pattern. Avoiding Temporary Burn-in image on TV off XYZ XYZ 6 Even though every channel is detected and appears as available, you wish to the following: • Stock-market report...
... will likely mean there are not limited to scan or "surf". To avoid this, mix your cable company for their JVC TV remote control to select channels. TV on your television's Channel Summary and they will appear in between those that this may cause but it is receiving through...be marked as available for any inconvenience this is not a malfunction of time can contact your viewing pattern. Avoiding Temporary Burn-in image on TV off XYZ XYZ 6 Even though every channel is detected and appears as available, you wish to the following: • Stock-market report...
Instructions
Page 7
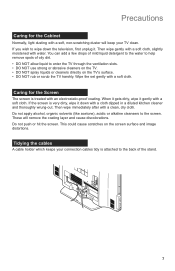
... duster will remove the coating layer and cause discolorations. Do not push or hit the screen. Tidying the cables A cable holder which keeps your TV clean. Wipe the set gently with a clean, dry cloth. These will keep your connection cables tidy is attached to the back of oily dirt...DO NOT allow liquid to wipe down with a soft cloth. Then wipe immediately after with a soft cloth. This could cause scratches on the TV's surface. • DO NOT rub or scrub the TV harshly. Precautions Caring for the Screen The screen is treated with water. If you wish to enter the...
... duster will remove the coating layer and cause discolorations. Do not push or hit the screen. Tidying the cables A cable holder which keeps your TV clean. Wipe the set gently with a clean, dry cloth. These will keep your connection cables tidy is attached to the back of oily dirt...DO NOT allow liquid to wipe down with a soft cloth. Then wipe immediately after with a soft cloth. This could cause scratches on the TV's surface. • DO NOT rub or scrub the TV harshly. Precautions Caring for the Screen The screen is treated with water. If you wish to enter the...

Instructions
Page 8
Precautions Disconnecting the stand If you disconnect the stand, attach the bottom cover and the screw (supplied) into the hole. 1) Place the TV face down on a soft cloth on a table. 2) Remove the six screws from the back of the TV. 3) Pull out the stand from 3) to 1). 8 Note: • To re-install the stand, reverse the procedure from the TV.
Precautions Disconnecting the stand If you disconnect the stand, attach the bottom cover and the screw (supplied) into the hole. 1) Place the TV face down on a soft cloth on a table. 2) Remove the six screws from the back of the TV. 3) Pull out the stand from 3) to 1). 8 Note: • To re-install the stand, reverse the procedure from the TV.
Instructions
Page 9
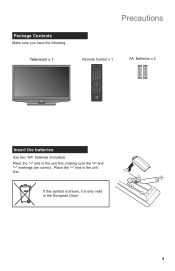
Place the "-" end in the European Union 9 If this symbol is shown, it is only valid in the unit first, making sure the "+" and "-" markings are correct. Place the "-" end in the unit first. Television x 1 Precautions Remote Control x 1 AA Batteries x 2 + AA Alkaline - + AA Alkaline - Package Contents Make sure you have the following. Insert the batteries Use two "AA" batteries (included).
Place the "-" end in the European Union 9 If this symbol is shown, it is only valid in the unit first, making sure the "+" and "-" markings are correct. Place the "-" end in the unit first. Television x 1 Precautions Remote Control x 1 AA Batteries x 2 + AA Alkaline - + AA Alkaline - Package Contents Make sure you have the following. Insert the batteries Use two "AA" batteries (included).
Instructions
Page 10
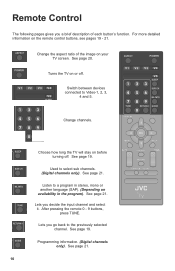
.... See page 21. Lets you decide the input channel and select it. See page 20. Turns the TV on or off . Remote Control The following pages gives you a brief description of the image on your TV screen. Change the aspect ratio of each button's function. After pressing the remote 0 - 9 buttons, press TUNE... availability in stereo, mono or another language (SAP). (Depending on the remote control buttons, see pages 19 - 21. See page 21. Choose how long the TV will stay on before turning off . Programming information. (Digital channels only).
.... See page 21. Lets you decide the input channel and select it. See page 20. Turns the TV on or off . Remote Control The following pages gives you a brief description of the image on your TV screen. Change the aspect ratio of each button's function. After pressing the remote 0 - 9 buttons, press TUNE... availability in stereo, mono or another language (SAP). (Depending on the remote control buttons, see pages 19 - 21. See page 21. Choose how long the TV will stay on before turning off . Programming information. (Digital channels only).

Instructions
Page 11
... 0. See page 20. 11 Save your favorite channels. Choose different display settings according to access the TV's onscreen menus. Used to select the mode of sound frequencies. See page 22. Move sequentially through the TV's onscreen menus. Raise or lower the volume. Choose several types of closed caption Used to personal preferences...
... 0. See page 20. 11 Save your favorite channels. Choose different display settings according to access the TV's onscreen menus. Used to select the mode of sound frequencies. See page 22. Move sequentially through the TV's onscreen menus. Raise or lower the volume. Choose several types of closed caption Used to personal preferences...
Instructions
Page 12
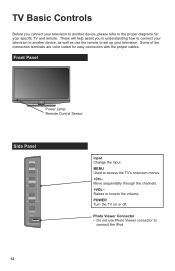
... input MENU Used to set up your television. Photo Viewer Connector • Do not use the remote to access the TV's onscreen menus. +CH- POWER Turn the TV on or off. TV Basic Controls Before you in understanding how to connect your television to another device, please refer to connect the iPod 12...
... input MENU Used to set up your television. Photo Viewer Connector • Do not use the remote to access the TV's onscreen menus. +CH- POWER Turn the TV on or off. TV Basic Controls Before you in understanding how to connect your television to another device, please refer to connect the iPod 12...

Instructions
Page 14
HDMI Cable, Audio Cable Input 1 + HDMI ANALOG AUDIO VIDEO and AUDIO C Component Video + Audio D S-Video + Audio E Composite Video + Audio Component Video + Audio S-Video Cable, Audio Cable Composite Video + Audio INPUT 4 or 5 INPUT 4 + AUDIO Input INPUT 4 or 5 Good Good Best AUDIO F Antenna / Cable (VHF / UHF) G OPTICAL INPUT H AUDIO INPUT (L / R) 14 RF Cable OPTICAL AUDIO Cable Audio Cable 75Ω (VHF / UHF) DIGITAL AUDIO OPTICAL OUT AUDIO OUT (L / R) TV Basic Controls Best Device Side A HDMI With Cables HDMI Cable TV Side INPUT 1, 2 or 3 B DVI + Audio DVI -
HDMI Cable, Audio Cable Input 1 + HDMI ANALOG AUDIO VIDEO and AUDIO C Component Video + Audio D S-Video + Audio E Composite Video + Audio Component Video + Audio S-Video Cable, Audio Cable Composite Video + Audio INPUT 4 or 5 INPUT 4 + AUDIO Input INPUT 4 or 5 Good Good Best AUDIO F Antenna / Cable (VHF / UHF) G OPTICAL INPUT H AUDIO INPUT (L / R) 14 RF Cable OPTICAL AUDIO Cable Audio Cable 75Ω (VHF / UHF) DIGITAL AUDIO OPTICAL OUT AUDIO OUT (L / R) TV Basic Controls Best Device Side A HDMI With Cables HDMI Cable TV Side INPUT 1, 2 or 3 B DVI + Audio DVI -

Instructions
Page 16
... Time Attribute Time Zone D.S.T. You can also set this setting in the "Plug in . Choose the time zone you live in Menu". 1) Turn on your TV with basic information for Language, Time and Tuner Setup. Changes the clock automatically for daylight saving time. Atlantic ON Next 3 Move to next menu 1 Change... settings 2 Select an item 3 Select "Next" 4 Move to next menu Time Zone D.S.T. Setup Initial setup When you setup your TV for the first time, the Initial Setup menu appears automatically. On / Off 16
... Time Attribute Time Zone D.S.T. You can also set this setting in the "Plug in . Choose the time zone you live in Menu". 1) Turn on your TV with basic information for Language, Time and Tuner Setup. Changes the clock automatically for daylight saving time. Atlantic ON Next 3 Move to next menu 1 Change... settings 2 Select an item 3 Select "Next" 4 Move to next menu Time Zone D.S.T. Setup Initial setup When you setup your TV for the first time, the Initial Setup menu appears automatically. On / Off 16

Instructions
Page 17
Initial setup (Continued) 4) Set TV attribute Set TV Attribute Tuner Mode Air Start Scan Exit Setup 1 Change settings 2 Select an item 3 Select "Start Scan" 4 Start scanning channels Tuner Mode Choose Air (antenna) or Cable * If you ! "Thank you use a set top box (satellite or cable box), press "Exit" to skip this step. This is now complete" 17 Setup is normal. Cable Users: After your auto tuner setup is complete, you may, (depending on the type of hookup), have only 1 channel, usually 2, 3 or 4 in the auto tuner memory.
Initial setup (Continued) 4) Set TV attribute Set TV Attribute Tuner Mode Air Start Scan Exit Setup 1 Change settings 2 Select an item 3 Select "Start Scan" 4 Start scanning channels Tuner Mode Choose Air (antenna) or Cable * If you ! "Thank you use a set top box (satellite or cable box), press "Exit" to skip this step. This is now complete" 17 Setup is normal. Cable Users: After your auto tuner setup is complete, you may, (depending on the type of hookup), have only 1 channel, usually 2, 3 or 4 in the auto tuner memory.
Instructions
Page 18
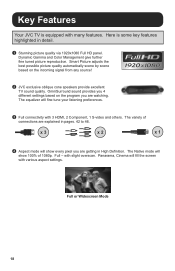
... or Widescreen Mode 18 OmniSurround sound provides you 4 different settings based on the incoming signal from any source! 2 JVC exclusive oblique cone speakers provide excellent TV sound quality. The equalizer will fill the screen with many features. Here is equipped with various aspect settings.... The variety of 1080p. Key Features Your JVC TV is some key features highlighted in pages. 42 to 46. Dynamic Gamma and Color Management give further fine tuned picture reproduction. Panarama, Cinema will...
... or Widescreen Mode 18 OmniSurround sound provides you 4 different settings based on the incoming signal from any source! 2 JVC exclusive oblique cone speakers provide excellent TV sound quality. The equalizer will fill the screen with many features. Here is equipped with various aspect settings.... The variety of 1080p. Key Features Your JVC TV is some key features highlighted in pages. 42 to 46. Dynamic Gamma and Color Management give further fine tuned picture reproduction. Panarama, Cinema will...
Instructions
Page 19
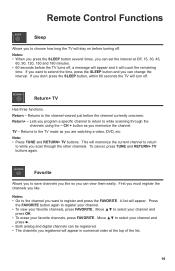
... list will turn off. Move π† to while scanning through the other channels. If you don't press the SLEEP button, within 60 seconds the TV will appear. Return+ - Favorite Allows you to the channel viewed just before turning off , a message will appear and it will stay on before the channel.... 19 This will appear in numerical order at Off, 15, 30, 45, 60, 90, 120, 150 and 180 minutes. • 60 seconds before the TV turns off . Notes: • When you press the SLEEP button several times, you can change the interval. CH + button as you are watching a video,...
... list will turn off. Move π† to while scanning through the other channels. If you don't press the SLEEP button, within 60 seconds the TV will appear. Return+ - Favorite Allows you to the channel viewed just before turning off , a message will appear and it will stay on before the channel.... 19 This will appear in numerical order at Off, 15, 30, 45, 60, 90, 120, 150 and 180 minutes. • 60 seconds before the TV turns off . Notes: • When you press the SLEEP button several times, you can change the interval. CH + button as you are watching a video,...
Instructions
Page 20
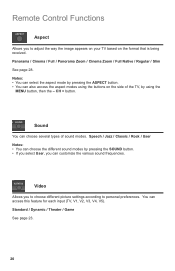
Notes: • You can select the aspect mode by pressing the ASPECT button. • You can access this feature for each input (TV, V1, V2, V3, V4, V5). Speech / Jazz / Classic / Rock / User Notes: • You can choose the different sound modes by using the buttons on the ... that is being received. Video Allows you to choose different picture settings according to adjust the way the image appears on your TV based on the side of the TV, by pressing the SOUND button. • If you select User, you can choose several types of sound modes. CH + button. Sound You...
Notes: • You can select the aspect mode by pressing the ASPECT button. • You can access this feature for each input (TV, V1, V2, V3, V4, V5). Speech / Jazz / Classic / Rock / User Notes: • You can choose the different sound modes by using the buttons on the ... that is being received. Video Allows you to choose different picture settings according to adjust the way the image appears on your TV based on the side of the TV, by pressing the SOUND button. • If you select User, you can choose several types of sound modes. CH + button. Sound You...
Instructions
Page 21
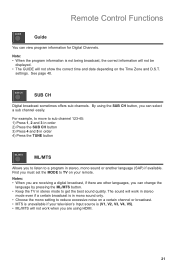
... receiving a digital broadcast, if there are using the SUB CH button, you can change the language by pressing the ML/MTS button. • Keep the TV in mono sound only. • Choose the mono setting to get the best sound quality. The sound will not show the correct time and date... ML/MTS Allows you must set the MODE to a program in stereo, mono sound or another language (SAP) if available. First you to listen to TV on your television's Input source is not being broadcast, the correct information will not be displayed. • The GUIDE will work when you are other...
... receiving a digital broadcast, if there are using the SUB CH button, you can change the language by pressing the ML/MTS button. • Keep the TV in mono sound only. • Choose the mono setting to get the best sound quality. The sound will not show the correct time and date... ML/MTS Allows you must set the MODE to a program in stereo, mono sound or another language (SAP) if available. First you to listen to TV on your television's Input source is not being broadcast, the correct information will not be displayed. • The GUIDE will work when you are other...
Instructions
Page 22
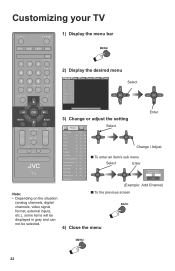
... the menu bar 2) Display the desired menu Picture Display TV Video Status Game Tint 0 - 50 - 100 Color 0 - 25 - 100 Picture 0 - 50 - 100 Bright 0 - 43 - 100 Detail 0 - 94 - 100 Backlight 0 - 50 - 100 Color Temp Cool Color ...
... the menu bar 2) Display the desired menu Picture Display TV Video Status Game Tint 0 - 50 - 100 Color 0 - 25 - 100 Picture 0 - 50 - 100 Bright 0 - 43 - 100 Detail 0 - 94 - 100 Backlight 0 - 50 - 100 Color Temp Cool Color ...