
User Guide
Page 1
Model Number: Serial Number: LCT2224-001C-A 0407TNH-II-IM LCD Flat Television Users Guide For Models: LT-42E488 LT-37E488 LT-32E488 LT-42E478 LT-37E478 LT-32E478 LT-42EX38 LT-37EX38 LT-32EX38 Illustration of LT-32E488 and RM-C1291 Important Note: In the spaces below, enter the model and serial number of your sales receipt or invoice to the inside cover of the television cabinet). Keep this guide. Staple your television (located at the rear of this user's guide in a convenient place for future use. Keep the carton and original packaging for future reference.
Model Number: Serial Number: LCT2224-001C-A 0407TNH-II-IM LCD Flat Television Users Guide For Models: LT-42E488 LT-37E488 LT-32E488 LT-42E478 LT-37E478 LT-32E478 LT-42EX38 LT-37EX38 LT-32EX38 Illustration of LT-32E488 and RM-C1291 Important Note: In the spaces below, enter the model and serial number of your sales receipt or invoice to the inside cover of the television cabinet). Keep this guide. Staple your television (located at the rear of this user's guide in a convenient place for future use. Keep the carton and original packaging for future reference.
User Guide
Page 5
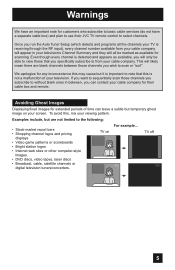
... cable company for any inconvenience this may cause but are blank channels between , you wish to select channels. We apologize for their JVC TV remote control to scan or "surf". Examples include, but it is important to the following: • Stock-market report bars ... DVD discs, video tapes, laser discs • Broadcast, cable, satellite channels or digital television tuners/converters. To avoid this is receiving through the RF input), every channel number available from your television's Channel Summary and they will only be able to view those channels you can leave ...
... cable company for any inconvenience this may cause but are blank channels between , you wish to select channels. We apologize for their JVC TV remote control to scan or "surf". Examples include, but it is important to the following: • Stock-market report bars ... DVD discs, video tapes, laser discs • Broadcast, cable, satellite channels or digital television tuners/converters. To avoid this is receiving through the RF input), every channel number available from your television's Channel Summary and they will only be able to view those channels you can leave ...
User Guide
Page 6
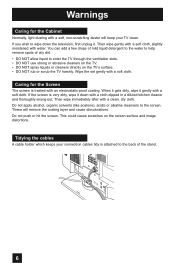
If you wish to wipe down the television, first unplug it down with water. This could cause scratches on the TV's surface. • DO NOT rub or scrub the TV harshly. When it gets dirty, wipe it gently with an electrostatic-proof coating. You can add a few drops of mild liquid detergent to the... water to help remove spots of the stand. 6 Tidying the cables A cable holder which keeps your TV clean. These will keep your connection cables tidy is attached to the back of oily dirt. • DO NOT allow liquid to enter the...
If you wish to wipe down the television, first unplug it down with water. This could cause scratches on the TV's surface. • DO NOT rub or scrub the TV harshly. When it gets dirty, wipe it gently with an electrostatic-proof coating. You can add a few drops of mild liquid detergent to the... water to help remove spots of the stand. 6 Tidying the cables A cable holder which keeps your TV clean. These will keep your connection cables tidy is attached to the back of oily dirt. • DO NOT allow liquid to enter the...
User Guide
Page 9
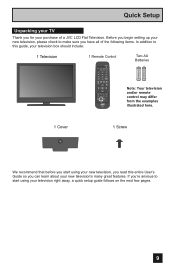
... - + AA Alkaline - Quick Setup Unpacking your TV Thank you for your purchase of the following items. In addition to this entire User's Guide so you have all of a JVC LCD Flat Television. ML/MTS DISPLAY C.C. Before you begin setting up your new television, please check to start using your new television's many great features. L FAV. Two...
... - + AA Alkaline - Quick Setup Unpacking your TV Thank you for your purchase of the following items. In addition to this entire User's Guide so you have all of a JVC LCD Flat Television. ML/MTS DISPLAY C.C. Before you begin setting up your new television, please check to start using your new television's many great features. L FAV. Two...
User Guide
Page 10
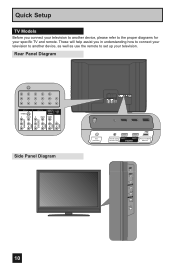
... 1 OPTICAL OUT INPUT 2 PHOTO VIEWER / SERVICE INPUT MENU + CHANNEL - Quick Setup TV Models Before you in understanding how to connect your television to another device, please refer to set up your specific TV and remote. These will help assist you connect your television to another device, as well as use the remote to the...
... 1 OPTICAL OUT INPUT 2 PHOTO VIEWER / SERVICE INPUT MENU + CHANNEL - Quick Setup TV Models Before you in understanding how to connect your television to another device, please refer to set up your specific TV and remote. These will help assist you connect your television to another device, as well as use the remote to the...
User Guide
Page 12
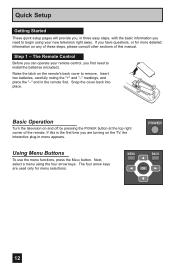
... Buttons To use the menu functions, press the MENU button. The Remote Control Before you can operate your new television right away. MENU BACK OK 12 Raise the latch on the TV, the interactive plug-in the remote first. Snap the cover back into place. Next, select a menu using ...your remote control, you need to remove. If this manual. Basic Operation Turn the television on any of these steps, please consult other...
... Buttons To use the menu functions, press the MENU button. The Remote Control Before you can operate your new television right away. MENU BACK OK 12 Raise the latch on the TV, the interactive plug-in the remote first. Snap the cover back into place. Next, select a menu using ...your remote control, you need to remove. If this manual. Basic Operation Turn the television on any of these steps, please consult other...
User Guide
Page 13
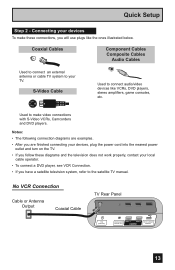
.... Notes: • The following connection diagrams are examples. • After you are finished connecting your TV. No VCR Connection Cable or Antenna Output Coaxial Cable TV Rear Panel 75 Ω (VHF/UHF) DIGITAL AUDIO INPUT 1 OPTICAL OUT INPUT 2 PHOTO VIEWER / SERVICE 13 Coaxial Cables ...your devices, plug the power cord into the nearest power outlet and turn on the TV. • If you follow these connections, you have a satellite television system, refer to make these diagrams and the television does not work properly, contact your local cable operator. • To connect a ...
.... Notes: • The following connection diagrams are examples. • After you are finished connecting your TV. No VCR Connection Cable or Antenna Output Coaxial Cable TV Rear Panel 75 Ω (VHF/UHF) DIGITAL AUDIO INPUT 1 OPTICAL OUT INPUT 2 PHOTO VIEWER / SERVICE 13 Coaxial Cables ...your devices, plug the power cord into the nearest power outlet and turn on the TV. • If you follow these connections, you have a satellite television system, refer to make these diagrams and the television does not work properly, contact your local cable operator. • To connect a ...
User Guide
Page 16
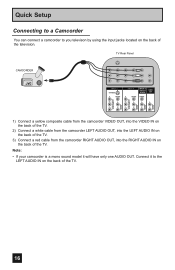
... L L L PR R R R AUDIO AUDIO AUDIO COMPONENT AUDIO COMPONENT 1) Connect a yellow composite cable from the camcorder VIDEO OUT, into the VIDEO IN on the back of the TV. 2) Connect a white cable from the camcorder LEFT AUDIO OUT, into the LEFT AUDIO IN on the back of the... RIGHT AUDIO OUT, into the RIGHT AUDIO IN on the back of the TV. 16 Note: • If your camcorder is a mono sound model it to you televison by using the input jacks located on the back of the television. Quick Setup Connecting to a Camcorder You can connect a camcorder to the LEFT...
... L L L PR R R R AUDIO AUDIO AUDIO COMPONENT AUDIO COMPONENT 1) Connect a yellow composite cable from the camcorder VIDEO OUT, into the VIDEO IN on the back of the TV. 2) Connect a white cable from the camcorder LEFT AUDIO OUT, into the LEFT AUDIO IN on the back of the... RIGHT AUDIO OUT, into the RIGHT AUDIO IN on the back of the TV. 16 Note: • If your camcorder is a mono sound model it to you televison by using the input jacks located on the back of the television. Quick Setup Connecting to a Camcorder You can connect a camcorder to the LEFT...
User Guide
Page 18
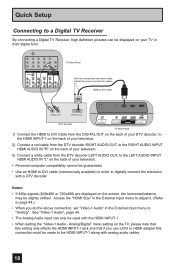
... HDMI INPUT-1. • When setting the "Video-1 Audio - Analog/Digital" menu setting on your television. • Personal computer compatibility cannot be displayed on the TV, please note that this connection must be made , tighten the screw to secure the cables. HDMI ...8226; Use an HDMI to DVI cable (commercially available) in order to digitally connect the television with analog audio cables. 18 Quick Setup Connecting to a Digital TV Receiver By connecting a Digital TV Receiver, high definition pictures can only be slightly shifted. AUDIO AUDIO AUDIO COMPONENT AUDIO COMPONENT...
... HDMI INPUT-1. • When setting the "Video-1 Audio - Analog/Digital" menu setting on your television. • Personal computer compatibility cannot be displayed on the TV, please note that this connection must be made , tighten the screw to secure the cables. HDMI ...8226; Use an HDMI to DVI cable (commercially available) in order to digitally connect the television with analog audio cables. 18 Quick Setup Connecting to a Digital TV Receiver By connecting a Digital TV Receiver, high definition pictures can only be slightly shifted. AUDIO AUDIO AUDIO COMPONENT AUDIO COMPONENT...
User Guide
Page 19
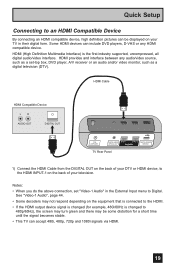
...your DTV or HDMI device, to the HDMI INPUT-1 on the back of your TV in the External Input menu to Digital. Some HDMI devices can include DVD players, D-VHS or any audio/video source, such as a digital television (DTV). See "Video-1 Audio", page 44. • Some decoders may ...be displayed on your television. Quick Setup Connecting to an HDMI Compatible Device By connecting an HDMI compatible device, high definition pictures can be some distortion for a short time until the signal becomes stable. • This TV can accept 480i, 480p, 720p and 1080i signals ...
...your DTV or HDMI device, to the HDMI INPUT-1 on the back of your TV in the External Input menu to Digital. Some HDMI devices can include DVD players, D-VHS or any audio/video source, such as a digital television (DTV). See "Video-1 Audio", page 44. • Some decoders may ...be displayed on your television. Quick Setup Connecting to an HDMI Compatible Device By connecting an HDMI compatible device, high definition pictures can be some distortion for a short time until the signal becomes stable. • This TV can accept 480i, 480p, 720p and 1080i signals ...
User Guide
Page 20
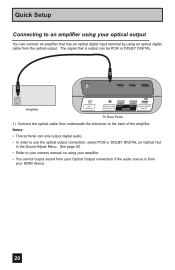
... digital audio. • In order to use the optical output connection, select PCM or DOLBY DIGITAL on using an optical digital cable from underneath the television to the back of the amplifier. Amplifier 75 Ω (VHF/UHF) DIGITAL AUDIO INPUT 1 OPTICAL OUT INPUT 2 PHOTO VIEWER / SERVICE... TV Rear Panel 1) Connect the optical cable from the optical output. The signal that has an optical digital input terminal by using your amplifier. • You ...
... digital audio. • In order to use the optical output connection, select PCM or DOLBY DIGITAL on using an optical digital cable from underneath the television to the back of the amplifier. Amplifier 75 Ω (VHF/UHF) DIGITAL AUDIO INPUT 1 OPTICAL OUT INPUT 2 PHOTO VIEWER / SERVICE... TV Rear Panel 1) Connect the optical cable from the optical output. The signal that has an optical digital input terminal by using your amplifier. • You ...
User Guide
Page 21
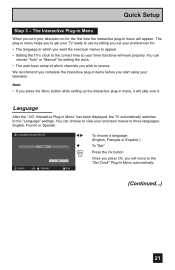
... : • The language in Menu" has been displayed, the TV automatically switches to the "Set Clock" Plug-in Menu automatically. (Continued...) 21 You can choose to receive. Quick Setup Step 3 - Language After the "JVC Interactive Plug-in which channels you set your television. The plug-in menu helps you start using your preferences...
... : • The language in Menu" has been displayed, the TV automatically switches to the "Set Clock" Plug-in Menu automatically. (Continued...) 21 You can choose to receive. Quick Setup Step 3 - Language After the "JVC Interactive Plug-in which channels you set your television. The plug-in menu helps you start using your preferences...
User Guide
Page 23
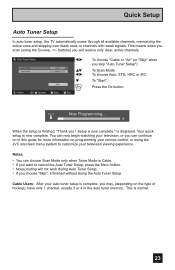
...information on in the auto tuner memory. Quick Setup Auto Tuner Setup In auto tuner setup, the TV automatically scans through all available channels, memorizing the active ones and skipping over blank ones or channels ...control, or using the CHANNEL +/- Notes: • You can continue on programming your television viewing experience. This means when you choose "Skip", it finished without doing the Auto ...you will not work during Auto Tuner Setup. • If you scan (using the JVC onscreen menu system to cancel the Auto Tuner Setup, press the MENU button. • Noise muting will...
...information on in the auto tuner memory. Quick Setup Auto Tuner Setup In auto tuner setup, the TV automatically scans through all available channels, memorizing the active ones and skipping over blank ones or channels ...control, or using the CHANNEL +/- Notes: • You can continue on programming your television viewing experience. This means when you choose "Skip", it finished without doing the Auto ...you will not work during Auto Tuner Setup. • If you scan (using the JVC onscreen menu system to cancel the Auto Tuner Setup, press the MENU button. • Noise muting will...
User Guide
Page 24
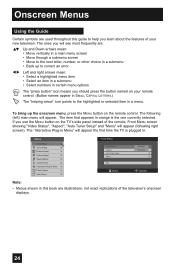
...; Move to the next letter, number, or other choice in a submenu • Back up the onscreen menu, press the MENU button on the TV's side panel instead of the television's onscreen displays. 24 Onscreen Menus Using the Guide Certain symbols are : π† √® Up and Down arrows mean : • Select...
...; Move to the next letter, number, or other choice in a submenu • Back up the onscreen menu, press the MENU button on the TV's side panel instead of the television's onscreen displays. 24 Onscreen Menus Using the Guide Certain symbols are : π† √® Up and Down arrows mean : • Select...

User Guide
Page 25
...each menu follow later in this method). 2) Press the OK button. Tuner Mode Scan Mode Cable Auto Auto • To go back to your television's operation simply and quickly. Notes: • If you do not press any buttons for a few seconds, the onscreen menu will close the ...onscreen menu system and return you make adjustments to the previous screen, press the BACK button. Onscreen Menus The Onscreen Menu System Your television comes with JVC's onscreen menu system. The onscreen menus let you to a different feature, use the π†arrows and enter by using the &#...
...each menu follow later in this method). 2) Press the OK button. Tuner Mode Scan Mode Cable Auto Auto • To go back to your television's operation simply and quickly. Notes: • If you do not press any buttons for a few seconds, the onscreen menu will close the ...onscreen menu system and return you make adjustments to the previous screen, press the BACK button. Onscreen Menus The Onscreen Menu System Your television comes with JVC's onscreen menu system. The onscreen menus let you to a different feature, use the π†arrows and enter by using the &#...

User Guide
Page 29
... (Password input screen will appear) Enter the password by using the 10 button keypad Initial Setup > V-Chip V-Chip Set US TV Ratings Set Movie Ratings Set Canadian Ratings English Set Canadian Ratings French Advanced V-Chip Rating Advanced Canadian Rating Unrated Select BACK Operate Back... ratings. Descriptions for descriptions of each of the three V-Chip formats appear in Canada. You can customize the V-Chip settings of your television to the initial Setup Menu. • To set up V-Chip ratings limits, these programs will appear when the password is correct. Note...
... (Password input screen will appear) Enter the password by using the 10 button keypad Initial Setup > V-Chip V-Chip Set US TV Ratings Set Movie Ratings Set Canadian Ratings English Set Canadian Ratings French Advanced V-Chip Rating Advanced Canadian Rating Unrated Select BACK Operate Back... ratings. Descriptions for descriptions of each of the three V-Chip formats appear in Canada. You can customize the V-Chip settings of your television to the initial Setup Menu. • To set up V-Chip ratings limits, these programs will appear when the password is correct. Note...
User Guide
Page 34
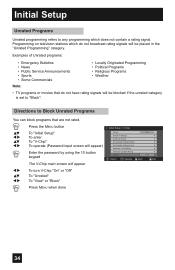
... • Sports • Some Commercials Note: • Locally Originated Programming • Political Programs • Religious Programs • Weather • TV programs or movies that are not rated. Press the MENU button π† √® π† √® To "Initial Setup...; π† √® The V-Chip main screen will be placed in the "Unrated Programming" category. Programming on television stations which does not contain a rating signal. Directions to Block Unrated Programs You can block programs that do not broadcast rating ...
... • Sports • Some Commercials Note: • Locally Originated Programming • Political Programs • Religious Programs • Weather • TV programs or movies that are not rated. Press the MENU button π† √® π† √® To "Initial Setup...; π† √® The V-Chip main screen will be placed in the "Unrated Programming" category. Programming on television stations which does not contain a rating signal. Directions to Block Unrated Programs You can block programs that do not broadcast rating ...
User Guide
Page 35
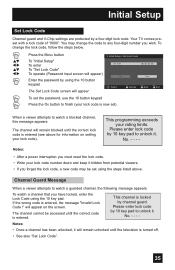
You may be accessed until the television is now set using the steps listed above for information on the screen. To change the code to any four-digit number you have locked, ...: The channel will appear) Enter the password by using the 10 key pad. will remain unlocked until the correct code is entered (see above . Your TV comes preset with a lock code of "0000". Channel Guard Message When a viewer attempts to unlock it will appear on setting your rating limits. Notes: •...
You may be accessed until the television is now set using the steps listed above for information on the screen. To change the code to any four-digit number you have locked, ...: The channel will appear) Enter the password by using the 10 key pad. will remain unlocked until the correct code is entered (see above . Your TV comes preset with a lock code of "0000". Channel Guard Message When a viewer attempts to unlock it will appear on setting your rating limits. Notes: •...
User Guide
Page 36
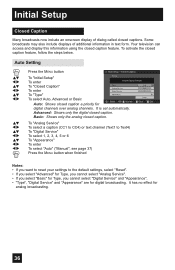
... (CC1 to CC4) or text channel (Text1 to Text4) To "Digital Service" To select 1, 2, 3, 4, 5 or 6 To "Appearance" To enter To select "Auto" ("Manual", see page 37) Press the MENU button when finished Notes: • If you want to reset your settings to the default settings, select "Reset". • If you select... feature, follow the steps below. It has no effect for analog broadcasting. 36 Some broadcasts may also include displays of dialog called closed caption. Your television can access and display this information using the closed caption a priority for digital broadcasting.
... (CC1 to CC4) or text channel (Text1 to Text4) To "Digital Service" To select 1, 2, 3, 4, 5 or 6 To "Appearance" To enter To select "Auto" ("Manual", see page 37) Press the MENU button when finished Notes: • If you want to reset your settings to the default settings, select "Reset". • If you select... feature, follow the steps below. It has no effect for analog broadcasting. 36 Some broadcasts may also include displays of dialog called closed caption. Your television can access and display this information using the closed caption a priority for digital broadcasting.

User Guide
Page 44
...menu when an HDMI 480p picture signal is being input to your DVI or HDMI component's instruction manual for HDMI. When you select "Auto", the television will select "Size1" or "Size2" automatically. There are two types of HDMI 480p picture signals: 640x480 and 720x480. Video-1 Audio This feature is... terminal. External Input HDMI Size The HDMI Size option can only be displayed when an HDMI or DVI 480p picture signal is input to your TV. π† √® π† √® Press the MENU button To "External Input" To enter To "Video-1 Audio" To select "Analog",...
...menu when an HDMI 480p picture signal is being input to your DVI or HDMI component's instruction manual for HDMI. When you select "Auto", the television will select "Size1" or "Size2" automatically. There are two types of HDMI 480p picture signals: 640x480 and 720x480. Video-1 Audio This feature is... terminal. External Input HDMI Size The HDMI Size option can only be displayed when an HDMI or DVI 480p picture signal is input to your TV. π† √® π† √® Press the MENU button To "External Input" To enter To "Video-1 Audio" To select "Analog",...

