Instruction Manual
Page 2
... you need to operate the receiver while driving, be involved in a residential installation. This will also be determined by one or more of the FCC Rules. When the temperature increases, and the operating temperature is no user serviceable parts inside the car is encouraged to try to Part 15 of the following measures: - Consult the dealer or an experienced radio/TV technician...
... you need to operate the receiver while driving, be involved in a residential installation. This will also be determined by one or more of the FCC Rules. When the temperature increases, and the operating temperature is no user serviceable parts inside the car is encouraged to try to Part 15 of the following measures: - Consult the dealer or an experienced radio/TV technician...
Instruction Manual
Page 3
... Activating the downloaded files 29 General settings - RM-RK300 7 Main elements and features 7 Getting started 8 Basic operations 8 Canceling the display demonstrations ... 9 Setting the clock 9 Radio operations 10 Listening to the radio 10 Storing stations in memory 11 Listening to a preset station 12 Disc/SD card operations ......... 13 Playing a disc in the receiver 13 Playing discs in the CD changer 14 Playing an SD card 15 Other main functions 17 Selecting the playback modes 19 Sound adjustments 21 Setting the basic sound selection menu...
... Activating the downloaded files 29 General settings - RM-RK300 7 Main elements and features 7 Getting started 8 Basic operations 8 Canceling the display demonstrations ... 9 Setting the clock 9 Radio operations 10 Listening to the radio 10 Storing stations in memory 11 Listening to a preset station 12 Disc/SD card operations ......... 13 Playing a disc in the receiver 13 Playing discs in the CD changer 14 Playing an SD card 15 Other main functions 17 Selecting the playback modes 19 Sound adjustments 21 Setting the basic sound selection menu...
Instruction Manual
Page 4
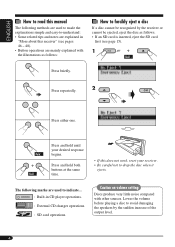
... the output level. 4 Lower the volume before playing a disc to drop the disc when it ejects. ENGLISH How to read this manual The following marks are used to made the explanations simple and easy-to-understand: • Some related tips and notes are explained in CD player operations. : External CD changer operations. : SD card operations. Press and hold both buttons at the same time. • If this receiver" (see...
... the output level. 4 Lower the volume before playing a disc to drop the disc when it ejects. ENGLISH How to read this manual The following marks are used to made the explanations simple and easy-to-understand: • Some related tips and notes are explained in CD player operations. : External CD changer operations. : SD card operations. Press and hold both buttons at the same time. • If this receiver" (see...
Instruction Manual
Page 7
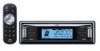
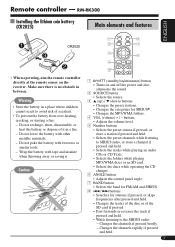
Caution: 1 (standby/on/attenuator) button • Turns on the receiver. Changes the channels rapidly if pressed and held . • While listening to the SIRIUS radio: - Do not leave the battery with tweezers or similar tools. - buttons • Adjusts the volume level. 5 Number buttons • Selects the preset station if pressed, or store a station if pressed and held. • Selects the preset channels while listening to avoid risk of it . Make sure there is...
Caution: 1 (standby/on/attenuator) button • Turns on the receiver. Changes the channels rapidly if pressed and held . • While listening to the SIRIUS radio: - Do not leave the battery with tweezers or similar tools. - buttons • Adjusts the volume level. 5 Number buttons • Selects the preset station if pressed, or store a station if pressed and held. • Selects the preset channels while listening to avoid risk of it . Make sure there is...
Instruction Manual
Page 8
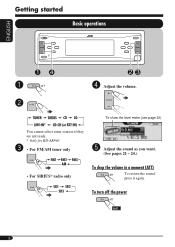
To turn off the power 8 You cannot select some sources if they are not ready. * Only for KD-AR960. ! • For FM/AM tuner only @ Adjust the sound as you want. (See pages 21 - 24.) • For SIRIUS® radio only To drop the volume in a moment (ATT) To restore the sound, press it again. Getting started Basic operations ENGLISH ~ ⁄ Adjust the volume. Ÿ To show the level meter (see page 32).
To turn off the power 8 You cannot select some sources if they are not ready. * Only for KD-AR960. ! • For FM/AM tuner only @ Adjust the sound as you want. (See pages 21 - 24.) • For SIRIUS® radio only To drop the volume in a moment (ATT) To restore the sound, press it again. Getting started Basic operations ENGLISH ~ ⁄ Adjust the volume. Ÿ To show the level meter (see page 32).
Instruction Manual
Page 11
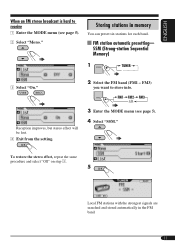
... to store into. FM3) you want to receive 1 Enter the MODE menu (see page 5). 4 Select "SSM." Reception improves, but stereo effect will be lost. 4 Exit from the setting. 3 Enter the MODE menu (see page 5). 2 Select "Mono." Storing stations in the FM band. 11 SSM (Strong-station Sequential Memory) 1 3 Select "On." 2 Select the FM band (FM1 - To restore the stereo effect, repeat the same procedure and...
... to store into. FM3) you want to receive 1 Enter the MODE menu (see page 5). 4 Select "SSM." Reception improves, but stereo effect will be lost. 4 Exit from the setting. 3 Enter the MODE menu (see page 5). 2 Select "Mono." Storing stations in the FM band. 11 SSM (Strong-station Sequential Memory) 1 3 Select "On." 2 Select the FM band (FM1 - To restore the stereo effect, repeat the same procedure and...

Instruction Manual
Page 14
... cannot use the JVC MP3compatible CD changer with your receiver. • You can be played repeatedly until you change the source or eject the magazine from the CD changer. • When the current disc is an MP3 disc: Clock display Current disc number Current folder number Current track number Track name*1 Folder name*1 • When the current disc is an audio CD or a CD Text disc: Current disc number Disc name*2 Current track number ~ * If you have changed "Ext Input" setting...
... cannot use the JVC MP3compatible CD changer with your receiver. • You can be played repeatedly until you change the source or eject the magazine from the CD changer. • When the current disc is an MP3 disc: Clock display Current disc number Current folder number Current track number Track name*1 Folder name*1 • When the current disc is an audio CD or a CD Text disc: Current disc number Disc name*2 Current track number ~ * If you have changed "Ext Input" setting...
Instruction Manual
Page 21
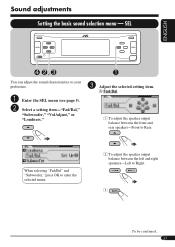
Sound adjustments Setting the basic sound selection menu - Adjust the selected setting item. A Fad/Bal 1 To adjust the speaker output balance between the left and right speakers-Left to Rear. When selecting "Fad/Bal" and "Subwoofer," press OK to enter the selected menu. 2 To adjust the speaker output balance between the front and rear speakers-Front to Right. 3 To be continued... 21 SEL ENGLISH You can adjust the sound characteristics to your preference. ~ Enter the SEL menu (see page 5). Ÿ Select a setting item-"Fad/Bal," "Subwoofer," "VolAdjust," or "Loudness." !
Sound adjustments Setting the basic sound selection menu - Adjust the selected setting item. A Fad/Bal 1 To adjust the speaker output balance between the left and right speakers-Left to Rear. When selecting "Fad/Bal" and "Subwoofer," press OK to enter the selected menu. 2 To adjust the speaker output balance between the front and rear speakers-Front to Right. 3 To be continued... 21 SEL ENGLISH You can adjust the sound characteristics to your preference. ~ Enter the SEL menu (see page 5). Ÿ Select a setting item-"Fad/Bal," "Subwoofer," "VolAdjust," or "Loudness." !
Instruction Manual
Page 23
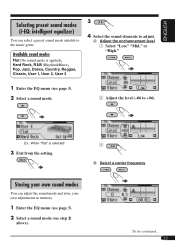
..., User 1, User 2, User 3 3 4 Select the sound elements to adjust. ENGLISH Selecting preset sound modes (i-EQ: intelligent equalizer) You can adjust the sound mode and store your own adjustments in memory. 1 Enter the EQ menu (see page 5). 2 Select a sound mode (see page 5). 2 Select a sound mode. 2 Adjust the level (-06 to +06). To be continued... 23 Available sound modes Flat (No sound mode is selected 3 Exit from the setting. 3 B Select a center frequency Storing your own sound modes You can select a preset sound mode suitable to the music genre. A Adjust the enchancement level...
..., User 1, User 2, User 3 3 4 Select the sound elements to adjust. ENGLISH Selecting preset sound modes (i-EQ: intelligent equalizer) You can adjust the sound mode and store your own adjustments in memory. 1 Enter the EQ menu (see page 5). 2 Select a sound mode (see page 5). 2 Select a sound mode. 2 Adjust the level (-06 to +06). To be continued... 23 Available sound modes Flat (No sound mode is selected 3 Exit from the setting. 3 B Select a center frequency Storing your own sound modes You can select a preset sound mode suitable to the music genre. A Adjust the enchancement level...
Instruction Manual
Page 31
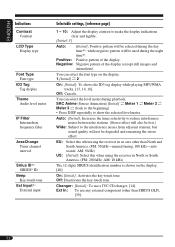
... "Auto." *4 Displayed only when "Dimmer" is subject to DST. Dims the display when you turn on the headlights. Any hour - On: [Initial]; The entire text information can scroll the display regardless of the following time zone for clock adjustment. Auto: Repeats scrolling (in clock is automatically adjusted using the clock time data provided via the SIRIUS® radio channel. Off: Cancels. Factory-preset animation is used , [26]. User: Your own user animation is used...
... "Auto." *4 Displayed only when "Dimmer" is subject to DST. Dims the display when you turn on the headlights. Any hour - On: [Initial]; The entire text information can scroll the display regardless of the following time zone for clock adjustment. Auto: Repeats scrolling (in clock is automatically adjusted using the clock time data provided via the SIRIUS® radio channel. Off: Cancels. Factory-preset animation is used , [26]. User: Your own user animation is used...
Instruction Manual
Page 32
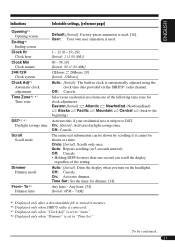
... used during playback. AM: 10 kHz) The 12-digits SIRIUS identification number is shown on the display. 1 [Initial] O 2 On: [Initial]; ENGLISH Indications Contrast Contrast LCD Type Display type Font Type Font type ID3 Tag Tag display Theme Audio level meter IF Filter Intermediate frequency filter AreaChange Tuner channel interval Sirius ID*2 SIRIUS® ID Beep Key-touch tone Ext Input*3 External input Selectable settings, [reference page] 1 - 10: Adjust...
... used during playback. AM: 10 kHz) The 12-digits SIRIUS identification number is shown on the display. 1 [Initial] O 2 On: [Initial]; ENGLISH Indications Contrast Contrast LCD Type Display type Font Type Font type ID3 Tag Tag display Theme Audio level meter IF Filter Intermediate frequency filter AreaChange Tuner channel interval Sirius ID*2 SIRIUS® ID Beep Key-touch tone Ext Input*3 External input Selectable settings, [reference page] 1 - 10: Adjust...
Instruction Manual
Page 33
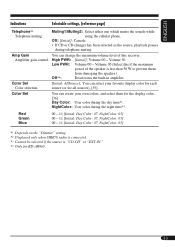
... "Dimmer" setting. *2 Displayed only when SIRIUS radio is connected. *3 Cannot be selected if the source is less than 50 W to prevent them for KD-AR960. 33 You can create your favorite display color for each source (or for all sources), [35]. ENGLISH Indications Selectable settings, [reference page] Telephone*4 Telephone muting Amp Gain Amplifier gain control Color Sel Color selection Color Set Muting1/Muting2: Select either one which mutes the sounds while using the cellular phone. Cancels. • If CD...
... "Dimmer" setting. *2 Displayed only when SIRIUS radio is connected. *3 Cannot be selected if the source is less than 50 W to prevent them for KD-AR960. 33 You can create your favorite display color for each source (or for all sources), [35]. ENGLISH Indications Selectable settings, [reference page] Telephone*4 Telephone muting Amp Gain Amplifier gain control Color Sel Color selection Color Set Muting1/Muting2: Select either one which mutes the sounds while using the cellular phone. Cancels. • If CD...
Instruction Manual
Page 35
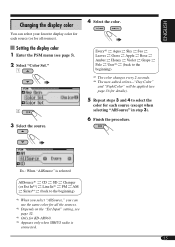
Setting the display color 1 Enter the PSM menu (see page 36 for details). 5 Repeat steps 3 and 4 to select the color for each source (or for all the sources. *2 Depends on the "Ext Input" setting, see page 32. *3 Only for KD-AR960. *4 Appears only when SIRIUS radio is selected AllSource*1 O CD O SD O Changer (or Ext In*2) O Line In*3 O FM O AM O Sirius*4 O (back to the beginning) *5 The color changes every 2 seconds...
Setting the display color 1 Enter the PSM menu (see page 36 for details). 5 Repeat steps 3 and 4 to select the color for each source (or for all the sources. *2 Depends on the "Ext Input" setting, see page 32. *3 Only for KD-AR960. *4 Appears only when SIRIUS radio is selected AllSource*1 O CD O SD O Changer (or Ext In*2) O Line In*3 O FM O AM O Sirius*4 O (back to the beginning) *5 The color changes every 2 seconds...
Instruction Manual
Page 36
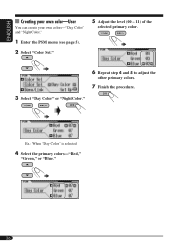
Ex.: When "Day Color" is selected 4 Select the primary colors-"Red," "Green," or "Blue." 36 ENGLISH Creating your own color-User You can create your own colors-"Day Color" and "NightColor." 1 Enter the PSM menu (see page 5). 2 Select "Color Set." 5 Adjust the level (00 - 11) of the selected primary color. 6 Repeat step 4 and 5 to adjust the other primary colors. 7 Finish the procedure. 3 Select "Day Color" or "NightColor."
Ex.: When "Day Color" is selected 4 Select the primary colors-"Red," "Green," or "Blue." 36 ENGLISH Creating your own color-User You can create your own colors-"Day Color" and "NightColor." 1 Enter the PSM menu (see page 5). 2 Select "Color Set." 5 Adjust the level (00 - 11) of the selected primary color. 6 Repeat step 4 and 5 to adjust the other primary colors. 7 Finish the procedure. 3 Select "Day Color" or "NightColor."
Instruction Manual
Page 39
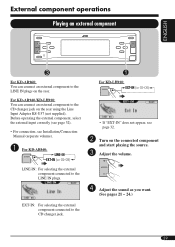
Adjust the volume. External component operations Playing an external component ENGLISH For KD-AR960: You can connect an external component to the CD changer jack on the rear using the Line Input Adapter KS-U57 (not supplied). Before operating the external component, select the external input correctly (see page 32). • For connection, see Installation/Connection Manual (separate volume). ~ For KD-AR960: • If "EXT-IN" does not appear, see...
Adjust the volume. External component operations Playing an external component ENGLISH For KD-AR960: You can connect an external component to the CD changer jack on the rear using the Line Input Adapter KS-U57 (not supplied). Before operating the external component, select the external input correctly (see page 32). • For connection, see Installation/Connection Manual (separate volume). ~ For KD-AR960: • If "EXT-IN" does not appear, see...
Instruction Manual
Page 40
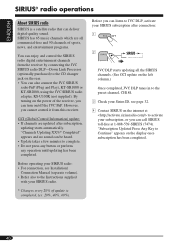
... music channels which are updated after connection: 1 2 JVC DLP starts updating all commercial-free and 50 channels of sports, news, and entertainment programs. You can call SIRIUS toll-free at to activate your subscription, or you can listen to JVC DLP, activate your Sirius ID, see Installation/ Connection Manual (separate volume). • Refer also to the Instructions supplied with your SIRIUS radio. * Changes every 20% of the receiver, you cannot control it from the receiver by connecting...
... music channels which are updated after connection: 1 2 JVC DLP starts updating all commercial-free and 50 channels of sports, news, and entertainment programs. You can call SIRIUS toll-free at to activate your subscription, or you can listen to JVC DLP, activate your Sirius ID, see Installation/ Connection Manual (separate volume). • Refer also to the Instructions supplied with your SIRIUS radio. * Changes every 20% of the receiver, you cannot control it from the receiver by connecting...
Instruction Manual
Page 46
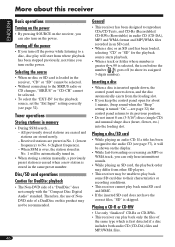
... power • If you turn on this receiver ENGLISH Basic operations Turning on the power • By pressing SOURCE on the receiver, you can play will be automatically tuned in. • When storing a station manually, a previously preset station is erased when a new station is stored in memory • During SSM search... - All previously stored stations are erased and stations are preset in the receiver, "CD" or "SD" cannot be selected. • Without connecting...
... power • If you turn on this receiver ENGLISH Basic operations Turning on the power • By pressing SOURCE on the receiver, you can play will be automatically tuned in. • When storing a station manually, a previously preset station is erased when a new station is stored in memory • During SSM search... - All previously stored stations are erased and stations are preset in the receiver, "CD" or "SD" cannot be selected. • Without connecting...
Instruction Manual
Page 48
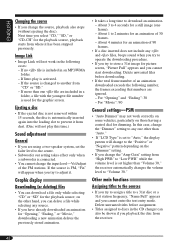
... Intro play this case, change the source, playback also stops (without ejecting the disc). About 3 to another from where it has been stopped previously. For "Movie": 90 General settings-PSM • "Auto Dimmer" may not work in the following number, the frames exceeding that numbers are using a two-speaker system, set to "Auto," the display pattern will appear when you try to download an animation. - In this time.) Sound adjustment...
... Intro play this case, change the source, playback also stops (without ejecting the disc). About 3 to another from where it has been stopped previously. For "Movie": 90 General settings-PSM • "Auto Dimmer" may not work in the following number, the frames exceeding that numbers are using a two-speaker system, set to "Auto," the display pattern will appear when you try to download an animation. - In this time.) Sound adjustment...
Instruction Manual
Page 49
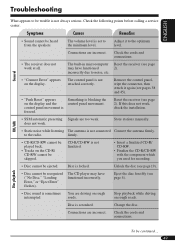
... recognized ("No Disc," "Loading Error," or "Eject Error" flashes). incorrectly due to the optimum level. Remove the control panel, wipe the connector, then attach it to noise, etc. Stop playback while driving on the CD-R/ CD-RW cannot be skipped. Change the disc. Connections are incorrect. Check the cords and connections. • The receiver does not work , check the installation. attached correctly. Store stations manually. • Static noise while listening The antenna is freezed...
... recognized ("No Disc," "Loading Error," or "Eject Error" flashes). incorrectly due to the optimum level. Remove the control panel, wipe the connector, then attach it to noise, etc. Stop playback while driving on the CD-R/ CD-RW cannot be skipped. Change the disc. Connections are incorrect. Check the cords and connections. • The receiver does not work , check the installation. attached correctly. Store stations manually. • Static noise while listening The antenna is freezed...
Instruction Manual
Page 53
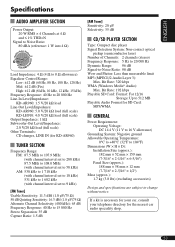
...;V Selectivity: 35 dB CD/SD PLAYER SECTION Type: Compact disc player Signal Detection System: Non-contact optical pickup (semiconductor laser) Number of Channels: 2 channels (stereo) Frequency Response: 5 Hz to 20 000 Hz Dynamic Range: 96 dB Signal-to change without notice. Bit Rate: 192 kbps Playable SD Card: Format: Fat 12/16 Storage: Up to 512 MB Playable Audio Format for the nearest car audio...
...;V Selectivity: 35 dB CD/SD PLAYER SECTION Type: Compact disc player Signal Detection System: Non-contact optical pickup (semiconductor laser) Number of Channels: 2 channels (stereo) Frequency Response: 5 Hz to 20 000 Hz Dynamic Range: 96 dB Signal-to change without notice. Bit Rate: 192 kbps Playable SD Card: Format: Fat 12/16 Storage: Up to 512 MB Playable Audio Format for the nearest car audio...


