Instructions
Page 4
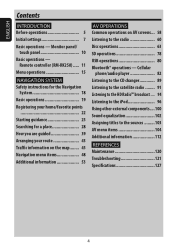
Cellular phone/audio player 82 Listening to the CD changer 89 Listening to the satellite radio ........ 91 Listening to the HD Radio™ broadcast .... 94 Listening to the iPod ... panel/ touch panel 10 Basic operations - ENGLISH Contents INTRODUCTION Before operations 5 Initial settings 7 Basic operations - Remote controller (RM-RK250) ..... 11 Menu operations 15 NAVIGATION SYSTEM Safety instructions for the Navigation System 18 Basic operations 19 Registering your home/favorite points 22 Starting guidance 25 Searching for a place 28 How you are guided 39 Arranging...
Cellular phone/audio player 82 Listening to the CD changer 89 Listening to the satellite radio ........ 91 Listening to the HD Radio™ broadcast .... 94 Listening to the iPod ... panel/ touch panel 10 Basic operations - ENGLISH Contents INTRODUCTION Before operations 5 Initial settings 7 Basic operations - Remote controller (RM-RK250) ..... 11 Menu operations 15 NAVIGATION SYSTEM Safety instructions for the Navigation System 18 Basic operations 19 Registering your home/favorite points 22 Starting guidance 25 Searching for a place 28 How you are guided 39 Arranging...
Instructions
Page 7
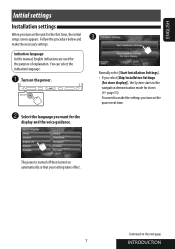
... for the first time, the initial setup screen appears. ENGLISH Initial settings Installation settings When you select [Skip Installation Settings (for store display)], the System starts in the navigation demonstration mode for stores (☞ page 53). You can select the indication language. ~ Turn on the next page 7 INTRODUCTION Follow the procedure below...
... for the first time, the initial setup screen appears. ENGLISH Initial settings Installation settings When you select [Skip Installation Settings (for store display)], the System starts in the navigation demonstration mode for stores (☞ page 53). You can select the indication language. ~ Turn on the next page 7 INTRODUCTION Follow the procedure below...
Instructions
Page 12
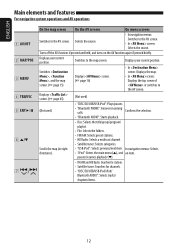
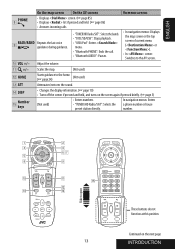
ENGLISH Main elements and features For navigation system operations and AV operations 1 AV/OFF 2 MAP/POS 3 MENU 4 TRAFFIC 5 ENT 6 6 5/∞ 7 / On the map screen On the AV screens On menu screens • In navigation menus: Switches to the map screen. Selects the source. Switches ...playlist. • File: Selects the folders. • FM/AM: Selects preset stations. • HD Radio: Selects a multicast channel. In navigation menus: Selects • "iPod": Enters the main menu (5), and an item. Switches to the AV screen. Displays your current position. pauses/resumes...
ENGLISH Main elements and features For navigation system operations and AV operations 1 AV/OFF 2 MAP/POS 3 MENU 4 TRAFFIC 5 ENT 6 6 5/∞ 7 / On the map screen On the AV screens On menu screens • In navigation menus: Switches to the map screen. Selects the source. Switches ...playlist. • File: Selects the folders. • FM/AM: Selects preset stations. • HD Radio: Selects a multicast channel. In navigation menus: Selects • "iPod": Enters the main menu (5), and an item. Switches to the AV screen. Displays your current position. pauses/resumes...
Instructions
Page 13
...playback. • "USB iPod": Enters menu. • "Bluetooth PHONE": Ends the call. • "Bluetooth AUDIO": Pauses. • In navigation menus: Displays the map screen or the top screen of current menu ( or ). • In screen: Switches to open These buttons do not ...function at this position. Adjust the volume. q +/- In navigation menus: Enters a phone number or house number. 1 2 3 4 67 5 8 9 p q t w e r Slide to the AV screen. p VOL +/- Continued on the...
...playback. • "USB iPod": Enters menu. • "Bluetooth PHONE": Ends the call. • "Bluetooth AUDIO": Pauses. • In navigation menus: Displays the map screen or the top screen of current menu ( or ). • In screen: Switches to open These buttons do not ...function at this position. Adjust the volume. q +/- In navigation menus: Enters a phone number or house number. 1 2 3 4 67 5 8 9 p q t w e r Slide to the AV screen. p VOL +/- Continued on the...
Instructions
Page 15
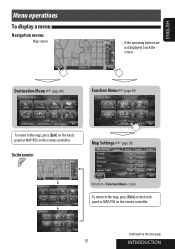
Destination Menu (☞ page 48) Function Menu (☞ page 49) To return to the map, press [Exit] on the touch panel or MAP/POS on the remote controller. On the remote: Map Settings (☞ page 50) Returns to screen To return to the map, press [Exit] on the touch panel or MAP/POS on the remote controller. Continued on the next page 15 INTRODUCTION ENGLISH Menu operations To display a menu Navigation menus Map screen • If the operating buttons are not displayed, touch the screen.
Destination Menu (☞ page 48) Function Menu (☞ page 49) To return to the map, press [Exit] on the touch panel or MAP/POS on the remote controller. On the remote: Map Settings (☞ page 50) Returns to screen To return to the map, press [Exit] on the touch panel or MAP/POS on the remote controller. Continued on the next page 15 INTRODUCTION ENGLISH Menu operations To display a menu Navigation menus Map screen • If the operating buttons are not displayed, touch the screen.
Instructions
Page 16
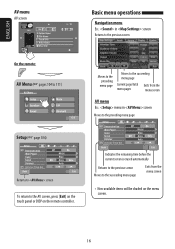
... to the AV screen, press [Exit] on the touch panel or DISP on the menu screen. 16 ENGLISH AV menu AV screen Basic menu operations Navigation menu Ex.: in screen Moves to the preceding menu page Setup Demonstration Wall Paper Color Scroll Dimmer Dimmer Time Set Back Metal Blue Once Auto...
... to the AV screen, press [Exit] on the touch panel or DISP on the menu screen. 16 ENGLISH AV menu AV screen Basic menu operations Navigation menu Ex.: in screen Moves to the preceding menu page Setup Demonstration Wall Paper Color Scroll Dimmer Dimmer Time Set Back Metal Blue Once Auto...
Instructions
Page 18
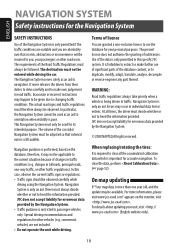
... drive carefully and to heed the information provided. Inaccurate or incorrect instructions may occur in traffic. In this specific JVC system. Navigation System is only an aid. JVC does not accept liability for your personal purposes. Navigation System is only an aid. Errors may happen to be observed. Driver must therefore always be given due to passenger...
... drive carefully and to heed the information provided. Inaccurate or incorrect instructions may occur in traffic. In this specific JVC system. Navigation System is only an aid. JVC does not accept liability for your personal purposes. Navigation System is only an aid. Errors may happen to be observed. Driver must therefore always be given due to passenger...
Instructions
Page 19
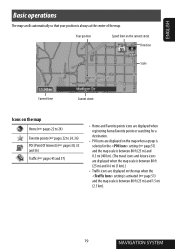
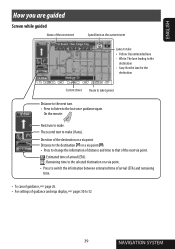
ENGLISH Basic operations The map scrolls automatically so that your position is between 80 ft (25 m) and 1.5 mi (2.5 km). 19 NAVIGATION SYSTEM Your position Speed limit on the current street Direction Scale Current time Current street Icons on the map Home (☞ pages 22 to 24) Favorite ...
ENGLISH Basic operations The map scrolls automatically so that your position is between 80 ft (25 m) and 1.5 mi (2.5 km). 19 NAVIGATION SYSTEM Your position Speed limit on the current street Direction Scale Current time Current street Icons on the map Home (☞ pages 22 to 24) Favorite ...
Instructions
Page 21
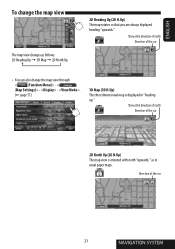
...; You can also change the map view The map view changes as in "heading up." Shows the direction of north Direction of the car 21 NAVIGATION SYSTEM
...; You can also change the map view The map view changes as in "heading up." Shows the direction of north Direction of the car 21 NAVIGATION SYSTEM
Instructions
Page 23
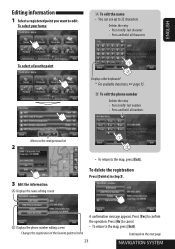
... confirm the operation. B Displays the phone number editing screen Changes the registration of the favorite point to 32 characters. Continued on the next page 23 NAVIGATION SYSTEM To select your home A To edit the name • You can use up to home A confirmation message appears. B To edit the phone number Deletes the...
... confirm the operation. B Displays the phone number editing screen Changes the registration of the favorite point to 32 characters. Continued on the next page 23 NAVIGATION SYSTEM To select your home A To edit the name • You can use up to home A confirmation message appears. B To edit the phone number Deletes the...
Instructions
Page 25
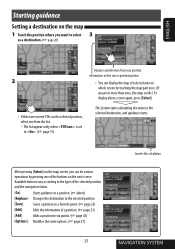
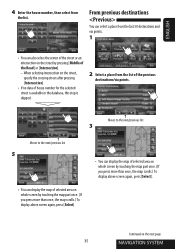
... only when is set to . (☞ page 51) The System starts calculating the route to the selected destination, and guidance starts. Available buttons vary according to the type of the selected position and the navigation status. [Go]: Starts guidance to a position. (☞ above...]: Adds a position to via points. (☞ page 43) [Options]: Modifies the route options. (☞ page 27) 25 Cancels the calculation NAVIGATION SYSTEM ENGLISH Starting guidance Setting a destination on the map 1 Touch the position where you press more than once, the map scrolls.) To display above )...
... only when is set to . (☞ page 51) The System starts calculating the route to the selected destination, and guidance starts. Available buttons vary according to the type of the selected position and the navigation status. [Go]: Starts guidance to a position. (☞ above...]: Adds a position to via points. (☞ page 43) [Options]: Modifies the route options. (☞ page 27) 25 Cancels the calculation NAVIGATION SYSTEM ENGLISH Starting guidance Setting a destination on the map 1 Touch the position where you press more than once, the map scrolls.) To display above )...
Instructions
Page 27
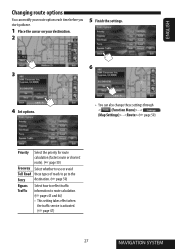
... Select whether to route calculation. (☞ pages 45 and 46) • This setting takes effect when the traffic service is activated. (☞ page 47) 27 NAVIGATION SYSTEM
... Select whether to route calculation. (☞ pages 45 and 46) • This setting takes effect when the traffic service is activated. (☞ page 47) 27 NAVIGATION SYSTEM
Instructions
Page 29
... whole screen by touching the map part once. (If you press more than once, the map scrolls.) To display above screen again, press [Select]. 29 NAVIGATION SYSTEM When selecting center of the city, go to step 5. Moves to the next/previous list B To enter the street name before specifying the city Go...
... whole screen by touching the map part once. (If you press more than once, the map scrolls.) To display above screen again, press [Select]. 29 NAVIGATION SYSTEM When selecting center of the city, go to step 5. Moves to the next/previous list B To enter the street name before specifying the city Go...
Instructions
Page 31
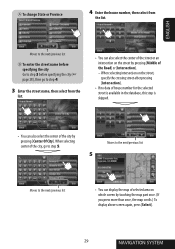
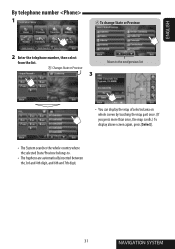
A Changes State or Province 3 Moves to the next/previous list • You can display the map of selected area on whole screen by touching the map part once. (If you press more than once, the map scrolls.) To display above screen again, press [Select]. • The System searches the whole country where the selected State/Province belongs to. • The hyphens are automatically inserted between the 3rd and 4th digit, and 6th and 7th digit. 31 NAVIGATION SYSTEM ENGLISH By telephone number 1 A To change State or Province 2 Enter the telephone number, then select from the list.
A Changes State or Province 3 Moves to the next/previous list • You can display the map of selected area on whole screen by touching the map part once. (If you press more than once, the map scrolls.) To display above screen again, press [Select]. • The System searches the whole country where the selected State/Province belongs to. • The hyphens are automatically inserted between the 3rd and 4th digit, and 6th and 7th digit. 31 NAVIGATION SYSTEM ENGLISH By telephone number 1 A To change State or Province 2 Enter the telephone number, then select from the list.
Instructions
Page 33
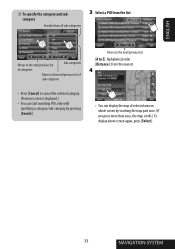
... whole screen by touching the map part once. (If you press more than once, the map scrolls.) To display above screen again, press [Select]. 33 NAVIGATION SYSTEM
... whole screen by touching the map part once. (If you press more than once, the map scrolls.) To display above screen again, press [Select]. 33 NAVIGATION SYSTEM
Instructions
Page 35
When selecting intersection on the next page 35 NAVIGATION SYSTEM Continued on the street, specify the crossing street after pressing [Intersection]. • If no data of house number for the selected street is available in ...
When selecting intersection on the next page 35 NAVIGATION SYSTEM Continued on the street, specify the crossing street after pressing [Intersection]. • If no data of house number for the selected street is available in ...
Instructions
Page 37
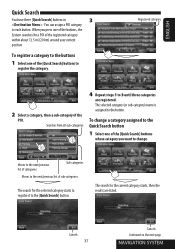
When you want to 3 until three categories are listed. Cancels 37 Cancels Continued on the next page NAVIGATION SYSTEM The selected category (or sub-category) name is assigned to the [Quick Search] button. Moves to the next/previous list of categories Sub-categories Moves ... 1 to change a category assigned to the Quick Search button 1 Select one of the [Quick Search] buttons whose category you press one of the buttons, the System searches for a POI of the POI. The search for the selected category starts to register it to the button. You can assign a POI category to...
When you want to 3 until three categories are listed. Cancels 37 Cancels Continued on the next page NAVIGATION SYSTEM The selected category (or sub-category) name is assigned to the [Quick Search] button. Moves to the next/previous list of categories Sub-categories Moves ... 1 to change a category assigned to the Quick Search button 1 Select one of the [Quick Search] buttons whose category you press one of the buttons, the System searches for a POI of the POI. The search for the selected category starts to register it to the button. You can assign a POI category to...
Instructions
Page 39
... Route to take (green) Distance to the next turn to make (if any). On the remote: Next turn . • Press to listen to 52. 39 NAVIGATION SYSTEM Direction of guidance and map display, ☞ pages 50 to the last voice guidance again.
... Route to take (green) Distance to the next turn to make (if any). On the remote: Next turn . • Press to listen to 52. 39 NAVIGATION SYSTEM Direction of guidance and map display, ☞ pages 50 to the last voice guidance again.
Instructions
Page 41
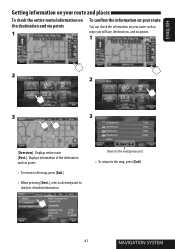
... destination and via points • To return to the map, press [Exit]. • When pressing [Dest.], select a desired point to the map, press [Exit]. 41 NAVIGATION SYSTEM Moves to the next/previous list • To return to check its detailed information.
... destination and via points • To return to the map, press [Exit]. • When pressing [Dest.], select a desired point to the map, press [Exit]. 41 NAVIGATION SYSTEM Moves to the next/previous list • To return to check its detailed information.

Instructions
Page 43
To add via points After guidance has started... 1 Select a place you can select up to four places ("via points") to stop by scrolling the map, ☞ page 20. 2 To change the sequence of via point by . ENGLISH Arranging your route Adding places to stop by After selecting your destination, you want to stop by. • To search for a via point, ☞ page 28. • To find a via points 1 2 3 3 4 Destination Via point The System starts calculating the new route, and guidance starts. 43 Continued on the next page NAVIGATION SYSTEM
To add via points After guidance has started... 1 Select a place you can select up to four places ("via points") to stop by scrolling the map, ☞ page 20. 2 To change the sequence of via point by . ENGLISH Arranging your route Adding places to stop by After selecting your destination, you want to stop by. • To search for a via point, ☞ page 28. • To find a via points 1 2 3 3 4 Destination Via point The System starts calculating the new route, and guidance starts. 43 Continued on the next page NAVIGATION SYSTEM


