Instructions
Page 2
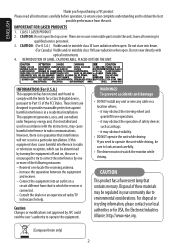
... sure to look around carefully. • The driver must not watch the monitor while driving. Increase the separation between the equipment and receiver. - WARNINGS: To prevent accidents and damage • DO NOT install any unit or wire any cable in accordance with optical instruments. 4. If ...from the unit. IMPORTANT FOR LASER PRODUCTS 1. CLASS 1 LASER PRODUCT 2. However, there is encouraged to try to correct the interference by JVC could void the user's authority to operate the equipment. Connect the equipment into beam. (For Canada) Visible and/or invisible class 1M ...
... sure to look around carefully. • The driver must not watch the monitor while driving. Increase the separation between the equipment and receiver. - WARNINGS: To prevent accidents and damage • DO NOT install any unit or wire any cable in accordance with optical instruments. 4. If ...from the unit. IMPORTANT FOR LASER PRODUCTS 1. CLASS 1 LASER PRODUCT 2. However, there is encouraged to try to correct the interference by JVC could void the user's authority to operate the equipment. Connect the equipment into beam. (For Canada) Visible and/or invisible class 1M ...
Instructions
Page 6
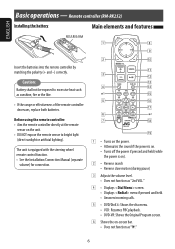
...effectiveness of the remote controller decreases, replace both batteries. The unit is equipped with the steering wheel remote control function. • See the Installation/Connection Manual (separate volume) for connection. 1 • Turns on the power. • Attenuates the sound if the power is on....8226; Displays screen. • Displays menu if pressed and held. • Answers incoming calls. 5 • DVD/DivX 6: Shows the disc menu. • VCD: Resumes PBC playback. • DVD-VR: Shows the Original Program screen. 6 Shows the on the unit. • DO NOT expose the remote sensor...
...effectiveness of the remote controller decreases, replace both batteries. The unit is equipped with the steering wheel remote control function. • See the Installation/Connection Manual (separate volume) for connection. 1 • Turns on the power. • Attenuates the sound if the power is on....8226; Displays screen. • Displays menu if pressed and held. • Answers incoming calls. 5 • DVD/DivX 6: Shows the disc menu. • VCD: Resumes PBC playback. • DVD-VR: Shows the Original Program screen. 6 Shows the on the unit. • DO NOT expose the remote sensor...
Instructions
Page 48
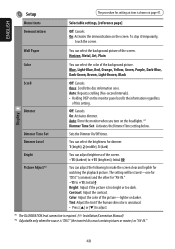
...the color of the screen. Wall Paper You can select the color of this setting. Once: Scrolls the disc information once. Auto: Dims the monitor when you turn on the screen. On: Activates dimmer. Tint: Adjust the tint if the human skin color is unnatural. • Press [5] ...or [∞] to adjust. *1 The ILLUMINATION lead connection is required. (☞ Installation/Connection Manual) *2 Adjustable only when the source is too bright or too dark. Initial 00 Picture Adjust*2 You can adjust the following to +15 (...
...the color of the screen. Wall Paper You can select the color of this setting. Once: Scrolls the disc information once. Auto: Dims the monitor when you turn on the screen. On: Activates dimmer. Tint: Adjust the tint if the human skin color is unnatural. • Press [5] ...or [∞] to adjust. *1 The ILLUMINATION lead connection is required. (☞ Installation/Connection Manual) *2 Adjustable only when the source is too bright or too dark. Initial 00 Picture Adjust*2 You can adjust the following to +15 (...
Instructions
Page 52
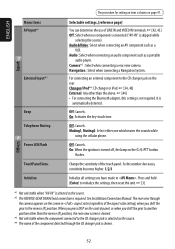
... camera appears on the rear. The rear view through the CD changer jack is shown. 52 Navigation : Select when connecting a Navigation System. See Installation/Connection Manual. ENGLISH Input The procedure for setting an item is shown on the flashes. Press and hold [Enter] to initialize the settings, then .... When you press DISP on the control panel, or when you shift the gear to the CD changer jack is selected as a portable audio player. Audio&Video: Select when connecting an AV component such as the source. *4 The name of the aspect ratio setting) when you shift the ...
... camera appears on the rear. The rear view through the CD changer jack is shown. 52 Navigation : Select when connecting a Navigation System. See Installation/Connection Manual. ENGLISH Input The procedure for setting an item is shown on the flashes. Press and hold [Enter] to initialize the settings, then .... When you press DISP on the control panel, or when you shift the gear to the CD changer jack is selected as a portable audio player. Audio&Video: Select when connecting an AV component such as the source. *4 The name of the aspect ratio setting) when you shift the ...
Instructions
Page 65
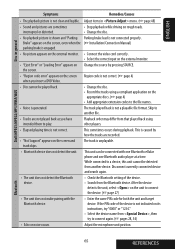
...device name from another file. • Tracks are not played back as you insert a DVD Video. Disconnect currently connected device and search again. • The unit does not detect .... • No picture appears on the external monitor. • Connect the video cord correctly. • Select the correct input on the external monitor. • "Eject Error" or "Loading Error... with one Bluetooth cellular phone and one Bluetooth audio player at a time. Brake" appears on the screen, even when the (☞ Installation/Connection Manual) parking brake is caused by pressing SOURCE...
...device name from another file. • Tracks are not played back as you insert a DVD Video. Disconnect currently connected device and search again. • The unit does not detect .... • No picture appears on the external monitor. • Connect the video cord correctly. • Select the correct input on the external monitor. • "Eject Error" or "Loading Error... with one Bluetooth cellular phone and one Bluetooth audio player at a time. Brake" appears on the screen, even when the (☞ Installation/Connection Manual) parking brake is caused by pressing SOURCE...
Instructions
Page 69
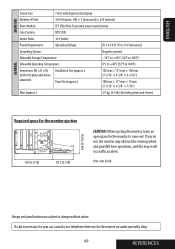
... Operating Temperature: 0°C to +40°C (32°F to 104°F) Dimensions (W × H × D) (with trim plate and sleeve attached): Installation Size (approx.): Panel Size (approx.): 182 mm × 111 mm × 160 mm (7-3/16" × 4-3/8" × 6-5/16") 188 mm × ...× 7/16") Mass (approx.): 2.9 kg (6.4 lbs) (including trims and sleeve) Required space for the monitor ejection 160 (6-5/16) 90.5 (3-5/8) 100 (3-15/16) CAUTION: When ejecting the monitor, leave an open space for the nearest car audio speciality shop. 69 REFERENCES Unit: mm (inch) Design and...
... Operating Temperature: 0°C to +40°C (32°F to 104°F) Dimensions (W × H × D) (with trim plate and sleeve attached): Installation Size (approx.): Panel Size (approx.): 182 mm × 111 mm × 160 mm (7-3/16" × 4-3/8" × 6-5/16") 188 mm × ...× 7/16") Mass (approx.): 2.9 kg (6.4 lbs) (including trims and sleeve) Required space for the monitor ejection 160 (6-5/16) 90.5 (3-5/8) 100 (3-15/16) CAUTION: When ejecting the monitor, leave an open space for the nearest car audio speciality shop. 69 REFERENCES Unit: mm (inch) Design and...


