Instructions
Page 2
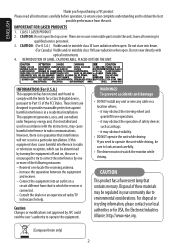
... not installed and used in a residential installation. leave all instructions carefully before operation, to ensure your local authorities or for a Class B digital device, pursuant to Part 15 of these materials may obstruct visibility. • DO NOT operate the unit while driving. REPRODUCTION OF LABEL: CAUTION LABEL, PLACED OUTSIDE THE UNIT. Caution Changes or modifications not approved by JVC could void the user's authority to qualified service...
... not installed and used in a residential installation. leave all instructions carefully before operation, to ensure your local authorities or for a Class B digital device, pursuant to Part 15 of these materials may obstruct visibility. • DO NOT operate the unit while driving. REPRODUCTION OF LABEL: CAUTION LABEL, PLACED OUTSIDE THE UNIT. Caution Changes or modifications not approved by JVC could void the user's authority to qualified service...
Instructions
Page 3
... iPod 40 Using other external components ..... 42 SETTINGS Sound equalization 45 Assigning titles to forcibly eject a disc NO EJECT? Troubleshooting 64 • Stop the car before operating the unit. 3 INTRODUCTION Monitor panel/touch panel 5 Basic operations- How to the sources .......... 46 Menu operations 47 REFERENCES Maintenance 56 For safety... ENGLISH How to reset your finger directly (if you have some ineffective dots. Remote controller (RM-RK252) ...... 6 Back 2 at the same time 1 OPERATIONS Before operating the unit...
... iPod 40 Using other external components ..... 42 SETTINGS Sound equalization 45 Assigning titles to forcibly eject a disc NO EJECT? Troubleshooting 64 • Stop the car before operating the unit. 3 INTRODUCTION Monitor panel/touch panel 5 Basic operations- How to the sources .......... 46 Menu operations 47 REFERENCES Maintenance 56 For safety... ENGLISH How to reset your finger directly (if you have some ineffective dots. Remote controller (RM-RK252) ...... 6 Back 2 at the same time 1 OPERATIONS Before operating the unit...
Instructions
Page 7
...; DVD Video/DivX 6: Shows the disc menu. • VCD: Resumes PBC playback. • DVD-VR: Shows the Playlist screen. u • Makes selection/settings Skips back or forward by five minutes for DivX/MPEG1/MPEG2 Changes discs for audio player operation). Other discs (except VCD/CD): Selects the folders. • 4 / ¢: - Press briefly: Selects an item. - "Bluetooth PHONE": Ends the call. o*3 Number buttons • Enters numbers. • "TUNER"/"SAT"/"HD Radio": Selects the preset station directly. *1 Functions...
...; DVD Video/DivX 6: Shows the disc menu. • VCD: Resumes PBC playback. • DVD-VR: Shows the Playlist screen. u • Makes selection/settings Skips back or forward by five minutes for DivX/MPEG1/MPEG2 Changes discs for audio player operation). Other discs (except VCD/CD): Selects the folders. • 4 / ¢: - Press briefly: Selects an item. - "Bluetooth PHONE": Ends the call. o*3 Number buttons • Enters numbers. • "TUNER"/"SAT"/"HD Radio": Selects the preset station directly. *1 Functions...
Instructions
Page 9
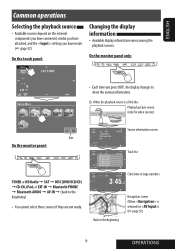
..., iPod, or EXT-IN = Bluetooth PHONE = Bluetooth AUDIO = AV-IN = (back to the beginning) • You cannot select these sources if they are not ready. ENGLISH Common operations Selecting the playback source • Available sources depend on the external components you have connected, media you have attached, and the settings you press DISP, the display changes to the beginning Navigation screen (When is a DivX disc. Ex. On the monitor...
..., iPod, or EXT-IN = Bluetooth PHONE = Bluetooth AUDIO = AV-IN = (back to the beginning) • You cannot select these sources if they are not ready. ENGLISH Common operations Selecting the playback source • Available sources depend on the external components you have connected, media you have attached, and the settings you press DISP, the display changes to the beginning Navigation screen (When is a DivX disc. Ex. On the monitor...
Instructions
Page 25
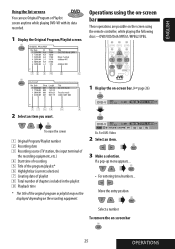
...-screen bar These operations are possible on the screen using the remote controller, while playing the following discs-DVD/VCD/DivX/MPEG1/MPEG2/JPEG. 1 Display the on -screen bar 25 OPERATIONS If a pop-up menu appears... • For entering time/numbers... : Move the entry position : Select a number To remove the on -screen bar. (☞page 26) 2 Select an item you want. To erase the screen 1 Original Program/Playlist number 2 Recording date 3 Recording source (TV station...
...-screen bar These operations are possible on the screen using the remote controller, while playing the following discs-DVD/VCD/DivX/MPEG1/MPEG2/JPEG. 1 Display the on -screen bar 25 OPERATIONS If a pop-up menu appears... • For entering time/numbers... : Move the entry position : Select a number To remove the on -screen bar. (☞page 26) 2 Select an item you want. To erase the screen 1 Original Program/Playlist number 2 Recording date 3 Recording source (TV station...
Instructions
Page 27
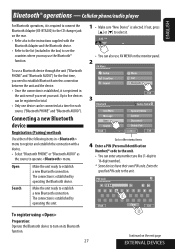
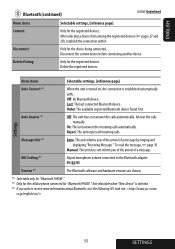
... a new Bluetooth connection. The connection is selected. To register using Preparation: Operate the Bluetooth device to turn on its Bluetooth function. 27 Continued on the monitor panel. 2 3 Go to other menu items 4 Enter a PIN (Personal Identification Number)* code to the unit. • You can be connected at a time for the first time, you like (1-digit to see the countries where you reset your unit. ENGLISH Bluetooth® operations - Connecting a new Bluetooth device Registration (Pairing) methods Use either of...
... a new Bluetooth connection. The connection is selected. To register using Preparation: Operate the Bluetooth device to turn on its Bluetooth function. 27 Continued on the monitor panel. 2 3 Go to other menu items 4 Enter a PIN (Personal Identification Number)* code to the unit. • You can be connected at a time for the first time, you like (1-digit to see the countries where you reset your unit. ENGLISH Bluetooth® operations - Connecting a new Bluetooth device Registration (Pairing) methods Use either of...

Instructions
Page 29
... monitor panel (except /ATT or +/-). • Hold the message displayed on the touch panel. • You can also use SOURCE on the touch panel. Press it repeatedly. Ÿ Press [AV MENU]. • You can adjust the microphone volume. (☞ page 55) 29 EXTERNAL DEVICES Using the Bluetooth cellular phone ENGLISH Sound mode (☞ page 45) The Bluetooth icon lights up when the adapter is connected. ☞ page 31 *1 Status of the device Signal...
... monitor panel (except /ATT or +/-). • Hold the message displayed on the touch panel. • You can also use SOURCE on the touch panel. Press it repeatedly. Ÿ Press [AV MENU]. • You can adjust the microphone volume. (☞ page 55) 29 EXTERNAL DEVICES Using the Bluetooth cellular phone ENGLISH Sound mode (☞ page 45) The Bluetooth icon lights up when the adapter is connected. ☞ page 31 *1 Status of the device Signal...
Instructions
Page 33
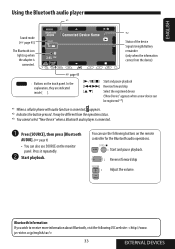
... Bluetooth, visit the following buttons on the remote controller for the Bluetooth audio operations. : Start and pause playback. : Reverse/forward skip : Adjust the volume. It may be registered.*3) *1 When a cellular phone with audio function is connected, appears. *2 Indicates the button pressed. You can use SOURCE on the touch panel. Press it repeatedly. Ÿ Start playback. ENGLISH Using the Bluetooth audio player *1 Sound mode (☞ page 45) The Bluetooth icon lights up when the adapter is connected. ~ Press [SOURCE], then press [Bluetooth AUDIO...
... Bluetooth, visit the following buttons on the remote controller for the Bluetooth audio operations. : Start and pause playback. : Reverse/forward skip : Adjust the volume. It may be registered.*3) *1 When a cellular phone with audio function is connected, appears. *2 Indicates the button pressed. You can use SOURCE on the touch panel. Press it repeatedly. Ÿ Start playback. ENGLISH Using the Bluetooth audio player *1 Sound mode (☞ page 45) The Bluetooth icon lights up when the adapter is connected. ~ Press [SOURCE], then press [Bluetooth AUDIO...
Instructions
Page 42
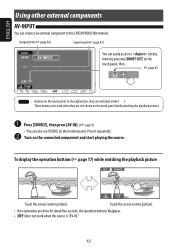
... repeatedly. Ÿ Turn on the touch panel. To display the operation buttons (☞ page 17) while watching the playback picture Touch the screen (center portion). Touch the screen (center portion). • If no operations are indicated inside [ ]. ENGLISH Using other external components AV-INPUT You can also use SOURCE on the monitor panel. These buttons also work when the source is "AV-IN." 42 Assigned title (☞ page 46) Sound mode (☞ page...
... repeatedly. Ÿ Turn on the touch panel. To display the operation buttons (☞ page 17) while watching the playback picture Touch the screen (center portion). Touch the screen (center portion). • If no operations are indicated inside [ ]. ENGLISH Using other external components AV-INPUT You can also use SOURCE on the monitor panel. These buttons also work when the source is "AV-IN." 42 Assigned title (☞ page 46) Sound mode (☞ page...
Instructions
Page 43
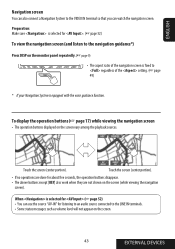
... to an audio source connected to the VIDEO IN terminal so that you can also connect a Navigation System to the LINE IN terminals. • Some status messages such as volume level will not appear on the screen (while viewing the navigation screen). ENGLISH Navigation screen You can watch the navigation screen. Preparation: Make sure is selected for about five seconds, the operation buttons disappear. • The above buttons except [KEY] also work when...
... to an audio source connected to the VIDEO IN terminal so that you can also connect a Navigation System to the LINE IN terminals. • Some status messages such as volume level will not appear on the screen (while viewing the navigation screen). ENGLISH Navigation screen You can watch the navigation screen. Preparation: Make sure is selected for about five seconds, the operation buttons disappear. • The above buttons except [KEY] also work when...
Instructions
Page 49
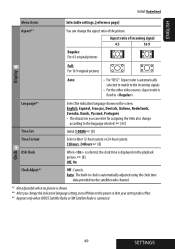
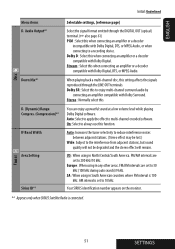
... the incoming signals. • For the other video sources: Aspect ratio is fixed to the language selected. ☞ [63] Time Set Initial 1:00AM ☞ [8] Time Format Select either 12-hour system or 24-hour system. 12Hours, 24Hours ☞ [8] Clock OSD Clock When is selected, the clock time is displayed on the playback picture. ☞ [8] Off, On Clock Adjust*5 Off : Cancels. Aspect ratio of the picture. Auto : The built...
... the incoming signals. • For the other video sources: Aspect ratio is fixed to the language selected. ☞ [63] Time Set Initial 1:00AM ☞ [8] Time Format Select either 12-hour system or 24-hour system. 12Hours, 24Hours ☞ [8] Clock OSD Clock When is selected, the clock time is displayed on the playback picture. ☞ [8] Off, On Clock Adjust*5 Off : Cancels. Aspect ratio of the picture. Auto : The built...
Instructions
Page 50
... on-screen bar. ☞ [25] 1: Higher position 2: Lower position Disc File Type*3 Select playback file type when a disc contains different types of the external monitor is 16:9. 4:3 LB (Letterbox)/4:3 PS (Pan Scan): Select when the aspect ratio of files. Audio: Plays back audio files. Audio&Video: Plays back audio files and DivX/MPEG1/MPEG2 files. Menu items Selectable settings, [reference page] Time Zone*1 *2 Select your residential area is set to see how the pictures...
... on-screen bar. ☞ [25] 1: Higher position 2: Lower position Disc File Type*3 Select playback file type when a disc contains different types of the external monitor is 16:9. 4:3 LB (Letterbox)/4:3 PS (Pan Scan): Select when the aspect ratio of files. Audio: Plays back audio files. Audio&Video: Plays back audio files and DivX/MPEG1/MPEG2 files. Menu items Selectable settings, [reference page] Time Zone*1 *2 Select your residential area is set to see how the pictures...
Instructions
Page 51
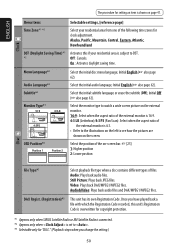
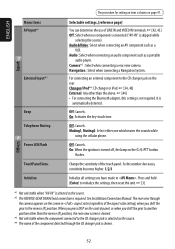
... adjacent stations, but sound quality will not be degraded and the stereo effect will remain. Tuner *4 Appears only when SIRIUS Satellite Radio is 100 kHz. When playing back a multi-channel disc, this setting affects the signals reproduced through the DIGITAL OUT (optical) terminal. (☞ also page 61) PCM : Select this when connecting an amplifier or a decoder compatible with Dolby Digital, DTS, or MPEG Audio...
... adjacent stations, but sound quality will not be degraded and the stereo effect will remain. Tuner *4 Appears only when SIRIUS Satellite Radio is 100 kHz. When playing back a multi-channel disc, this setting affects the signals reproduced through the DIGITAL OUT (optical) terminal. (☞ also page 61) PCM : Select this when connecting an amplifier or a decoder compatible with Dolby Digital, DTS, or MPEG Audio...
Instructions
Page 52
.... It is shown. 52 On: When the ignition is turned off, the lamp on the screen in . Initialize Selectable settings, [reference page] You can determine the use of the touch panel. Muting1, Muting2: Select either one which mutes the sounds while using the cellular phone. Navigation : Select when connecting a Navigation System. Camera*2 : Select when connecting a rear view camera. Audio&Video: Select when connecting an AV component such as a portable audio player. See Installation/Connection Manual.
.... It is shown. 52 On: When the ignition is turned off, the lamp on the screen in . Initialize Selectable settings, [reference page] You can determine the use of the touch panel. Muting1, Muting2: Select either one which mutes the sounds while using the cellular phone. Navigation : Select when connecting a Navigation System. Camera*2 : Select when connecting a rear view camera. Audio&Video: Select when connecting an AV component such as a portable audio player. See Installation/Connection Manual.
Instructions
Page 55
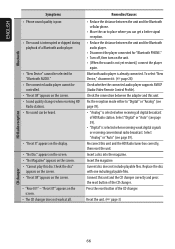
... the message, ☞ page 30. Menu items Selectable settings, [reference page] Auto Connect *4 When the unit is turned on, the connection is selected. *6 If you wish to the Bluetooth adapter. 01/02/03 Version *6 The Bluetooth software and hardware versions are shown. *4 Selectable only for "Bluetooth PHONE." *5 Only for the cellular phone connected for the device being connected. MIC Setting *5 Adjust microphone volume connected to receive more information about Bluetooth, visit the following JVC web...
... the message, ☞ page 30. Menu items Selectable settings, [reference page] Auto Connect *4 When the unit is turned on, the connection is selected. *6 If you wish to the Bluetooth adapter. 01/02/03 Version *6 The Bluetooth software and hardware versions are shown. *4 Selectable only for "Bluetooth PHONE." *5 Only for the cellular phone connected for the device being connected. MIC Setting *5 Adjust microphone volume connected to receive more information about Bluetooth, visit the following JVC web...
Instructions
Page 60
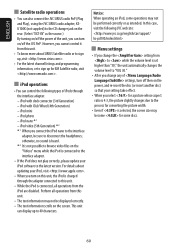
... not be displayed correctly. • The text information scrolls on the screen. iPod video (5th Generation) *2 *1 When you change any of settings, turn off the power of iPods through the adapter connected to this unit. • The text information may become for XM Satellite radio, visit . Notice: When operating an iPod, some discs. 60 iPod mini - ENGLISH Satellite radio operations • You can also connect the JVC SIRIUS radio PnP (Plug and Play), using the JVC SIRIUS radio adapter, KSU100K...
... not be displayed correctly. • The text information scrolls on the screen. iPod video (5th Generation) *2 *1 When you change any of settings, turn off the power of iPods through the adapter connected to this unit. • The text information may become for XM Satellite radio, visit . Notice: When operating an iPod, some discs. 60 iPod mini - ENGLISH Satellite radio operations • You can also connect the JVC SIRIUS radio PnP (Plug and Play), using the JVC SIRIUS radio adapter, KSU100K...
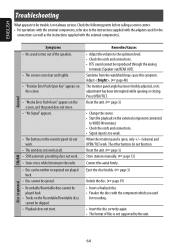
Instructions
Page 64
...; The format of the speakers. • The screen is not supported by the unit. The other buttons do not work. • The unit does not work at all. • SSM automatic presetting does not work . Remedies/Causes • Adjust the volume to VIDEO IN terminal. • Check the cords and connections. • Signal input is open, only +/- (volume) and OPEN/TILT work . • Static noise while listening to the radio. • Disc can be...
...; The format of the speakers. • The screen is not supported by the unit. The other buttons do not work. • The unit does not work at all. • SSM automatic presetting does not work . Remedies/Causes • Adjust the volume to VIDEO IN terminal. • Check the cords and connections. • Signal input is open, only +/- (volume) and OPEN/TILT work . • Static noise while listening to the radio. • Disc can be...
Instructions
Page 65
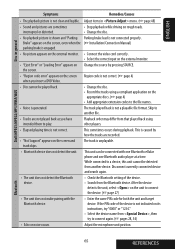
... picture appears on the external monitor. • Connect the video cord correctly. • Select the correct input on the external monitor. • "Eject Error" or "Loading Error" appears on the screen. • "Region code error" appears on the screen, even when the (☞ Installation/Connection Manual) parking brake is generated. If the PIN code of the device. • Search from another file. • Tracks are sometimes interrupted or distorted. • Stop playback while driving on the unit to play. Brake" appears on...
... picture appears on the external monitor. • Connect the video cord correctly. • Select the correct input on the external monitor. • "Eject Error" or "Loading Error" appears on the screen. • "Region code error" appears on the screen, even when the (☞ Installation/Connection Manual) parking brake is generated. If the PIN code of the device. • Search from another file. • Tracks are sometimes interrupted or distorted. • Stop playback while driving on the unit to play. Brake" appears on...
Instructions
Page 66
... Disc" appears on the screen. • "No Magazine" appears on the screen. • "Cannot play this unit and the HD Radio tuner box correctly, then reset the unit. Bluetooth audio player is already connected. Select "Analog" or "Auto" (see page 39). • "Digital" is selected when receiving weak digital signals or receiving conventional radio broadcast. To select "New Device," disconnect it. (☞ page 28) Check whether the connected audio player supports AVRCP (Audio Video Remote Control Profile). Press the reset button...
... Disc" appears on the screen. • "No Magazine" appears on the screen. • "Cannot play this unit and the HD Radio tuner box correctly, then reset the unit. Bluetooth audio player is already connected. Select "Analog" or "Auto" (see page 39). • "Digital" is selected when receiving weak digital signals or receiving conventional radio broadcast. To select "New Device," disconnect it. (☞ page 28) Check whether the connected audio player supports AVRCP (Audio Video Remote Control Profile). Press the reset button...
Instructions
Page 67
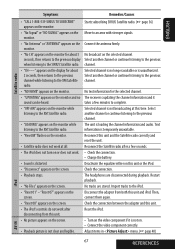
...; Check the connection. • Charge the battery. Text information is loading the channel information and audio. Import tracks to the XM Satellite radio. • "NO NAME" appears on the monitor. • "UPDATING" appears on the screen. • Playback picture is unauthorized. Disconnect the adapter from this time. Check the connection between the adapter and this unit or the iPod. Reset the iPod. • Turn on . • Connect the video component correctly.
...; Check the connection. • Charge the battery. Text information is loading the channel information and audio. Import tracks to the XM Satellite radio. • "NO NAME" appears on the monitor. • "UPDATING" appears on the screen. • Playback picture is unauthorized. Disconnect the adapter from this time. Check the connection between the adapter and this unit or the iPod. Reset the iPod. • Turn on . • Connect the video component correctly.


