
Instructions
Page 3
... increases, and the operating temperature is equipped with the steering wheel remote control function. • See the Installation/Connection Manual (separate volume) for a long time in hot or cold weather, wait until the temperature in the menu. appears on the display. For safety... • Do not raise the volume level too much, as this will also be halted on volume setting: Digital devices (CD/USB) produce very little...
... increases, and the operating temperature is equipped with the steering wheel remote control function. • See the Installation/Connection Manual (separate volume) for a long time in hot or cold weather, wait until the temperature in the menu. appears on the display. For safety... • Do not raise the volume level too much, as this will also be halted on volume setting: Digital devices (CD/USB) produce very little...

Instructions
Page 5
... 4 SETTINGS Selecting a preset sound mode 27 Menu operations 29 • Creating your own color-User Color 34 • Setting the time for dimmer 35 • Changing the Bluetooth setting 35 Title assignment 37 OPERATIONS Basic operations 6 • Using the control panel 6 • Using the remote controller (RM-RK50)......... 7 Listening to the radio 9 Disc operations 10 USB operations 12 Using the Bluetooth® devices 13 • Connecting a Bluetooth device for the first time 14 • Using the Bluetooth cellular phone 16 • Using the Bluetooth audio player 18...
... 4 SETTINGS Selecting a preset sound mode 27 Menu operations 29 • Creating your own color-User Color 34 • Setting the time for dimmer 35 • Changing the Bluetooth setting 35 Title assignment 37 OPERATIONS Basic operations 6 • Using the control panel 6 • Using the remote controller (RM-RK50)......... 7 Listening to the radio 9 Disc operations 10 USB operations 12 Using the Bluetooth® devices 13 • Connecting a Bluetooth device for the first time 14 • Using the Bluetooth cellular phone 16 • Using the Bluetooth audio player 18...
Instructions
Page 6
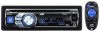
ENGLISH Basic operations Using the control panel 1 • FM/AM: Select preset station. • HD RADIO: Select channel. • SIRIUS/XM: Select category. • CD/USB FRONT/USB REAR/CD-CH: Select folder. • iPod: Enter the main menu/Pause playback*2/ Confirm selection. • BT FRONT/BT REAR (Phone): Adjust the microphone volume (during a phone call conversation). • BT FRONT/BT REAR (Audio)*3: Select group/folder. 2 • Turn on the power. • Attenuate the sound (if the power is on). • Turn off the power [Hold...
ENGLISH Basic operations Using the control panel 1 • FM/AM: Select preset station. • HD RADIO: Select channel. • SIRIUS/XM: Select category. • CD/USB FRONT/USB REAR/CD-CH: Select folder. • iPod: Enter the main menu/Pause playback*2/ Confirm selection. • BT FRONT/BT REAR (Phone): Adjust the microphone volume (during a phone call conversation). • BT FRONT/BT REAR (Audio)*3: Select group/folder. 2 • Turn on the power. • Attenuate the sound (if the power is on). • Turn off the power [Hold...

Instructions
Page 7
... setting between and *7 [Hold]. • BT FRONT/BT REAR (Audio): Pause playback. y Remote sensor u AUX (auxiliary) input jack *1 Also known as sunshine, fire, or the like. Replace only with the same or equivalent type. • Battery shall not be sure that you have not raise the volume level too much. *3 For Bluetooth devices that support AVRCP 1.3. *4 When the HD Radio tuner box is connected, the built-in "Menu operations...
... setting between and *7 [Hold]. • BT FRONT/BT REAR (Audio): Pause playback. y Remote sensor u AUX (auxiliary) input jack *1 Also known as sunshine, fire, or the like. Replace only with the same or equivalent type. • Battery shall not be sure that you have not raise the volume level too much. *3 For Bluetooth devices that support AVRCP 1.3. *4 When the HD Radio tuner box is connected, the built-in "Menu operations...
Instructions
Page 8
... for Bluetooth audio player. D ∞ : Confirms the selection. 3 Adjusts the volume level. 4 Selects the sound mode. 5 Selects the source. 6 For Bluetooth cellular phone: - Changes the disc if pressed briefly. - Pauses or resumes playback with 5 U. (Now 5 U/D ∞/2 R/F 3 work as dashboards) exposed to direct sunlight for USB operations). • While playing an MP3 disc on an MP3-compatible CD changer: - Changes the channels if pressed briefly. - Skips 10 items at a time if pressed and held . • While listening to the satellite (SIRIUS...
... for Bluetooth audio player. D ∞ : Confirms the selection. 3 Adjusts the volume level. 4 Selects the sound mode. 5 Selects the source. 6 For Bluetooth cellular phone: - Changes the disc if pressed briefly. - Pauses or resumes playback with 5 U. (Now 5 U/D ∞/2 R/F 3 work as dashboards) exposed to direct sunlight for USB operations). • While playing an MP3 disc on an MP3-compatible CD changer: - Changes the channels if pressed briefly. - Skips 10 items at a time if pressed and held . • While listening to the satellite (SIRIUS...
Instructions
Page 9
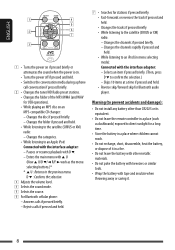
... When an FM stereo broadcast is connected, you want to store. "SSM 01-06" "SSM 07-12" "SSM 13-18" 3 Local FM stations with sufficient signal strength, the indicator lights up on the next page OPERATIONS 9 To stop searching, press 4 /¢ . • If an HD Radio tuner box is hard to receive, activate monaural mode for a station to listen-Auto Search. Hold...
... When an FM stereo broadcast is connected, you want to store. "SSM 01-06" "SSM 07-12" "SSM 13-18" 3 Local FM stations with sufficient signal strength, the indicator lights up on the next page OPERATIONS 9 To stop searching, press 4 /¢ . • If an HD Radio tuner box is hard to receive, activate monaural mode for a station to listen-Auto Search. Hold...
Instructions
Page 13
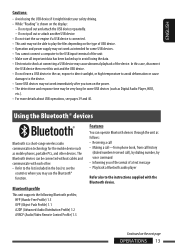
... the USB device then reset this unit and the USB device. • Do not leave a USB device in the box) to the instructions supplied with each other devices. Using the Bluetooth® devices Bluetooth is a short-range wireless radio communication technology for some USB devices (such as intended for the mobile device such as follows: • Receiving a call • Making a call-from phone book, from call history (dialed number/received call), by dialing number, by...
... the USB device then reset this unit and the USB device. • Do not leave a USB device in the box) to the instructions supplied with each other devices. Using the Bluetooth® devices Bluetooth is a short-range wireless radio communication technology for some USB devices (such as intended for the mobile device such as follows: • Receiving a call • Making a call-from phone book, from call history (dialed number/received call), by dialing number, by...
Instructions
Page 14
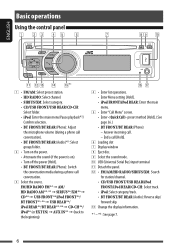
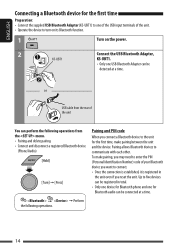
... Bluetooth audio can be detected at a time. = Perform the following operations from the menu. • Pairing and delete pairing • Connect and disconnect a registered Bluetooth device (Phone/Audio) [Turn] = [Press] Pairing and PIN code When you reset the unit. Pairing allows Bluetooth devices to communicate with each other. or USB cable from the rear of the unit. • Operate the device to turn on its Bluetooth function. 1 Turn on the power. 2 KS-UBT1 Connect the USB Bluetooth Adapter, KS-UBT1. • Only one USB Bluetooth Adapter can be connected at a time...
... Bluetooth audio can be detected at a time. = Perform the following operations from the menu. • Pairing and delete pairing • Connect and disconnect a registered Bluetooth device (Phone/Audio) [Turn] = [Press] Pairing and PIN code When you reset the unit. Pairing allows Bluetooth devices to communicate with each other. or USB cable from the rear of the unit. • Operate the device to turn on its Bluetooth function. 1 Turn on the power. 2 KS-UBT1 Connect the USB Bluetooth Adapter, KS-UBT1. • Only one USB Bluetooth Adapter can be connected at a time...

Instructions
Page 17
...; Select "Delete All" to delete all the listed numbers in Bluetooth setting menu (see on page 30 for in step 2. • When is set to delete. • To adjust the microphone volume (01 - 03) during a phone call comes in blue (see page 36). 1 Enter "Call Menu" screen. Switching conversation media (the unit/ cellular phone) During a phone call 4 Enter the "Delete Entries" screen. You can preset the microphone volume (see...
...; Select "Delete All" to delete all the listed numbers in Bluetooth setting menu (see on page 30 for in step 2. • When is set to delete. • To adjust the microphone volume (01 - 03) during a phone call comes in blue (see page 36). 1 Enter "Call Menu" screen. Switching conversation media (the unit/ cellular phone) During a phone call 4 Enter the "Delete Entries" screen. You can preset the microphone volume (see...
Instructions
Page 26
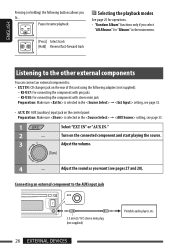
... 33. • AUX IN: AUX (auxiliary) input jack on the connected component and start playing the source. 3 Adjust the volume. 4 - Turn on the control panel. Preparation: Make sure is selected in the main menu. [Press] Select track [Hold] Reverse/fast-forward track Listening to the other external components You can connect an external component to: • EXT IN: CD changer jack on the rear of this unit using the following buttons allows you...
... 33. • AUX IN: AUX (auxiliary) input jack on the connected component and start playing the source. 3 Adjust the volume. 4 - Turn on the control panel. Preparation: Make sure is selected in the main menu. [Press] Select track [Hold] Reverse/fast-forward track Listening to the other external components You can connect an external component to: • EXT IN: CD changer jack on the rear of this unit using the following buttons allows you...
Instructions
Page 28
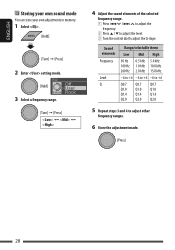
....0 Q1.4 Q1.4 Q1.4 Q2.0 Q2.0 Q2.0 5 Repeat steps 3 and 4 to adjust the Q-slope. ENGLISH Storing your own sound mode You can store your own adjustments in memory. 1 Select . [Turn] = [Press] 2 Enter setting mode. 3 Select a frequency range. [Turn] = [Press] Ô Ô 4 Adjust the sound elements of the selected frequency range. 1 Press 4 / ¢ to adjust the frequency. 2 Press 5 / ∞ to adjust the level. 3 Turn the control dial to adjust other frequency ranges. 6 Store the adjustment made. 28
....0 Q1.4 Q1.4 Q1.4 Q2.0 Q2.0 Q2.0 5 Repeat steps 3 and 4 to adjust the Q-slope. ENGLISH Storing your own sound mode You can store your own adjustments in memory. 1 Select . [Turn] = [Press] 2 Enter setting mode. 3 Select a frequency range. [Turn] = [Press] Ô Ô 4 Adjust the sound elements of the selected frequency range. 1 Press 4 / ¢ to adjust the frequency. 2 Press 5 / ∞ to adjust the level. 3 Turn the control dial to adjust other frequency ranges. 6 Store the adjustment made. 28

Instructions
Page 29
... car's battery. *2 Displayed only when SIRIUS Satellite radio or XM Satellite radio is connected. *3 Displayed only when is not interrupted by turning off the ignition key of your residential area from the menu, press DISP or MENU. Clock Clock Adjust*2 • Auto • Off : The built-in clock is turned off . : Cancels; Continued on the display at all times when the power is done for clock adjustment. ENGLISH Menu operations 1 Call up the 2 Select the desired item. menu. [Turn...
... car's battery. *2 Displayed only when SIRIUS Satellite radio or XM Satellite radio is connected. *3 Displayed only when is not interrupted by turning off the ignition key of your residential area from the menu, press DISP or MENU. Clock Clock Adjust*2 • Auto • Off : The built-in clock is turned off . : Cancels; Continued on the display at all times when the power is done for clock adjustment. ENGLISH Menu operations 1 Call up the 2 Select the desired item. menu. [Turn...
Instructions
Page 30
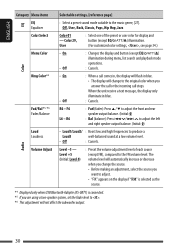
... rear speaker output balance. (Initial: 0) : Bal (balance): Press 4 / ¢ to adjust the left and right speaker output balance. (Initial: 0) Loud Loudness • Loud1/Loud2/ : Boost low and high frequencies to the music genre, [27]. Level +5 (Initial: Level 0) : Preset the volume adjustment level of the preset or user color for display and button (except EQ/ /0) illumination. (For customized color settings, , see page 34.) Menu Color • On • Off : Changes the display and button (except EQ/ /0) illumination during menu, list search and playback mode operations...
... rear speaker output balance. (Initial: 0) : Bal (balance): Press 4 / ¢ to adjust the left and right speaker output balance. (Initial: 0) Loud Loudness • Loud1/Loud2/ : Boost low and high frequencies to the music genre, [27]. Level +5 (Initial: Level 0) : Preset the volume adjustment level of the preset or user color for display and button (except EQ/ /0) illumination. (For customized color settings, , see page 34.) Menu Color • On • Off : Changes the display and button (except EQ/ /0) illumination during menu, list search and playback mode operations...
Instructions
Page 31
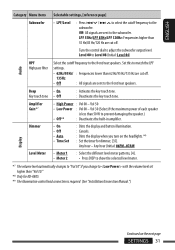
... - Display *7 The volume level automatically changes to "Vol 30" if you turn on the next page SETTINGS 31 Amplifier Gain *7 Dimmer Level Meter • High Power : Vol 00 - Off: All signals are sent to adjust the subwoofer output level. Turn the control dial to the subwoofer. Vol 30 (Select if the maximum power of each speaker is required. (See "Installation/Connection Manual.") Continued on the headlights. *9 : Set the timer for KD-A805. *9 The illumination control lead connection is...
... - Display *7 The volume level automatically changes to "Vol 30" if you turn on the next page SETTINGS 31 Amplifier Gain *7 Dimmer Level Meter • High Power : Vol 00 - Off: All signals are sent to adjust the subwoofer output level. Turn the control dial to the subwoofer. Vol 30 (Select if the maximum power of each speaker is required. (See "Installation/Connection Manual.") Continued on the headlights. *9 : Set the timer for KD-A805. *9 The illumination control lead connection is...
Instructions
Page 33
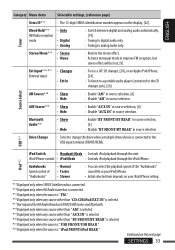
... "AUX IN" in source selection. Blend Hold*14 HD Radio reception mode • Auto • Digital • Analog : Switch between digital and analog audio automatically, [19]. : Tuning to digital audio only. : Tuning to the CD changer jack), [26]. Tuner Stereo/Mono*15 • Stereo • Mono : Restore the stereo effect. : Activate monaural mode to change the drive when a multiple drives device is " iPod FRONT/iPod REAR." USB*21 iPod Switch • Headunit Mode : Controls iPod playback through the iPod/iPhone. ENGLISH Category Menu items Selectable settings, [reference...
... "AUX IN" in source selection. Blend Hold*14 HD Radio reception mode • Auto • Digital • Analog : Switch between digital and analog audio automatically, [19]. : Tuning to digital audio only. : Tuning to the CD changer jack), [26]. Tuner Stereo/Mono*15 • Stereo • Mono : Restore the stereo effect. : Activate monaural mode to change the drive when a multiple drives device is " iPod FRONT/iPod REAR." USB*21 iPod Switch • Headunit Mode : Controls iPod playback through the iPod/iPhone. ENGLISH Category Menu items Selectable settings, [reference...
Instructions
Page 35
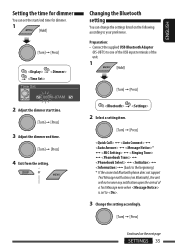
... USB input terminals of the unit. 1 [Turn] = [Press] 2 Select a setting item. [Turn] = [Press] Ô Ô Ô * Ô Ô Ô Ô Ô Ô Ô (back to the beginning) * If the connected Bluetooth phone does not support Text Message notification (via Bluetooth), the unit will not receive any notification upon the arrival of a Text Message even when is set the start/end time for dimmer. 1 [Turn] = [Press] 2 Adjust the dimmer start time. [Turn] = [Press] 3 Adjust...
... USB input terminals of the unit. 1 [Turn] = [Press] 2 Select a setting item. [Turn] = [Press] Ô Ô Ô * Ô Ô Ô Ô Ô Ô Ô (back to the beginning) * If the connected Bluetooth phone does not support Text Message notification (via Bluetooth), the unit will not receive any notification upon the arrival of a Text Message even when is set the start/end time for dimmer. 1 [Turn] = [Press] 2 Adjust the dimmer start time. [Turn] = [Press] 3 Adjust...

Instructions
Page 36
.../ BT REAR (Phone)." Enter the PIN code to the unit to transfer. Initialize Yes: Initialize all incoming calls. Dial Number: Display the "Dial Number" screen. AutoAccess Phone: Auto synchronize from the SIM card. AutoAccess SIM: Auto synchronize from the phone memory. ENGLISH menu ( : Initial) Quick Call You can copy the phone book memory of a cellular phone into the unit. Hold to synchronize. • Selectable only when the connected phone supports Phonebook Auto Synchronize. Received Calls: Show...
.../ BT REAR (Phone)." Enter the PIN code to the unit to transfer. Initialize Yes: Initialize all incoming calls. Dial Number: Display the "Dial Number" screen. AutoAccess Phone: Auto synchronize from the SIM card. AutoAccess SIM: Auto synchronize from the phone memory. ENGLISH menu ( : Initial) Quick Call You can copy the phone book memory of a cellular phone into the unit. Hold to synchronize. • Selectable only when the connected phone supports Phonebook Auto Synchronize. Received Calls: Show...
Instructions
Page 42
... of Apple Inc. 42 Menu operations • setting for may not be performed correctly or as intended. In this case, change the setting to any use of such marks by the Bluetooth SIG, Inc. Other trademarks and trade names are those having a control dial for "iPod FRONT/iPod REAR." and other than . • If is set higher than 30 station frequencies, "Name Full" appears...
... of Apple Inc. 42 Menu operations • setting for may not be performed correctly or as intended. In this case, change the setting to any use of such marks by the Bluetooth SIG, Inc. Other trademarks and trade names are those having a control dial for "iPod FRONT/iPod REAR." and other than . • If is set higher than 30 station frequencies, "Name Full" appears...

Instructions
Page 43
...; Disc cannot be selected. Remove the control panel, wipe the connector, then attach it again (see page 3). • SSM automatic presetting does not work at all. Store stations manually. • Static noise while listening to the optimum level. • Check the cords and connections. • The unit does not work . Connect the antenna firmly. • "AM" cannot be played back. "CD Loading Error," or "Eject Error" flashes). • "Please Eject" appears on the display. Reset the unit...
...; Disc cannot be selected. Remove the control panel, wipe the connector, then attach it again (see page 3). • SSM automatic presetting does not work at all. Store stations manually. • Static noise while listening to the optimum level. • Check the cords and connections. • The unit does not work . Connect the antenna firmly. • "AM" cannot be played back. "CD Loading Error," or "Eject Error" flashes). • "Please Eject" appears on the display. Reset the unit...
Instructions
Page 45
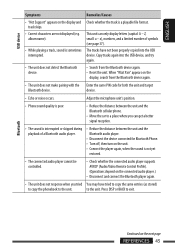
... make pairing with the Enter the same PIN code for Bluetooth Phone. • Turn off, then turn on the unit. • Connect the player again, when the sound is not yet restored. • The connected audio player cannot be controlled. • Check whether the connected audio player supports AVRCP (Audio/Video Remote Control Profile). (Operations depend on the next page REFERENCES 45 ENGLISH USB device Symptoms • "Not Support" appears on the display, search from the Bluetooth device again. • Reset the unit...
... make pairing with the Enter the same PIN code for Bluetooth Phone. • Turn off, then turn on the unit. • Connect the player again, when the sound is not yet restored. • The connected audio player cannot be controlled. • Check whether the connected audio player supports AVRCP (Audio/Video Remote Control Profile). (Operations depend on the next page REFERENCES 45 ENGLISH USB device Symptoms • "Not Support" appears on the display, search from the Bluetooth device again. • Reset the unit...


