
Instructions
Page 2
...not stare into an outlet on a circuit different from the unit. REPRODUCTION OF LABEL: CAUTION LABEL, PLACED OUTSIDE THE UNIT. [European Union only] KD-APD89 is no user serviceable parts inside the unit; CLASS 1 LASER PRODUCT 2. ENGLISH Thank you for a Class B digital device, pursuant to Part... to which can radiate radio frequency energy and, if not installed and used in a residential installation. This equipment generates, uses, and can be determined by turning the equipment off and on, the user is encouraged to try to correct the interference by JVC could void the user's...
...not stare into an outlet on a circuit different from the unit. REPRODUCTION OF LABEL: CAUTION LABEL, PLACED OUTSIDE THE UNIT. [European Union only] KD-APD89 is no user serviceable parts inside the unit; CLASS 1 LASER PRODUCT 2. ENGLISH Thank you for a Class B digital device, pursuant to Part... to which can radiate radio frequency energy and, if not installed and used in a residential installation. This equipment generates, uses, and can be determined by turning the equipment off and on, the user is encouraged to try to correct the interference by JVC could void the user's...

Instructions
Page 5
... procedure. ENGLISH Preparation Cancel the display demonstration and set the clock • See also pages 27 and 28. 1 Turn on page 27) INTRODUCTIONS 5 Changing the display information and pattern When the power is turned off: Check the current clock time Ex.: When tuner is selected as the source Source operation display •...
... procedure. ENGLISH Preparation Cancel the display demonstration and set the clock • See also pages 27 and 28. 1 Turn on page 27) INTRODUCTIONS 5 Changing the display information and pattern When the power is turned off: Check the current clock time Ex.: When tuner is selected as the source Source operation display •...

Instructions
Page 6
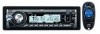
... Basic operations Using the control panel 1 • TUNER: Select preset station. • HD RADIO: Select channel. • SIRIUS/XM: Select category. • CD/USB/CD-CH: Select folder. • USB-iPod: Enter the main menu [Hold]. • iPod...CD/USB/CD-CH/USB-iPod/iPod: Select track. • BT-AUDIO: Reverse skip/forward skip. 9 • Volume control [Turn]. 6 • Select the source [Press]*1. r • TUNER: Select the bands. • USB-iPod: Start/pause playback. • BT-AUDIO: Start/pause playback. *1 Holding SOURCE will enter the Bluetooth menu. *2 When the HD Radio...
... Basic operations Using the control panel 1 • TUNER: Select preset station. • HD RADIO: Select channel. • SIRIUS/XM: Select category. • CD/USB/CD-CH: Select folder. • USB-iPod: Enter the main menu [Hold]. • iPod...CD/USB/CD-CH/USB-iPod/iPod: Select track. • BT-AUDIO: Reverse skip/forward skip. 9 • Volume control [Turn]. 6 • Select the source [Press]*1. r • TUNER: Select the bands. • USB-iPod: Start/pause playback. • BT-AUDIO: Start/pause playback. *1 Holding SOURCE will enter the Bluetooth menu. *2 When the HD Radio...

Instructions
Page 7
...or dispose of the MP3/WMA/WAV. • While playing an MP3 disc on an MP3-compatible CD changer: - Continued on the next page OPERATIONS 7 Changes the categories. • While listening to ...• Changes the folder of it . 1 • Turns the power on if pressed briefly or attenuates the sound when the power is on. • Turns the power off if pressed and held . - Select the...leave the remote controller in a place (such as dashboards) exposed to the satellite (SIRIUS or XM) radio: - Changes the folder if pressed and held . Using the remote controller (RM-RK50) Installing the...
...or dispose of the MP3/WMA/WAV. • While playing an MP3 disc on an MP3-compatible CD changer: - Continued on the next page OPERATIONS 7 Changes the categories. • While listening to ...• Changes the folder of it . 1 • Turns the power on if pressed briefly or attenuates the sound when the power is on. • Turns the power off if pressed and held . - Select the...leave the remote controller in a place (such as dashboards) exposed to the satellite (SIRIUS or XM) radio: - Changes the folder if pressed and held . Using the remote controller (RM-RK50) Installing the...

Instructions
Page 12
... about USB operations, see pages 35 and 36. ENGLISH If a USB device has been attached... To stop play the files depending on the display, you turn on the display. • Do not start the car engine if a USB device is currently attached, playback starts from the unit. • Press SOURCE to... use the Bluetooth® function. Cautions: • Avoid using the USB device if it is required to connect the Bluetooth Adapter (KS-BTA200) to the CD changer jack on the rear of the unit. • Make sure all important data has been backed up to avoid losing the data. • Do...
... about USB operations, see pages 35 and 36. ENGLISH If a USB device has been attached... To stop play the files depending on the display, you turn on the display. • Do not start the car engine if a USB device is currently attached, playback starts from the unit. • Press SOURCE to... use the Bluetooth® function. Cautions: • Avoid using the USB device if it is required to connect the Bluetooth Adapter (KS-BTA200) to the CD changer jack on the rear of the unit. • Make sure all important data has been backed up to avoid losing the data. • Do...

Instructions
Page 13
ENGLISH Registering using "Open" Preparation: Operate the device to turn on the display. 2 Select "New." 3 Enter setting menu. 4 Select "Open." 5 Enter a PIN (Personal Identification Number) code to the unit. • You can use the device ...
ENGLISH Registering using "Open" Preparation: Operate the device to turn on the display. 2 Select "New." 3 Enter setting menu. 4 Select "Open." 5 Enter a PIN (Personal Identification Number) code to the unit. • You can use the device ...

Instructions
Page 14
... want to connect. Press number button 3 to select "No" or return to the unit. Refer to connect the Bluetooth device automatically when the unit is turned on. (See "Auto Connect" on page 32.) Using the Bluetooth cellular phone 1 Select "BT-PHONE." 2 Enter Bluetooth menu. 3 -
... want to connect. Press number button 3 to select "No" or return to the unit. Refer to connect the Bluetooth device automatically when the unit is turned on. (See "Auto Connect" on page 32.) Using the Bluetooth cellular phone 1 Select "BT-PHONE." 2 Enter Bluetooth menu. 3 -

Instructions
Page 17
...change to another station, or if you turned off the power. • This setting cannot take effect for basic radio operations. 2 When receiving an HD Radio station... Searching for HD Radio stations only 1 2 Changing HD Radio reception mode While receiving an HD Radio broadcast, the unit tunes to digital or...the receiving condition. 1 While listening to pages 8 - 10 for the conventional FM/AM stations. • If the radio station forces the reception mode to the CD changer jack on the rear of the unit. First four letters of programming. EXTERNAL DEVICES 17 This service is called ...
...change to another station, or if you turned off the power. • This setting cannot take effect for basic radio operations. 2 When receiving an HD Radio station... Searching for HD Radio stations only 1 2 Changing HD Radio reception mode While receiving an HD Radio broadcast, the unit tunes to digital or...the receiving condition. 1 While listening to pages 8 - 10 for the conventional FM/AM stations. • If the radio station forces the reception mode to the CD changer jack on the rear of the unit. First four letters of programming. EXTERNAL DEVICES 17 This service is called ...
Instructions
Page 24
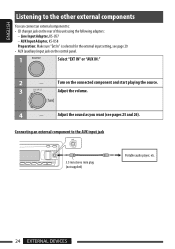
... the sound as you want (see page 29. • AUX (auxiliary) input jack on the connected component and start playing the source. 3 Adjust the volume. 4 - Turn on the control panel. 1 Select "EXT IN" or "AUX IN." 2 - Line Input Adapter, KS-U57 - ENGLISH Listening to the other external components You can connect... component to the AUX input jack 3.5 mm stereo mini plug (not supplied) Portable audio player, etc. 24 EXTERNAL DEVICES Connecting an external component to : • CD changer jack on the rear of this unit using the following adapters: -
... the sound as you want (see page 29. • AUX (auxiliary) input jack on the connected component and start playing the source. 3 Adjust the volume. 4 - Turn on the control panel. 1 Select "EXT IN" or "AUX IN." 2 - Line Input Adapter, KS-U57 - ENGLISH Listening to the other external components You can connect... component to the AUX input jack 3.5 mm stereo mini plug (not supplied) Portable audio player, etc. 24 EXTERNAL DEVICES Connecting an external component to : • CD changer jack on the rear of this unit using the following adapters: -

Instructions
Page 26
... FM). When "On" is shown on the display, you want to adjust. D Loudness, [Off or On] Turn the control dial to select "Off" or "On." ENGLISH 3 Turn the control dial to adjust the subwoofer output level. [0 to 8] 4 Press number button 1 ( ) to select... the subwoofer phase. [0deg (normal) or 180deg (reverse)] C VolAdjust, [-5 to +5] Turn the control dial to adjust the input level of the selected frequency range. 1 Use 5 / ∞ to adjust the level. 2 Press number button 5 ( ), then turn the control dial to select the frequency. 3 Press number button 5 ( ), then...
... FM). When "On" is shown on the display, you want to adjust. D Loudness, [Off or On] Turn the control dial to select "Off" or "On." ENGLISH 3 Turn the control dial to adjust the subwoofer output level. [0 to 8] 4 Press number button 1 ( ) to select... the subwoofer phase. [0deg (normal) or 180deg (reverse)] C VolAdjust, [-5 to +5] Turn the control dial to adjust the input level of the selected frequency range. 1 Use 5 / ∞ to adjust the level. 2 Press number button 5 ( ), then turn the control dial to select the frequency. 3 Press number button 5 ( ), then...

Instructions
Page 27
... • Meter 2 • On • Off Setting, [reference page] : Display demonstration will show the clock time for about 5 seconds when the power is turned off, [5]. *1 If the power supply is recommended to select "Off" to save the car's battery. pressing DISP will be activated automatically if no operation is...; Press DISP to show the selected level meter. : Clock time is shown on the display when the power is turned off the ignition key of your car, it is not interrupted by turning off . : Cancels; To display the rest 5 Repeat steps 2 - 4 to adjust other categories. By pressing ...
... • Meter 2 • On • Off Setting, [reference page] : Display demonstration will show the clock time for about 5 seconds when the power is turned off, [5]. *1 If the power supply is recommended to select "Off" to save the car's battery. pressing DISP will be activated automatically if no operation is...; Press DISP to show the selected level meter. : Clock time is shown on the display when the power is turned off the ignition key of your car, it is not interrupted by turning off . : Cancels; To display the rest 5 Repeat steps 2 - 4 to adjust other categories. By pressing ...

Instructions
Page 28
..., Alaska, Pacific, Mountain, Central : Activates daylight savings time if your residential area from one of the setting.) : Dims the display when you turn on the "Dimmer" setting. 28 To*6 Contrast Contrast LCD Type Display type • Auto • Off • On • Time Set...Initial: 00 (1:00AM), [5]. : See also page 5 for setting. : The built-in clock is automatically adjusted using the clock data provided via the satellite radio channel. : Cancels. : Select your residential area is set to DST. : Cancels. : Scrolls the track information once. : Repeats scrolling (at 5-second ...
..., Alaska, Pacific, Mountain, Central : Activates daylight savings time if your residential area from one of the setting.) : Dims the display when you turn on the "Dimmer" setting. 28 To*6 Contrast Contrast LCD Type Display type • Auto • Off • On • Time Set...Initial: 00 (1:00AM), [5]. : See also page 5 for setting. : The built-in clock is automatically adjusted using the clock data provided via the satellite radio channel. : Cancels. : Select your residential area is set to DST. : Cancels. : Scrolls the track information once. : Repeats scrolling (at 5-second ...

Instructions
Page 30
Color Set Color setting Red Green Blue - Then, turn the control dial to set the dimmer start time. 1 Turn the control dial to the previous screen by pressing number button 3 or 6. Changing the display color You can move back to set the dimmer end ...
Color Set Color setting Red Green Blue - Then, turn the control dial to set the dimmer start time. 1 Turn the control dial to the previous screen by pressing number button 3 or 6. Changing the display color You can move back to set the dimmer end ...

Instructions
Page 32
... not answer the calls automatically. Message Info Only for the device being connected for "BT-PHONE." Setting menu ( : Initial) Auto Connect When the unit is turned on the display, you can move back to your preference. • When is shown on , the connection is compatible with ... Auto: The unit informs you...
... not answer the calls automatically. Message Info Only for the device being connected for "BT-PHONE." Setting menu ( : Initial) Auto Connect When the unit is turned on the display, you can move back to your preference. • When is shown on , the connection is compatible with ... Auto: The unit informs you...

Instructions
Page 33
... number button 4 ( to select a character set. ) repeatedly 2 Turn the control dial to select a character. (For available characters, see the right column.) 3 Use 4 /¢ to move back to 30 station frequencies (FM and AM) using 10 characters (maximum) for each title. • When HD Radio tuner box is connected, this feature will be...
... number button 4 ( to select a character set. ) repeatedly 2 Turn the control dial to select a character. (For available characters, see the right column.) 3 Use 4 /¢ to move back to 30 station frequencies (FM and AM) using 10 characters (maximum) for each title. • When HD Radio tuner box is connected, this feature will be...

Instructions
Page 34
...stored anew. - The pickup lens inside the unit. - Turning off the power while listening to No. 6 (highest frequency). - Disc/USB operations Caution for the following reasons: - Playback starts automatically. Playing a CD-R or CD-RW • Use only "finalized" CD-Rs or CD-RWs. • This unit can only hear intermittent sounds.... Next time you can play back on this unit Basic operations Turning on the power • By pressing SOURCE on the unit, you select "CD" as those which are detected first if a disc includes both audio CD (CD-DA) files and MP3/WMA files. • This unit ...
...stored anew. - The pickup lens inside the unit. - Turning off the power while listening to No. 6 (highest frequency). - Disc/USB operations Caution for the following reasons: - Playback starts automatically. Playing a CD-R or CD-RW • Use only "finalized" CD-Rs or CD-RWs. • This unit can only hear intermittent sounds.... Next time you can play back on this unit Basic operations Turning on the power • By pressing SOURCE on the unit, you select "CD" as those which are detected first if a disc includes both audio CD (CD-DA) files and MP3/WMA files. • This unit ...
Instructions
Page 36
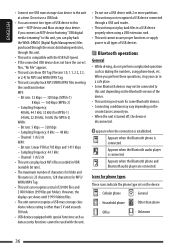
... show ID3 Tag (Version 1.0, 1.1, 2.2, 2.3, or 2.4) for phone types These icons indicate the phone type set on the circumstances around you. • When the unit is turned off, the device is established. Do not use a USB device with special functions such as dialing the numbers, using a USB extension cord. • This unit...
... show ID3 Tag (Version 1.0, 1.1, 2.2, 2.3, or 2.4) for phone types These icons indicate the phone type set on the circumstances around you. • When the unit is turned off, the device is established. Do not use a USB device with special functions such as dialing the numbers, using a USB extension cord. • This unit...

Instructions
Page 37
...connected to the interface adapter. • Update your iPod to the latest software version before using the JVC SIRIUS radio adapter, KS-U100K (not supplied) to the CD changer jack on the rear. Satellite radio • You can normally be received in the USA, but the connection has failed. iPod photo... or pausing of the unit, you connect the iPod nano to sign up for XM Satellite radio, visit . By turning on /off and turn off the JVC PnP. iPod with click wheel (4th Generation) - You can turn on /off the power of a video file, resuming playback will not work.) • ...
...connected to the interface adapter. • Update your iPod to the latest software version before using the JVC SIRIUS radio adapter, KS-U100K (not supplied) to the CD changer jack on the rear. Satellite radio • You can normally be received in the USA, but the connection has failed. iPod photo... or pausing of the unit, you connect the iPod nano to sign up for XM Satellite radio, visit . By turning on /off and turn off the JVC PnP. iPod with click wheel (4th Generation) - You can turn on /off the power of a video file, resuming playback will not work.) • ...

Instructions
Page 41
...sometimes The tracks have not been properly copied into the USB device, and try again. • The sound is interrupted or skipped during • Turn off the power then on again. • Do not pull out or connect the USB device repeatedly while "Reading" is displayed on the display..... • Readout time varies depending on the USB device. • Do not use too many hierarchy, folders and empty folders.* • Turn off , then turn on The connected USB device may be malfunctioning, the display, then returns to play back as you have been formatted correctly. included in an...
...sometimes The tracks have not been properly copied into the USB device, and try again. • The sound is interrupted or skipped during • Turn off the power then on again. • Do not pull out or connect the USB device repeatedly while "Reading" is displayed on the display..... • Readout time varies depending on the USB device. • Do not use too many hierarchy, folders and empty folders.* • Turn off , then turn on The connected USB device may be malfunctioning, the display, then returns to play back as you have been formatted correctly. included in an...

Instructions
Page 42
...; Move the car to a place where you can be connected with the Bluetooth device. • Enter the same PIN code for "BT-PHONE." • Turn off, then turn on the connected audio player.) 42 The unit can get a better signal reception. • The sound is interrupted or skipped during playback of the...
...; Move the car to a place where you can be connected with the Bluetooth device. • Enter the same PIN code for "BT-PHONE." • Turn off, then turn on the connected audio player.) 42 The unit can get a better signal reception. • The sound is interrupted or skipped during playback of the...


