Instructions
Page 2
... FOR LASER PRODUCTS 1. CAUTION: Do not open . Do not view directly with the instructions, may be determined by JVC could void the user's authority to radio or television reception, which the receiver is no user serviceable parts inside the car... If this will not occur in a particular installation. Reorient or relocate the receiving antenna. - CAUTION: (For U.S.A.) Visible and/or invisible class II laser radiation...
... FOR LASER PRODUCTS 1. CAUTION: Do not open . Do not view directly with the instructions, may be determined by JVC could void the user's authority to radio or television reception, which the receiver is no user serviceable parts inside the car... If this will not occur in a particular installation. Reorient or relocate the receiving antenna. - CAUTION: (For U.S.A.) Visible and/or invisible class II laser radiation...
Instructions
Page 3
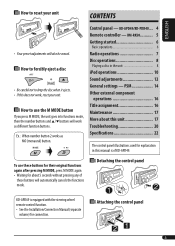
Control panel - KD-APD49/KD-PDR40 ... 4 Remote controller - Ex.: When number button 2 works as different function buttons. RM-RK50........... 5 Getting started 6 Basic operations 6 Radio operations 7 Disc operations 8 Playing a disc in this manual is equipped with the steering wheel remote control function. • See the Installation/Connection Manual (separate volume) for explanation in the unit 8 iPod operations 10 Sound adjustments 12 General settings - Attaching the control panel 3 How to use these buttons will automatically cancels the functions mode. ...
Control panel - KD-APD49/KD-PDR40 ... 4 Remote controller - Ex.: When number button 2 works as different function buttons. RM-RK50........... 5 Getting started 6 Basic operations 6 Radio operations 7 Disc operations 8 Playing a disc in this manual is equipped with the steering wheel remote control function. • See the Installation/Connection Manual (separate volume) for explanation in the unit 8 iPod operations 10 Sound adjustments 12 General settings - Attaching the control panel 3 How to use these buttons will automatically cancels the functions mode. ...
Instructions
Page 4
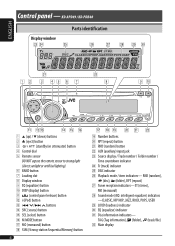
...) button 4 Control dial 5 Remote sensor DO NOT expose the remote sensor to strong light (direct sunlight or artificial lighting). 6 BAND button 7 Loading slot 8 Display window 9 EQ (equalizer) button p DISP (display) button q (control panel release) button w i (iPod) button e 4 /¢ buttons r SRC (source) button t SEL (select) button y M MODE button u MO (monaural) button i SSM (Strong-station Sequential Memory) button 4 o Number buttons ; RPT (repeat) button a RND (random) button s AUX (auxiliary) input jack d Source display / Track number / Folder number / Time...
...) button 4 Control dial 5 Remote sensor DO NOT expose the remote sensor to strong light (direct sunlight or artificial lighting). 6 BAND button 7 Loading slot 8 Display window 9 EQ (equalizer) button p DISP (display) button q (control panel release) button w i (iPod) button e 4 /¢ buttons r SRC (source) button t SEL (select) button y M MODE button u MO (monaural) button i SSM (Strong-station Sequential Memory) button 4 o Number buttons ; RPT (repeat) button a RND (random) button s AUX (auxiliary) input jack d Source display / Track number / Folder number / Time...

Instructions
Page 5
... starting a fire: - Returns to play back the selection directly.) 3 VOL - / VOL + buttons • Adjusts the volume level. 4 SOUND button • Selects the sound mode (iEQ: intelligent equalizer). 5 SOURCE button • Selects the source. 6 2 R (reverse) / F (forward) 3 buttons • Searches for a long time; Wrap the battery with D ∞. • Changes the folder of the MP3/WMA discs. • While listening to an iPod (in between. RM-RK50 Installing the lithium coin battery (CR2025) Main elements and features...
... starting a fire: - Returns to play back the selection directly.) 3 VOL - / VOL + buttons • Adjusts the volume level. 4 SOUND button • Selects the sound mode (iEQ: intelligent equalizer). 5 SOURCE button • Selects the source. 6 2 R (reverse) / F (forward) 3 buttons • Searches for a long time; Wrap the battery with D ∞. • Changes the folder of the MP3/WMA discs. • While listening to an iPod (in between. RM-RK50 Installing the lithium coin battery (CR2025) Main elements and features...
Instructions
Page 6
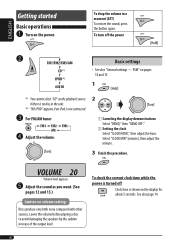
... disc in a moment (ATT) To restore the sound, press the button again. To check the current clock time while the power is not connected. ! See also page 14. 6 ENGLISH Getting started Basic operations ~ Turn on volume setting: Discs produce very little noise compared with other sources. For FM/AM tuner ⁄ Adjust the volume. 2 1 Canceling the display demonstrations Select "DEMO," then "DEMO OFF." 2 Setting the clock Select "CLOCK HOUR," then adjust the hour. Select "CLOCK MIN" (minute), then adjust...
... disc in a moment (ATT) To restore the sound, press the button again. To check the current clock time while the power is not connected. ! See also page 14. 6 ENGLISH Getting started Basic operations ~ Turn on volume setting: Discs produce very little noise compared with other sources. For FM/AM tuner ⁄ Adjust the volume. 2 1 Canceling the display demonstrations Select "DEMO," then "DEMO OFF." 2 Setting the clock Select "CLOCK HOUR," then adjust the hour. Select "CLOCK MIN" (minute), then adjust...
Instructions
Page 7
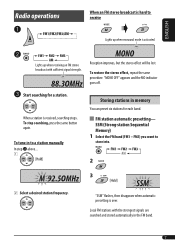
To tune in to store into. 2 3 2 Select a desired station frequency. Storing stations in memory You can preset six stations for a station. FM3) you want to a station manually In step ! "SSM" flashes, then disappears when automatic presetting is received, searching stops. Local FM stations with sufficient signal strength. ! ENGLISH Radio operations ~ When an FM stereo broadcast is hard to receive Lights up when monaural mode is activated. Ÿ Lights up when receiving an FM stereo broadcast with...
To tune in to store into. 2 3 2 Select a desired station frequency. Storing stations in memory You can preset six stations for a station. FM3) you want to a station manually In step ! "SSM" flashes, then disappears when automatic presetting is received, searching stops. Local FM stations with sufficient signal strength. ! ENGLISH Radio operations ~ When an FM stereo broadcast is hard to receive Lights up when monaural mode is activated. Ÿ Lights up when receiving an FM stereo broadcast with...

Instructions
Page 8
... 16. Listening to a preset station 1 2 Select the preset station (1 - 6) you change the source or eject the disc. 3 Preset number flashes for MP3 or WMA discs) directly To select a number from 01 - 06: To select a number from 07 - 12: 8 To assign a title to a station, "NO NAME" appears. ENGLISH Manual presetting Ex.: Storing the FM station of 92.50MHz into preset number 4 of the FM1 band. 1 2 Disc operations Playing a disc in the unit All tracks will be played repeatedly until you want.
... 16. Listening to a preset station 1 2 Select the preset station (1 - 6) you change the source or eject the disc. 3 Preset number flashes for MP3 or WMA discs) directly To select a number from 01 - 06: To select a number from 07 - 12: 8 To assign a title to a station, "NO NAME" appears. ENGLISH Manual presetting Ex.: Storing the FM station of 92.50MHz into preset number 4 of the FM1 band. 1 2 Disc operations Playing a disc in the unit All tracks will be played repeatedly until you want.
Instructions
Page 10
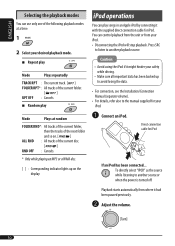
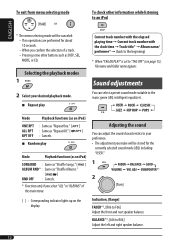
iPod operations You can play Mode Plays at a time. 1 2 Select your desired playback mode. 7 Repeat play Mode Plays repeatedly TRACK RPT : The current track. [ ] FOLDER RPT* : All tracks of the current disc. [ ] RND OFF : Cancels. * Only while playing an MP3 or a WMA disc. [ ] : Corresponding indicator lights up to avoid losing the data. • For connection, see the Installation/Connection Manual (separate volume). • For details, refer also to the manual supplied for...
iPod operations You can play Mode Plays at a time. 1 2 Select your desired playback mode. 7 Repeat play Mode Plays repeatedly TRACK RPT : The current track. [ ] FOLDER RPT* : All tracks of the current disc. [ ] RND OFF : Cancels. * Only while playing an MP3 or a WMA disc. [ ] : Corresponding indicator lights up to avoid losing the data. • For connection, see the Installation/Connection Manual (separate volume). • For details, refer also to the manual supplied for...
Instructions
Page 11
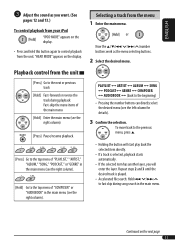
... ! Adjust the sound as the menu selecting buttons. 2 Select the desired menu. PLAYLIST Ô ARTIST Ô ALBUM Ô SONG Ô PODCASTÔ GENRE Ô COMPOSER Ô AUDIOBOOK Ô (back to control playback from the menu 1 Enter the main menu. Selecting a track from the unit. "HEAD MODE" appears on the next page 11 Continued on the display. or Now the 5/∞/4 /¢ /number buttons work as you will start play...
... ! Adjust the sound as the menu selecting buttons. 2 Select the desired menu. PLAYLIST Ô ARTIST Ô ALBUM Ô SONG Ô PODCASTÔ GENRE Ô COMPOSER Ô AUDIOBOOK Ô (back to control playback from the menu 1 Enter the main menu. Selecting a track from the unit. "HEAD MODE" appears on the next page 11 Continued on the display. or Now the 5/∞/4 /¢ /number buttons work as you will start play...
Instructions
Page 12
Adjusting the sound You can select a preset sound mode suitable to the music genre (iEQ: intelligent equalizer). BALANCE*3, [L06 to your desired playback mode. 7 Repeat play Mode Playback functions (as on iPod) SONG RND : Same as "Shuffle Songs." [ ] ALBUM RND * : Same as DISP, SEL, MODE, or EQ. Pressing some other information while listening to an iPod Current track number with the elapsed playing time = Current track number with the clock time = Track title...
Adjusting the sound You can select a preset sound mode suitable to the music genre (iEQ: intelligent equalizer). BALANCE*3, [L06 to your desired playback mode. 7 Repeat play Mode Playback functions (as on iPod) SONG RND : Same as "Shuffle Songs." [ ] ALBUM RND * : Same as DISP, SEL, MODE, or EQ. Pressing some other information while listening to an iPod Current track number with the elapsed playing time = Current track number with the clock time = Track title...
Instructions
Page 13
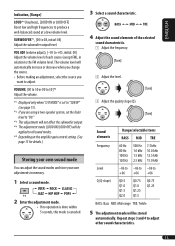
... the amplifier gain control setting. (See page 15 for details.) Storing your own sound mode You can adjust the sound modes and store your own adjustments in relation to 08, initial: 04] Adjust the subwoofer output level. VOLUME, [00 to 50 or 00 to 30]*5 Adjust the volume. *1 Displayed only when "L/O MODE" is canceled. 3 Select a sound characteristic. 4 Adjust the sound elements of each source (except FM), in memory. 1 Select a sound mode. 2 Enter the adjustment mode. • If no operation is...
... the amplifier gain control setting. (See page 15 for details.) Storing your own sound mode You can adjust the sound modes and store your own adjustments in relation to 08, initial: 04] Adjust the subwoofer output level. VOLUME, [00 to 50 or 00 to 30]*5 Adjust the volume. *1 Displayed only when "L/O MODE" is canceled. 3 Select a sound characteristic. 4 Adjust the sound elements of each source (except FM), in memory. 1 Select a sound mode. 2 Enter the adjustment mode. • If no operation is...
Instructions
Page 14
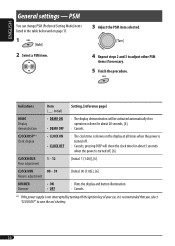
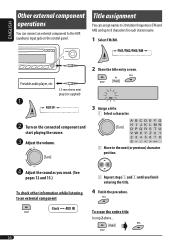
... the display and button illumination. : Cancels. *1 If the power supply is turned off, [6]. ENGLISH General settings - CLOCK DISP*1 Clock display • CLOCK ON • CLOCK OFF : The clock time is shown on page 15. 1 3 Adjust the PSM item selected. 2 Select a PSM item. 4 Repeat steps 2 and 3 to save the car's battery. 14 CLOCK HOUR 1 - 12 Hour adjustment [Initial: 1 (1:00)], [6]. Indications Item ( : Initial) Setting, [reference page] DEMO Display demonstration • DEMO ON • DEMO OFF : The display...
... the display and button illumination. : Cancels. *1 If the power supply is turned off, [6]. ENGLISH General settings - CLOCK DISP*1 Clock display • CLOCK ON • CLOCK OFF : The clock time is shown on page 15. 1 3 Adjust the PSM item selected. 2 Select a PSM item. 4 Repeat steps 2 and 3 to save the car's battery. 14 CLOCK HOUR 1 - 12 Hour adjustment [Initial: 1 (1:00)], [6]. Indications Item ( : Initial) Setting, [reference page] DEMO Display demonstration • DEMO ON • DEMO OFF : The display...
Instructions
Page 15
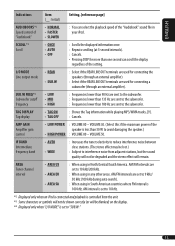
... the subwoofer. VOLUME 30. (Select this if the maximum power of the speaker is 100 kHz. AREA Tuner channel interval • AREA US • AREA EU • AREA SA : When using in your iPod. IF BAND Intermediate frequency band • AUTO • WIDE : Increases the tuner selectivity to reduce interference noise between close stations. (The stereo effect may be blanked) on the display. *4 Displayed only when "L/O MODE" is set...
... the subwoofer. VOLUME 30. (Select this if the maximum power of the speaker is 100 kHz. AREA Tuner channel interval • AREA US • AREA EU • AREA SA : When using in your iPod. IF BAND Intermediate frequency band • AUTO • WIDE : Increases the tuner selectivity to reduce interference noise between close stations. (The stereo effect may be blanked) on the display. *4 Displayed only when "L/O MODE" is set...
Instructions
Page 16
... other information while listening to the AUX (auxiliary) input jack on the connected component and start playing the source. ! To erase the entire title In step 2 above... 16 Portable audio player, etc. ~ 3.5 mm stereo mini plug (not supplied) 3 Assign a title. 1 Select a character. Ÿ Turn on the control panel. ENGLISH Other external component operations You can assign names to 30 station frequencies (FM and AM) and up to...
... other information while listening to the AUX (auxiliary) input jack on the connected component and start playing the source. ! To erase the entire title In step 2 above... 16 Portable audio player, etc. ~ 3.5 mm stereo mini plug (not supplied) 3 Assign a title. 1 Select a character. Ÿ Turn on the control panel. ENGLISH Other external component operations You can assign names to 30 station frequencies (FM and AM) and up to...
Instructions
Page 17
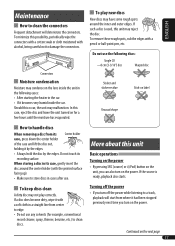
... the car. Turning off the power • If you turn off the power while listening to clean the connectors Frequent detachment will start from where it had been stopped previously next time you can also turn on the power. In this unit Basic operations Turning on the power • By pressing SRC (source) or i (iPod) button on the unit, you turn on the next page 17 To remove these...
... the car. Turning off the power • If you turn off the power while listening to clean the connectors Frequent detachment will start from where it had been stopped previously next time you can also turn on the power. In this unit Basic operations Turning on the power • By pressing SRC (source) or i (iPod) button on the unit, you turn on the next page 17 To remove these...
Instructions
Page 18
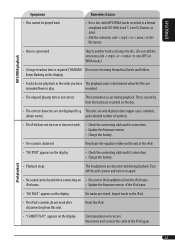
.... 1 (lowest frequency) to select another disc, connect an iPod, or press SRC to No. 6 (highest frequency). - Received stations are dirty or scratched. - Insert another playback source. however, unclosed sessions will be recommended. When SSM is dirty. - Using these discs under high temperature or high humidity may not be skipped while playing. • Some CD-Rs or CD-RWs may not play back multi-session discs; Disc operations Caution...
.... 1 (lowest frequency) to select another disc, connect an iPod, or press SRC to No. 6 (highest frequency). - Received stations are dirty or scratched. - Insert another playback source. however, unclosed sessions will be recommended. When SSM is dirty. - Using these discs under high temperature or high humidity may not be skipped while playing. • Some CD-Rs or CD-RWs may not play back multi-session discs; Disc operations Caution...
Instructions
Page 19
... iPod from this unit when "JVC" or " " appears on the iPod display after performing the search function. • This unit cannot play back the following JVC web site: General settings-PSM • If you turn on the disc format used with this unit. • While connecting an iPod with video (5th Generation) • Update your iPod to the latest software version before using it from "HIGH POWER" to "LOW POWER" while the volume level...
... iPod from this unit when "JVC" or " " appears on the iPod display after performing the search function. • This unit cannot play back the following JVC web site: General settings-PSM • If you turn on the disc format used with this unit. • While connecting an iPod with video (5th Generation) • Update your iPod to the latest software version before using it from "HIGH POWER" to "LOW POWER" while the volume level...
Instructions
Page 20
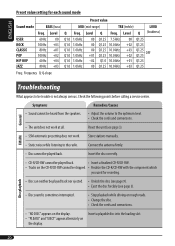
... calling a service center. ENGLISH Preset value setting for recording. Connect the antenna firmly. • Disc cannot be skipped. • Finalize the CD-R/CD-RW with the component which you used for each sound mode Preset value Sound mode BASS (bass) MID (mid-range) Freq. Insert the disc correctly. • CD-R/CD-RW cannot be played back. • Insert a finalized CD-R/CD-RW. • Tracks on the display. 20 Level Q TRE (treble) LOUD Freq. Store stations manually. •...
... calling a service center. ENGLISH Preset value setting for recording. Connect the antenna firmly. • Disc cannot be skipped. • Finalize the CD-R/CD-RW with the component which you used for each sound mode Preset value Sound mode BASS (bass) MID (mid-range) Freq. Insert the disc correctly. • CD-R/CD-RW cannot be played back. • Insert a finalized CD-R/CD-RW. • Tracks on the display. 20 Level Q TRE (treble) LOUD Freq. Store stations manually. •...
Instructions
Page 21
... use too many hierarchical levels and folders. iPod nano. • Update the firmware version of symbols. • The iPod does not turn it on again. • No sound can only display letters (upper case), numbers, album name). No tracks are disconnected during playback. Reset the iPod. • "CANNOT PLAY" appears on the display. • Check the connecting cable and its connection. • Update the firmware version. • Charge the battery...
... use too many hierarchical levels and folders. iPod nano. • Update the firmware version of symbols. • The iPod does not turn it on again. • No sound can only display letters (upper case), numbers, album name). No tracks are disconnected during playback. Reset the iPod. • "CANNOT PLAY" appears on the display. • Check the connecting cable and its connection. • Update the firmware version. • Charge the battery...
Instructions
Page 22
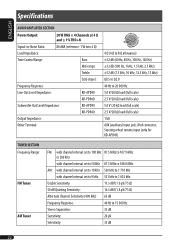
ENGLISH Specifications AUDIO AMPLIFIER SECTION Power Output: 20 W RMS × 4 Channels at 4 Ω and ≤ 1% THD+N Signal-to-Noise Ratio: 80 dBA (reference: 1 W into 4 Ω) Load Impedance: Tone Control Range: Bass: Mid-range: Treble: Q (Q-slope): Frequency Response: Line-Out Level/Impedance: KD-APD49: KD-PDR40: Subwoofer-Out Level/Impedance: KD-APD49: KD-PDR40: Output Impedance: Other Terminal: 4 Ω (4 Ω to 8 Ω allowance) ±12 dB (60 Hz, 80 Hz, 100 Hz...
ENGLISH Specifications AUDIO AMPLIFIER SECTION Power Output: 20 W RMS × 4 Channels at 4 Ω and ≤ 1% THD+N Signal-to-Noise Ratio: 80 dBA (reference: 1 W into 4 Ω) Load Impedance: Tone Control Range: Bass: Mid-range: Treble: Q (Q-slope): Frequency Response: Line-Out Level/Impedance: KD-APD49: KD-PDR40: Subwoofer-Out Level/Impedance: KD-APD49: KD-PDR40: Output Impedance: Other Terminal: 4 Ω (4 Ω to 8 Ω allowance) ±12 dB (60 Hz, 80 Hz, 100 Hz...


